Page 33 of 48
*
Phonebook Menu (contacts) Fig. 23
Contacts Menu. Fig. 24
Search window. As soon as the first pairing is performed, it
m
ay take some time for the phonebook 1)
d")
Telephone management system (PHONE)*
Phonebook Menu (contacts) Fig. 23
Contacts Menu. Fig. 24
Search window. As soon as the first pairing is performed, it
m
ay take some time for the phonebook 1)
da-
ta from the paired mobile telephone to be
available on the Infotainment system. De- pending on the volume of data to be transfer-
r
ed, the process can take several minutes. It
may be necessary to confirm the data transfer
on the mobile telephone.
The phonebook can also be opened during a
telephone call.
In the PHONE main menu, press the Contacts function button to access the phonebook.
Possible functions
Select a con-
tact from the
list
Search the list and press on the icon to the right of the desired con-
tact in order to initiate a call.
OR: If the contact has several tele-
phone numbers, first press the con-
tact and then the number to be used
to make the call. To edit the number
before calling, press
.
Searching for a
contact in the
search window
Press the Search
› ›› Fig. 23 function
button to open the search window.
Enter the name to be searched for in
the window ››› Fig. 24.
The number of matching results is
displayed on the left hand side under
the input field. Press the OK button to
change to the list.
Search the list and press the desired
contact to make the call. Note
If you edit the number before calling, this will
on
ly be used for the call and will not be stor-
ed in the phonebook. Call Menu (call lists)
Fig. 25
Call lists menu. ●
In the PHONE m
ain menu, press the Call list function button.
● Press the FIL
TER function button.
● Select the desired call list: A
ll ,
Mi ssed ,
Di
alled or
R eceived .
If
a phone number has been stored in the
phonebook, the call list will display the name
stored instead of the number. »1)
Depending on the device, only the contacts from
the t
elephone memory are loaded. 31
Page 34 of 48
*
Possible displays in the Calls menuDisplay: Meaning
Missed calls
: Displays the numbers of missed
and unanswered calls.
Dialled numbers
: Indicates the num")
Telephone management system (PHONE)*
Possible displays in the Calls menuDisplay: Meaning
Missed calls
: Displays the numbers of missed
and unanswered calls.
Dialled numbers
: Indicates the numbers dial-
led on the mobile telephone and on the Infotain-
ment system telephone management system.
Received calls
: Indicates the numbers of the
calls received on the mobile telephone and on
the Infotainment system telephone management
system. Note
The availability of the call lists will depend on
the mo
bile phone used. Direct access menus to the phone-
book
Fig. 26
Phonebook shortcut. Fig. 27
Shortcut buttons. This dropdown menu allows you to select the
f
unction of the buttons on the home page,
from among ››› Fig. 26:
● A-Z : Phone
book shortcut keys
● FAVOURITES :
Speed dial keys.
Phonebook shortcut keys
You can directly access the contacts in the
phonebooks that start with the character se-
lected via these keys.
If there are no contacts that coincide with the
chosen character, the entry that immediately
follows is displayed.
Pressing multiple times in quick succession
will search for the characters shown on the
button.
Press and hold the and direction arrows
to change the letters of the buttons. Speed dial keys
The s
peed dial buttons ››› Fig. 27 A may
e
ach be used to store a telephone number
from the phonebook.
All the speed dial buttons must be manually
edited and will be assigned to a user profile.
Up to 12 favourites can be added to the quick
dial buttons.
Possible functions
Assigning speed
dial buttons
Press a free speed dial button from
the PHONE main menu.
Select the desired contact from the
list. If the selected contact has
several telephone numbers, select
the desired number.
Editing assigned
speed dial but-
tons
Press and hold a used speed dial
button in the PHONE main menu
until the Contacts menu opens.
Select the desired contact from the
list. If the selected contact has
several telephone numbers, select
the desired number.
To close the Contacts menu with-
out applying the changes, press
the BACK
function button.
Deleting assigned
speed dial but-
tonsThe telephone numbers stored in
the speed dial buttons can be de-
leted in the menu User profile
settings > Manage favour-
ites › ›› table on page 33 .32
Page 35 of 48
*Possible functions
Dialling with
speed dial but-
tonsBriefly press an assigned speed di-
al button from the PHONE main
menu to call the telephone number
that has")
Telephone management system (PHONE)*Possible functions
Dialling with
speed dial but-
tonsBriefly press an assigned speed di-
al button from the PHONE main
menu to call the telephone number
that has been stored on it. Note
The contacts stored on the speed dial buttons
DO NO
T update automatically. If a contact
stored on a speed dial button is modified on
the mobile telephone, the speed dial button
will need to be reassigned. Telephone settings
Press the
S
ETUP function button from the
PHONE m
ain menu.
Function button: function
Select phone: From the list, select the mobile telephone
to be connected to the hands-free profile with the Info-
tainment system.
OR: Press Find to connect a new mobile telephone.
Bluetooth: Open the Bluetooth setup
menu
› ›› page 33.
User profile: Open the User profile settings menu
› ›› page 33. Bluetooth
®
settin
gs In the PHONE m
ain menu, press the SETUP function button and then the
Bluet ooth func-
tion b
utton.
Function button: function
Bluetooth: Press to deactivate Bluetooth
®
. Disconnects
all active connections.
Visibility: Activation and deactivation of Bluetooth ®
visi-
bility.
Visible: Bluetooth ®
visibility is active.
Hidden: Bluetooth ®
visibility is deactivated. Blue-
tooth ®
visibility must be active for the external
pairing of a Bluetooth ®
device with the Infotain-
ment system. If you have a Bluetooth audio device
active and playing, the visibility is automatically
set to Hidden .
Name: Viewing and changing the name of the Blue-
tooth ®
Infotainment system. This will be the name dis-
played to other Bluetooth ®
devices.
Paired devices: Displays paired devices. To disconnect
and connect Bluetooth ®
devices and profiles.
Find devices: Search for visible Bluetooth ®
devices within
the range of the Infotainment system. The maximum
range is approx. 10 metres.
Bluetooth audio (A2DP/AVRCP): This function must be ac-
tive if it is necessary to connect an external audio source
via Bluetooth ®
to the Infotainment system. ››› page 23. User profile settings
In the PHONE m
ain menu, press the SETUP function button and then the
U ser profile func-
tion b
utton.
Function button: function
Manage favourites: Editing speed dial buttons.
Speed dial button in use : Press to delete the stored
number.
Speed dial button free : Press to assign a number
from the phonebook to the speed dial button in
question.
Mailbox number: To enter or edit the voicemail number.
Sort by: To set the order of appearance of the entries in
the phonebook ( Forename and surname or vice-versa).
Import contacts: Press to import the phonebook of the
connected telephone, or to update the imported phone-
book.
Select ringtonea) : To select a ringtone from a list of prede-
fined melodies (tones). The selected ringtone is played
and set up when exiting the submenu.
Remember your
mobile telephone: If there is already an ac-
tive Bluetooth ®
connection with another mobile tele-
phone when turning off the ignition, the following mes-
sage appears: “Remember your mobile phone ”.
a)
Depending on the mobile telephone used, the selected ring
tone, or the one set up on the mobile telephone, is played. This
function will not be displayed if not supported by the mobile tel-
ephone.
»
33
Page 36 of 48
Telephone management system (PHONE)*
Note
Some telephones need to be restarted to re-
do wnload the most recent contacts added. 34
Page 37 of 48

CAR menu
CAR menu Intr oduction to managing the
CAR menu
CAR menu Fig. 28
View menu. By pressing the
CAR infotainment button you
w
ill access its main menu with the following
options:
● VIEW
● MINIPLAYER, in the top right corner (Radio
or M
edia function).
● PREVIOUS-NEXT (to change screen)
● SETUP ›
›› Booklet Instruction Manual,
chapter System setup (CAR) Press the
CAR Infotainment button and the
VIEW f
unction button to access the following
options, described below:
● CONSUMERS
● DRIVING DATA
● ECOTRAINER
● VEHICLE STATUS
Consumers Fig. 29
Consumers menu. Press the button, Convenience consumers
(ECO) t
o access the information on the sta-
tus of the main convenience consumers of
the vehicle. It is shown via a consumption in-
dicator bar in l/h (gal/h). Note
The values that appear in the figure are indi-
c
ative and may vary depending on the fea-
tures. Driving data
Fig. 30
Driving data menu. The onboard computer is equipped with 3
memorie
s that work automatically. In these
memories you can see the distance travelled,
average speed, time passed, average con-
sumption and autonomy of the vehicle.
Since start
Indicates and stores the values of the journey
completed and the consumption from when
the ignition is switched on to when it is
switched off. »
35
Page 38 of 48

CAR menu
Since refuelling
Di splay and storage of the values for the jour-
ney and the consumption. By refuelling, the
memory will be erased automatically.
Long-term
The memory records the values for a specific
number of partial trips, up to a total of 19
hours and 59 minutes or 99 hours and 59 mi-
nutes, or 1999.9 km (or miles) for 9999 km
(or miles), depending on the model of instru-
ment panel.
When one of these values is reached (de-
pending on the version of the instrument
panel), the memory is automatically deleted
and it starts counting from 0 again. Note
The values that appear in the figure are indi-
c
ative and may vary depending on the fea-
tures. Ecotrainer*
Fig. 31
Ecotrainer menu. Fig. 32
Driving style symbols. Open ECOTRAINER menu
● With the vehicle stopped, press the CAR button on the Infotainment system.
● Press the VIEW function button and then
sel
ect ECOTRAINER . If the corresponding equipment is available,
the E
COTRAINER will provide information on
driving style. The information on driving style
is only evaluated and displayed when mov-
ing forward.
Points: Driving style display
This indicates the driving style since starting
the vehicle on a scale of 0 to 100. The higher
the score displayed, the more efficient the
driving style. To see more information, press
the display. It shows statistics for the last 30
minutes of driving since starting the vehicle.
If the car has not yet been driven for 30 mi-
nutes, it shows values from the last trip in
grey.
∅ km/l: Average fuel consumption
Shows the average fuel consumption. The
value is calculated by using the kilometres
covered since starting the vehicle. To see
more information, press the display. It shows
statistics for the last 30 minutes of driving
since starting the vehicle. If the car has not
yet been driven for 30 minutes, it shows val-
ues from the last trip in grey.
ECO tips: Tips on how to save fuel
By pressing the ECO tips function button, you
c
an view tips on how to save fuel. These tips
can only be viewed when the vehicle is stop-
ped.
36
Page 39 of 48

CAR menu
Evaluation of efficient driving style
The effic iency of the driving style is reflected
by different elements on the display.
Display ›› › Fig. 31: Meaning
1The white column represents the current time.
It shows the position of the evaluation that is cur-
rently being performed.
2
Bars to represent acceleration.
The position of the car represents the acceleration.
If speed is constant, the car remains in the central
area. When accelerating or braking, the car moves
forward or backward respectively.
3
Columns to show driving style efficiency.
On the horizon, the columns represent the effi-
ciency of the driving style in a retrospective man-
ner and move from left to right every five seconds
or so. The higher the height of the columns, the
more efficient the driving style.
The colour of the sky represents the average of the
last three minutes. The colour changes from grey
(less efficient) to blue (more efficient).
4
Different symbols can be displayed on the right of
the vehicle representation; these provide informa-
tion on the current driving style. ››› table on
page 37 .
Symbols ›› › Fig. 32: Meaning
AForesight when driving. If sudden changes of ac-
celeration occur, driving style efficiency is re-
duced.
BGear-change indicator.
Symbols ››› Fig. 32: Meaning
CThe current vehicle speed is having a negative im-
pact on fuel consumption.
DEcological driving style. Vehicle status
Fig. 33
Vehicle status menu Press the button,
Vehicle status , t
o ac-
cess the information on the vehicle status
messages and the Start-Stop System. Note
The values that appear in the figure are indi-
c
ative and may vary depending on the fea-
tures. Tyres
Fig. 34
Tyres menu By pressing the
Pr
evious or Next but-
tons, the tyre pressure loss indicator will
open, to show you the tyre pressure
››› Fig. 34.
From this menu, using the Set button, the
tyre pressures will be stored. 37
Page 40 of 48

Introduction Fig. 35
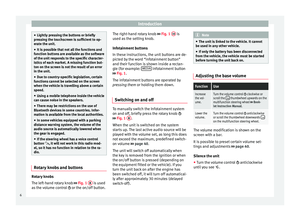
Main menu Activate the setup main menu (SETUP)
● Press the Infotainment button MENU to
open the System setup m
ain menu.
● Press t")
Setup
Setup
S ystem setup Menu (SETUP)
Introduction Fig. 35
Main menu Activate the setup main menu (SETUP)
● Press the Infotainment button MENU to
open the System setup m
ain menu.
● Press the function button corresponding to
the set
up you wish to carry out.
System setup main menu (SETUP) ●
Press the Infotainment button Set
up , to
open the
System setup main menu.
● Press the function button corresponding to
the set
up you wish to carry out.
Function button: effect
Sound setup: adjust volume and sound setup
› ›› page 40.
Screen: change screen setup ››› page 38.
Date and time: adjust time and date setup ››› page 39.
Idioma/Language: adjusting the language for text.
Additional keypad languages: to select the additional key-
pad languages.
Units: adjust units of measurement ››› page 39.
Configuration wizard: Open the wizard to configure the ini-
tial setup of the Infotainment system.
Factory settings: ››› page 39.
Bluetooth*: adjust Bluetooth setup
System information: indication of the system information
(device number, hardware and software version).
Copyright: message with radio software licensing infor-
mation. Note
For all the infotainment systems to work
pr
operly, it is important to set the correct
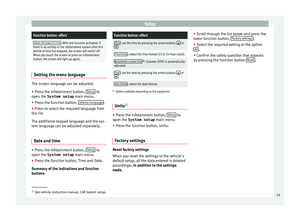
time and date in the vehicle. Screen setup
Fig. 36
Display in Standby mode ●
Press the Infotainment button, Set
up to
open the System setup m
ain menu.
● Press the Sc
reen function button. When you
c
lose a menu, the changes will take effect au-
tomatically.
Summary of the indications and function
buttons
Function button: effect
Brightness: select the brightness level of the screen.
Show clock in standby mode: in standby mode the current
time and date are shown on the display of the Infotain-
ment system ››› Fig. 36.
Acoustic touchscreen feedback: the feedback when you press
a function button on the screen is activated. 38


*
Note
Some telephones need to be restarted to re-
do wnload the most recent contacts added. 34")