2017 RENAULT ALASKAN seat adjustment
[x] Cancel search: seat adjustmentPage 35 of 340
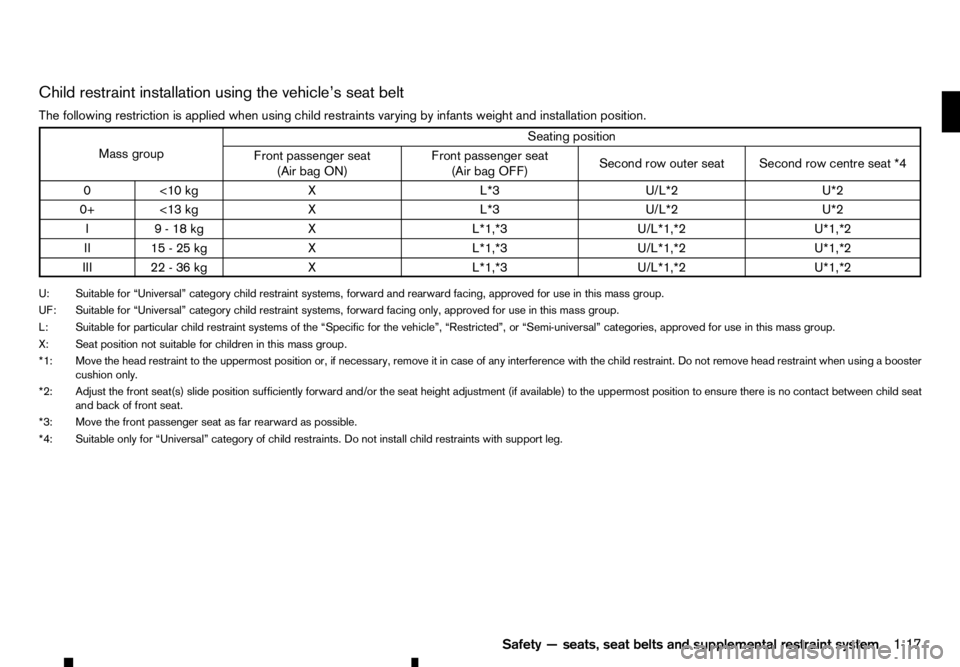
Child restraint installation using the vehicle’s seat belt
The following restriction is applied when using child restraints varying by infants weight and installation position. Mass group
Seating position
Front passenger seat (Air bag ON) Front passenger seat
(Air bag OFF) Second row outer seat Second row centre seat *4
0< 10 kg XL *3U/L*2 U*2
0+ <13 kg XL *3U/L*2 U*2
I9 -18kgX L*1,*3U/L*1,*2 U*1,*2
II 15 -25kgX L*1,*3U/L*1,*2 U*1,*2
III 22 -36kgX L*1,*3U/L*1,*2 U*1,*2
U: Suitable for “Universal” category child restraint systems, forward and rearward facing, approved for use in this mass group.
UF: Suitable for “Universal” category child restraint systems, forward facing only, approved for use in this mass group.
L: Suitable for particular child restraint systems of the “Specific for the vehicle”, “Restricted”, or “Semi-universal” categories, approved for use in this mass group. X: Seat position not suitable for children in this mass group.
*1: Move the head restraint to the uppermost position or, if necessary, remove it in case of any interference with the child restraint. Do not remove head restraint when using abooster
cushion only.
*2: Adjust the front seat(s) slide position sufficiently forward and/or the seat height adjustment (if available) to the uppermost position to ensure there is no contact between child seat and back of front seat.
*3: Move the front passenger seat as far rearward as possible.
*4: Suitable only for “Universal” category of child restraints. Do not install child restraints with support leg.
Safety—seats, seat belts and supplemental restraint system 1-17
Page 36 of 340
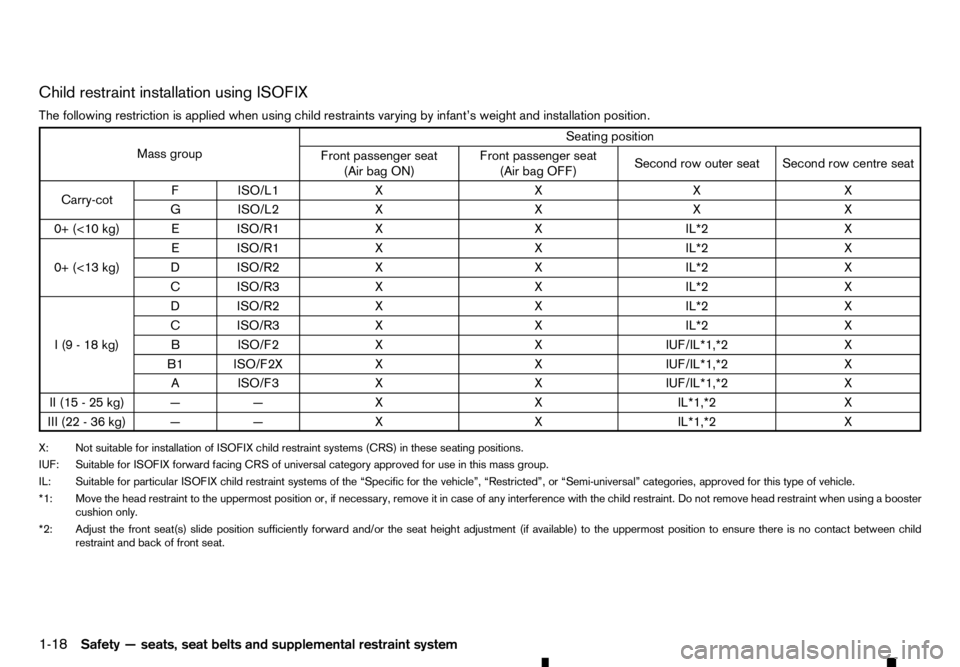
Child restraint installation using ISOFIX
The following restriction is applied when using child restraints varying by infant’s weight and installation position. Mass group
Seating position
Front passenger seat (Air bag ON) Front passenger seat
(Air bag OFF) Second row outer seat Second row centre seat
Carry-cot FI
SO/L1 XX XX
GI SO/L2 XX XX
0+ (<10 kg) EISO/R1 XX IL*2X
0+ (<13 kg) EI
SO/R1 XX IL*2X
DI SO/R2 XX IL*2X
CI SO/R3 XX IL*2X
I(9-18k g) DI
SO/R2 XX IL*2X
CI SO/R3 XX IL*2X
BI SO/F2 XX IUF/IL*1,*2X
B1 ISO/F2X XX IUF/IL*1,*2X
AI SO/F3 XX IUF/IL*1,*2X
II (15 -25kg) —— XX IL*1,*2X
III (22 -36kg) —— XX IL*1,*2X
X: Not suitable for installation of ISOFIX child restraint systems (CRS) in these seating positions.
IUF: Suitable for ISOFIX forward facing CRS of universal category approved for use in this mass group.
IL: Suitable for particular ISOFIX child restraint systems of the “Specific for the vehicle”, “Restricted”, or “Semi-universal” categories, approved for this type of vehicle.
*1: Move the head restraint to the uppermost position or, if necessary, remove it in case of any interference with the child restraint. Do not remove head restraint when using abooster
cushion only.
*2: Adjust the front seat(s) slide position sufficiently forward and/or the seat height adjustment (if available) to the uppermost position to ensure there is no contact between child restraint and back of front seat.
1-18 Safety —seats, seat belts and supplemental restraint system
Page 37 of 340
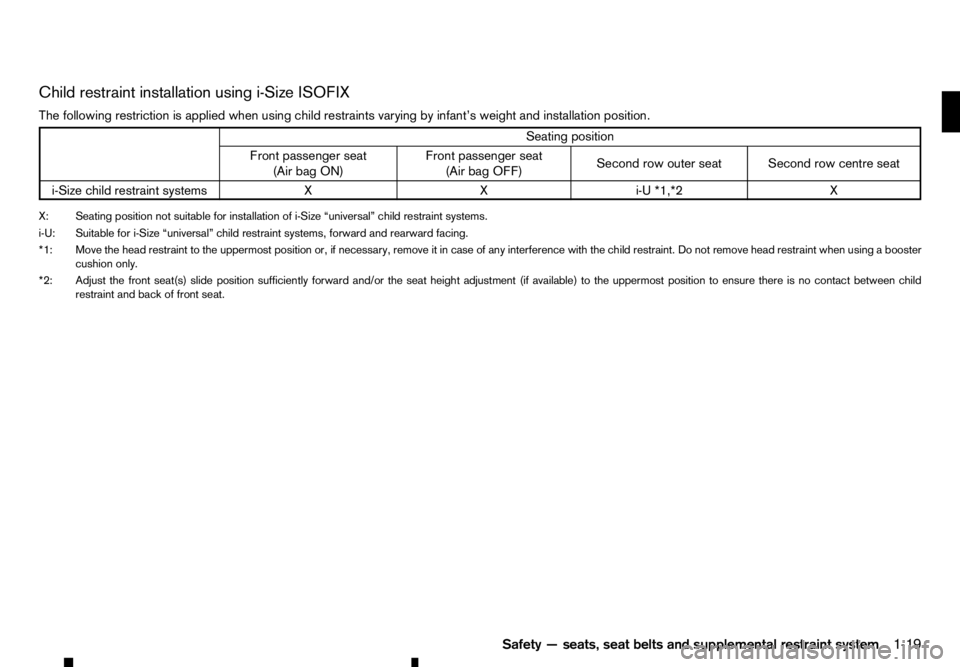
Child restraint installation using i-Size ISOFIX
The following restriction is applied when using child restraints varying by infant’s weight and installation position. Seating position
Front passenger seat (Air bag ON) Front passenger seat
(Air bag OFF) Second row outer seat Second row centre seat
i-Size child restraint systems XX i-U *1,*2X
X: Seating position not suitable for installation of i-Size “universal” child restraint systems.
i-U: Suitable for i-Size “universal” child restraint systems, forward and rearward facing.
*1: Move the head restraint to the uppermost position or, if necessary, remove it in case of any interference with the child restraint. Do not remove head restraint when using abooster
cushion only.
*2: Adjust the front seat(s) slide position sufficiently forward and/or the seat height adjustment (if available) to the uppermost position to ensure there is no contact between child restraint and back of front seat.
Safety—seats, seat belts and supplemental restraint system 1-19
Page 45 of 340

Front-facing child restraint:
Be sure to follow the child restraint manufacturer’s
instructions for the proper use of your child restraint.
Follow these steps to install afront-facing child re-
straint on the front passenger’s seat using three-
point type seat belt without automatic locking mode:
If you must install afront-facing child restraint sys-
tem on the front seat, follow these steps:
j A Air bag switch
j B Left Hand Drive models
j C Right Hand Drive models
The front passenger air bag can be turned off with
the front passenger air bag switch j
Al ocated in-
side the glove box. 1. Turn off the front passenger air bag by inserting
the emergency/mechanical key into the front pas-
senger air bag switch jAa nd turning it to the
OFF position, see “Mechanical key” in the
“3. Pre-driving checks and adjustments” section
and “Front passenger air bag status light (where
fitted)” later in this section. Place the ignition
switch in the ONposition and make sure that the
front air bag status light on the centre con-
sole illuminates. 2. Move the seat to the rearmost position
➁.
3. Remove the head restraint ➂when
aforward
facing child restraint is to be fitted.
Store the head restraint in asafe place.
Be sure to reinstall the head restraint when-
ever the child restraint is removed (see “Head
restraints” earlier in this section).
4. Position the child restraint in the seat ➃.
5. Route the seat belt tongue through the child re- straint and insert it into the buckle ➄until you
hear and feel the latch engage.
To prevent slack in the seat belt webbing, it is
necessary to secure the seat belt in place with
locking devices attached to the child restraint. NP A1411 NP A1412
NIC2428
Steps 2and 3 NIC2429
Front-facing: Step
4and 5
Safety —seats, seat belts and supplemental restraint system 1-27
Page 46 of 340

6. Remove any additional slack from the seat belt;
press downward ➅and rearward
j6a firmly in
the centre of the child restraint with your knee to
compress the vehicle seat cushion and seatback
while pulling up on the seat belt.
7. Test the child restraint before you place the child in it ➆.P
ush the child restraint from side to side
and tug it forward to make sure that it is held
securely in place. 8. Check to make sure that the child restraint is
properly secured prior to each use. If the child
restraint is loose, repeat steps 1through 7.
Rear-facing child restraint:
Be sure to follow the child restraint manufacturer’s
instructions for the proper use of your child restraint.
Follow these steps to install afront-facing child re-
straint on the front passenger’s seat using three-
point type seat belt without automatic locking mode:
If you must install arear-facing child restraint system
on the front seat, follow these steps:
j A Air bag switch
j B Left Hand Drive models
j C Right Hand Drive models
The front passenger air bag can be turned off with
the front passenger air bag switch jAl ocated in-
side the glove box. 1. Turn off the front passenger air bag by inserting
the emergency/mechanical key into the front pas-
senger air bag switch jA, see “Mechanical key”
in the “3. Pre-driving checks and adjustments”
section and “Front passenger air bag status light
(where fitted)” later in this section. Place the igni-
tion switch in the ONposition and make sure that
the front air bag status light on the centre
console illuminates.
2. Move the seat to the rearmost position ➁. NIC2430
Step 6
NIC2431
Step 7 NP A1411 NP A1412
NIC2428
Steps 2and 3
1-28 Safety —seats, seat belts and supplemental restraint system
Page 56 of 340

•
Do not fit
arearward facing child seat on the
front passenger seat if the air bag activation/
deactivation system (where fitted) is malfunc-
tioning. Your vehicle must immediately be
taken to an approved dealer or qualified work-
shop in such asituation.
The front passenger air bag status lights and
are located on the instrument panel between
the centre vents.
When the ignition switch is placed in the ON posi-
tion, the front passenger air bag status ON and
OFF lights illuminate and then turn off or remain on
depending on the front passenger air bag status.
• When the ignition switch is placed in the ON
position and the front passenger air bag is ac-
tive, both the front passenger air bag status OFF
light ,a
nd the Supplemental Restraint Sys-
tem (SRS) air bag warning light in the com-
bination meter ➀will turn off after about
7sec-
onds.
The front passenger air bag status ON light will illuminate and then turn off after
aperiod of
time when the front passenger air bag switch is
in the ON position.
• When the ignition switch is placed in the ON
position and the front passenger air bag is inac-
tive, both the front passenger air bag status ON
light ,a
nd the Supplemental Restraint Sys-
tem (SRS) air bag warning light in the com-
bination meter ➀will turn off after about
7sec-
onds. The front passenger air bag status OFF light will illuminate and remain on as long as the
front passenger air bag switch is in the OFF
position.
If the front passenger air bag status light operates in
aw ay other than described above, the front passen-
ger air bag may not function properly. Have the sys-
tem checked, and if necessary repaired, by an ap-
proved dealer or qualified workshop promptly.
Front passenger air bag switch (where fitted):
The front passenger air bag can be turned off with
the front passenger air bag switch j
Al ocated in-
side the glove box.
j A Air bag switch (where fitted)
j B Left Hand Drive models
j C Right Hand Drive models
To turn off the front passenger air bag:
1. Place the ignition switch in the OFFposition. 2. Open the glove box and insert the key into the
front passenger air bag switch. For Remote Con-
trol Key equipped models, see “Keys” in the
“3. Pre-driving checks and adjustments” section
for mechanical key usage.
3. Push and turn the key to the
4. Place the ignition switch in the ONposition. The
front passenger air bag status OFF light will illuminate and remain on.
To turn on the front passenger air bag:
1. Place the ignition switch in the OFFposition.
2. Open the glove box and insert the key into the front passenger air bag switch.
3. Push and turn the key to the
4. Place the ignition switch in the ONposition. The
front passenger air bag status ON light will
illuminate, and after
aperiod of time, will then
turn off.
Supplemental driver’s knee air bag
system (where fitted)
The supplemental driver’s knee air bag is located
under the steering column.
The supplemental driver’s knee air bag system is
designed to inflate in higher severity frontal colli-
sions, although it may inflate if the forces in another
type of collision are similar to those of ahigher se-
verity impact. It may not inflate in certain collisions. NP A1296
1-38 Safety —seats, seat belts and supplemental restraint system
Page 125 of 340
Closing the tailgate
When closing the tailgate, make sure that the latches
or levers are securely locked.
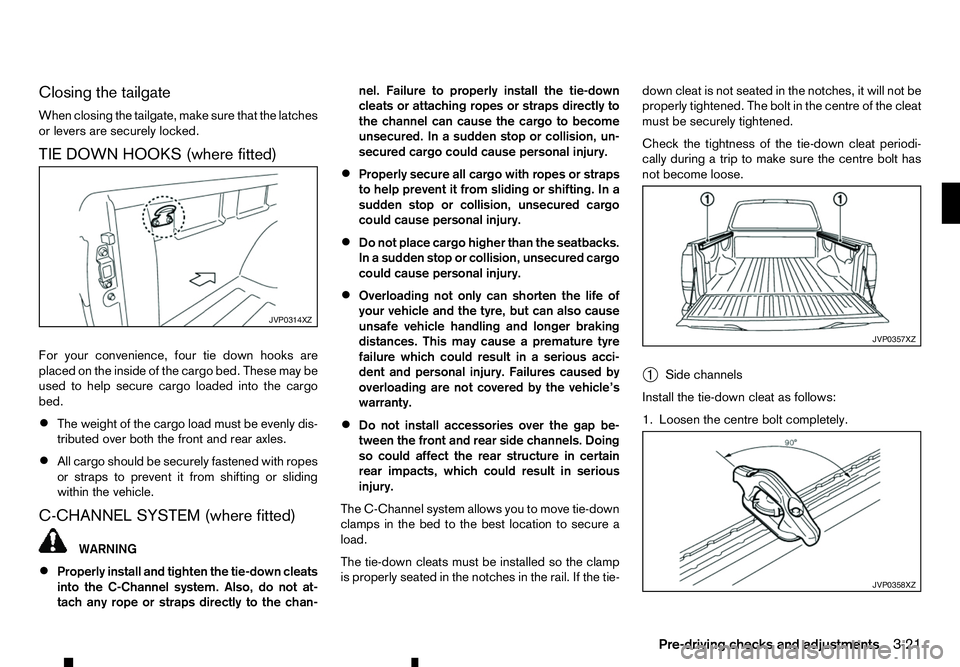
TIE DOWN HOOKS (where fitted)
For your convenience, four tie down hooks are
placed on the inside of the cargo bed. These may be
used to help secure cargo loaded into the cargo
bed.
• The weight of the cargo load must be evenly dis-
tributed over both the front and rear axles.
• All cargo should be securely fastened with ropes
or straps to prevent it from shifting or sliding
within the vehicle.
C-CHANNEL SYSTEM (where fitted) WARNING
• Properly install and tighten the tie-down cleats
into the C-Channel system. Also, do not at-
tach any rope or straps directly to the chan- nel. Failure to properly install the tie-down
cleats or attaching ropes or straps directly to
the channel can cause the cargo to become
unsecured. In
asudden stop or collision, un-
secured cargo could cause personal injury.
• Properly secure all cargo with ropes or straps
to help prevent it from sliding or shifting. In a
sudden stop or collision, unsecured cargo
could cause personal injury.
• Do not place cargo higher than the seatbacks.
In
as udden stop or collision, unsecured cargo
could cause personal injury.
• Overloading not only can shorten the life of
your vehicle and the tyre, but can also cause
unsafe vehicle handling and longer braking
distances. This may cause
apremature tyre
failure which could result in aserious acci-
dent and personal injury. Failures caused by
overloading are not covered by the vehicle’s
warranty.
• Do not install accessories over the gap be-
tween the front and rear side channels. Doing
so could affect the rear structure in certain
rear impacts, which could result in serious
injury.
The C-Channel system allows you to move tie-down
clamps in the bed to the best location to secure a
load.
The tie-down cleats must be installed so the clamp
is properly seated in the notches in the rail. If the tie- down cleat is not seated in the notches, it will not be
properly tightened. The bolt in the centre of the cleat
must be securely tightened.
Check the tightness of the tie-down cleat periodi-
cally during
atrip to make sure the centre bolt has
not become loose.
➀ Side channels
Install the tie-down cleat as follows:
1. Loosen the centre bolt completely. JVP0314XZ
JVP0357XZ
JVP0358XZ
Pre-driving checks and adjustments
3-21
Page 126 of 340
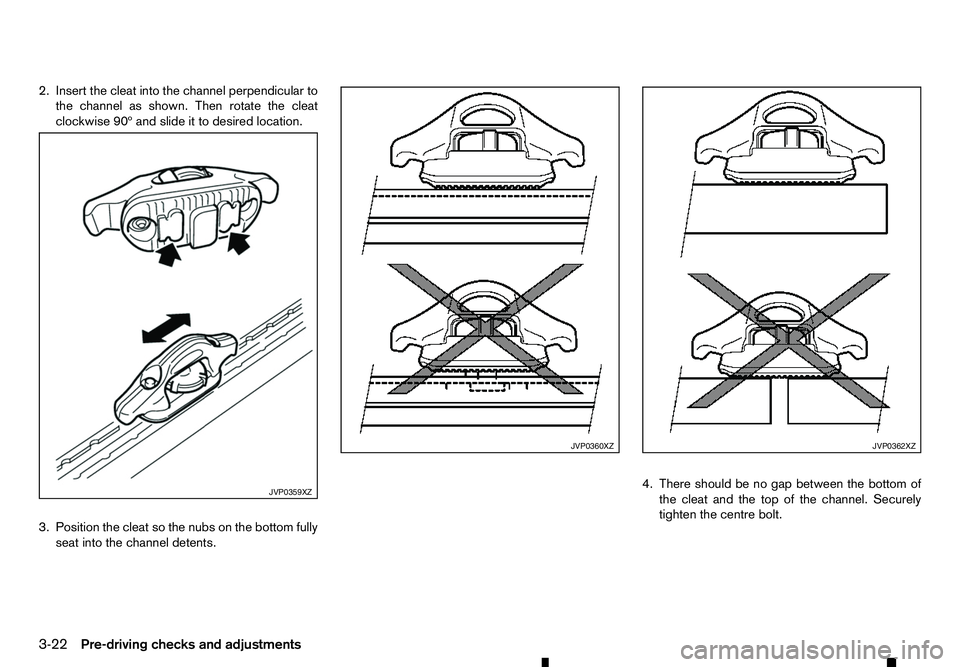
2. Insert the cleat into the channel perpendicular to
the channel as shown. Then rotate the cleat
clockwise 90º and slide it to desired location.
3. Position the cleat so the nubs on the bottom fully seat into the channel detents. 4. There should be no gap between the bottom of
the cleat and the top of the channel. Securely
tighten the centre bolt. JVP0359XZ JVP0360XZ JVP0362XZ
3-22 Pre-driving checks and adjustments