2017 PEUGEOT 5008 ignition
[x] Cancel search: ignitionPage 71 of 404
69
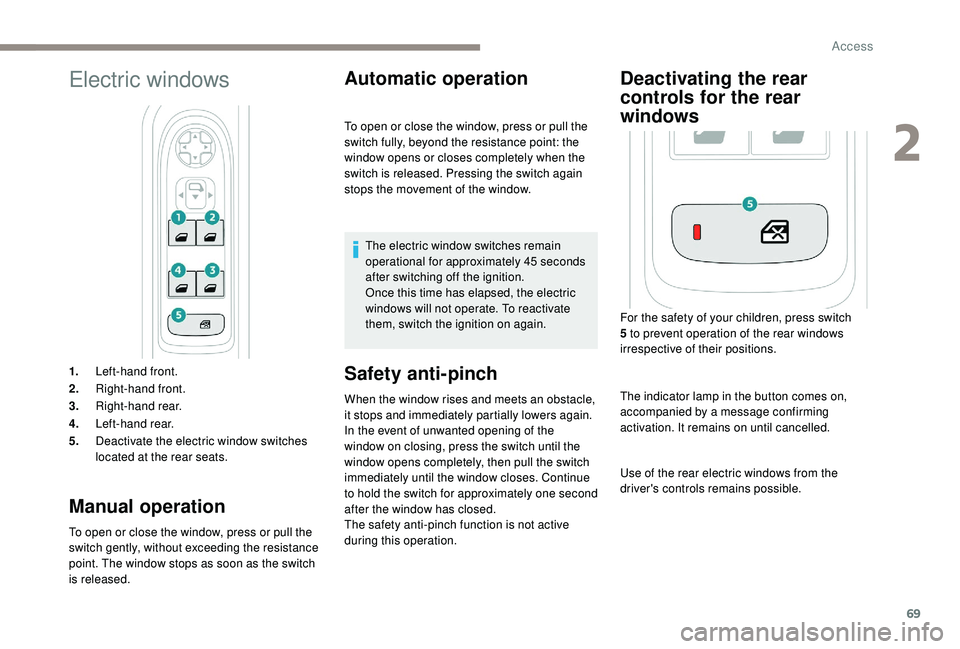
Electric windows
1.Left-hand front.
2. Right-hand front.
3. Right-hand rear.
4. Left-hand rear.
5. Deactivate the electric window switches
located at the rear seats.
Manual operation
To open or close the window, press or pull the
switch gently, without exceeding the resistance
point. The window stops as soon as the switch
is released.
Automatic operation
Safety anti-pinch
When the window rises and meets an obstacle,
it stops and immediately partially lowers again.
In the event of unwanted opening of the
window on closing, press the switch until the
window opens completely, then pull the switch
immediately until the window closes. Continue
to hold the switch for approximately one second
after the window has closed.
The safety anti-pinch function is not active
during this operation. To open or close the window, press or pull the
switch fully, beyond the resistance point: the
window opens or closes completely when the
switch is released. Pressing the switch again
stops the movement of the window.
The electric window switches remain
operational for approximately 45
seconds
after switching off the ignition.
Once this time has elapsed, the electric
windows will not operate. To reactivate
them, switch the ignition on again.
Deactivating the rear
controls for the rear
windows
For the safety of your children, press switch
5 to prevent operation of the rear windows
irrespective of their positions.
The indicator lamp in the button comes on,
accompanied by a message confirming
activation. It remains on until cancelled.
Use of the rear electric windows from the
driver's controls remains possible.
2
Access
Page 73 of 404
71
Principles
Complete opening of the sunroof involves partly
raising the mobile glass, then sliding it over the
fixed glass.
Any intermediate position is possible.
Opening the roof involves opening the blind. By
contrast, the blind can remain open when the
roof is closed.
The control buttons for the sunroof and blind
can be used:
-
w
ith the ignition on, if the state of charge of
the battery is adequate,
-
w
ith the engine running,
-
i
n STOP mode with Stop & Start,
-
d
uring the 45 seconds after switching off
the ignition,
-
d
uring the 45 seconds after locking the
vehicle.
Before operating the sunroof or blind
control buttons, ensure that no object or
person might prevent the movement.
Operating the sunroof
Opening
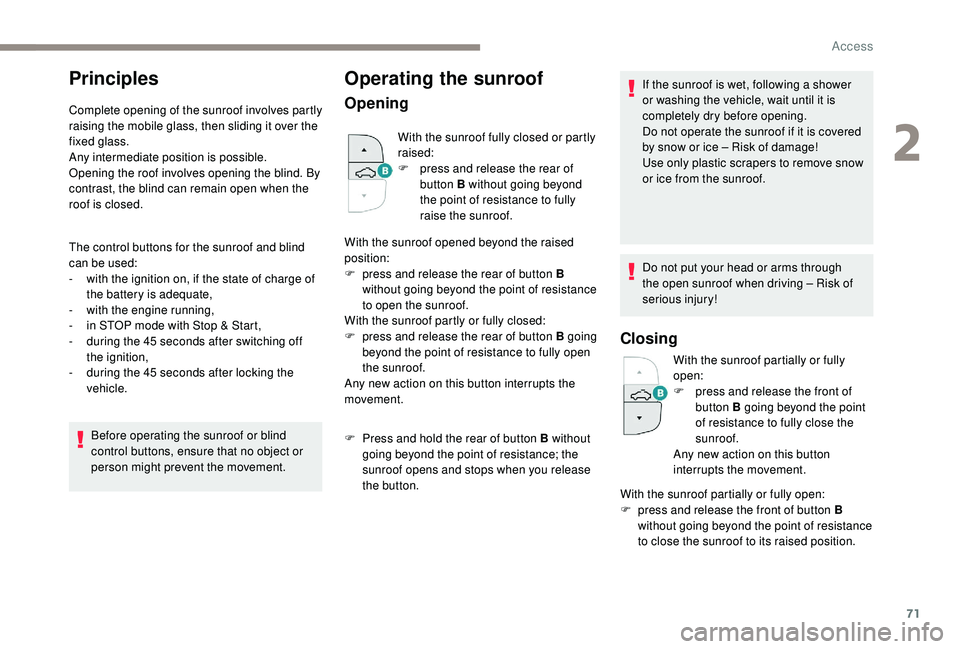
With the sunroof fully closed or partly
raised:
F
p
ress and release the rear of
button B without going beyond
the point of resistance to fully
raise the sunroof.
With the sunroof opened beyond the raised
position:
F
p
ress and release the rear of button B
without going beyond the point of resistance
to open the sunroof.
With the sunroof partly or fully closed:
F
p
ress and release the rear of button B going
beyond the point of resistance to fully open
the sunroof.
Any new action on this button interrupts the
movement.
F
P
ress and hold the rear of button B without
going beyond the point of resistance; the
sunroof opens and stops when you release
the button. If the sunroof is wet, following a shower
or washing the vehicle, wait until it is
completely dry before opening.
Do not operate the sunroof if it is covered
by snow or ice – Risk of damage!
Use only plastic scrapers to remove snow
or ice from the sunroof.
Do not put your head or arms through
the open sunroof when driving – Risk of
serious injury!
Closing
With the sunroof partially or fully
open:
F
p
ress and release the front of
button B going beyond the point
of resistance to fully close the
sunroof.
Any new action on this button
interrupts the movement.
With the sunroof partially or fully open:
F
p
ress and release the front of button B
without going beyond the point of resistance
to close the sunroof to its raised position.
2
Access
Page 76 of 404
74
Driving position
Adopting a good driving position helps improve
your comfort and protection.
It also optimises interior and exterior visibility
as well as access to controls.
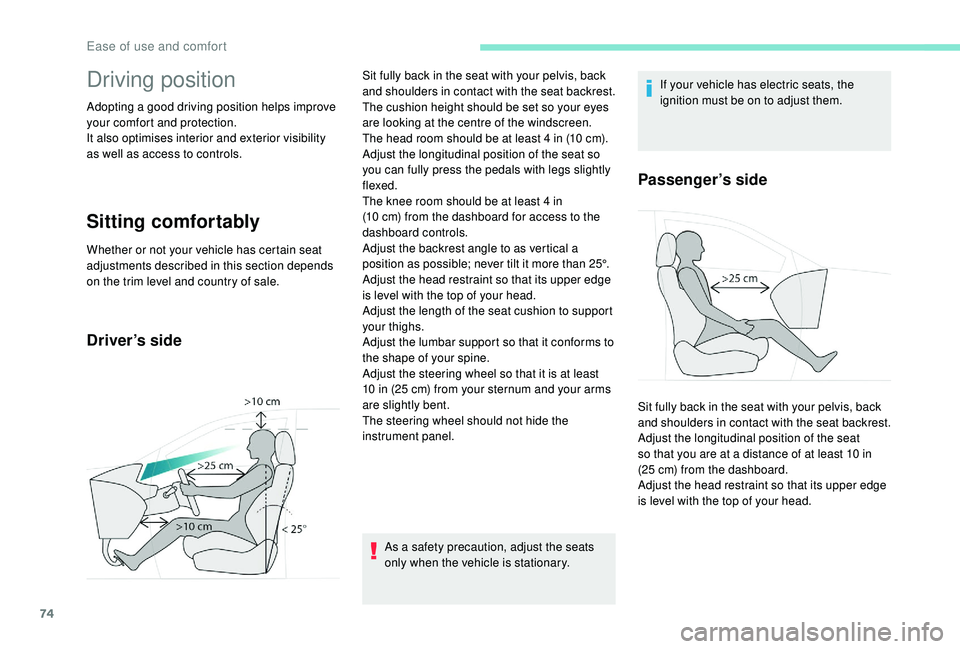
Sitting comfortably
Whether or not your vehicle has certain seat
adjustments described in this section depends
on the trim level and country of sale.
Driver’s side
As a safety precaution, adjust the seats
only when the vehicle is stationary.If your vehicle has electric seats, the
ignition must be on to adjust them.
Passenger’s side
Sit fully back in the seat with your pelvis, back
and shoulders in contact with the seat backrest.
The cushion height should be set so your eyes
are looking at the centre of the windscreen.
The head room should be at least 4
in (10 cm).
Adjust the longitudinal position of the seat so
you can fully press the pedals with legs slightly
flexed.
The knee room should be at least 4
in
(10
cm) from the dashboard for access to the
dashboard controls.
Adjust the backrest angle to as vertical a
position as possible; never tilt it more than 25°.
Adjust the head restraint so that its upper edge
is level with the top of your head.
Adjust the length of the seat cushion to support
your thighs.
Adjust the lumbar support so that it conforms to
the shape of your spine.
Adjust the steering wheel so that it is at least
10
in (25 cm) from your sternum and your arms
are slightly bent.
The steering wheel should not hide the
instrument panel. Sit fully back in the seat with your pelvis, back
and shoulders in contact with the seat backrest.
Adjust the longitudinal position of the seat
so that you are at a distance of at least 10
in
(25
cm) from the dashboard.
Adjust the head restraint so that its upper edge
is level with the top of your head.
Ease of use and comfort
Page 77 of 404

75
Before moving off
If your vehicle has electric door mirrors,
the ignition must be on to adjust them.
When driving
Never adjust the seats or steering wheel
when driving.
Always keep your feet on the floor.
Adjust the interior and exterior door mirrors to
reduce blind spots.
Fasten your seat belt: place the diagonal belt in
the middle of your shoulder and adjust the lap
belt so that it is tightened across your pelvis.
Ensure that all passengers have fastened their
seat belts correctly. Maintain a good driving position and hold the
steering wheel with both hands at the quarter
to three position, so that you can easily and
quickly reach the controls behind and near the
steering wheel.
3
Ease of use and comfort
Page 81 of 404
79
Front head restraints
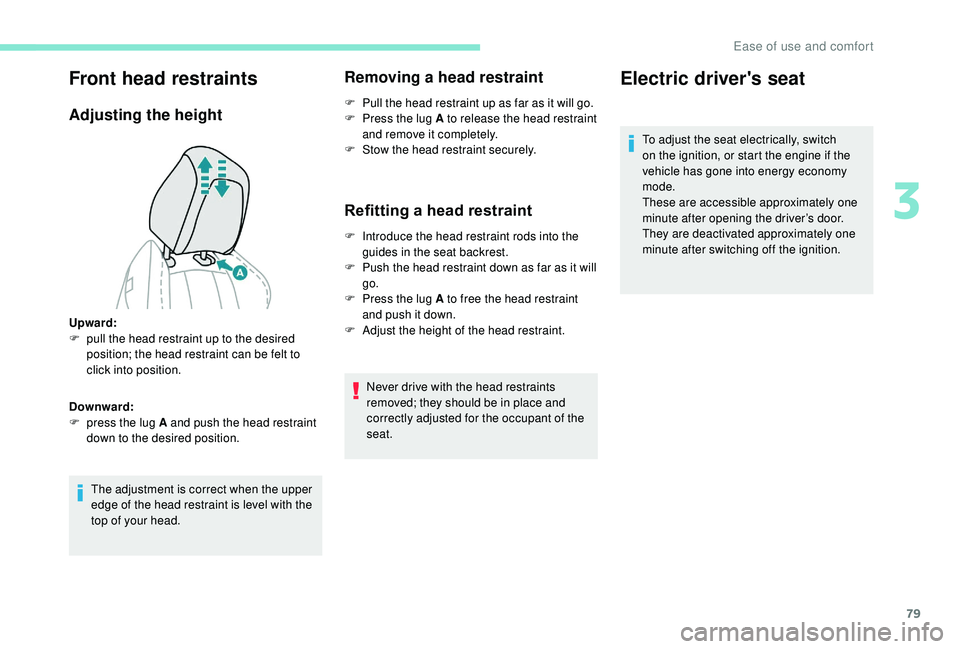
Adjusting the height
The adjustment is correct when the upper
edge of the head restraint is level with the
top of your head.
Removing a head restraint
F Pull the head restraint up as far as it will go.
F P ress the lug A to release the head restraint
and remove it completely.
F
S
tow the head restraint securely.
Refitting a head restraint
F Introduce the head restraint rods into the guides in the seat backrest.
F
P
ush the head restraint down as far as it will
go.
F
P
ress the lug A to free the head restraint
and push it down.
F
A
djust the height of the head restraint.
Never drive with the head restraints
removed; they should be in place and
correctly adjusted for the occupant of the
seat.
Upward:
F
p
ull the head restraint up to the desired
position; the head restraint can be felt to
click into position.
Downward:
F
p
ress the lug A and push the head restraint
down to the desired position.
Electric driver's seat
To adjust the seat electrically, switch
on the ignition, or start the engine if the
vehicle has gone into energy economy
mode.
These are accessible approximately one
minute after opening the driver’s door.
They are deactivated approximately one
minute after switching off the ignition.
3
Ease of use and comfort
Page 83 of 404

81
Before moving the seat backwards,
ensure that there is nothing that might
prevent the full travel of the seat.
There is a risk of trapping or pinching
passengers if present in the rear seats
or jamming the seat if large objects are
placed on the floor behind the seat.
Storing driving positions
Associated with adjustments of the electrical
driver’s seat, this function allows two driving
positions to be memorised, to make these
adjustments easier if there are frequent driver
changes.
It takes account of the electric adjustments of
the seat and the door mirrors.
Storing a position
Using buttons M / 1 / 2
F S it in the driver’s seat.
F
S
witch on the ignition.
F
A
djust your seat and the door mirrors.
F
P
ress button M , then press button 1
or
2
within four seconds.
An audible signal indicates that the position has
been stored.
Storing a new position cancels the
previous position.
Recalling a stored position
Ignition on or engine running
F P ress button 1 or 2 to recall the
corresponding position.
An audible signal confirms that adjustment is
complete.
You can interrupt the current movement by
pressing button M , 1
or 2 or by using one
of the seat controls.
A stored position cannot be recalled while
driving.
Recalling stored positions is deactivated
45
seconds after switching off the ignition.
Heated seats
The function is active only with the engine
running.
Switching on
F Press the button corresponding to your seat.
F
E
ach press changes the level of heating; the
corresponding number of indicator lamps
come on:
•
1
indicator lamp = low.
•
2
indicator lamps = medium.
•
3
indicator lamps = high.
Switching off
F Press the button again until all the indicator lamps are off.
The state of the system is not kept in memory
when the ignition is switched off.
Do not use the function when the seat is
not occupied.
Reduce the intensity of the heating as
soon as possible.
When the seat and passenger
compartment have reached an adequate
temperature, you can stop the function;
reducing the consumption of electrical
current reduces fuel consumption.
3
Ease of use and comfort
Page 86 of 404

84
F From outside: lock the vehicle using the remote control or the key.
F
F
rom inside: with the ignition on, pull the
control A in the central position rearwards.
If the mirrors are folded using control A ,
they will not unfold when the vehicle is
unlocked. Pull again on control A .
Unfolding
F From outside: unlock the vehicle using the
remote control or the key.
F
F
rom inside: with the ignition on, pull the
control A in the central position rearwards. The folding and unfolding of the door
mirrors using the remote control can be
deactivated by a PEUGEOT dealer or a
qualified workshop.
If necessary the mirrors can be folded
manually.
Automatic tilting in reverse gear
System which provides a view of the ground
during parking manoeuvres in reverse gear.
With the engine running, on engaging reverse
gear, the mirror glasses tilt downwards.
They return to their initial position:
-
a f
ew seconds after coming out of reverse
g e a r,
-
o
nce the speed of the vehicle exceeds
6
mph (10 km/h),
-
o
n switching off the engine. This function is activated /
deactivated via the " Vehicle
settings " tab in the Vehicle /
Driving menu of the touch screen.
Rear view mirror
Equipped with an anti-dazzle system, which
darkens the mirror glass and reduces the
nuisance to the driver caused by the sun,
headlamps from other vehicles, etc.
Manual model
Folding
Adjustment
F
A djust the mirror so that the glass is
directed correctly in the "day" position.
Day / night position
F
P
ull the lever to change to the "night" anti-
dazzle position.
F
P
ush the lever to change to the normal
"day" position.
Automatic "electrochrome"
model
In order to ensure optimum visibility during
your manoeuvres, the mirror lightens
automatically when reverse gear is
engaged.
This system automatically and progressively
changes between day and night use by means
of a sensor measuring the light coming from the
rear of the vehicle.
Ease of use and comfort
Page 95 of 404
93
i-Cockpit Amplify function
This function allows the driving ambiences to
be managed.
Specific system settings are offered for each
ambience.
These ambiences can be personalised in the
touch screen.
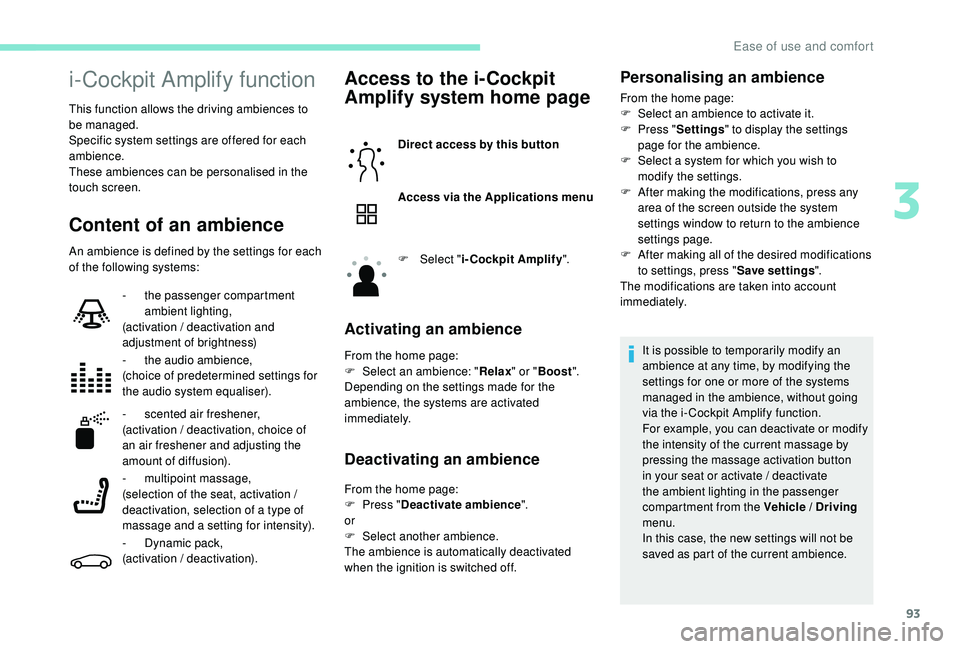
Content of an ambience
An ambience is defined by the settings for each
of the following systems:
Access to the i-Cockpit
Amplify system home page
Direct access by this button
Access via the Applications menu
F
Sel
ect "i-Cockpit Amplify ".
Activating an ambience
From the home page:
F
Sel ect an ambience: " Relax" or "Boost ".
Depending on the settings made for the
ambience, the systems are activated
immediately.
Deactivating an ambience
From the home page:
F P ress " Deactivate ambience ".
or
F
Sel
ect another ambience.
The ambience is automatically deactivated
when the ignition is switched off.
-
t
he passenger compartment
ambient lighting,
(activation / deactivation and
adjustment of brightness)
-
t
he audio ambience,
(choice of predetermined settings for
the audio system equaliser).
-
s
cented air freshener,
(activation / deactivation, choice of
an air freshener and adjusting the
amount of diffusion).
- m
ultipoint massage,
(selection of the seat, activation /
deactivation, selection of a type of
massage and a setting for intensity).
-
D
ynamic pack,
(activation / deactivation).
Personalising an ambience
From the home page:
F S elect an ambience to activate it.
F
P
ress " Settings " to display the settings
page for the ambience.
F
S
elect a system for which you wish to
modify the settings.
F
A
fter making the modifications, press any
area of the screen outside the system
settings window to return to the ambience
settings page.
F
A
fter making all of the desired modifications
to settings, press " Save settings".
The modifications are taken into account
immediately.
It is possible to temporarily modify an
ambience at any time, by modifying the
settings for one or more of the systems
managed in the ambience, without going
via the i- Cockpit Amplify function.
For example, you can deactivate or modify
the intensity of the current massage by
pressing the massage activation button
in your seat or activate / deactivate
the ambient lighting in the passenger
compartment from the Vehicle / Driving
menu.
In this case, the new settings will not be
saved as part of the current ambience.
3
Ease of use and comfort