2017 PEUGEOT 5008 wheel
[x] Cancel search: wheelPage 276 of 404
274
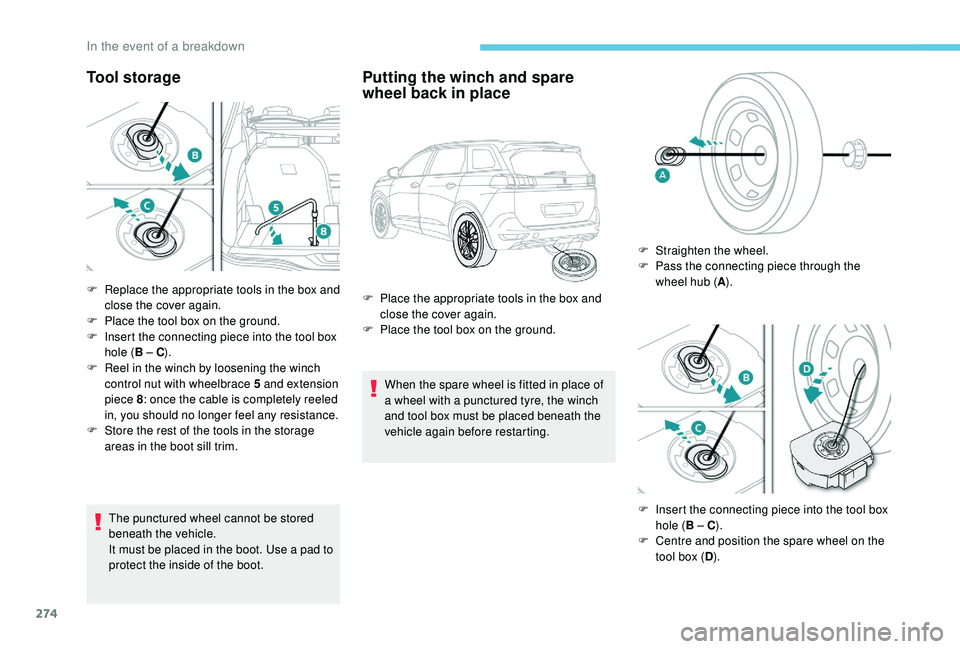
Tool storage
The punctured wheel cannot be stored
beneath the vehicle.
It must be placed in the boot. Use a pad to
protect the inside of the boot.
Putting the winch and spare
wheel back in place
When the spare wheel is fitted in place of
a wheel with a punctured tyre, the winch
and tool box must be placed beneath the
vehicle again before restarting.
F
R
eplace the appropriate tools in the box and
close the cover again.
F
P
lace the tool box on the ground.
F
I
nsert the connecting piece into the tool box
hole ( B – C).
F
R
eel in the winch by loosening the winch
control nut with wheelbrace 5
and extension
piece 8 : once the cable is completely reeled
in, you should no longer feel any resistance.
F
S
tore the rest of the tools in the storage
areas in the boot sill trim. F
P
lace the appropriate tools in the box and
close the cover again.
F
P
lace the tool box on the ground. F
S
traighten the wheel.
F
P
ass the connecting piece through the
wheel hub ( A).
F
I
nsert the connecting piece into the tool box
hole ( B – C).
F
C
entre and position the spare wheel on the
tool box ( D).
In the event of a breakdown
Page 277 of 404
275
Removing a wheel
Wheel with wheel trim
When removing the wheel, first remove
the wheel trim by pulling at the valve
aperture using the wheelbrace.
When refitting the wheel , after tightening
the wheel bolts, refit the wheel trim,
starting by placing its aperture in line with
the valve and then pushing it into place all
round its edge with the palm of your hand.
*
position P for the automatic gearbox
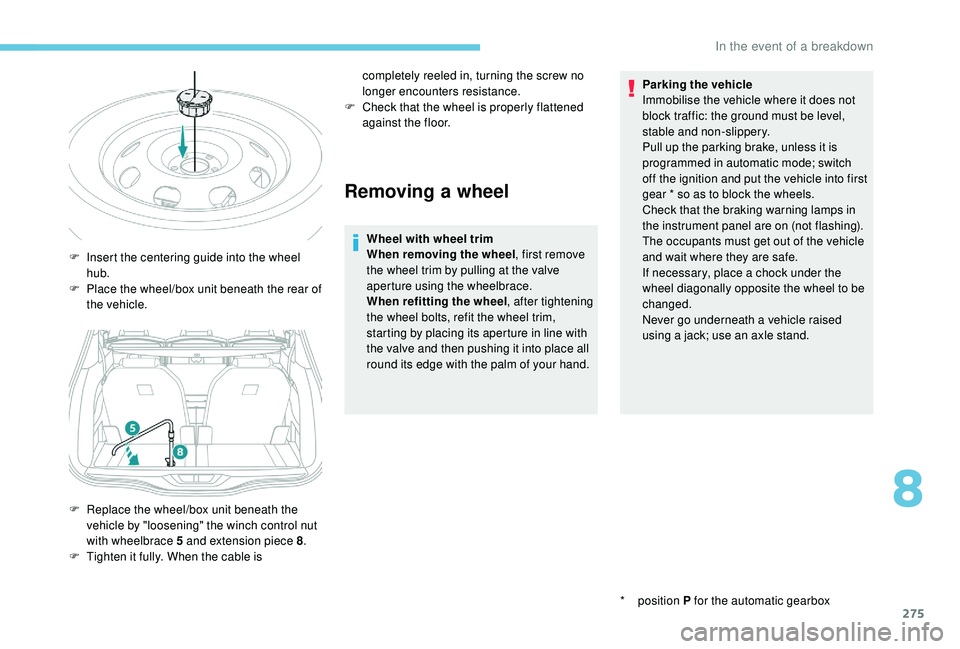
F
I
nsert the centering guide into the wheel
hub.
F
P
lace the wheel/box unit beneath the rear of
the vehicle.
F
R
eplace the wheel/box unit beneath the
vehicle by "loosening" the winch control nut
with wheelbrace 5
and extension piece 8 .
F
T
ighten it fully. When the cable is completely reeled in, turning the screw no
longer encounters resistance.
F
C
heck that the wheel is properly flattened
against the floor. Parking the vehicle
Immobilise the vehicle where it does not
block traffic: the ground must be level,
stable and non-slippery.
Pull up the parking brake, unless it is
programmed in automatic mode; switch
off the ignition and put the vehicle into first
gear * so as to block the wheels.
Check that the braking warning lamps in
the instrument panel are on (not flashing).
The occupants must get out of the vehicle
and wait where they are safe.
If necessary, place a chock under the
wheel diagonally opposite the wheel to be
changed.
Never go underneath a vehicle raised
using a jack; use an axle stand.
8
In the event of a breakdown
Page 278 of 404
276
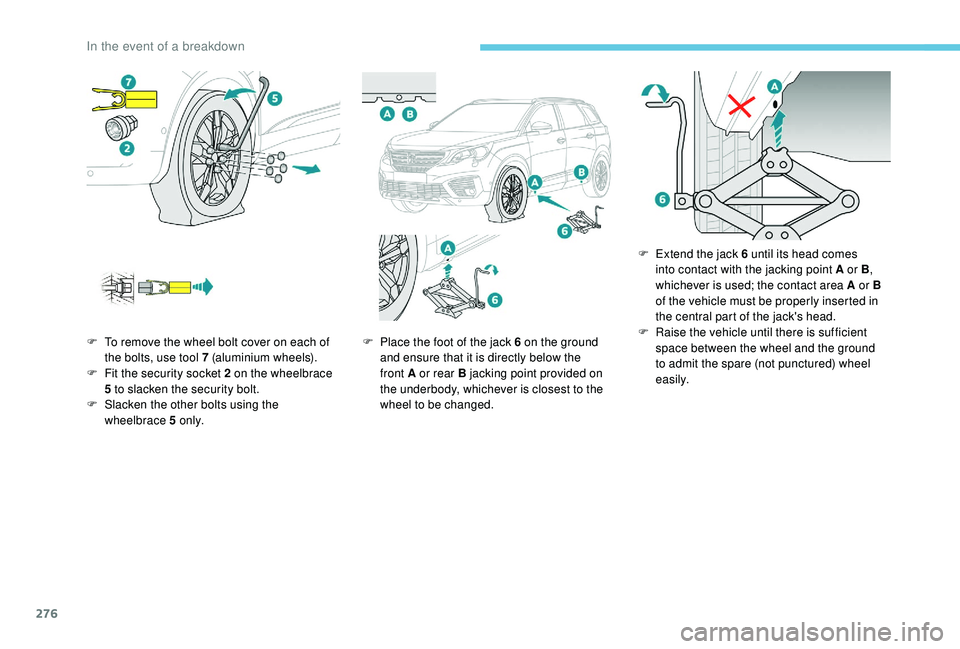
F To remove the wheel bolt cover on each of the bolts, use tool 7 (aluminium wheels).
F
F
it the security socket 2 on the wheelbrace
5
to slacken the security bolt.
F
S
lacken the other bolts using the
wheelbrace 5
o n l y. F
P lace the foot of the jack 6 on the ground
and ensure that it is directly below the
front A or rear B jacking point provided on
the underbody, whichever is closest to the
wheel to be changed. F
E
xtend the jack 6 until its head comes
into contact with the jacking point A or B ,
whichever is used; the contact area A or B
of the vehicle must be properly inserted in
the central part of the jack's head.
F Ra ise the vehicle until there is sufficient
space between the wheel and the ground
to admit the spare (not punctured) wheel
easily.
In the event of a breakdown
Page 279 of 404
277
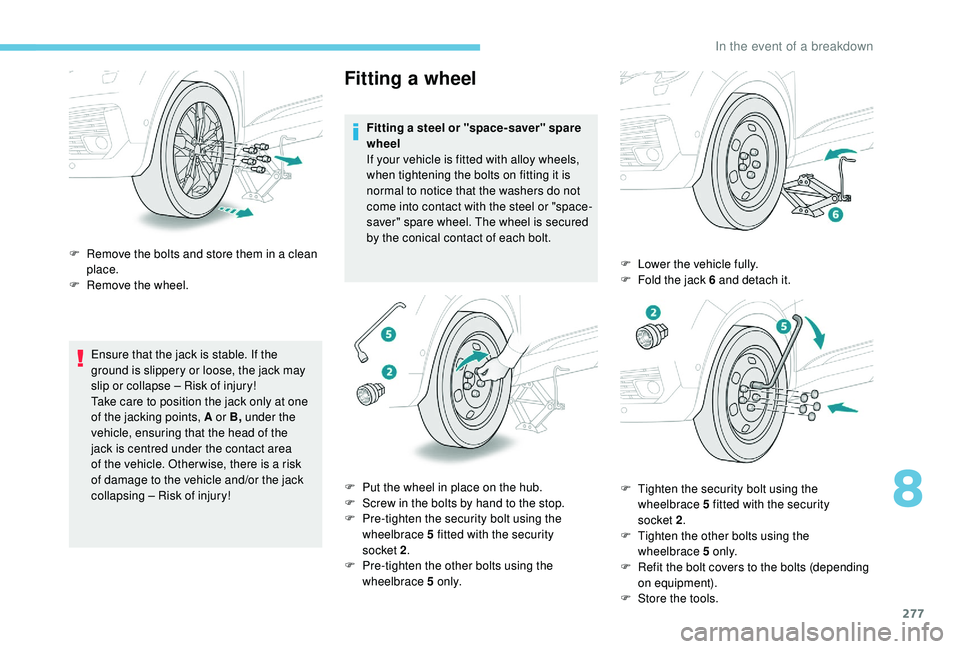
Ensure that the jack is stable. If the
ground is slippery or loose, the jack may
slip or collapse – Risk of injury!
Take care to position the jack only at one
of the jacking points, A or B, under the
vehicle, ensuring that the head of the
jack is centred under the contact area
of the vehicle. Other wise, there is a risk
of damage to the vehicle and/or the jack
collapsing – Risk of injury!
Fitting a wheel
Fitting a steel or "space-saver" spare
wheel
If your vehicle is fitted with alloy wheels,
when tightening the bolts on fitting it is
normal to notice that the washers do not
come into contact with the steel or "space-
saver" spare wheel. The wheel is secured
by the conical contact of each bolt.
F
R
emove the bolts and store them in a clean
place.
F
R
emove the wheel.
F
P
ut the wheel in place on the hub.
F
S
crew in the bolts by hand to the stop.
F
P
re-tighten the security bolt using the
wheelbrace 5
fitted with the security
socket 2 .
F
P
re-tighten the other bolts using the
wheelbrace 5
o n l y. F
L
ower the vehicle fully.
F
F
old the jack 6 and detach it.
F
T
ighten the security bolt using the
wheelbrace 5
fitted with the security
socket 2 .
F
T
ighten the other bolts using the
wheelbrace 5
o n l y.
F
R
efit the bolt covers to the bolts (depending
on equipment).
F
S
tore the tools.
8
In the event of a breakdown
Page 280 of 404
278
After changing a wheel
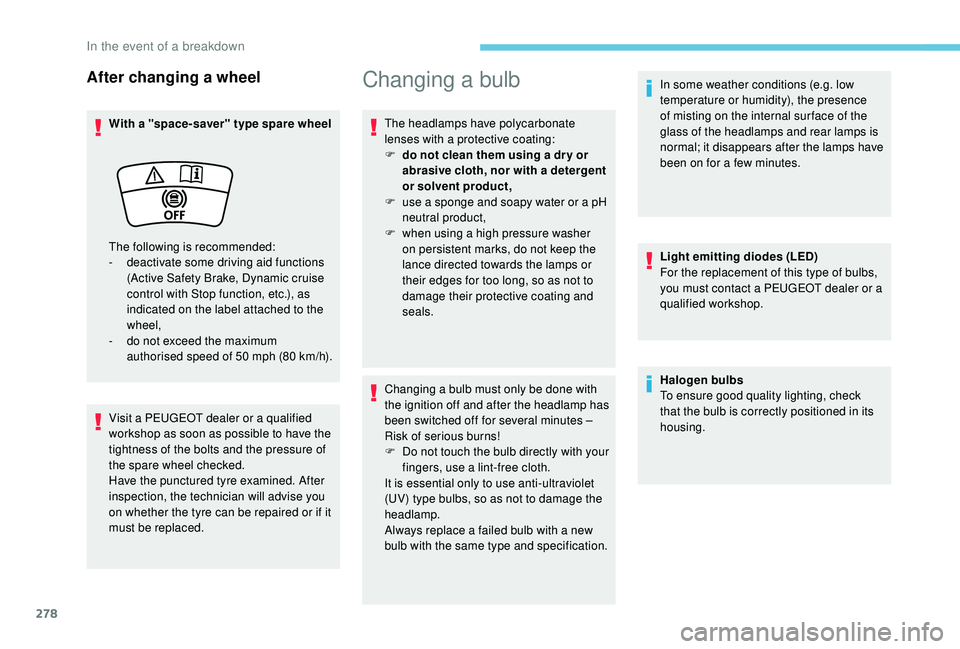
With a "space-saver" type spare wheel
Visit a PEUGEOT dealer or a qualified
workshop as soon as possible to have the
tightness of the bolts and the pressure of
the spare wheel checked.
Have the punctured tyre examined. After
inspection, the technician will advise you
on whether the tyre can be repaired or if it
must be replaced.
Changing a bulb
The headlamps have polycarbonate
lenses with a protective coating:
F
d
o not clean them using a dr y or
abrasive cloth, nor with a detergent
or solvent product,
F
u
se a sponge and soapy water or a pH
neutral product,
F
w
hen using a high pressure washer
on persistent marks, do not keep the
lance directed towards the lamps or
their edges for too long, so as not to
damage their protective coating and
seals.
Changing a bulb must only be done with
the ignition off and after the headlamp has
been switched off for several minutes –
Risk of serious burns!
F
D
o not touch the bulb directly with your
fingers, use a lint-free cloth.
It is essential only to use anti-ultraviolet
(UV) type bulbs, so as not to damage the
headlamp.
Always replace a failed bulb with a new
bulb with the same type and specification. In some weather conditions (e.g. low
temperature or humidity), the presence
of misting on the internal sur face of the
glass of the headlamps and rear lamps is
normal; it disappears after the lamps have
been on for a few minutes.
Light emitting diodes (LED)
For the replacement of this type of bulbs,
you must contact a PEUGEOT dealer or a
qualified workshop.
The following is recommended:
-
d
eactivate some driving aid functions
(Active Safety Brake, Dynamic cruise
control with Stop function, etc.), as
indicated on the label attached to the
wheel,
-
d
o not exceed the maximum
authorised speed of 50
mph (80
km/h). Halogen bulbs
To ensure good quality lighting, check
that the bulb is correctly positioned in its
housing.
In the event of a breakdown
Page 292 of 404
290
F Move the gear lever into neutral (N mode with an automatic gearbox).
Failure to follow this instruction may cause
damage to some components (braking,
transmission, etc.) and the absence of
braking assistance when the engine is
restarted. F
S
witch on the hazard warning lamps on
both vehicles.
F
S
et off gently and drive slowly for a short
distance.
Towing another vehicle
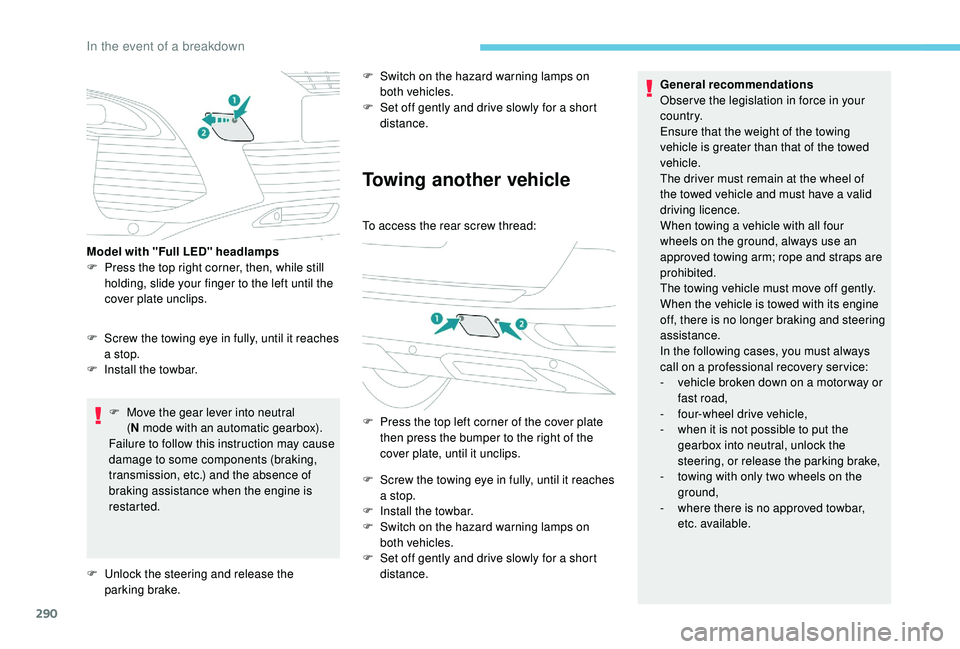
To access the rear screw thread:
F
P
ress the top left corner of the cover plate
then press the bumper to the right of the
cover plate, until it unclips.
F
S
crew the towing eye in fully, until it reaches
a stop.
F
I
nstall the towbar.
F
S
witch on the hazard warning lamps on
both vehicles.
F
S
et off gently and drive slowly for a short
distance. General recommendations
Obser ve the legislation in force in your
c o u nt r y.
Ensure that the weight of the towing
vehicle is greater than that of the towed
vehicle.
The driver must remain at the wheel of
the towed vehicle and must have a valid
driving licence.
When towing a vehicle with all four
wheels on the ground, always use an
approved towing arm; rope and straps are
prohibited.
The towing vehicle must move off gently.
When the vehicle is towed with its engine
off, there is no longer braking and steering
assistance.
In the following cases, you must always
call on a professional recovery ser vice:
-
v
ehicle broken down on a motor way or
fast road,
-
f
our-wheel drive vehicle,
-
w
hen it is not possible to put the
gearbox into neutral, unlock the
steering, or release the parking brake,
-
t
owing with only two wheels on the
ground,
-
w
here there is no approved towbar,
etc. available.
F
S
crew the towing eye in fully, until it reaches
a stop.
F
I
nstall the towbar.
Model with "Full LED" headlamps
F
P
ress the top right corner, then, while still
holding, slide your finger to the left until the
cover plate unclips.
F
U
nlock the steering and release the
parking brake.
In the event of a breakdown
Page 301 of 404

3
In the "Settings" menu you can create
a profile for just one person or a group
of people with common points, with
the possibility of entering a multitude of
settings (radio presets, audio settings,
navigation history, contact favourites,
etc.); these settings are taken into account
automatically.
In very hot conditions, the volume may
be limited to protect the system. It may go
into standby (screen and sound off) for at
least 5 minutes
The return to normal takes place when
the temperature in the passenger
compartment has dropped.Steering mounted controls
Depending on model.
Voice commands :
This control is located on the
steering wheel or at the end of the
lighting control stalk (depending on
model).
Short press, system voice
commands.
Long press, smartphone voice
commands via the system.
or Increase volume.
or Mute / Restore the sound.
Or
Mute by pressing the volume
increase and decrease buttons
simultaneously.
Restore the sound by pressing one
of the two volume buttons.
or Decrease volume. or
Media
(short press): change the
multimedia source.
Telephone (short press): start
telephone call.
Call in progress (short press):
access telephone menu.
Telephone (long press): reject an
incoming call, end call; when no call
is in progress, access telephone
menu.
or Radio
(rotate): automatic search for
the previous / next station.
Media (rotate): previous / next track,
move in a list.
Short press : confirm a selection; if
nothing selected, access to presets.
Radio : display the list of stations.
Media : display the list of tracks.
Radio (press and hold): update the
list of stations received.
.
PEUGEOT Connect Nav
Page 304 of 404

6
First steps
Example of a "voice command" for
navigation:
"Navigate to address 11 Regent
Street, London" .
Example of a "voice command" for
the radio and media: "Play ar tist
Madonna" .
Example of a "voice command" for
the telephone:
"Call David Miller" .
The voice commands, with a choice of
12
languages (English, French, Italian,
Spanish, German, Dutch, Portuguese,
Polish, Turkish, Russian, Arabic,
Brazilian), are made using the language
previously chosen and set in the system.
For some voice commands, there are
alternative synonyms.
Example: Guide to / Navigate to / Go to / ...
The voice commands in Arabic for
"Navigate to address" and "Display POI in
the city" are not available.
Information – Using the system
Press the Push To Talk voice
control button and tell me
what you'd like after the tone.
Remember you can interrupt
me at any time by pressing this
button. If you press it again
while I'm waiting for you to
speak, it'll end the conversation.
If you need to start over, say
"cancel". If you want to undo
something, say "undo". And to
get information and tips at any
time, just say "help". If you ask
to me do something and there's
some information missing
that I need, I'll give you some
examples or take you through
it step by step. There's more
information available in "novice"
mode. You can set the dialogue
mode to "expert" when you feel
comfortable.
Global voice commands
These commands can be made from any
screen page after pressing the " Voice
command" or "Telephone" button located
on the steering wheel, as long as there is
no telephone call in progress.
PEUGEOT Connect Nav