Page 245 of 566

70
70
243
3008-2_en_Chap06_conduite_ed01-2016
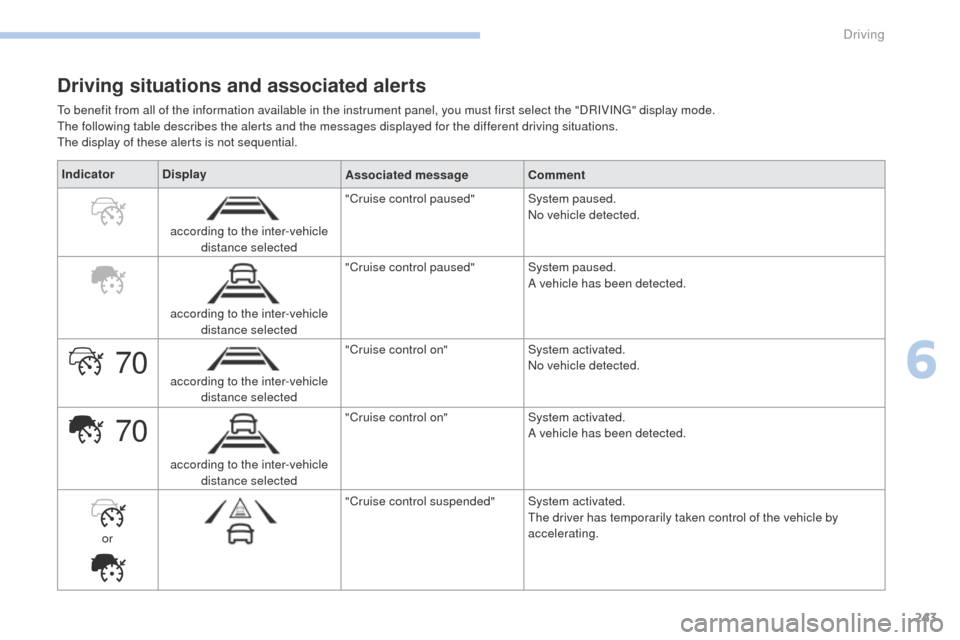
Driving situations and associated alerts
To benefit from all of the information available in the instrument panel, you must first select the "DRIVING" display mode.
The following table describes the alerts and the messages displayed for the different driving situations.
The display of these alerts is not sequential.Indicator Display
Associated messageComment
according to the inter-vehicle distance selected "Cruise control paused"
System paused.
No vehicle detected.
according to the inter-vehicle distance selected "Cruise control paused"
System paused.
A vehicle has been detected.
according to the inter-vehicle distance selected "Cruise control on"
System activated.
No vehicle detected.
according to the inter-vehicle distance selected "Cruise control on"
System activated.
A vehicle has been detected.
or "Cruise control suspended"
System activated.
The driver has temporarily taken control of the vehicle by
accelerating.
6
Driving
Page 248 of 566

246
3008-2_en_Chap06_conduite_ed01-2016
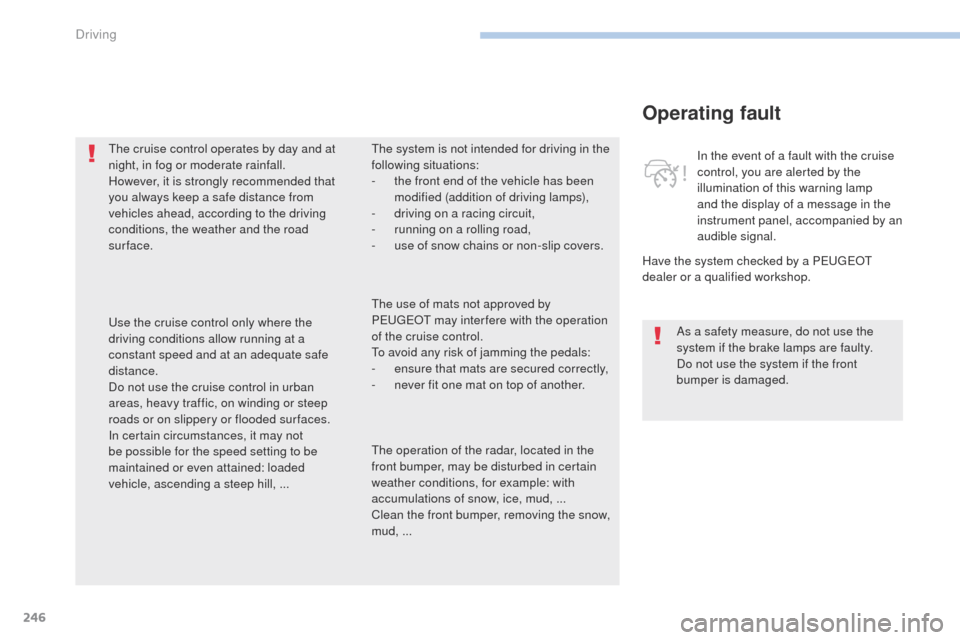
Operating fault
Have the system checked by a PEUGEOT
dealer or a qualified workshop.In the event of a fault with the cruise
control, you are alerted by the
illumination of this warning lamp
and the display of a message in the
instrument panel, accompanied by an
audible signal.
The cruise control operates by day and at
night, in fog or moderate rainfall.
However, it is strongly recommended that
you always keep a safe distance from
vehicles ahead, according to the driving
conditions, the weather and the road
sur face.
Use the cruise control only where the
driving conditions allow running at a
constant speed and at an adequate safe
distance.
Do not use the cruise control in urban
areas, heavy traffic, on winding or steep
roads or on slippery or flooded sur faces.
In certain circumstances, it may not
be possible for the speed setting to be
maintained or even attained: loaded
vehicle, ascending a steep hill, ... The system is not intended for driving in the
following situations:
-
t
he front end of the vehicle has been
modified (addition of driving lamps),
-
d
riving on a racing circuit,
-
r
unning on a rolling road,
-
u
se of snow chains or non-slip covers.
As a safety measure, do not use the
system if the brake lamps are faulty.
Do not use the system if the front
bumper is damaged.
The operation of the radar, located in the
front bumper, may be disturbed in certain
weather conditions, for example: with
accumulations of snow, ice, mud, ...
Clean the front bumper, removing the snow,
mud, ... The use of mats not approved by
PEUGEOT may inter fere with the operation
of the cruise control.
To avoid any risk of jamming the pedals:
-
e
nsure that mats are secured correctly,
-
n
ever fit one mat on top of another.
Driving
Page 259 of 566

257
3008-2_en_Chap06_conduite_ed01-2016
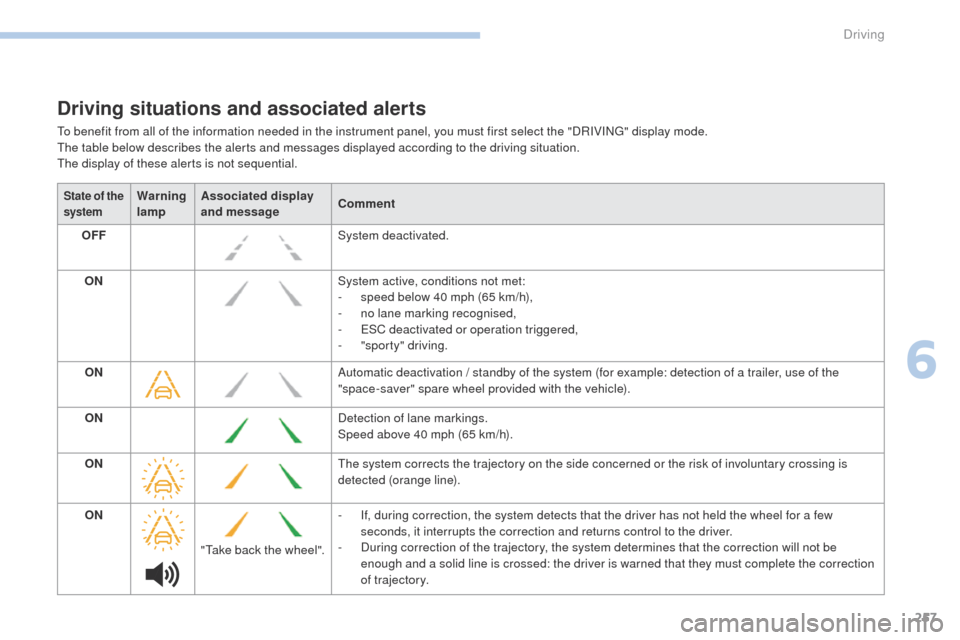
Driving situations and associated alerts
To benefit from all of the information needed in the instrument panel, you must first select the "DRIVING" display mode.
The table below describes the alerts and messages displayed according to the driving situation.
The display of these alerts is not sequential.
State of the
systemWarning
lampAssociated display
and message
Comment
OFF System deactivated.
ON System active, conditions not met:
-
s
peed below 40 mph (65 km/h),
-
n
o lane marking recognised,
-
E
SC deactivated or operation triggered,
-
"
sporty" driving.
ON Automatic deactivation / standby of the system (for example: detection of a trailer, use of the
"space-saver" spare wheel provided with the vehicle).
ON Detection of lane markings.
Speed above 40 mph (65 km/h).
ON The system corrects the trajectory on the side concerned or the risk of involuntary crossing is
detected (orange line).
ON "Take back the wheel". -
I
f, during correction, the system detects that the driver has not held the wheel for a few
seconds, it interrupts the correction and returns control to the driver.
-
D
uring correction of the trajectory, the system determines that the correction will not be
enough and a solid line is crossed: the driver is warned that they must complete the correction
of trajectory.
6
Driving
Page 267 of 566

265
3008-2_en_Chap06_conduite_ed01-2016
Panoramic vision
General points
Visiopark 1 - Visiopark 2
With the engine running, this system allows
views of the vehicle's surroundings to be
displayed in the touch screen, using one
camera for Visiopark 1, and two cameras for
Visiopark 2.The screen is divided into two parts: on the
left, a contextual view; on the right, a view from
above the vehicle.
The parking sensors complete the information
on the view from above the vehicle.
Different contextual views can be displayed in
the left-hand part:
-
s
tandard view,
-
1
80° view,
-
r
econstructed view.AUTO mode is activated by default.
In this mode, the system chooses the best view
to display (standard or zoom) according to the
information from the parking sensors.
You can change the type of view at any time
during a manoeuvre.
F
P
ress the button at the bottom left-hand
corner of the touch screen.
F
Sel
ect the type of view:
●
"St
andard view",
●
"1
80° view",
●
"Z
oom view",
●
"AU
TO view".
The display is immediately updated with the
type of view selected.
The state of the system is not kept in memory
when the ignition is switched off.
6
Driving
Page 269 of 566

267
3008-2_en_Chap06_conduite_ed01-2016
Visiopark 1
Rear vision
To activate the camera, located in the tailgate,
engage reverse and keep the speed of the
vehicle below 6 mph (10 km/h).
The system is deactivated:
-
a
utomatically above about 6 mph
(10 km/h),
-
a
utomatically on opening the tailgate,
-
w
hen coming out of reverse (the image
remains displayed for 7 seconds),
-
b
y pressing the red cross in the top left-
hand corner of the touch screen.
AUTO mode
This mode is activated by default.
Using sensors in the rear bumper, the
automatic view changes from a rear view to a
view from above, as an obstacle is approached
during a manoeuvre.
Standard view
The area behind the vehicle is displayed in the
screen.
The blue lines represent the width of your
vehicle, with the mirrors unfolded; their
direction changes with the position of the
steering wheel.
The red line represents a distance of 30 cm
from the rear bumper, and the two blue lines,
1 m and 2 m respectively.
This view is available with AUTO mode or in the
view selection menu.
6
Driving
Page 270 of 566
268
3008-2_en_Chap06_conduite_ed01-2016
Zoom view
The camera records the vehicle's surroundings
during the manoeuvre in order to reconstruct
a view from above the rear of the vehicle in its
near surroundings, allowing the vehicle to be
manoeuvred around obstacles nearby.
This view is available with AUTO mode or in the
view selection menu.
180° view
The 180° view facilitates reversing out of a
parking bay, making it possible to see the
approach of vehicles, pedestrians and cyclists.
This view is not recommended for carrying out
a complete manoeuvre.
It is made up of 3 areas: left A, centre B and
right C .
This view is available only from the view
selection menu.
Obstacles may appear further away
than they actually are in reality.
It is important to check the sides of the
vehicle during the manoeuvre, using the
mirrors.
The rear parking sensors also
provide information on the vehicle's
surroundings.
Driving
Page 273 of 566

271
3008-2_en_Chap06_conduite_ed01-2016
Zoom view
The camera records the vehicle's surroundings
during the manoeuvre in order to reconstruct
a view from above the front of the vehicle in its
near surroundings, allowing the vehicle to be
manoeuvred around obstacles nearby.
This view is available with AUTO mode or in the
view selection menu.
180° view
The 180° view facilitates the exit from of a
parking bay in forward gear, making it possible
to see the approach of vehicles, pedestrians
and cyclists.
This view is not recommended for carrying out
a complete manoeuvre.
It is made up of 3 areas: left A, centre B and
right C .
This view is available only from the view
selection menu.
The rear vision views are similar to those for
the Visiopark 1.
For more information on Visiopark 1
, refer to
the corresponding section. Obstacles may appear further away
than they actually are in reality.
It is important to check the sides of the
vehicle during the manoeuvre, using the
mirrors.
The front and rear parking sensors also
provide information on the vehicle's
surroundings.
6
Driving
Page 292 of 566

290
3008-2_en_Chap07_infos-pratiques_ed01-2016
Load reduction modeEnergy economy mode
Switching to economy mode
A message appears in the instrument panel
screen indicating that the vehicle has switched
to economy mode and the active functions are
put on standby.
Exiting economy mode
These functions are reactivated automatically
next time the vehicle is driven.
In order to restore the use of these functions
immediately, start the engine and let it run:
-
f
or less than ten minutes, to use the
equipment for approximately five minutes,
-
f
or more than ten minutes, to use the
equipment for up to approximately
thirty
minutes.
Let the engine run for the duration specified to
ensure that the battery charge is sufficient.
Do not repeatedly and continuously restart the
engine in order to charge the battery.
System which manages the use of certain
functions according to the level of charge
remaining in the battery.
When the vehicle is being driven, the load
reduction function temporarily deactivates
certain functions, such as the air conditioning,
the heated rear screen...
The deactivated functions are reactivated
automatically as soon as conditions permit.
System which manages the duration of use of certain functions to conserve a sufficient level of
charge in the battery.
After the engine has stopped, you can still use functions such as the audio and telematics
system,
windscreen wipers, dipped beam headlamps, courtesy lamps, etc. for a maximum
combined duration of about forty minutes.
A flat battery prevents the engine from
starting.
For more information on the 12 V
battery, refer to the corresponding
section.
If a telephone call is being made at this
time, it will be maintained for around
10
minutes with the Bluetooth hands-
free system of your audio system.
Practical information