Page 242 of 566
240
3008-2_en_Chap06_conduite_ed01-2016
Switching on
The cruise control is switched on manually, it
requires a vehicle speed of between 18 and
112 mph (30 and 180 km/h).
An automatic gearbox must be in position D
or M . F
W
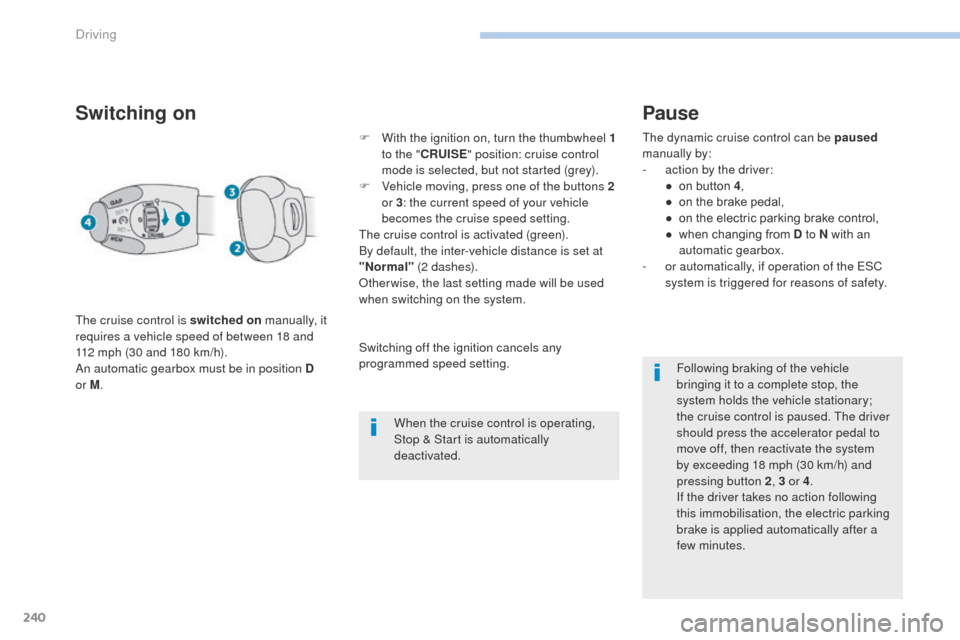
ith the ignition on, turn the thumbwheel 1
to the " CRUISE " position: cruise control
mode is selected, but not started (grey).
F
V
ehicle moving, press one of the buttons 2
or 3 : the current speed of your vehicle
becomes the cruise speed setting.
The cruise control is activated (green).
By default, the inter-vehicle distance is set at
"Normal" (2 dashes).
Otherwise, the last setting made will be used
when switching on the system.
When the cruise control is operating,
Stop & Start is automatically
deactivated.
Pause
The dynamic cruise control can be paused
manually by:
-
a
ction by the driver:
●
o
n button 4 ,
●
o
n the brake pedal,
●
o
n the electric parking brake control,
●
w
hen changing from D to N with an
automatic gearbox.
-
o
r automatically, if operation of the ESC
system is triggered for reasons of safety.
Following braking of the vehicle
bringing it to a complete stop, the
system holds the vehicle stationary;
the cruise control is paused. The driver
should press the accelerator pedal to
move off, then reactivate the system
by exceeding 18
mph (30 km/h) and
pressing button
2, 3 or 4 .
If the driver takes no action following
this immobilisation, the electric parking
brake is applied automatically after a
few minutes.
Switching off the ignition cancels any
programmed speed setting.
Driving
Page 252 of 566
250
3008-2_en_Chap06_conduite_ed01-2016
Active Safety Brake
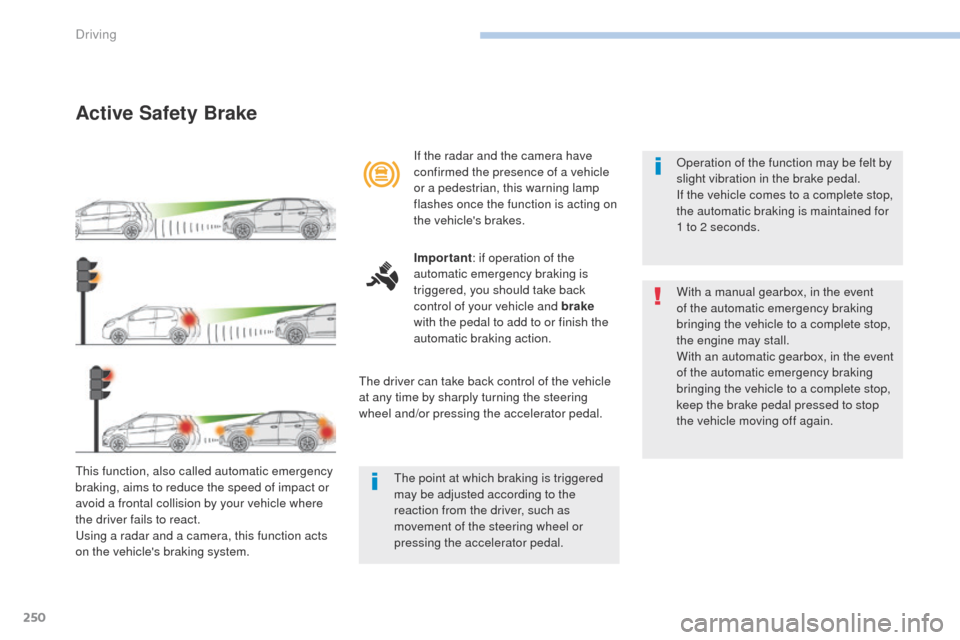
This function, also called automatic emergency
braking, aims to reduce the speed of impact or
avoid a frontal collision by your vehicle where
the driver fails to react.
Using a radar and a camera, this function acts
on the vehicle's braking system.If the radar and the camera have
confirmed the presence of a vehicle
or a pedestrian, this warning lamp
flashes once the function is acting on
the vehicle's brakes.
Important
: if operation of the
automatic emergency braking is
triggered, you should take back
control of your vehicle and brake
with the pedal to add to or finish the
automatic braking action.
The driver can take back control of the vehicle
at any time by sharply turning the steering
wheel and/or pressing the accelerator pedal. Operation of the function may be felt by
slight vibration in the brake pedal.
If the vehicle comes to a complete stop,
the automatic braking is maintained for
1 to 2 seconds.
With a manual gearbox, in the event
of the automatic emergency braking
bringing the vehicle to a complete stop,
the engine may stall.
With an automatic gearbox, in the event
of the automatic emergency braking
bringing the vehicle to a complete stop,
keep the brake pedal pressed to stop
the vehicle moving off again.
The point at which braking is triggered
may be adjusted according to the
reaction from the driver, such as
movement of the steering wheel or
pressing the accelerator pedal.
Driving
Page 271 of 566
269
3008-2_en_Chap06_conduite_ed01-2016
Visiopark 2
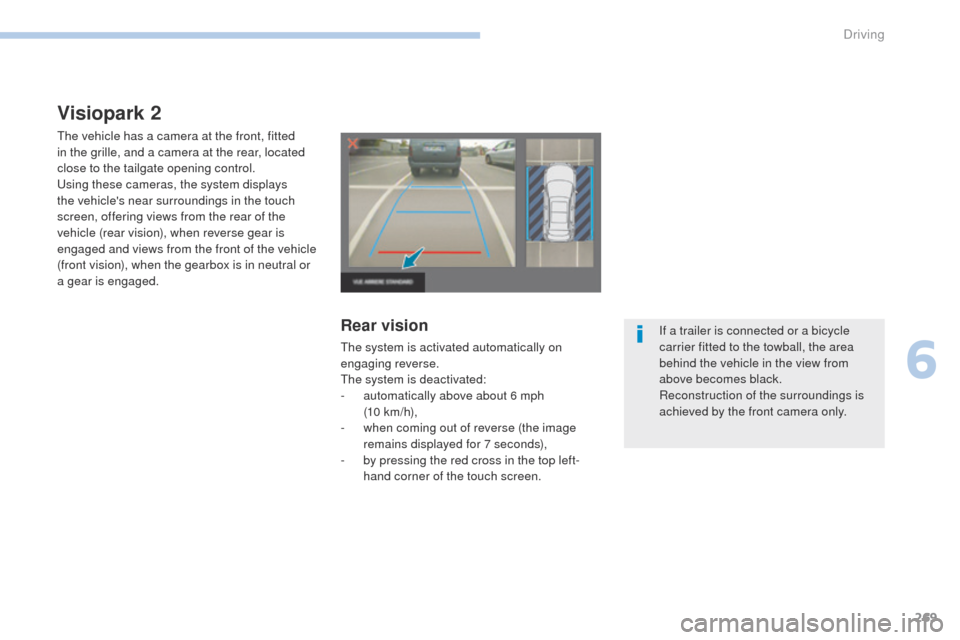
The vehicle has a camera at the front, fitted
in the grille, and a camera at the rear, located
close to the tailgate opening control.
Using these cameras, the system displays
the vehicle's near surroundings in the touch
screen, offering views from the rear of the
vehicle (rear vision), when reverse gear is
engaged and views from the front of the vehicle
(front vision), when the gearbox is in neutral or
a gear is engaged.
Rear vision
The system is activated automatically on
engaging reverse.
The system is deactivated:
-
a
utomatically above about 6 mph
(10 km/h),
-
w
hen coming out of reverse (the image
remains displayed for 7 seconds),
-
b
y pressing the red cross in the top left-
hand corner of the touch screen. If a trailer is connected or a bicycle
carrier fitted to the towball, the area
behind the vehicle in the view from
above becomes black.
Reconstruction of the surroundings is
achieved by the front camera only.
6
Driving
Page 272 of 566

270
3008-2_en_Chap06_conduite_ed01-2016
Front and rear visionAUTO mode
This mode is activated by default.
Using sensors in the front bumper, the
automatic view changes from front view to the
view from above as an obstacle is approached
during a manoeuvre.
Standard view
The area in front of your vehicle is displayed in
the screen.
The blue lines represent the width of your
vehicle, with the mirrors unfolded; their
direction changes with the position of the
steering wheel.
The red line represents a distance of 30 cm
from the front bumper, and the two blue lines,
1 m and 2 m respectively.
This view is available with AUTO mode or in the
view selection menu.
With the engine running and the
speed below 12 mph (20 km/h), the
system is activated in the Driving
menu of the touch screen:
F
Sel
ect " Panoramic visual aid ".
AUTO mode is displayed by default, with front
vision, if the gearbox is in neutral or with a
gear engaged, or with rear vision, if reverse is
engaged.
The system is deactivated:
-
a
utomatically above about 18 mph
(30
km/h) (the image disappears
temporarily from 12 mph (20 km/h)),
-
b
y pressing the red cross in the top left-
hand corner of the touch screen.
Driving
Page 274 of 566

272
3008-2_en_Chap06_conduite_ed01-2016
Park Assist
This system provides active assistance with
parking. It detects a parking space then
operates the steering to park in the space.
It operates the steering while the driver
manages the accelerator, brakes, gears and
clutch (manual gearbox). During phases of
entry into and exit from a parking space, the
system provides visual and audible information
to the driver in order to make the manoeuvres
safe. It may be necessary to move for wards
and backwards more than once.During a manoeuvre, the steering
wheel turns quickly: do not hold the
steering wheel, do not place your
hands between the spokes of the
steering wheel and take care with
loose and bulky clothing (scarves, ties,
handbags...) - Risk of injury!
When Park Assist is activated, it
prevents a change to STOP mode of
Stop & Start. In STOP mode, activation
of Park Assist restarts the engine.
This manoeuvring assistance system
cannot, in any circumstances, replace
the need for vigilance on the part of the
driver.
The driver must remain in control of their
vehicle ensuring that the space remains
clear throughout the manoeuvre.
In some circumstances, the sensors may
not detect small obstacles located in
their blind spots.
The driver can take control at any time by
gripping the steering wheel. The Park Assist system provides assistance for
the following manoeuvres:
A.
E
ntry into a parallel parking space
B.
E
xit from a parallel parking spaceC.
B
ay parking
The Park Assist system cannot work
with the engine off.
Driving
Page 304 of 566
302
3008-2_en_Chap07_infos-pratiques_ed01-2016
Automatic gearbox
The gearbox does not require any
maintenance (no oil change).
Refer to the manufacturer's service
schedule for the checking interval
for this component.
Electric parking
brake
This system does not require any
routine servicing. However, in
the event of a problem, have the
system checked by a PEUGEOT
dealer or a qualified workshop.
Brake pads
Brake wear depends on the style
of driving, particularly in the case
of vehicles used in town, over short
distances. It may be necessary to
Brake disc wear
For information on checking brake
disc wear, contact a PEUGEOT
dealer or a qualified workshop.For more information on the Electric parking
brake
, refer to the corresponding section.
Manual gearbox
The gearbox does not require any
maintenance (no oil change).
Refer to the manufacturer's service
schedule for the checking interval
for this component.
Only use products recommended by
PEUGEOT or products of equivalent
quality and specification.
In order to optimise the operation of
units as important as those in the
braking system, PEUGEOT selects and
offers very specific products.
After washing the vehicle, dampness,
or in wintry conditions, ice can form
on the brake discs and pads: braking
efficiency may be reduced. Make light
brake applications to dry and defrost
the brakes.
have the condition of the brakes checked, even
between vehicle services.
Unless there is a leak in the circuit, a drop in
the brake fluid level indicates that the brake
pads are worn.
Practical information
Page 321 of 566
319
3008-2_en_Chap08_en cas-de-panne_ed01-2016
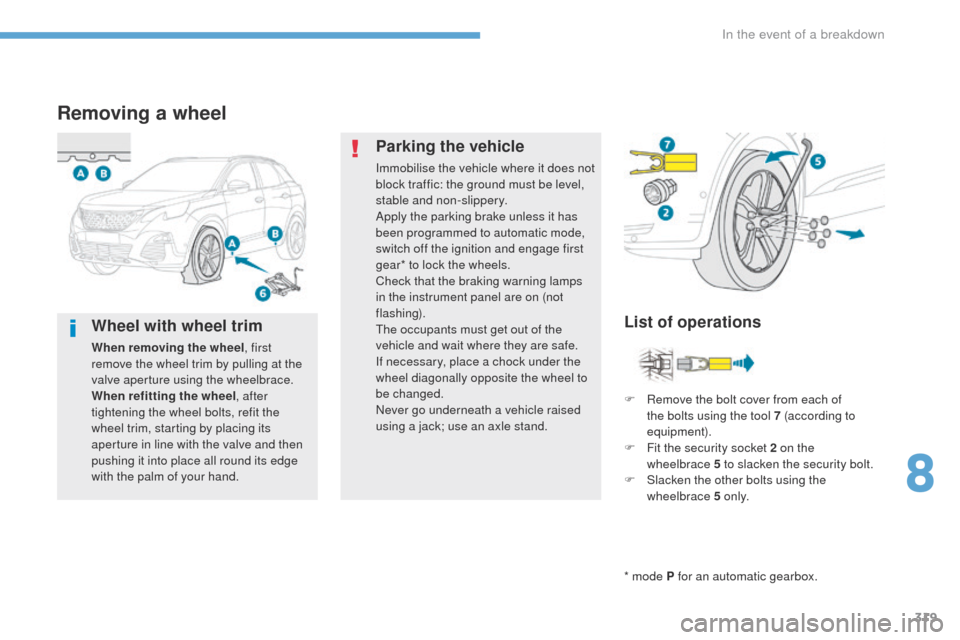
Removing a wheel
* mode P for an automatic gearbox.
List of operations
Parking the vehicle
Immobilise the vehicle where it does not
block traffic: the ground must be level,
stable and non-slippery.
Apply the parking brake unless it has
been programmed to automatic mode,
switch off the ignition and engage first
gear* to lock the wheels.
Check that the braking warning lamps
in the instrument panel are on (not
flashing).
The occupants must get out of the
vehicle and wait where they are safe.
If necessary, place a chock under the
wheel diagonally opposite the wheel to
be changed.
Never go underneath a vehicle raised
using a jack; use an axle stand.
F
R
emove the bolt cover from each of
the bolts using the tool 7 (according to
equipment).
F
F
it the security socket 2 on the
wheelbrace
5 to slacken the security bolt.
F
S
lacken the other bolts using the
wheelbrace 5 o n l y.
Wheel with wheel trim
When removing the wheel , first
remove the wheel trim by pulling at the
valve aperture using the wheelbrace.
When refitting the wheel , after
tightening the wheel bolts, refit the
wheel trim, starting by placing its
aperture in line with the valve and then
pushing it into place all round its edge
with the palm of your hand.
8
In the event of a breakdown
Page 334 of 566
332
3008-2_en_Chap08_en cas-de-panne_ed01-2016
12 V battery
Procedure for starting the engine using another battery or charging a discharged battery.
General points
Protect your eyes and face before
handling the battery.
All operations on the battery must be
carried out in a well ventilated area and
away from naked flames and sources
of sparks, so as to avoid the risk of
explosion or fire.
Wash your hands afterwards.
If your vehicle has an automatic
gearbox, do not try to start the engine
by pushing the vehicle.
Batteries contain harmful substances
such as sulphuric acid and lead.
They must be disposed of in
accordance with regulations and must
not, in any circumstances, be discarded
with household waste.
Take used remote control batteries and
vehicle batteries to a special collection
point.
Lead-acid starter batteries
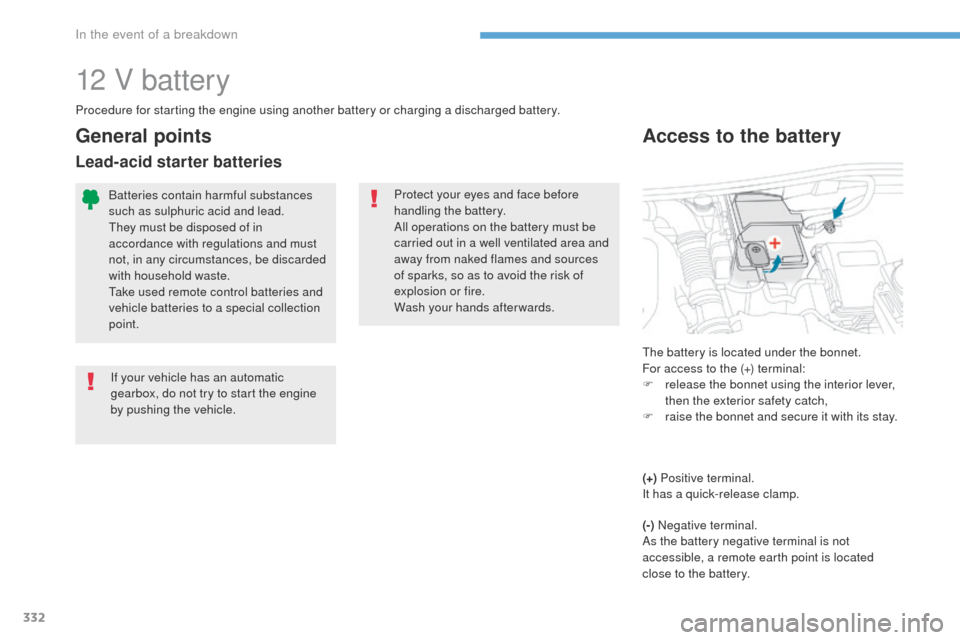
Access to the battery
The battery is located under the bonnet.
For access to the (+) terminal:
F
r
elease the bonnet using the interior lever,
then the exterior safety catch,
F
r
aise the bonnet and secure it with its stay.
(+) Positive terminal.
It has a quick-release clamp.
(-) Negative terminal.
As the battery negative terminal is not
accessible, a remote earth point is located
close to the battery.
In the event of a breakdown