Page 138 of 566
136
3008-2_en_Chap03_ergonomie-et-confort_ed01-2016
Luggage cover
It is in two parts:
- a f ixed part with an open storage space,
-
a m
obile part which rises as the tailgate
opens, with an open storage space. To remove the luggage cover:
F
u nhook the two cords,
F
r
aise the moving part slightly, then unclip it
on each side,
F
u
nclip the fixed part on each side, then
remove the luggage cover.
The luggage cover can be stowed under the
boot floor.
Under sudden deceleration, objects
placed on the luggage cover may be
turned into projectiles.
12 V accessory socket
F To connect a 12 V accessory (max power: 120 W), remove the cap and connect an
appropriate adaptor.
F
S
witch on the ignition.
The connection of an electrical device
not approved by PEUGEOT, such as a
USB charger, may adversely affect the
operation of vehicle electrical systems,
causing faults such as poor telephone
reception or inter ference with displays
in the screens.
Ease of use and comfort
Page 139 of 566

137
3008-2_en_Chap03_ergonomie-et-confort_ed01-2016
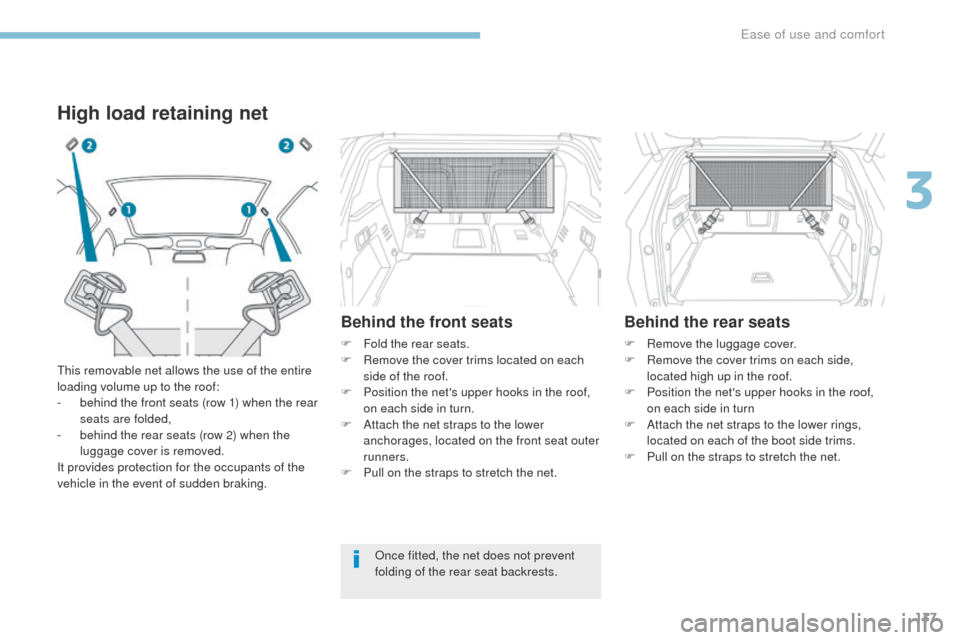
High load retaining net
This removable net allows the use of the entire
loading volume up to the roof:
-
b
ehind the front seats (row 1) when the rear
seats are folded,
-
b
ehind the rear seats (row 2) when the
luggage cover is removed.
It provides protection for the occupants of the
vehicle in the event of sudden braking.
Behind the front seats
F Fold the rear seats.
F R emove the cover trims located on each
side of the roof.
F
P
osition the net's upper hooks in the roof,
on each side in turn.
F
A
ttach the net straps to the lower
anchorages, located on the front seat outer
runners.
F
P
ull on the straps to stretch the net.
Behind the rear seats
F Remove the luggage cover.
F R emove the cover trims on each side,
located high up in the roof.
F
P
osition the net's upper hooks in the roof,
on each side in turn
F
A
ttach the net straps to the lower rings,
located on each of the boot side trims.
F
P
ull on the straps to stretch the net.
Once fitted, the net does not prevent
folding of the rear seat backrests.
3
Ease of use and comfort
Page 140 of 566
138
3008-2_en_Chap03_ergonomie-et-confort_ed01-2016
Adjustable boot floor
This two-position floor allows you to optimise
the volume of the boot by means of the outer
stops placed on the sides:
-
Hig
h position ( 100 kg max ): you obtain a
flat floor up to the front seats, when the
rear seats are folded.
-
L
ow position ( 150 kg max): maximum boot
volume. To change the height of the floor:
F
P ush the floor fully for wards then use the
side stops to move the floor to the desired
position.
To support the floor in the raised position:
F
F
rom the high position, raise the floor
towards the load space cover.
F
T
ake it past the retractable stops, then rest
the floor on these stops.
On certain versions, the adjustable boot
floor cannot be fitted in the low position.
Ease of use and comfort
Page 141 of 566
139
3008-2_en_Chap03_ergonomie-et-confort_ed01-2016
Sliding boot floor
F From the high position, press the handle and pull the boot floor towards you, as far
as it will go.
This position facilitates loading and unloading
of the boot.
Maximum load: 100 kg .
Storage well
F Raise the boot floor fully for access to the
storage well. Depending on version, this houses:
-
a t emporary puncture repair kit with the
vehicle's tools,
-
a s
pare wheel with the vehicle's tools.
It also allows storage of the luggage cover.
3
Ease of use and comfort
Page 142 of 566
140
3008-2_en_Chap03_ergonomie-et-confort_ed01-2016
Boot lamp
This comes on automatically when the boot is
opened and goes off automatically when the
boot is closed.
The lighting time varies according to the
circumstances:
-
w
hen the ignition is off, approximately
ten
minutes,
-
i
n energy economy mode, approximately
thirty seconds,
-
w
hen the engine is running, no limit.
Ease of use and comfort
Page 147 of 566

145
3008-2_en_Chap04_eclairage-et-visibilite_ed01-2016
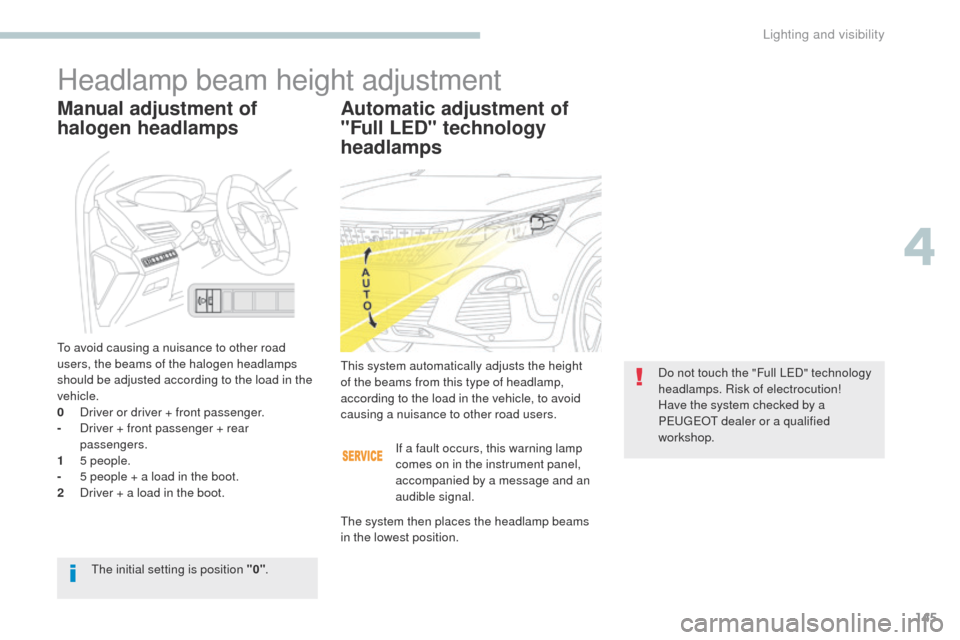
Headlamp beam height adjustment
Automatic adjustment of
"Full LED" technology
headlamps
This system automatically adjusts the height
of the beams from this type of headlamp,
according to the load in the vehicle, to avoid
causing a nuisance to other road users.Do not touch the "Full LED" technology
headlamps. Risk of electrocution!
Have the system checked by a
PEUGEOT dealer or a qualified
workshop.
The initial setting is position "0" .
Manual adjustment of
halogen headlamps
To avoid causing a nuisance to other road
users, the beams of the halogen headlamps
should be adjusted according to the load in the
vehicle.
0
D
river or driver + front passenger.
-
D
river + front passenger + rear
passengers.
1
5
people.
-
5 p
eople + a load in the boot.
2
D
river + a load in the boot. If a fault occurs, this warning lamp
comes on in the instrument panel,
accompanied by a message and an
audible signal.
The system then places the headlamp beams
in the lowest position.
4
Lighting and visibility
Page 311 of 566
309
3008-2_en_Chap08_en cas-de-panne_ed01-2016
Tool kit
This is a set of tools provided with the vehicle.
Its content depends on your vehicle's
equipment:
-
t
emporary puncture repair kit,
-
spar
e wheel.Access to the tools
The main tools are stowed in the boot under
t h e f l o o r.
For access to them:
F
o
pen the boot,
F
p
lace the adjustable boot floor in the high
position,
F
r
aise the floor past the two retractable
stops,
F
l
ay the floor on these two stops to hold it
up.For versions with a temporary
puncture repair kit:
F unclip the two fixings to open its cover.
8
In the event of a breakdown
Page 316 of 566

314
3008-2_en_Chap08_en cas-de-panne_ed01-2016
If after around 5 to 7 minutes the
pressure is not attained, this indicates
that the tyre is not repairable; contact
a PEUGEOT dealer or a qualified
workshop for assistance.
Take care, the sealant product is
harmful if swallowed and causes
irritation to the eyes.
Keep this product out of the reach of
children.
The use-by date is marked on the
cartridge.
After use, do not discard the
cartridge by the roadside, take it to a
PEUGEOT dealer or an authorised
waste disposal site.
Don't forget to obtain a new sealant
cartridge, available from a PEUGEOT
dealer or a qualified workshop.
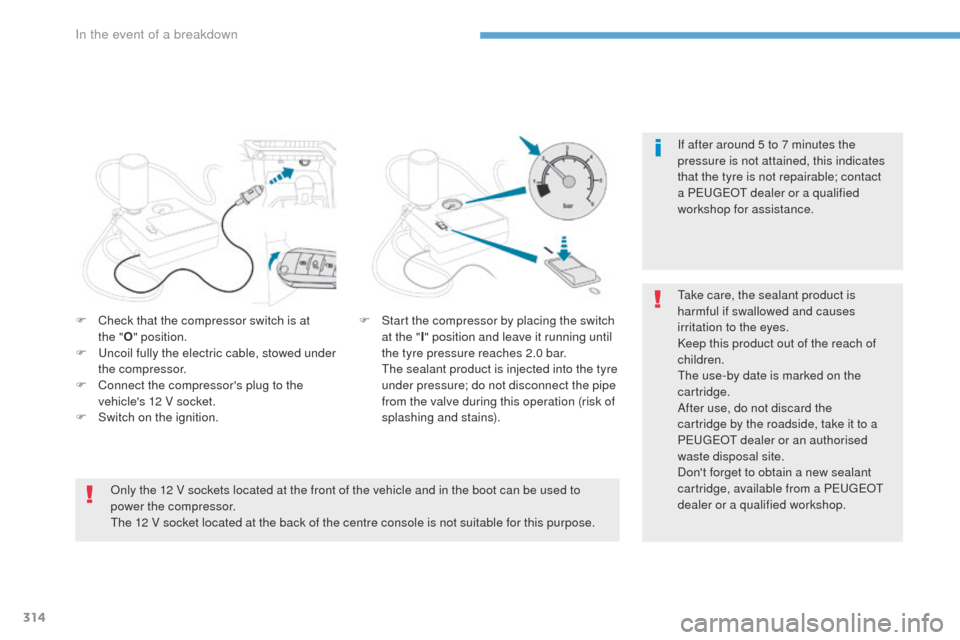
F
C
heck that the compressor switch is at
the
" O " position.
F
U
ncoil fully the electric cable, stowed under
the compressor.
F
C
onnect the compressor's plug to the
vehicle's 12 V socket.
F
S
witch on the ignition. F
S
tart the compressor by placing the switch
at the " I" position and leave it running until
the tyre pressure reaches 2.0 bar.
T
he sealant product is injected into the tyre
under pressure; do not disconnect the pipe
from the valve during this operation (risk of
splashing and stains).
Only the 12 V sockets located at the front of the vehicle and in the boot can be used to
power the compressor.
The 12 V socket located at the back of the centre console is not suitable for this purpose.
In the event of a breakdown