2017 Peugeot 3008 Hybrid 4 length
[x] Cancel search: lengthPage 90 of 566

88
3008-2_en_Chap03_ergonomie-et-confort_ed01-2016
Driving position
Adopting a good driving position helps improve your comfort and protection.
It also optimises interior and exterior visibility as well as access to controls.
Sitting comfortably
Driver
Sit fully back in the seat with your pelvis, back
and shoulders in contact with the seat backrest.
Adjust the height of the seat so that your eyes
are level with the middle of the windscreen.
Your head should be at a distance of at least
10 cm from the roof.
Adjust the longitudinal position of the seat so
that you can fully depress the pedals with your
legs still slightly bent.
Passenger
Sit fully back in the seat with your pelvis, back
and shoulders in contact with the seat backrest.
Adjust the longitudinal position of the seat so
that you are at a distance of at least 25 cm from
the dashboard.
Adjust the head restraint so that its upper edge
is level with the top of your head.
If your vehicle has electric seats, the
ignition must be on to adjust them.
The distance between your knees and the
dashboard should be at least 10 cm, for easy
access to the controls in the dashboard.
Adjust the seat backrest angle to the most
vertical position possible; the backrest must not
be reclined more than 25° from vertical.
Adjust the head restraint so that its upper edge
is level with the top of your head.
Adjust the length of the seat cushion to support
your thighs.
Adjust the lumbar support to fit the shape of
your spine.
Adjust the steering wheel so that it is at
distance of at least 25 cm from your chest
and
you are able to hold it with your arms slightly
bent.
The steering wheel must not obstruct your view
of the instrument panel.
As a safety measure, the seats and
steering wheel must only be adjusted
when stationary.
The presence in the vehicle of certain seat adjustments described in this section depends on the trim level and country of sale.
Ease of use and comfort
Page 93 of 566
91
3008-2_en_Chap03_ergonomie-et-confort_ed01-2016
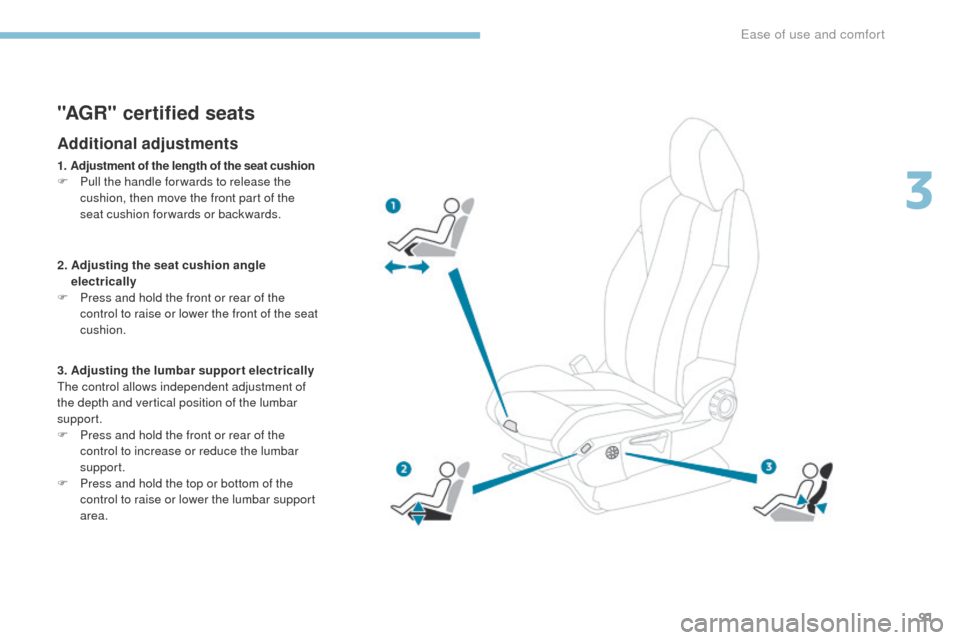
"AGR" certified seats
Additional adjustments
1. Adjustment of the length of the seat cushion
F P ull the handle for wards to release the
cushion, then move the front part of the
seat cushion forwards or backwards.
2.
A
djusting the seat cushion angle
electrically
F
P
ress and hold the front or rear of the
control to raise or lower the front of the seat
cushion.
3. Adjusting the lumbar suppor t electrically
The control allows independent adjustment of
the depth and vertical position of the lumbar
support.
F
P
ress and hold the front or rear of the
control to increase or reduce the lumbar
support.
F
P
ress and hold the top or bottom of the
control to raise or lower the lumbar support
area.
3
Ease of use and comfort
Page 97 of 566
95
3008-2_en_Chap03_ergonomie-et-confort_ed01-2016
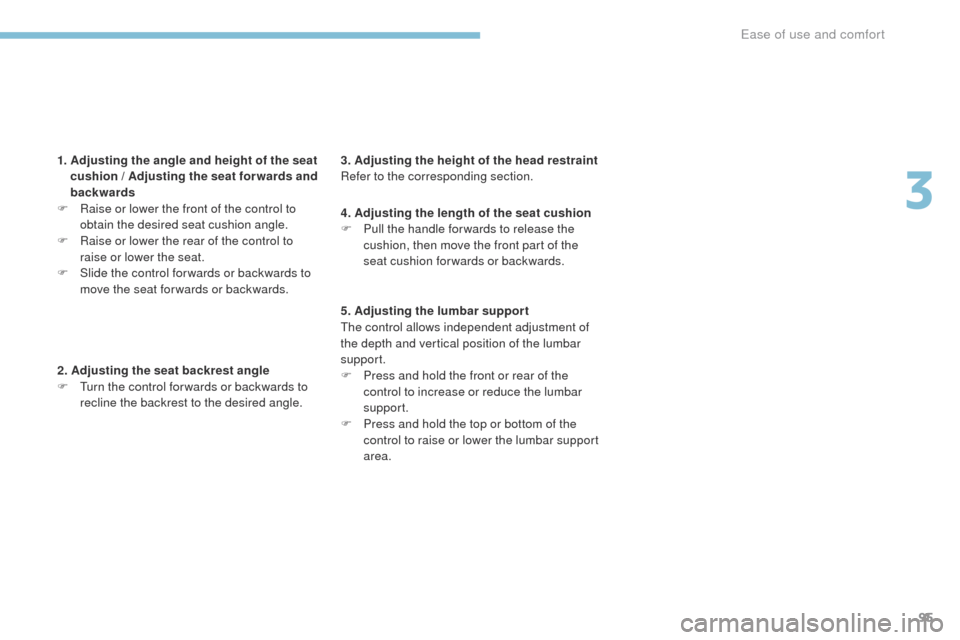
1. Adjusting the angle and height of the seat cushion / Adjusting the seat for wards and
backwards
F
R
aise or lower the front of the control to
obtain the desired seat cushion angle.
F
R
aise or lower the rear of the control to
raise or lower the seat.
F
S
lide the control for wards or backwards to
move the seat for wards or backwards.
2. Adjusting the seat backrest angle
F
T
urn the control for wards or backwards to
recline the backrest to the desired angle. 3. Adjusting the height of the head restraint
Refer to the corresponding section.
4. Adjusting the length of the seat cushion
F
P
ull the handle for wards to release the
cushion, then move the front part of the
seat cushion forwards or backwards.
5. Adjusting the lumbar support
The control allows independent adjustment of
the depth and vertical position of the lumbar
support.
F
P
ress and hold the front or rear of the
control to increase or reduce the lumbar
support.
F
P
ress and hold the top or bottom of the
control to raise or lower the lumbar support
area.
3
Ease of use and comfort
Page 155 of 566
153
3008-2_en_Chap04_eclairage-et-visibilite_ed01-2016
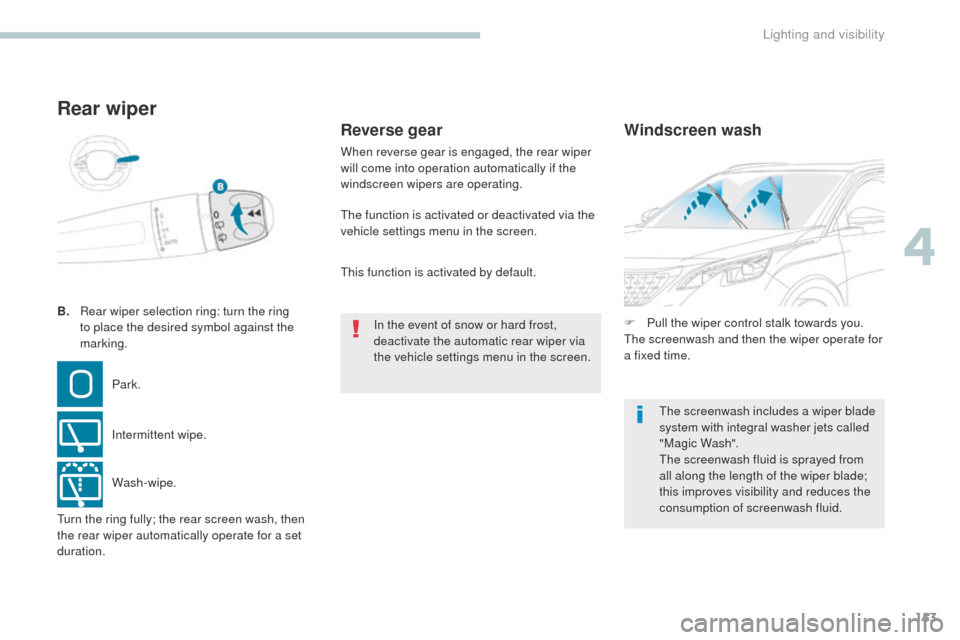
B. Rear wiper selection ring: turn the ring
to place the desired symbol against the
marking.
Rear wiper
Park.
Intermittent wipe.
Wash-wipe. F
P
ull the wiper control stalk towards you.
The screenwash and then the wiper operate for
a fixed time.
The screenwash includes a wiper blade
system with integral washer jets called
"Magic Wash".
The screenwash fluid is sprayed from
all along the length of the wiper blade;
this improves visibility and reduces the
consumption of screenwash fluid.
Windscreen wash
Reverse gear
When reverse gear is engaged, the rear wiper
will come into operation automatically if the
windscreen wipers are operating.
The function is activated or deactivated via the
vehicle settings menu in the screen.
In the event of snow or hard frost,
deactivate the automatic rear wiper via
the vehicle settings menu in the screen.
Turn the ring fully; the rear screen wash, then
the rear wiper automatically operate for a set
duration. This function is activated by default.
4
Lighting and visibility
Page 173 of 566
171
3008-2_en_Chap05_securite_ed01-2016
The driver must ensure that passengers use
the seat belts correctly and that they are all
fastened before setting off.
Wherever you are seated in the vehicle,
always fasten your seat belt, even for short
journeys.
Do not interchange the seat belt buckles as
they will not fulfill their role fully.
The seat belts are fitted with an inertia reel
permitting automatic adjustment of the length
of the strap to your size. The seat belt is
stowed automatically when not in use.
Before and after use, ensure that the seat
belt is reeled in correctly.
The lower part of the strap must be
positioned as low as possible on the pelvis.
The upper part must be positioned in the
hollow of the shoulder.
The inertia reels are fitted with an automatic
locking device which comes into operation in
the event of a collision, emergency braking
or if the vehicle rolls over. You can release
the device by pulling the strap firmly and
then releasing it so that it reels in slightly.Recommendations for children
Use a suitable child seat if the passenger is
less than 12 years old or shorter than one
and a half metres.
Never use the same seat belt to secure more
than one person.
Never allow a child to travel on your lap.
For more information on Child seats, refer to
the corresponding section.
In the event of an impact
Depending on the nature and seriousness
of the impact , the pretensioning device may
be deployed before and independently of the
airbags. Deployment of the pretensioners
is accompanied by a slight discharge of
harmless smoke and a noise, due to the
activation of the pyrotechnic cartridge
incorporated in the system.
In all cases, the airbag warning lamp
comes
on.
Following an impact, have the seat belts
system checked, and if necessary replaced,
by a PEUGEOT dealer or a qualified
workshop.
Advice
In order to be effective, a seat belt must:
- b e tightened as close to the body as
possible,
-
b
e pulled in front of you with a smooth
movement, checking that it does not
twist,
-
b
e used to restrain only one person,
-
n
ot bear any trace of cuts or fraying,
-
n
ot be converted or modified to avoid
affecting its performance.
In accordance with current safety
regulations, for all repairs on your vehicle's
seat belts, go to a qualified workshop with
the skills and equipment needed, which a
PEUGEOT dealer is able to provide.
Have your seat belts checked regularly by a
PEUGEOT dealer or a qualified workshop,
particularly if the straps show signs of
damage.
Clean the seat belt straps with soapy
water or a textile cleaning product, sold by
PEUGEOT dealers.
After folding or moving a seat or rear bench
seat, ensure that the seat belt is positioned
and reeled in correctly.
5
Safety
Page 454 of 566
94
Audio and Telematics
Transversal-Peugeot_en_Chap01_NAC-2-2-0_ed01-2016
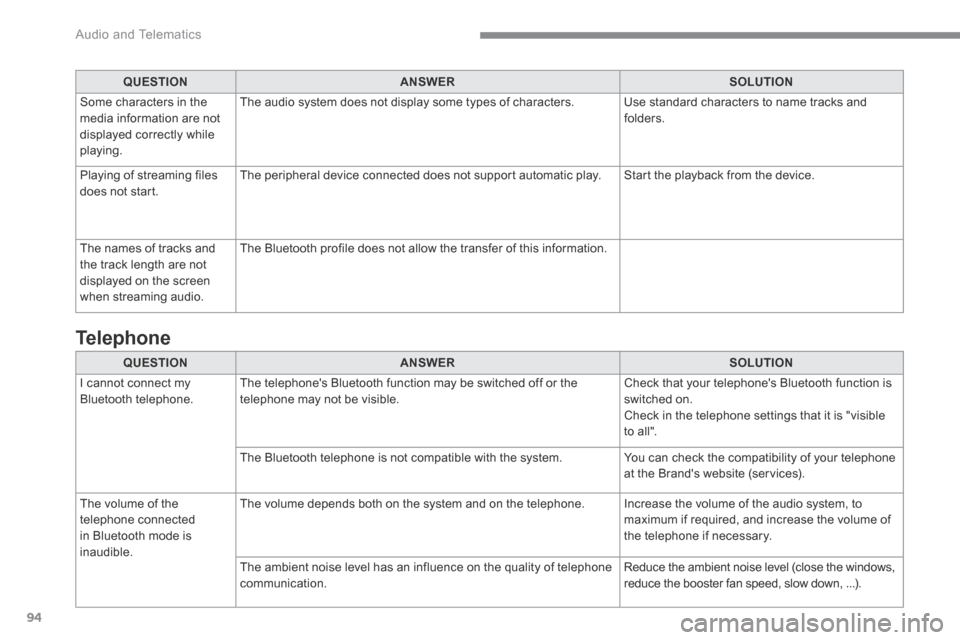
QUESTIONANSWERSOLUTION
I cannot connect my Bluetooth telephone. The telephone's Bluetooth function may be switched off or the telephone may not be visible. Check that your telephone's Bluetooth function is switched on. Check in the telephone settings that it is "visible to all".
The Bluetooth telephone is not compatible with the system. You can check the compatibility of your telephone at the Brand's website (services).
The volume of the telephone connected in Bluetooth mode is inaudible.
The volume depends both on the system and on the telephone. Increase the volume of the audio system, to maximum if required, and increase the volume of the telephone if necessary.
The ambient noise level has an influence on the quality of telephone communication. Reduce the ambient noise level (close the windows, reduce the booster fan speed, slow down, ...).
Telephone
QUESTIONANSWERSOLUTION
Some characters in the media information are not displayed correctly while playing.
The audio system does not display some types of characters. Use standard characters to name tracks and folders.
Playing of streaming files does not start. The peripheral device connected does not support automatic play. Start the playback from the device.
The names of tracks and the track length are not displayed on the screen when streaming audio.
The Bluetooth profile does not allow the transfer of this information.
Page 510 of 566
150
Audio and Telematics
Transversal-Peugeot_en_Chap02_RCC-2-2-0_ed01-2016
Media
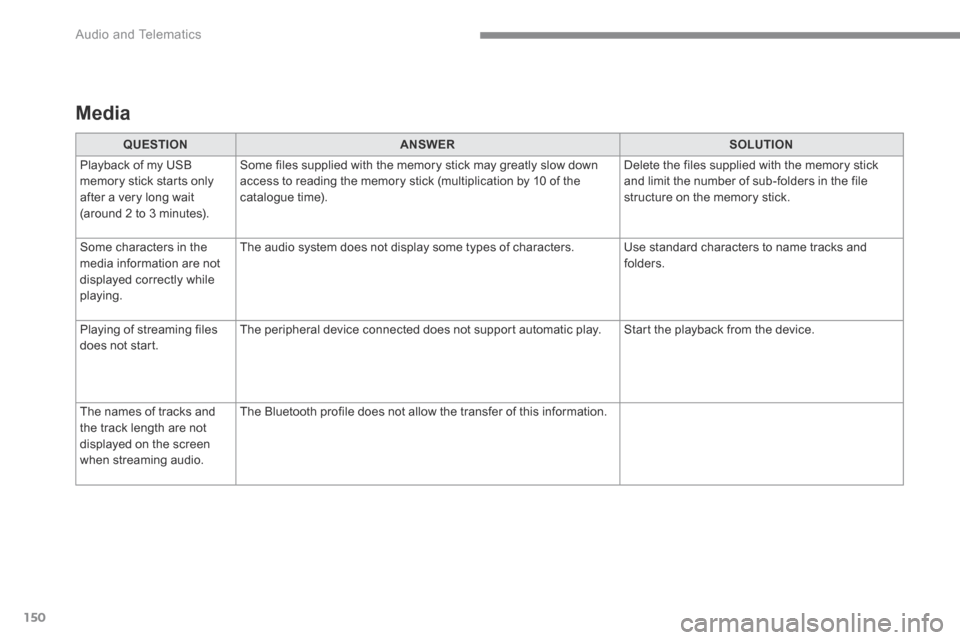
QUESTIONANSWERSOLUTION
Playback of my USB memory stick starts only after a very long wait (around 2 to 3 minutes).
Some files supplied with the memory stick may greatly slow down access to reading the memory stick (multiplication by 10 of the catalogue time).
Delete the files supplied with the memory stick and limit the number of sub-folders in the file structure on the memory stick.
Some characters in the media information are not displayed correctly while playing.
The audio system does not display some types of characters. Use standard characters to name tracks and folders.
Playing of streaming files does not start. The peripheral device connected does not support automatic play. Start the playback from the device.
The names of tracks and the track length are not displayed on the screen when streaming audio.
The Bluetooth profile does not allow the transfer of this information.
Page 552 of 566
12
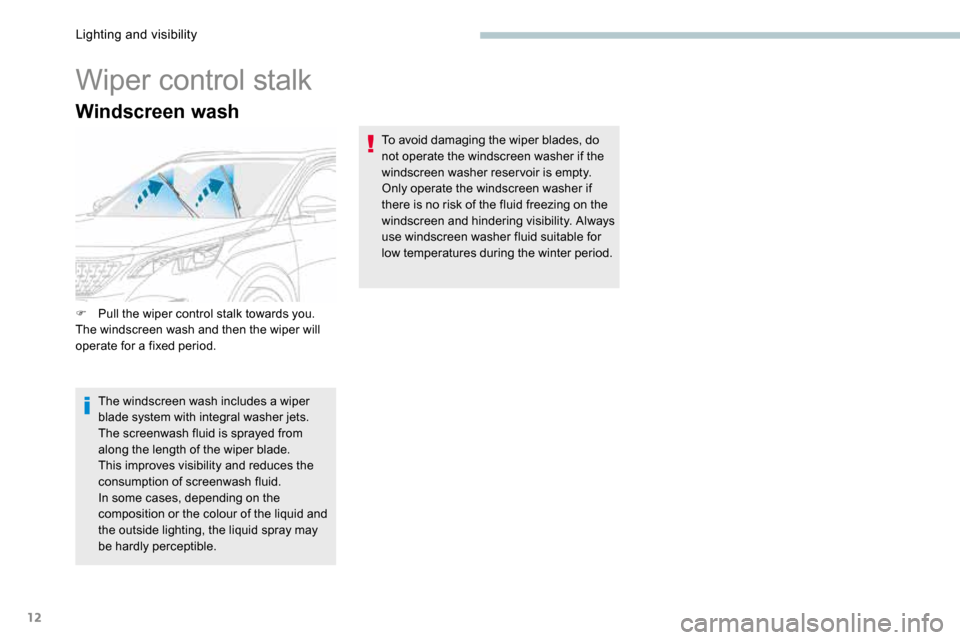
Windscreen wash
Wiper control stalk
F Pull the wiper control stalk towards you.
The windscreen wash and then the wiper will
operate for a fixed period.
The windscreen wash includes a wiper
blade system with integral washer jets.
The screenwash fluid is sprayed from
along the length of the wiper blade.
This improves visibility and reduces the
consumption of screenwash fluid.
In some cases, depending on the
composition or the colour of the liquid and
the outside lighting, the liquid spray may
be hardly perceptible. To avoid damaging the wiper blades, do
not operate the windscreen washer if the
windscreen washer reservoir is empty.
Only operate the windscreen washer if
there is no risk of the fluid freezing on the
windscreen and hindering visibility. Always
use windscreen washer fluid suitable for
low temperatures during the winter period.
Lighting and visibility