2017 Peugeot 3008 Hybrid 4 warning light
[x] Cancel search: warning lightPage 4 of 566

.
.
3008-2_en_Chap00a_sommaire_ed01-2016
Digital instrument panel 12
Indicator and warning lamps 1 6
Indicators
32
Manual test
4
0
Distance recorders
4
1
Lighting dimmer
4
2
Trip computer
4
3
Monochrome screen C
4
5
Touch screen
4
8
Remote control
5
4
Keyless Entry and Starting
5
8
Back-up procedures
6
4
Central locking
6
8
Alarm
70
D o o r s
74
Boot
7
5
Hands-free tailgate
7
6
Electric windows
8
2
Panoramic opening sunroof
8
4Driving position
8
8
Front seats
9
0
Steering wheel adjustment
9
9
Mirrors 99
i- Cockpit Amplify function
1
02
Heating and Ventilation
1
04
Manual air conditioning
1
06
Semi-automatic mono-zone air conditioning
1
08
Dual-zone automatic air conditioning 1 11
Front demist - defrost 1 16
Heated windscreen
1
17
Rear screen demist - defrost
1
18
Front fittings
1
19
Courtesy lamps
1
28
Interior mood lighting
1
29
Rear seats
1
30
Rear fittings
1
33
Boot fittings
1
35
Boot lamp
1
40Exterior lighting control stalk
1
41
Direction indicators
1
44
Headlamp beam height adjustment
1
45
Automatic illumination of headlamps
1
46
Automatic headlamp dipping
1
49
Cornering lighting
1
51
Wiper control stalk
1
52
Automatic rain sensitive wipers
1
55
General safety recommendations
1
56
Hazard warning lamps
1
57
Hor n
15
7
Emergency or assistance
1
58
Electronic stability programme (ESC)
1
60
Advanced Grip Control
1
64
Hill Assist Descent Control
1
66
Seat belts
1
68
Airbags
1
72
Child seats
1
77
Deactivating the passenger's front airbag
1
79
ISOFIX child seats
1
86
i-Size child seats
1
90
Child lock
1
93
Over view
Eco-driving
Instruments
Access Ease of use and comfort
Lighting and visibility
Safety
Contents
Page 6 of 566

4
3008-2_en_Chap00b_vue-ensemble_ed01-2016
Towing 336-337
Very cold climate screens
2
91
Dynamic cruise control with Stop
function
23
8-246
Front parking sensors
2
63 -264
Park Assist
2
72-279
Front foglamps
1
42
Cornering lighting
1
51
Remote control key
5
4, 63 - 67
Locking / Unlocking
5
5 -57
Starting the engine
1
97-199
Automatic illumination of
headlamps
14
6 -147
Automatic headlamp dipping
1
49-150
Automatic rain sensitive wipers
1
55
Fatigue detection system
2
52-253
Lane Departure Warning System
2
54
Assisted Lane Departure Warning System
255-259
Speed limit recognition
2
27-230
Distance alert / Active Safety B r a ke
2
47- 2 51
Electric windows
8
2- 83
D o o r s
74
C
entral locking
6
8 - 69
Alarm
70-73
Electronic stability programme (ESC)
160 -163
Advanced Grip Control
1
64-165
Hill Assist Descent Control
1
66 -167
Main lighting
14
1, 143 -14 4
Adjusting the headlamp beam height
1
45
Changing front bulbs
3
23-327
Heated windscreen
1
17
Demisting the windscreen
1
16
Windscreen wiper
1
52-154
Visiopark 2
26
5-266, 269-271 Electronic key
5
4, 63 - 67
Hands-free access
5
8 - 62
Keyless starting
1
97, 200 -202
Exterior
Over view
Page 9 of 566

7
3008-2_en_Chap00b_vue-ensemble_ed01-2016
Instruments and controls
Digital instrument panel 12-15
Warning lamps 1 6-31
Indicators, gauges
3
2- 40
Setting buttons
4
0 - 42
-
C
HECK / trip distance recorder
-
d
ashboard lighting dimmer /
mood lighting
Door mirrors
9
9 -100
Electric windows
8
2- 83
Changing a fuse
3
31
Opening the bonnet
2
94
Manual gearbox
2
10
Automatic gearbox
21
1-215
Electric parking brake
20
3-209 Blind / Panoramic opening
sunroof 84- 87
Courtesy lamps 1 28
Interior mood lighting 1 29
Emergency or assistance call
1
58 -159
Seat belts / passenger's front airbag warning lamp display
1
69-170, 174
Rear view mirror
1
01
Heating / Ventilation
1
04-105
Manual air conditioning
1
06-107
Semi-automatic mono-zone air conditioning
108 -110
Automatic dual-zone air c o n d i t i o n i n g
111
-115
Demisting / Defrosting, front
1
16
Demisting / Defrosting, rear screen
1
18
Heated seats
9
7
Monochrome screen C
4
5-47
Touch screen
4
8 -53
i- Cockpit Amplify function
1
02-103
Hazard warning lamps
1
57
Anti-theft / Starting with the START/ STOP button
20
0-202
Advanced Grip Control
1
64-165
Hill Assist Descent Control
1
66 -167
.
Over view
Page 19 of 566

17
3008-2_en_Chap01_instruments-de-bord_ed01-2016
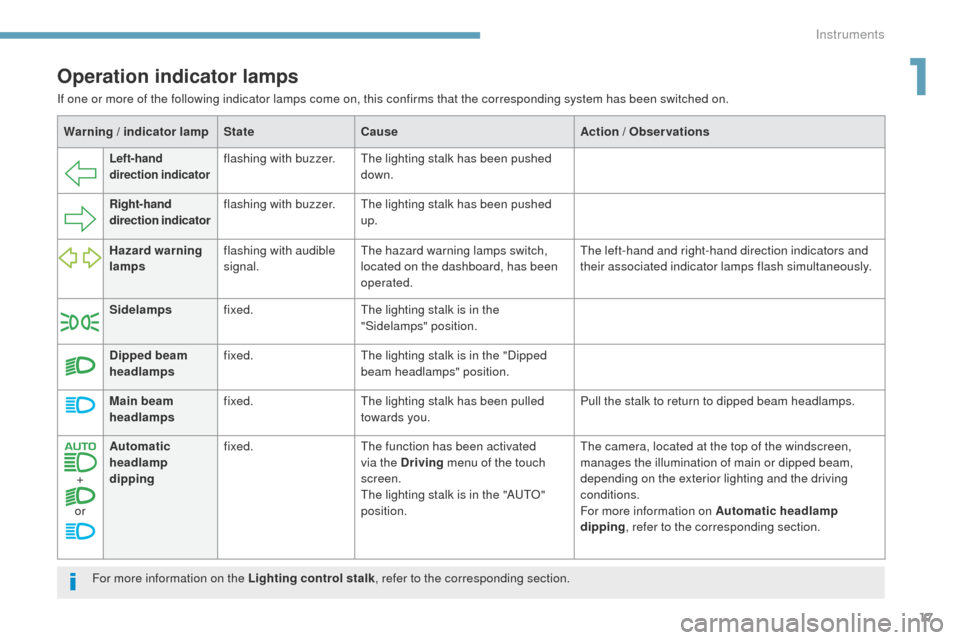
Warning / indicator lampStateCause Action / Observations
Left-hand
direction indicatorflashing with buzzer.The lighting stalk has been pushed
down.
Right-hand
direction indicator flashing with buzzer.
The lighting stalk has been pushed
up.
Hazard warning
lamps flashing with audible
signal. The hazard warning lamps switch,
located on the dashboard, has been
operated. The left-hand and right-hand direction indicators and
their associated indicator lamps flash simultaneously.
Sidelamps fixed. The lighting stalk is in the
"Sidelamps" position.
Dipped beam
headlamps fixed.
The lighting stalk is in the "Dipped
beam headlamps" position.
Main beam
headlamps fixed.
The lighting stalk has been pulled
towards you. Pull the stalk to return to dipped beam headlamps.
+
or Automatic
headlamp
dipping
fixed.
The function has been activated
via the Driving menu of the touch
screen.
The lighting stalk is in the "AUTO"
position. The camera, located at the top of the windscreen,
manages the illumination of main or dipped beam,
depending on the exterior lighting and the driving
conditions.
For more information on Automatic headlamp
dipping
, refer to the corresponding section.
Operation indicator lamps
For more information on the Lighting control stalk , refer to the corresponding section.
If one or more of the following indicator lamps come on, this confirms that the corresponding system has been switched on.
1
Instruments
Page 20 of 566

18
3008-2_en_Chap01_instruments-de-bord_ed01-2016
Warning / indicator lampStateCause Action / Observations
Diesel engine
pre-heating fixed.
When the ignition is switched on
with a key in the ignition switch or
a starting instruction made using
the
"START/STOP " button, the
engine temperature makes engine
pre-heating necessary. The period of illumination of the indicator lamp is
determined by the ambient conditions (up to about
thirty seconds in severe winter conditions).
With an ignition switch and key, wait until the indicator
lamp goes off before starting.
With Keyless Entry and Starting, once it goes off,
starting is immediate, on condition that the brake
pedal remains pressed with an automatic gearbox, or
the clutch pedal is pressed fully down with a manual
gearbox.
If the engine does not start, switch the ignition off and
then on, wait until the indicator lamp goes off again,
then start the engine.
Stop & Star t fixed. When the vehicle stops (red lights, traffic
jams,
...) the Stop & Start system has put
the engine into STOP mode. The warning lamp goes off and the engine restarts
automatically in START mode, as soon as you want
to move off.
flashes for a few
seconds, then goes
of f. STOP mode is temporarily
unavailable,
or
START mode is invoked
automatically. For more information on Stop & Star t
, refer to the
corresponding section.
Rear foglamps
fixed. The rear foglamps have been
switched on using the ring on the
lighting control stalk. Turn the ring on the lighting control stalk rear wards to
switch off the rear foglamps.
Front foglamps fixed. The front foglamps are switched on
using the ring on the lighting control
stalk. Turn the ring on the lighting control stalk rear ward
twice to switch off the front foglamps.
Instruments
Page 143 of 566

141
3008-2_en_Chap04_eclairage-et-visibilite_ed01-2016
Without AUTO lighting
With AUTO lighting
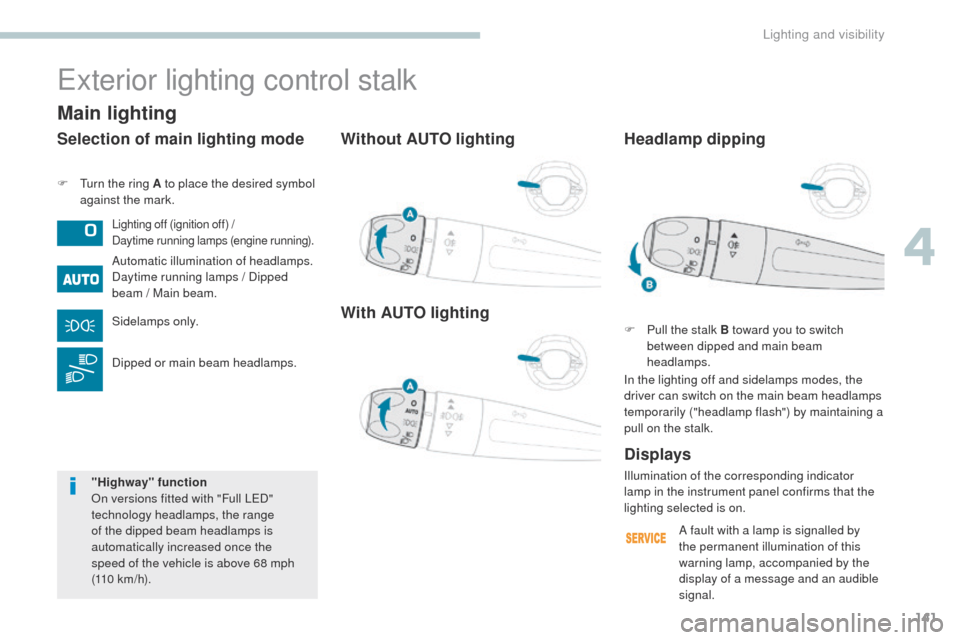
F Turn the ring A to place the desired symbol against the mark.
Exterior lighting control stalk
Lighting off (ignition off) /
Daytime running lamps (engine running).
Automatic illumination of headlamps.
Daytime running lamps / Dipped
beam / Main beam.
Sidelamps only.
Dipped or main beam headlamps.
Displays
Selection of main lighting mode
Illumination of the corresponding indicator
lamp in the instrument panel confirms that the
lighting selected is on.
Headlamp dipping
F Pull the stalk B toward you to switch
between dipped and main beam
headlamps.
In the lighting off and sidelamps modes, the
driver can switch on the main beam headlamps
temporarily ("headlamp flash") by maintaining a
pull on the stalk.
Main lighting
"Highway" function
On versions fitted with "Full LED"
technology headlamps, the range
of the dipped beam headlamps is
automatically increased once the
speed of the vehicle is above 68 mph
(110
km/h). A fault with a lamp is signalled by
the permanent illumination of this
warning lamp, accompanied by the
display of a message and an audible
signal.
4
Lighting and visibility
Page 146 of 566

144
3008-2_en_Chap04_eclairage-et-visibilite_ed01-2016
Direction indicators
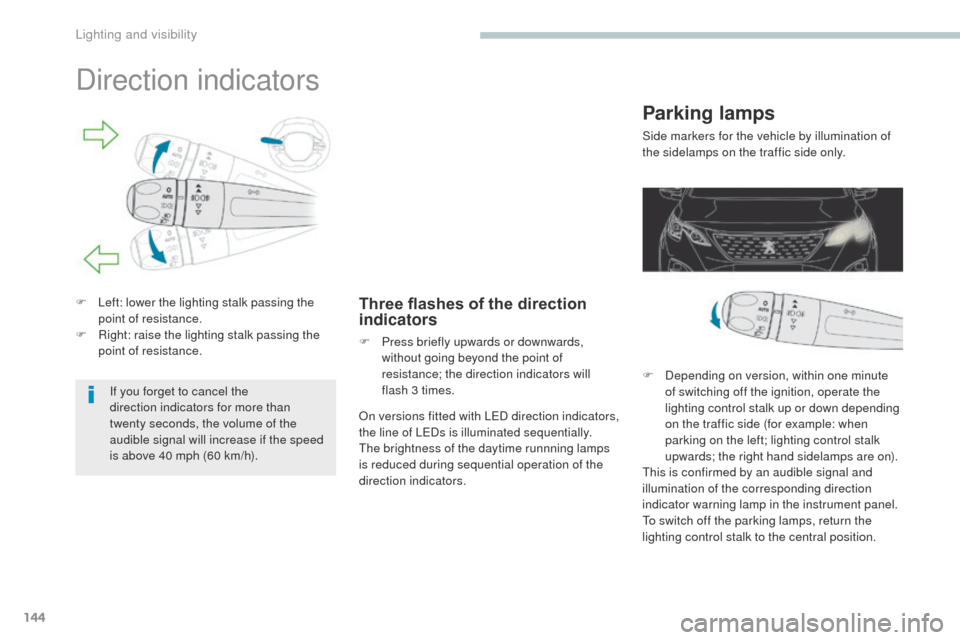
F Left: lower the lighting stalk passing the point of resistance.
F
R
ight: raise the lighting stalk passing the
point of resistance.Three flashes of the direction
indicators
F Press briefly upwards or downwards, without going beyond the point of
resistance; the direction indicators will
flash 3 times.
If you forget to cancel the
direction indicators for more than
twenty
seconds, the volume of the
audible signal will increase if the speed
is above 40 mph (60 km/h). On versions fitted with LED direction indicators,
the line of LEDs is illuminated sequentially.
The brightness of the daytime runnning lamps
is reduced during sequential operation of the
direction indicators.
Parking lamps
Side markers for the vehicle by illumination of
the sidelamps on the traffic side only.
F
D
epending on version, within one minute
of switching off the ignition, operate the
lighting control stalk up or down depending
on the traffic side (for example: when
parking on the left; lighting control stalk
upwards; the right hand sidelamps are on).
This is confirmed by an audible signal and
illumination of the corresponding direction
indicator warning lamp in the instrument panel.
To switch off the parking lamps, return the
lighting control stalk to the central position.
Lighting and visibility
Page 147 of 566

145
3008-2_en_Chap04_eclairage-et-visibilite_ed01-2016
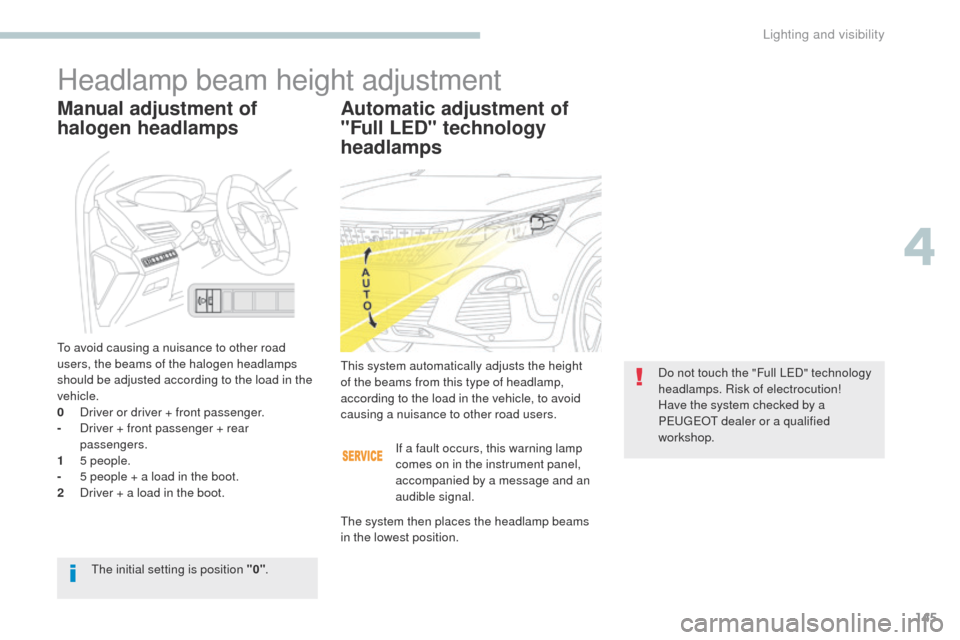
Headlamp beam height adjustment
Automatic adjustment of
"Full LED" technology
headlamps
This system automatically adjusts the height
of the beams from this type of headlamp,
according to the load in the vehicle, to avoid
causing a nuisance to other road users.Do not touch the "Full LED" technology
headlamps. Risk of electrocution!
Have the system checked by a
PEUGEOT dealer or a qualified
workshop.
The initial setting is position "0" .
Manual adjustment of
halogen headlamps
To avoid causing a nuisance to other road
users, the beams of the halogen headlamps
should be adjusted according to the load in the
vehicle.
0
D
river or driver + front passenger.
-
D
river + front passenger + rear
passengers.
1
5
people.
-
5 p
eople + a load in the boot.
2
D
river + a load in the boot. If a fault occurs, this warning lamp
comes on in the instrument panel,
accompanied by a message and an
audible signal.
The system then places the headlamp beams
in the lowest position.
4
Lighting and visibility