Page 308 of 566

306
3008-2_en_Chap07_infos-pratiques_ed01-2016
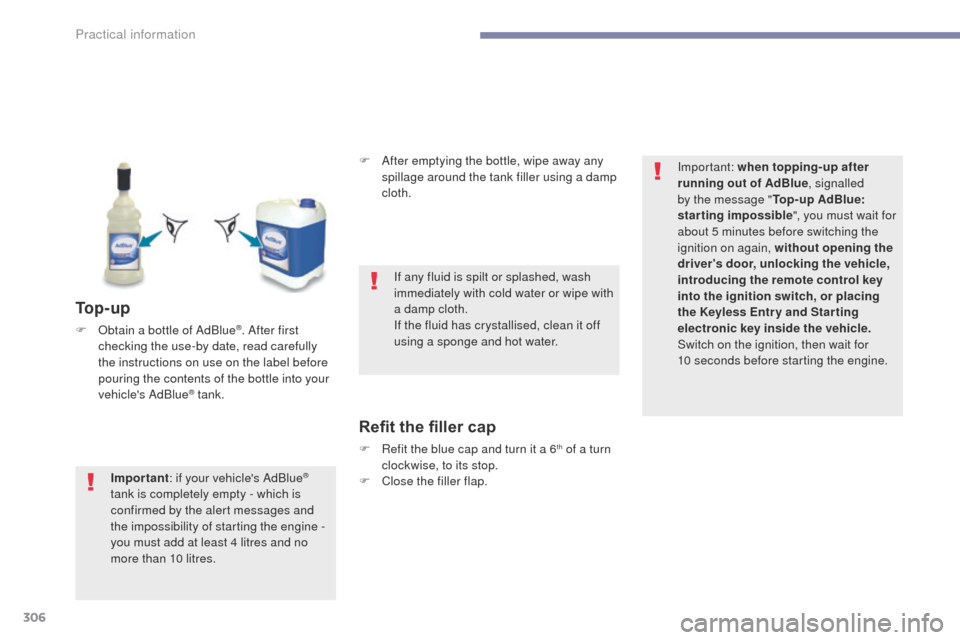
To p - u p
F Obtain a bottle of AdBlue®. After first
checking the use-by date, read carefully
the instructions on use on the label before
pouring the contents of the bottle into your
vehicle's AdBlue
® tank. F
A
fter emptying the bottle, wipe away any
spillage around the tank filler using a damp
cloth.
Refit the filler cap
F Refit the blue cap and turn it a 6th of a turn
clockwise, to its stop.
F
C
lose the filler flap.
Important
: if your vehicle's AdBlue
®
tank is completely empty - which is
confirmed by the alert messages and
the impossibility of starting the engine
-
you must add at least 4 litres and no
more than 10 litres. If any fluid is spilt or splashed, wash
immediately with cold water or wipe with
a damp cloth.
If the fluid has crystallised, clean it off
using a sponge and hot water.
Important: when topping-up after
running out of AdBlue
, signalled
by the message " Top-up AdBlue:
starting impossible ", you must wait for
about 5 minutes before switching the
ignition on again, without opening the
driver's door, unlocking the vehicle,
introducing the remote control key
into the ignition switch, or placing
the Keyless Entr y and Star ting
electronic key inside the vehicle.
Switch on the ignition, then wait for
10
seconds before starting the engine.
Practical information
Page 310 of 566
308
3008-2_en_Chap08_en cas-de-panne_ed01-2016
Running out of fuel (Diesel)
On vehicles fitted with Diesel engines, the fuel
system must be primed if you run out of fuel.For more information on Misfuel
prevention (Diesel) , refer to the
corresponding section.BlueHDi engines
If the engine does not start first
time, don't keep trying, but start the
procedure again from the beginning. F
F
ill the fuel tank with at least five litres of
Diesel.
F
S
witch on the ignition (without starting the
engine).
F
W
ait around 6 seconds and switch off the
ignition.
F
R
epeat the operation 10 times.
F
O
perate the starter to run the engine.
In the event of a breakdown
Page 315 of 566
313
3008-2_en_Chap08_en cas-de-panne_ed01-2016
Repair procedure
F Switch off the ignition.
F S ecure the speed limit sticker inside the
vehicle.
Avoid removing any foreign bodies
which have penetrated into the tyre.
F
U
ncoil the pipe stowed under the
compressor.
F
C
onnect the pipe from the compressor to
the sealant cartridge. F
R emove the valve cap from the tyre to be
repaired, and place it in a clean area.
F
C
onnect the hose from the sealant
cartridge to the valve of the tyre to be
repaired and tighten firmly.
F
T urn the sealant cartridge and secure it in
the cut-out provided on the compressor.
8
In the event of a breakdown
Page 316 of 566

314
3008-2_en_Chap08_en cas-de-panne_ed01-2016
If after around 5 to 7 minutes the
pressure is not attained, this indicates
that the tyre is not repairable; contact
a PEUGEOT dealer or a qualified
workshop for assistance.
Take care, the sealant product is
harmful if swallowed and causes
irritation to the eyes.
Keep this product out of the reach of
children.
The use-by date is marked on the
cartridge.
After use, do not discard the
cartridge by the roadside, take it to a
PEUGEOT dealer or an authorised
waste disposal site.
Don't forget to obtain a new sealant
cartridge, available from a PEUGEOT
dealer or a qualified workshop.
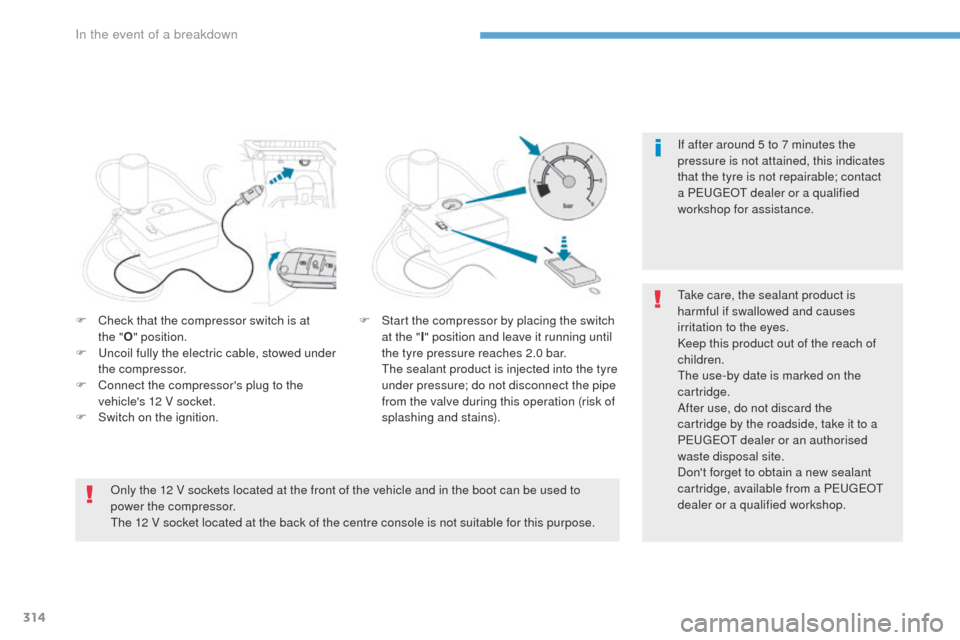
F
C
heck that the compressor switch is at
the
" O " position.
F
U
ncoil fully the electric cable, stowed under
the compressor.
F
C
onnect the compressor's plug to the
vehicle's 12 V socket.
F
S
witch on the ignition. F
S
tart the compressor by placing the switch
at the " I" position and leave it running until
the tyre pressure reaches 2.0 bar.
T
he sealant product is injected into the tyre
under pressure; do not disconnect the pipe
from the valve during this operation (risk of
splashing and stains).
Only the 12 V sockets located at the front of the vehicle and in the boot can be used to
power the compressor.
The 12 V socket located at the back of the centre console is not suitable for this purpose.
In the event of a breakdown
Page 317 of 566
315
3008-2_en_Chap08_en cas-de-panne_ed01-2016
F Place the switch in the "O" position.
F R emove the kit.
F
D
rive immediately for approximately
three miles (five kilometres), at reduced
speed (between 15 and 35 mph (20 and
60
km/h)), to plug the puncture.
F
S
top to check the repair and the tyre
pressure using the kit.
Checking / adjusting tyre pressures
You can also use the compressor, without
injecting sealant, to check and if necessary
adjust the tyre pressures
F
R
emove the valve cap from the tyre and
place it in a clean area.
F
U
ncoil the pipe stowed under the
compressor.
F
S
crew the pipe onto the valve and tighten
f i r m l y. F
C heck that the compressor switch is at
the
"O " position.
F
U
ncoil fully the electric cable, stowed under
the compressor.
F
C
onnect the compressor's plug to the
vehicle's 12 V socket.
F
S
witch on the ignition.
8
In the event of a breakdown
Page 321 of 566

319
3008-2_en_Chap08_en cas-de-panne_ed01-2016
Removing a wheel
* mode P for an automatic gearbox.
List of operations
Parking the vehicle
Immobilise the vehicle where it does not
block traffic: the ground must be level,
stable and non-slippery.
Apply the parking brake unless it has
been programmed to automatic mode,
switch off the ignition and engage first
gear* to lock the wheels.
Check that the braking warning lamps
in the instrument panel are on (not
flashing).
The occupants must get out of the
vehicle and wait where they are safe.
If necessary, place a chock under the
wheel diagonally opposite the wheel to
be changed.
Never go underneath a vehicle raised
using a jack; use an axle stand.
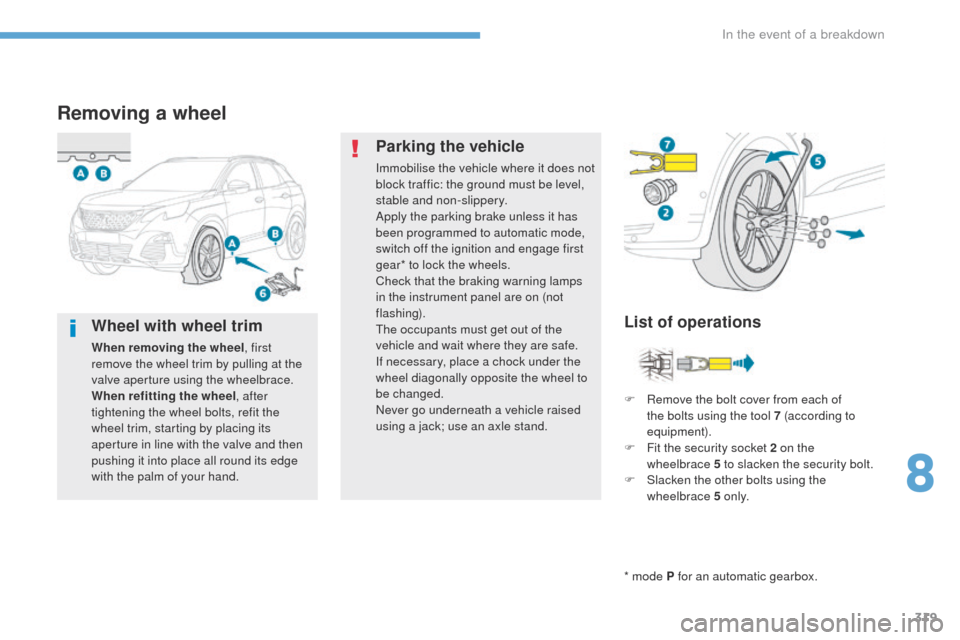
F
R
emove the bolt cover from each of
the bolts using the tool 7 (according to
equipment).
F
F
it the security socket 2 on the
wheelbrace
5 to slacken the security bolt.
F
S
lacken the other bolts using the
wheelbrace 5 o n l y.
Wheel with wheel trim
When removing the wheel , first
remove the wheel trim by pulling at the
valve aperture using the wheelbrace.
When refitting the wheel , after
tightening the wheel bolts, refit the
wheel trim, starting by placing its
aperture in line with the valve and then
pushing it into place all round its edge
with the palm of your hand.
8
In the event of a breakdown
Page 331 of 566

329
3008-2_en_Chap08_en cas-de-panne_ed01-2016
Reversing lamp
(tailgate)
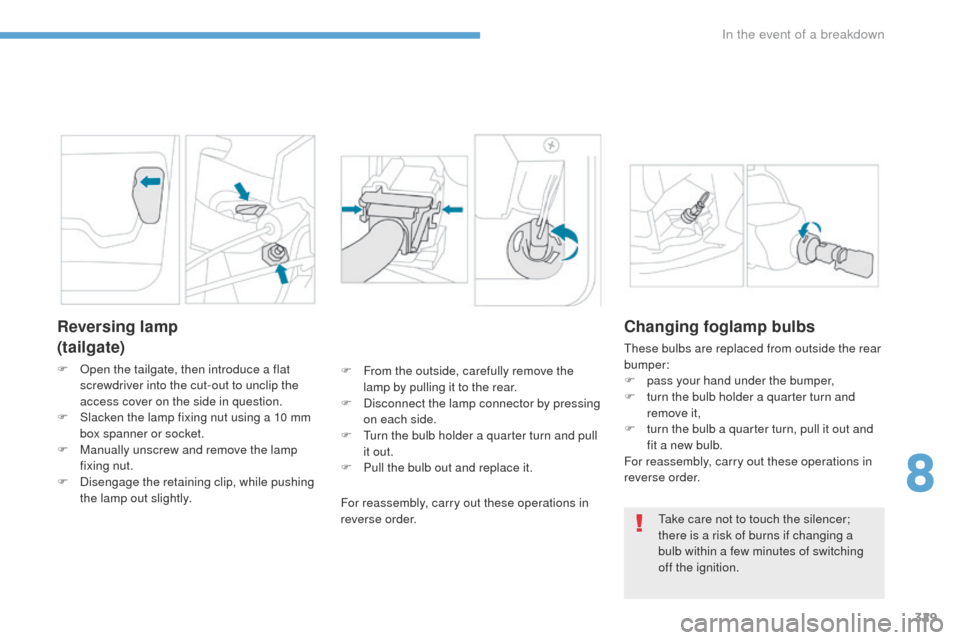
F Open the tailgate, then introduce a flat screwdriver into the cut-out to unclip the
access cover on the side in question.
F
S
lacken the lamp fixing nut using a 10 mm
box spanner or socket.
F
M
anually unscrew and remove the lamp
fixing nut.
F
D
isengage the retaining clip, while pushing
the lamp out slightly. F
F rom the outside, carefully remove the
lamp by pulling it to the rear.
F
D
isconnect the lamp connector by pressing
on each side.
F
T
urn the bulb holder a quarter turn and pull
it out.
F
P
ull the bulb out and replace it.
For reassembly, carry out these operations in
reverse order.
Changing foglamp bulbs
These bulbs are replaced from outside the rear
bumper:
F
p
ass your hand under the bumper,
F
t
urn the bulb holder a quarter turn and
remove it,
F
t
urn the bulb a quarter turn, pull it out and
fit a new bulb.
For reassembly, carry out these operations in
reverse order.
Take care not to touch the silencer;
there is a risk of burns if changing a
bulb within a few minutes of switching
off the ignition.
8
In the event of a breakdown
Page 333 of 566

331
3008-2_en_Chap08_en cas-de-panne_ed01-2016
Changing a fuse
Before changing a fuse:
F t he cause of the failure must be identified
and rectified,
F
a
ll electrical consumers must be switched
of f,
F
t
he vehicle must be immobilised with the
ignition off,
F
i
dentify the failed fuse using the allocation
tables and layout diagrams available.
Changing a fuse
The fuse allocation tables and
corresponding layout diagrams are
available at the following website:
http://public.servicebox.peugeot.com/ddb/
You can also contact a PEUGEOT
dealer or a qualified workshop.
To change a fuse, you must:
F
u
se the special tweezer to extract the fuse
from its housing and check the condition of
its filament.
F
a
lways replace the failed fuse with a fuse
of the same rating (same colour); using a
different rating could cause faults (risk of
f i r e).
If the fuse fails again soon after replacement,
have the vehicle's electrical system checked by
a PEUGEOT dealer or a qualified workshop. Good
Failed
Tw e e z e r
The replacement of a fuse not shown
in the allocation tables may cause a
serious malfunction of your vehicle.
Contact a PEUGEOT dealer or a
qualified workshop. PEUGEOT will not accept responsibility
for the cost incurred in repairing your
vehicle or for rectifying malfunctions
resulting from the installation of
accessories not supplied and not
recommended by PEUGEOT and
not installed in accordance with its
instructions, in particular when the
combined consumption of all of the
additional equipment connected
exceeds 10 milliamperes.Installing electrical
accessories
Your vehicle's electrical system is
designed to operate with standard or
optional equipment.
Before installing other electrical
equipment or accessories on your
vehicle, contact a PEUGEOT dealer or
a qualified workshop.
8
In the event of a breakdown