Page 4 of 566

.
.
3008-2_en_Chap00a_sommaire_ed01-2016
Digital instrument panel 12
Indicator and warning lamps 1 6
Indicators
32
Manual test
4
0
Distance recorders
4
1
Lighting dimmer
4
2
Trip computer
4
3
Monochrome screen C
4
5
Touch screen
4
8
Remote control
5
4
Keyless Entry and Starting
5
8
Back-up procedures
6
4
Central locking
6
8
Alarm
70
D o o r s
74
Boot
7
5
Hands-free tailgate
7
6
Electric windows
8
2
Panoramic opening sunroof
8
4Driving position
8
8
Front seats
9
0
Steering wheel adjustment
9
9
Mirrors 99
i- Cockpit Amplify function
1
02
Heating and Ventilation
1
04
Manual air conditioning
1
06
Semi-automatic mono-zone air conditioning
1
08
Dual-zone automatic air conditioning 1 11
Front demist - defrost 1 16
Heated windscreen
1
17
Rear screen demist - defrost
1
18
Front fittings
1
19
Courtesy lamps
1
28
Interior mood lighting
1
29
Rear seats
1
30
Rear fittings
1
33
Boot fittings
1
35
Boot lamp
1
40Exterior lighting control stalk
1
41
Direction indicators
1
44
Headlamp beam height adjustment
1
45
Automatic illumination of headlamps
1
46
Automatic headlamp dipping
1
49
Cornering lighting
1
51
Wiper control stalk
1
52
Automatic rain sensitive wipers
1
55
General safety recommendations
1
56
Hazard warning lamps
1
57
Hor n
15
7
Emergency or assistance
1
58
Electronic stability programme (ESC)
1
60
Advanced Grip Control
1
64
Hill Assist Descent Control
1
66
Seat belts
1
68
Airbags
1
72
Child seats
1
77
Deactivating the passenger's front airbag
1
79
ISOFIX child seats
1
86
i-Size child seats
1
90
Child lock
1
93
Over view
Eco-driving
Instruments
Access Ease of use and comfort
Lighting and visibility
Safety
Contents
Page 90 of 566

88
3008-2_en_Chap03_ergonomie-et-confort_ed01-2016
Driving position
Adopting a good driving position helps improve your comfort and protection.
It also optimises interior and exterior visibility as well as access to controls.
Sitting comfortably
Driver
Sit fully back in the seat with your pelvis, back
and shoulders in contact with the seat backrest.
Adjust the height of the seat so that your eyes
are level with the middle of the windscreen.
Your head should be at a distance of at least
10 cm from the roof.
Adjust the longitudinal position of the seat so
that you can fully depress the pedals with your
legs still slightly bent.
Passenger
Sit fully back in the seat with your pelvis, back
and shoulders in contact with the seat backrest.
Adjust the longitudinal position of the seat so
that you are at a distance of at least 25 cm from
the dashboard.
Adjust the head restraint so that its upper edge
is level with the top of your head.
If your vehicle has electric seats, the
ignition must be on to adjust them.
The distance between your knees and the
dashboard should be at least 10 cm, for easy
access to the controls in the dashboard.
Adjust the seat backrest angle to the most
vertical position possible; the backrest must not
be reclined more than 25° from vertical.
Adjust the head restraint so that its upper edge
is level with the top of your head.
Adjust the length of the seat cushion to support
your thighs.
Adjust the lumbar support to fit the shape of
your spine.
Adjust the steering wheel so that it is at
distance of at least 25 cm from your chest
and
you are able to hold it with your arms slightly
bent.
The steering wheel must not obstruct your view
of the instrument panel.
As a safety measure, the seats and
steering wheel must only be adjusted
when stationary.
The presence in the vehicle of certain seat adjustments described in this section depends on the trim level and country of sale.
Ease of use and comfort
Page 95 of 566

93
3008-2_en_Chap03_ergonomie-et-confort_ed01-2016
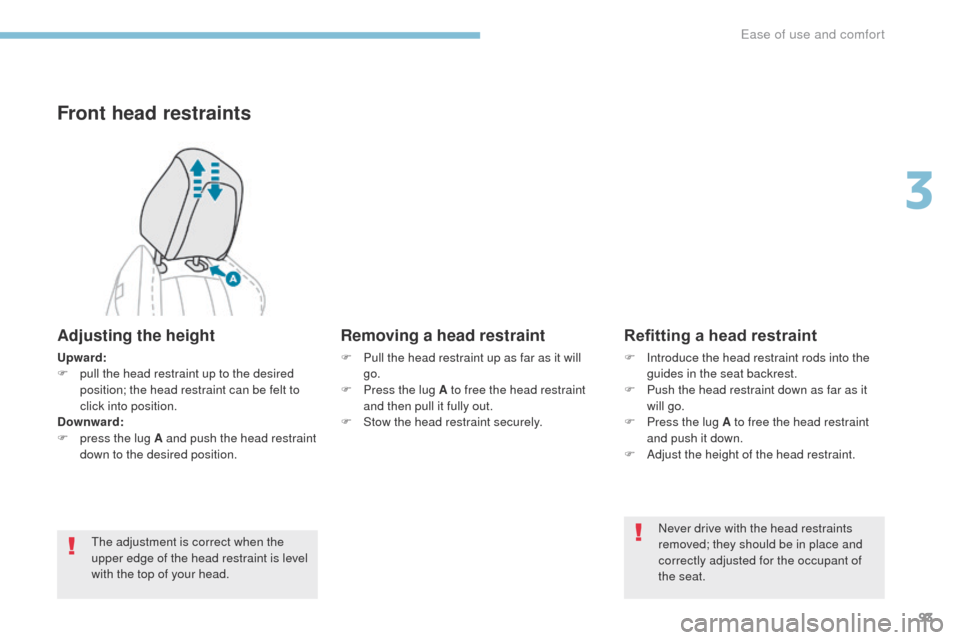
Front head restraints
Adjusting the height
Upward:
F p ull the head restraint up to the desired
position; the head restraint can be felt to
click into position.
Downward:
F
p
ress the lug A and push the head restraint
down to the desired position.
The adjustment is correct when the
upper edge of the head restraint is level
with the top of your head.
Removing a head restraint
F Pull the head restraint up as far as it will go.
F
P
ress the lug A to free the head restraint
and then pull it fully out.
F
S
tow the head restraint securely.
Refitting a head restraint
F Introduce the head restraint rods into the guides in the seat backrest.
F
P
ush the head restraint down as far as it
will go.
F
P
ress the lug A to free the head restraint
and push it down.
F
A
djust the height of the head restraint.Never drive with the head restraints
removed; they should be in place and
correctly adjusted for the occupant of
the seat.
3
Ease of use and comfort
Page 97 of 566

95
3008-2_en_Chap03_ergonomie-et-confort_ed01-2016
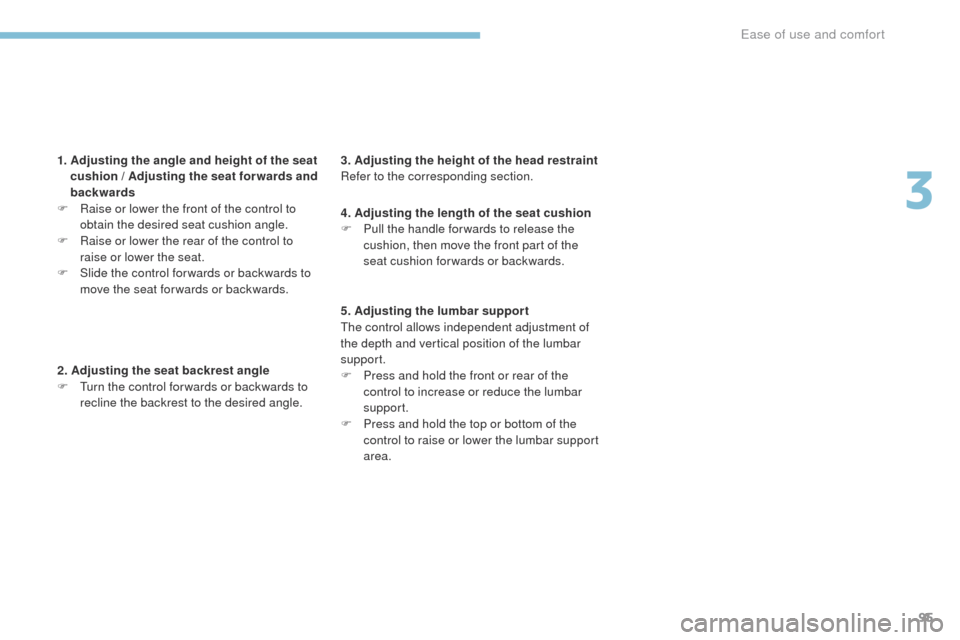
1. Adjusting the angle and height of the seat cushion / Adjusting the seat for wards and
backwards
F
R
aise or lower the front of the control to
obtain the desired seat cushion angle.
F
R
aise or lower the rear of the control to
raise or lower the seat.
F
S
lide the control for wards or backwards to
move the seat for wards or backwards.
2. Adjusting the seat backrest angle
F
T
urn the control for wards or backwards to
recline the backrest to the desired angle. 3. Adjusting the height of the head restraint
Refer to the corresponding section.
4. Adjusting the length of the seat cushion
F
P
ull the handle for wards to release the
cushion, then move the front part of the
seat cushion forwards or backwards.
5. Adjusting the lumbar support
The control allows independent adjustment of
the depth and vertical position of the lumbar
support.
F
P
ress and hold the front or rear of the
control to increase or reduce the lumbar
support.
F
P
ress and hold the top or bottom of the
control to raise or lower the lumbar support
area.
3
Ease of use and comfort
Page 101 of 566

99
3008-2_en_Chap03_ergonomie-et-confort_ed01-2016
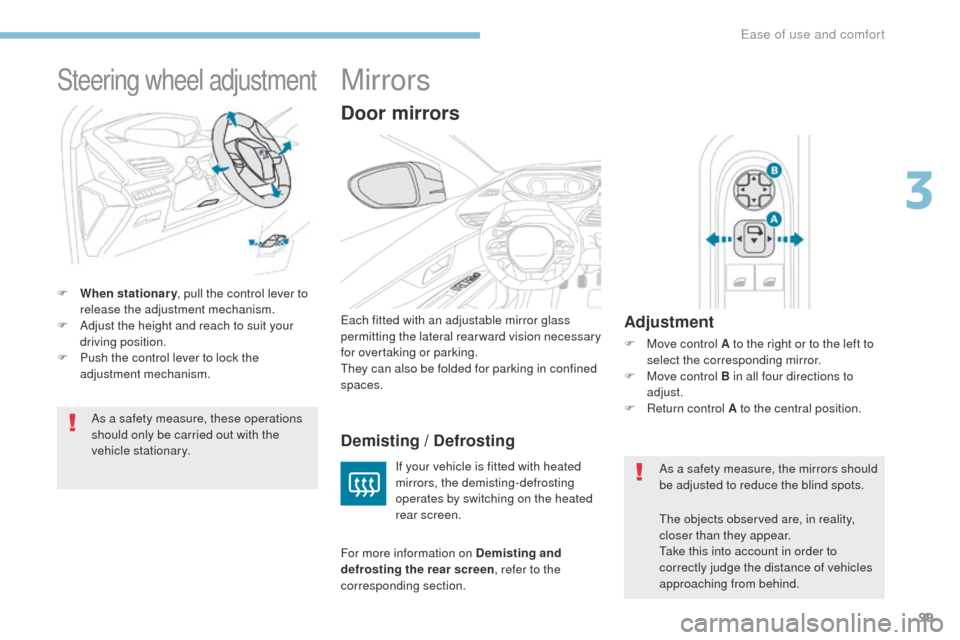
Steering wheel adjustment
F When stationary, pull the control lever to
release the adjustment mechanism.
F
A
djust the height and reach to suit your
driving position.
F
P
ush the control lever to lock the
adjustment mechanism.
As a safety measure, these operations
should only be carried out with the
vehicle stationary.
Mirrors
Each fitted with an adjustable mirror glass
permitting the lateral rearward vision necessary
for overtaking or parking.
They can also be folded for parking in confined
spaces.
Door mirrors
Demisting / Defrosting
If your vehicle is fitted with heated
mirrors, the demisting-defrosting
operates by switching on the heated
rear screen.
For more information on Demisting and
defrosting the rear screen , refer to the
corresponding section.
Adjustment
F Move control A to the right or to the left to select the corresponding mirror.
F
M
ove control B in all four directions to
adjust.
F
R
eturn control A to the central position.
The objects observed are, in reality,
closer than they appear.
Take this into account in order to
correctly judge the distance of vehicles
approaching from behind. As a safety measure, the mirrors should
be adjusted to reduce the blind spots.
3
Ease of use and comfort
Page 147 of 566

145
3008-2_en_Chap04_eclairage-et-visibilite_ed01-2016
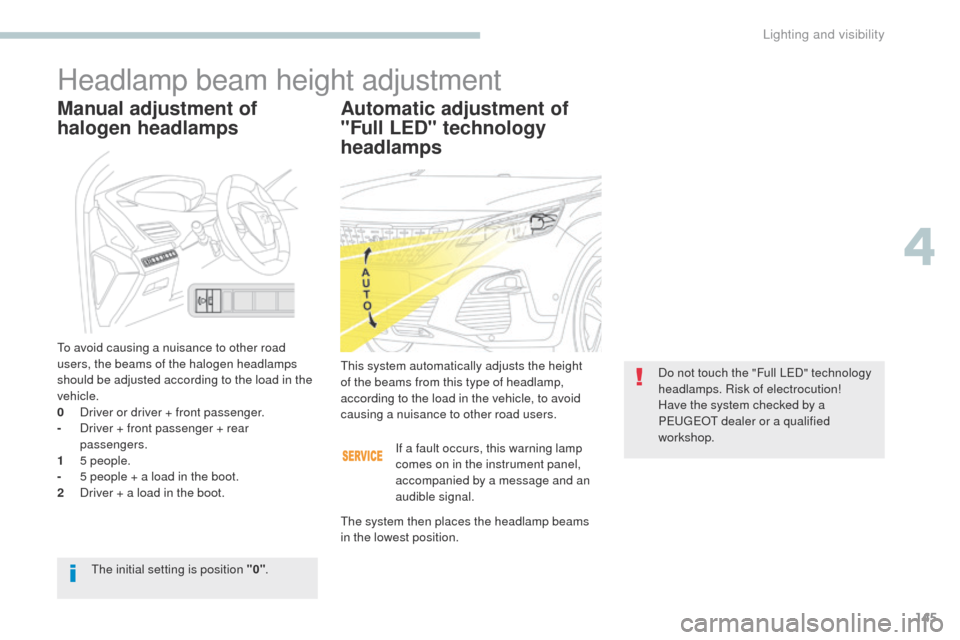
Headlamp beam height adjustment
Automatic adjustment of
"Full LED" technology
headlamps
This system automatically adjusts the height
of the beams from this type of headlamp,
according to the load in the vehicle, to avoid
causing a nuisance to other road users.Do not touch the "Full LED" technology
headlamps. Risk of electrocution!
Have the system checked by a
PEUGEOT dealer or a qualified
workshop.
The initial setting is position "0" .
Manual adjustment of
halogen headlamps
To avoid causing a nuisance to other road
users, the beams of the halogen headlamps
should be adjusted according to the load in the
vehicle.
0
D
river or driver + front passenger.
-
D
river + front passenger + rear
passengers.
1
5
people.
-
5 p
eople + a load in the boot.
2
D
river + a load in the boot. If a fault occurs, this warning lamp
comes on in the instrument panel,
accompanied by a message and an
audible signal.
The system then places the headlamp beams
in the lowest position.
4
Lighting and visibility
Page 170 of 566
168
3008-2_en_Chap05_securite_ed01-2016
F To adjust the anchorage point, squeeze the control A and slide it to one of the notches.
Height adjustment
Seat belts
Front seat belts
The front seat belts are fitted with a
pretensioning and force limiting system.
This system improves safety in the front
seats in the event of a front or side impact.
Depending on the severity of the impact, the
pretensioning system instantly tightens the seat
belts against the body of the occupants.
The pretensioning seat belts are active when
the ignition is on.
The force limiter reduces the pressure of the
seat belt on the chest of the occupant, so
improving their protection.Fastening
Unfastening
F Press the red button on the buckle.
F G uide the seat belt as it reels in.
F
P
ull the strap, then insert the tongue in the
buckle.
F
C
heck that the seat belt is fastened
correctly by pulling the strap.
Safety
Page 186 of 566
184
3008-2_en_Chap05_securite_ed01-2016
Locations for child seats secured using the seat belt
Weight of the child / indicative age
Seat Passenger's
front airbag Under 13 kg
(groups 0 (b)
a n d 0 +)
Up to about 1
year From 9 to 18 kg
(g r o u p 1)
From 1 to about 3 years From 15 to
25 kg
(group 2)
From 3 to about 6 years From 22 to
36 kg
(group 3)
From 6 to about 10 years
Row 1 (c) Passenger seat
with height
adjustment*
Deactivated "OFF"U
UUU
Activated "ON" XUF UFUF
Passenger seat
without height
adjustment**
Deactivated "OFF"U UUU
Activated "ON" XUF UFUF
Row 2 (d) Seat behind the
driver's seat
U
UUU
Seat behind the
passenger's seat U
UUU
Centre rear seat (e) UUUU
In accordance with European regulations, this table indicates the options for installing child seats secured using the seat belt and universally
approved
(a)
in relation to the weight of the child and the seat in the vehicle.
* Fully high position.
** Backrest straightened.
Safety