2017 NISSAN VERSA SEDAN ECO mode
[x] Cancel search: ECO modePage 95 of 404
– if possible, reduce the amount of cargobeing hauled or towed.
The MIL may stop blinking and come on steady.
Have the vehicle inspected. It is recommended
that you visit a NISSAN dealer for this service.
You do not need to have your vehicle towed to the
dealer.
CAUTION
Continued vehicle operation without hav-
ing the emission control system checked
and repaired as necessary could lead to
poor driveability, reduced fuel economy,
and possible damage to the emission con-
trol system.
Overdrive OFF indicator light (if so equipped)
The overdrive OFF indicator light illuminates
when the overdrive OFF mode is selected.
For additional information, refer to “Driving the
vehicle” in the “Starting and driving” section of
this manual.
Security indicator light (if soequipped)
This light blinks when the ignition switch is
placed in the OFF, LOCK or ACC position. The blinking security indicator light indicates that
the security systems equipped on the vehicle are
operational.
For additional information, refer to “Security sys-
tems” in this section.
Side light and headlight
indicator light (green) (if so
equipped)
The side light and headlight indicator light illumi-
nates when the side light or headlights are on
(not including daytime running or signature
lights) . If the headlight switch is in the AUTO
position, the side light and headlight indicator
light will illuminate when the headlights turn on.
For additional information, refer to “Headlight and
turn signal switch” in this section.
Slip indicator light
This indicator will blink when the VDC system is
operating, thus alerting the driver to the fact that
the road surface is slippery and the vehicle is
nearing its traction limits.
You may feel or hear the system working; this is
normal.
The light will blink for a few seconds after the
VDC system stops limiting wheel spin. The
indicator light also comes on when
you place the ignition switch in the ON position.
The light will turn off after approximately 2 sec-
onds if the system is operational. If the light does
not come on have the system checked. It is
recommended that you visit a NISSAN dealer for
this service.
Turn signal/hazard indicator
lights
The appropriate light flashes when the turn signal
switch is activated.
Both lights flash when the hazard switch is turned
on.
Vehicle Dynamic Control(VDC) OFF indicator light
This indicator light comes on when the VDC OFF
switch is pushed to off. This indicates the VDC
system has been turned off.
Push the VDC OFF switch again or restart the
engine and the system will operate normally. For
additional information, refer to “Vehicle Dynamic
Control (VDC) system” in the “Starting and driv-
ing” section of this manual.
The VDC indicator light also comes on when you
place the ignition switch in the ON position. The
light will turn off after about 2 seconds if the
system is operational. If the light stays on or
2-20Instruments and controls
Page 146 of 404
4 Monitor, climate, audio, phone and voice
recognition systems
Control panel buttons — color screen with
Navigation System (if so equipped)..................4-4
How to use the touch-screen . . ..................4-5
How to use the BACK button ....................4-7
How to use the
button ....................4-7
Clock Set ......................................4-9
button...................................4-9
How to use the ON•OFF button/VOL
(volume) control knob ...........................4-9
How to use the CAMERA button .................4-9
RearView Monitor (if so equipped) ..................4-10
RearView Monitor system operation .............4-11
How to read the displayed lines .................4-11
Difference between predicted and actual
distances ..................................... 4-12
Adjusting the screen ........................... 4-14
RearView Monitor system limitations .............4-14
System maintenance ........................... 4-16
Vents ........................................... 4-16
Heater and Air Conditioner (manual) ................4-17
Controls ...................................... 4-18
Heater operation .............................. 4-19
Air conditioner operation .......................4-20Air flow charts
................................. 4-21
Servicing air conditioner ........................... 4-25
Audio system .................................... 4-25
Radio ........................................ 4-25
FM radio reception ............................ 4-25
AM radio reception ............................ 4-26
Satellite radio reception (if so equipped) .........4-26
Audio operation precautions ....................4-26
FM/AM radio with compact disc (CD) player
(Type A) (if so equipped) .......................4-34
FM/AM radio with compact disc (CD) player
(Type B) (if so equipped) .......................4-38
FM/AM/SAT radio with compact disc (CD)
player (Type A) (if so equipped) .................4-43
FM/AM/SAT radio with compact disc (CD)
player (Type B) (if so equipped) .................4-48
USB (Universal Serial Bus) connection port
(models without Navigation System)
(if so equipped) ............................... 4-54
USB (Universal Serial Bus) connection port
(models with Navigation System)
(if so equipped) ............................... 4-56
iPod®* player operation without Navigation
System (if so equipped) ........................ 4-58
Page 152 of 404
Touch-screen maintenance
If you clean the display screen, use a dry, soft
cloth. If additional cleaning is necessary, use a
small amount of neutral detergent with a soft
cloth. Never spray the screen with water or de-
tergent. Dampen the cloth first and then wipe the
screen.
HOW TO USE THE BACK BUTTON
Press the BACK button to return to the previous
screen.
HOW TO USE THEBUTTON
For additional information about the “SiriusXM
Travel Link”, and “Traffic” features, refer to the
separate Navigation System Owner’s Manual.
For additional information about the “My Apps”
key, refer to “NissanConnect
SMMobile Apps” in
this section.
For additional information about the “Voice Com-
mands” key, refer to “NISSAN Voice Recognition
System” in this section. To select and/or adjust several functions, fea-
tures and modes that are available for your ve-
hicle:
1. Press the [
] button.
2. Touch the “Settings” key.
3. Touch the desired item.
LHA3622LHA2916
Monitor, climate, audio, phone and voice recognition systems4-7
Page 153 of 404
Menu itemResult
Audio For additional information, refer to “Audio system” in this section.
Navigation For additional information, refer to the separate Navigation System Owner’s Manual.
Phone & Bluetooth For additional information, refer to “Bluetooth® Hands-Free Phone System with Navigation System” in this
section.
System Touch this key to select and/or adjust various functions of this system. A screen with additional options will
appear.
Display Touch this key to adjust the appearance of the display.
Brightness Adjusts the brightness of the display.
Display Mode Adjusts to fit the level of lighting in the vehicle. Touch key to cycle through options. “Day” and “Night” modes
are suited for the respective times of day while “Auto” controls the display automatically.
Scroll Direction Adjusts the direction of the menu scroll. Choose to either move up or down.
Clock Touch this key to adjust the time.
Time Format The clock can be set to 12 hours or 24 hours.
Date Format Select from five possible formats for displaying the day, month, and year.
Clock Mode Adjust the mode for the clock. “Auto” uses the system’s GPS to automatically maintain the time. “Manual”
allows you to set the clock using the “Set Clock Manually” key.
Set Clock Manually (if so equipped) Adjust the clock manually, Touch the “+” or “-” keys to adjust the hours, minutes, day, month and year up or
down. “Clock Mode” must be set to manual for this option to be available.
Daylight Savings Time (if so equipped) Adjusts the daylight savings time on or off.
Time Zone (if so equipped) Choose the applicable time zone from the list.
Language Touch this key to change the language on the display.
Camera Settings Touch this key to change the camera settings.
Display Mode Touch this key to select the touch-screen display mode (day, night, or automatic) .
Brightness Adjust touch-screen brightness.
Contrast Adjust touch-screen contrast.
Color Adjust touch-screen color.
4-8Monitor, climate, audio, phone and voice recognition systems
Page 154 of 404
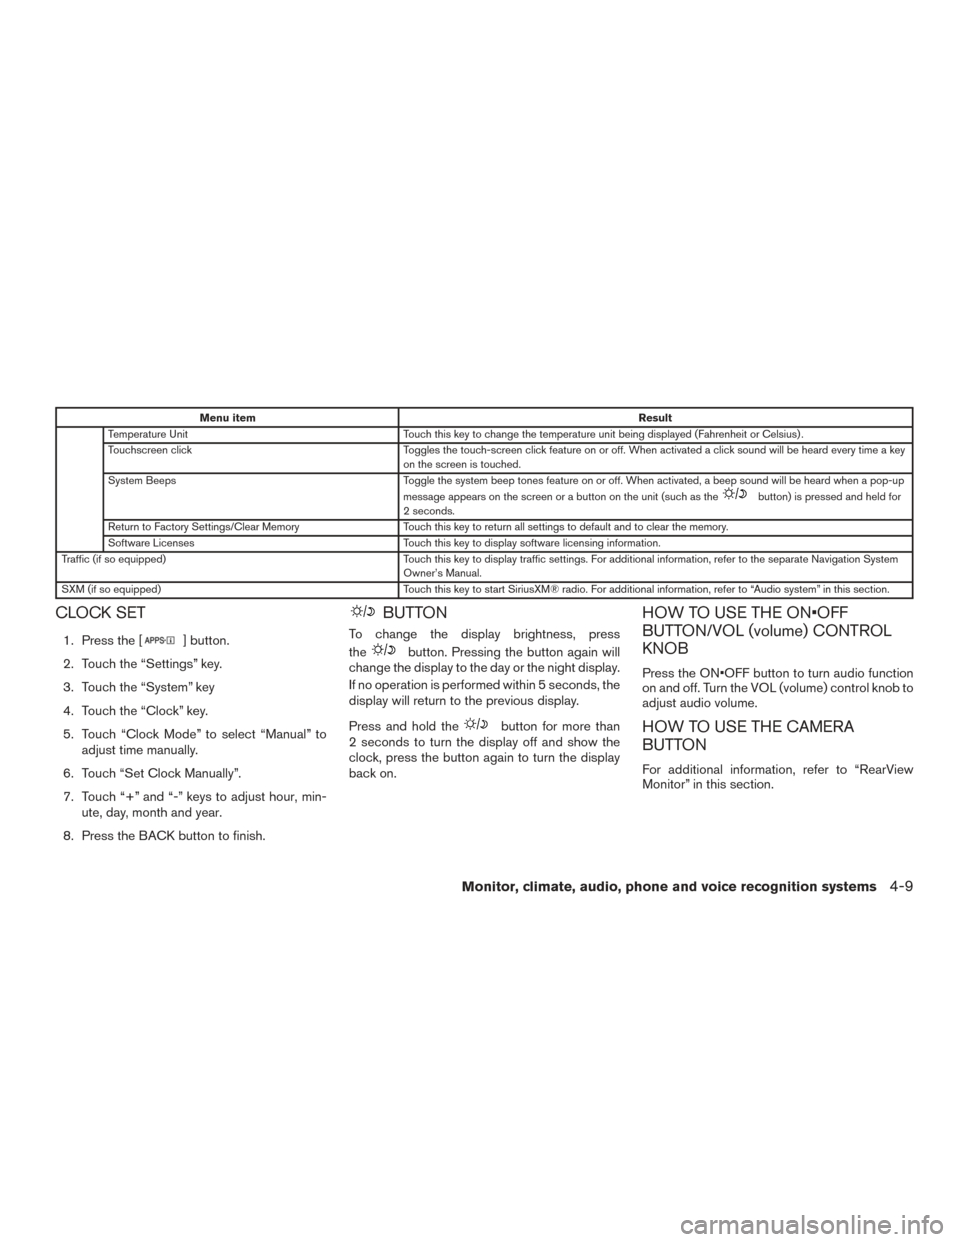
Menu itemResult
Temperature Unit Touch this key to change the temperature unit being displayed (Fahrenheit or Celsius) .
Touchscreen click Toggles the touch-screen click feature on or off. When activated a click sound will be heard every time a key
on the screen is touched.
System Beeps Toggle the system beep tones feature on or off. When activated, a beep sound will be heard when a pop-up
message appears on the screen or a button on the unit (such as the
button) is pressed and held for
2 seconds.
Return to Factory Settings/Clear Memory Touch this key to return all settings to default and to clear the memory.
Software Licenses Touch this key to display software licensing information.
Traffic (if so equipped) Touch this key to display traffic settings. For additional information, refer to the separate Navigation System
Owner’s Manual.
SXM (if so equipped) Touch this key to start SiriusXM® radio. For additional information, refer to “Audio system” in this section.
CLOCK SET
1. Press the [] button.
2. Touch the “Settings” key.
3. Touch the “System” key
4. Touch the “Clock” key.
5. Touch “Clock Mode” to select “Manual” to adjust time manually.
6. Touch “Set Clock Manually”.
7. Touch “+” and “-” keys to adjust hour, min- ute, day, month and year.
8. Press the BACK button to finish.
BUTTON
To change the display brightness, press
the
button. Pressing the button again will
change the display to the day or the night display.
If no operation is performed within 5 seconds, the
display will return to the previous display.
Press and hold the
button for more than
2 seconds to turn the display off and show the
clock, press the button again to turn the display
back on.
HOW TO USE THE ON•OFF
BUTTON/VOL (volume) CONTROL
KNOB
Press the ON•OFF button to turn audio function
on and off. Turn the VOL (volume) control knob to
adjust audio volume.
HOW TO USE THE CAMERA
BUTTON
For additional information, refer to “RearView
Monitor” in this section.
Monitor, climate, audio, phone and voice recognition systems4-9
Page 155 of 404
1. CAMERA button (models with navigation)WARNING
●Failure to follow the warnings and in-
structions for proper use of the Rear-
View Monitor system could result in se-
rious injury or death. ●
RearView Monitor is a convenience fea-
ture and is not a substitute for proper
backing. Always turn and look out the
windows and check mirrors to be sure
that it is safe to move before operating
the vehicle. Always back up slowly.
LHA3767
REARVIEW MONITOR (if so
equipped)
4-10Monitor, climate, audio, phone and voice recognition systems
Page 159 of 404
ADJUSTING THE SCREEN
The procedure for adjusting the display settings
of the screen differs depending on the type of
screen present on the vehicle.
For vehicles without Navigation System1. Firmly apply the brake and place the shift lever in R (reverse)
2. Press the ENTER/SETTING button.
3. The screen will display the Brightness set- tings. 4. Turn the TUNE/SCROLL knob to adjust the
setting up or down.
5. Press the ENTER/SETTING button again to display the Contrast settings.
6. Turn the TUNE/SCROLL knob to adjust the setting up or down.
7. Press the ENTER/SETTING button to com- plete the adjustment.
● Do not adjust the display settings of the
RearView Monitor while the vehicle is mov-
ing. For vehicles with Navigation System
1. Firmly apply the brake and place the shift lever in R (reverse)
2. Press the
button on the control panel.
3. The screen will display the Night settings.
4. Turn the TUNE knob to adjust the setting up or down.
5. Press the
button again to access the
Auto settings.
6. Turn the TUNE knob to adjust the setting up or down.
● Do not adjust the display settings of the
RearView Monitor while the vehicle is mov-
ing.
REARVIEW MONITOR SYSTEM
LIMITATIONS
WARNING
Listed below are the system limitations for
RearView Monitor. Failure to operate the
vehicle in accordance with these system
limitations could result in serious injury or
death.
Models without navigation
LHA3639
Models with navigation
LHA3679
4-14Monitor, climate, audio, phone and voice recognition systems
Page 162 of 404
WARNING
●The air conditioner cooling function op-
erates only when the engine is running.
● Do not leave children or adults who
would normally require the assistance
of others alone in your vehicle. Pets
should also not be left alone. They
could accidentally injure themselves or
others through inadvertent operation of
the vehicle. Also, on hot, sunny days,
temperatures in a closed vehicle could
quickly become high enough to cause
severe or possibly fatal injuries to
people or animals.
● Do not use the recirculation mode for
long periods as it may cause the interior
air to become stale and the windows to
fog up. NOTE:
● Odors from inside and outside the vehicle
can build up in the air conditioner unit. Odor
can enter the passenger compartment
through the vents.
● When parking, set the heater and air condi-
tioner controls to turn off air recirculation to
allow fresh air into the passenger compart-
ment. This should help reduce odors inside
the vehicle.
HEATER AND AIR CONDITIONER
(manual)
Monitor, climate, audio, phone and voice recognition systems4-17