Page 259 of 671
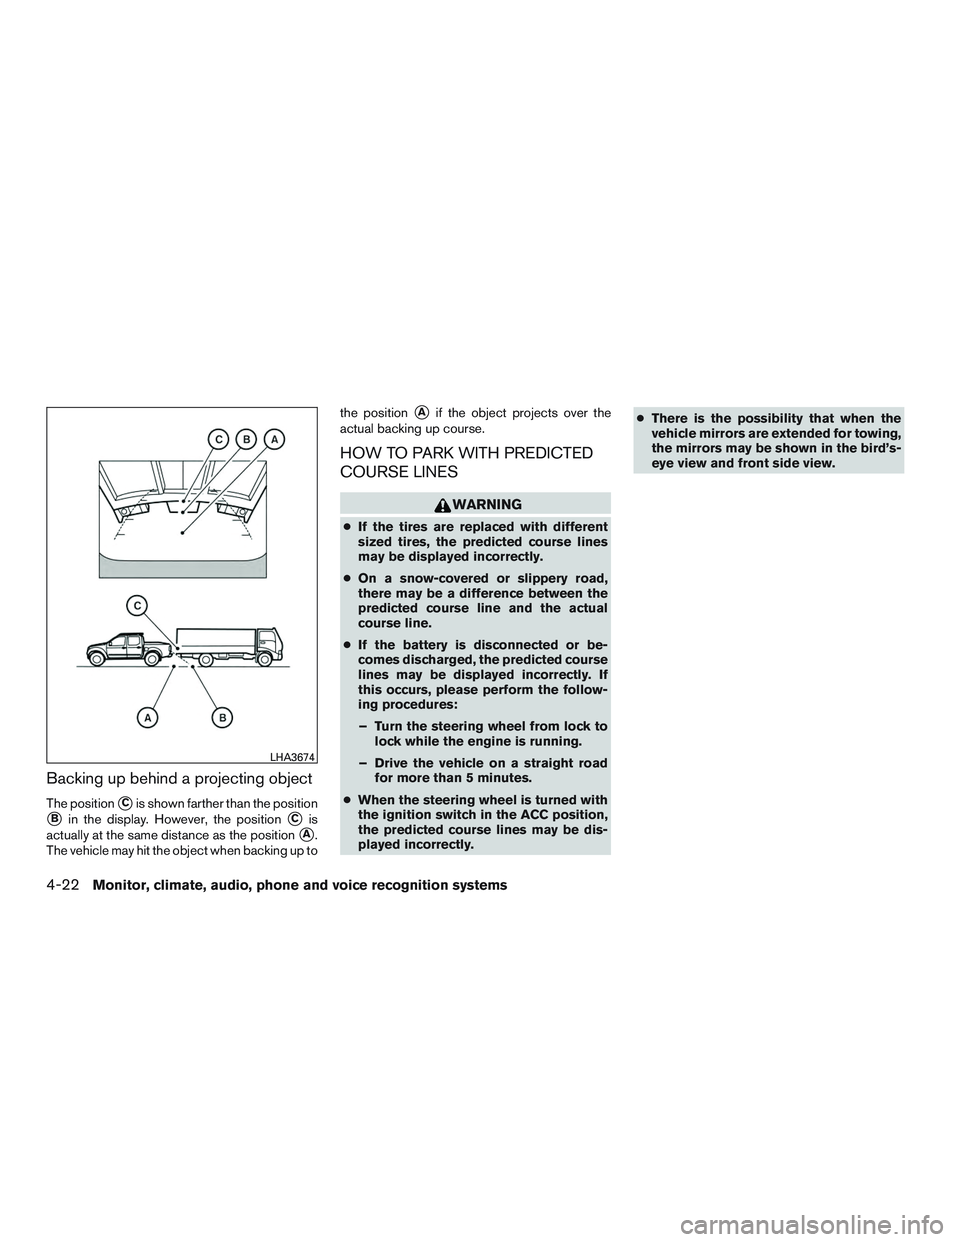
Backing up behind a projecting object
The position�Cis shown farther than the position
�Bin the display. However, the position�Cis
actually at the same distance as the position
�A.
The vehicle may hit the object when backing up to the position
�Aif the object projects over the
actual backing up course.
HOW TO PARK WITH PREDICTED
COURSE LINES
Page 266 of 671

WARNING
●Failure to follow the warnings and in-
structions for proper use of the Moving
Object Detection system could result in
serious injury or death.
● The MOD system is not a substitute for
proper vehicle operation and is not de-
signed to prevent contact with objects
surrounding the vehicle. When maneu-
vering, always use the outside mirrors
and rearview mirror and turn and check
the surroundings to ensure it is safe to
maneuver.
● The system is deactivated at speeds
above 6 mph (10 km/h). It is reactivated
at lower speeds.
● The MOD system is not designed to
detect surrounding stationary objects.
The MOD system can inform the driver of moving
objects near the vehicle when backing out of
garages, maneuvering in parking lots and in other
such instances.
The MOD system detects moving objects by
using image processing technology on the image
shown in the display.
MOD SYSTEM OPERATION
The MOD system will turn on automatically under
the following conditions: ● When the shift lever is in the R (Reverse)
position.
● When vehicle speed decreases below ap-
proximately 6 mph (10 km/h) and the camera
screen is displayed.
The MOD system operates in the following con-
ditions when the camera view is displayed:● When the shift lever is in the P (Park) or N
(Neutral) position and the vehicle is stopped,
the MOD system detects moving objects in
the bird’s-eye view. The MOD system will
not operate if the outside mirrors are moving
in or out, in the stowed position, or if either
front door is opened.
● When the shift lever is in the D (Drive) posi-
tion and the vehicle speed is below approxi-
mately 6 mph (10 km/h), the MOD system
detects moving objects in the front view.
Page 284 of 671

When the satellite radio is used for the first time
or the battery has been replaced, the satellite
radio may not work properly. This is not a mal-
function.")
SATELLITE RADIO RECEPTION (if so
equipped)
When the satellite radio is used for the first time
or the battery has been replaced, the satellite
radio may not work properly. This is not a mal-
function. Wait more than 10 minutes with satellite
radio ON and the vehicle outside of any metal or
large building for satellite radio to receive all of
the necessary data.
No satellite radio reception is available and “NO
SAT” is displayed when the SAT band option is
selected unless optional satellite receiver and
antenna are installed and a SiriusXM® Satellite
Radio service subscription is active. Satellite ra-
dio is not available in Alaska, Hawaii and Guam.
Satellite radio performance may be affected if
cargo carried on the roof blocks the satellite radio
signal.
If possible, do not put cargo over the satellite
antenna.
A build up of ice on the satellite radio antenna can
affect satellite radio performance. Remove the
ice to restore satellite radio reception.
AUDIO OPERATION PRECAUTIONSCompact disc (CD) player
Page 308 of 671

CAUTION
●To avoid damage and loss of function
when using a USB device, note the fol-
lowing precautions.
● Do not force the USB device into the
USB port. Inserting the USB device
tilted or up-side-down into the port may
damage the port. Make sure that the
USB device is connected correctly into
the USB port.
● Do not grab the USB port cover (if so
equipped) when pulling the USB device
out of the port. This could damage the
port and the cover.
● Do not leave the USB cable in a place
where it can be pulled unintentionally.
Pulling the cable may damage the port.
For additional information, refer to your device
manufacturer’s owner information regarding the
proper use and care of the device.
The USB port is located on the center console
beneath the heater and air conditioner controls.
Insert the USB device into the connection port.
When a compatible storage device is plugged
into the connection port, compatible audio files
on the storage device can be played through the
vehicle’s audio system.
Audio file operation
MEDIA button
Place the ignition switch in the ON or ACC
position and press the MEDIA button to switch to
the USB input mode. If a CD is playing or another
audio source is plugged in through the AUX IN
jack located in the center console, the MEDIA
button toggles between the three sources.
Play information
Information about the audio files being played
can be displayed on the display screen of the
vehicle’s audio system. Depending on how the
audio files are encoded, information such as
Folder, Song and Artist will be displayed.
The track number and number of total tracks in
the folder are displayed on the screen as well.
Page 309 of 671
 button
When the RPT (repeat) button is pressed while
an audio file on the USB device is")
The current play pattern of the USB device is
displayed on the screen unless no pattern is
applied.
RPT (repeat) button
When the RPT (repeat) button is pressed while
an audio file on the USB device is playing, the
play pattern can be changed as follows:
1 Folder Repeat→1 Track Repeat →OFF
1 Track Repeat: the current track will be re-
peated.
1 Folder Repeat: the current folder will be re-
peated.
OFF: No repeat play pattern is applied. The indi-
cator on the display will turn off.
The current play pattern of the USB device is
displayed on the screen unless no pattern is
applied.
TUNE/SCROLL knob (If so equipped)
If there are multiple folders with audio files on the
USB device, turn the TUNE/SCROLL knob to
change folders. Turn the knob to the left to skip
back a folder. Turn the knob to the right to skip
ahead a folder. If there is only one folder of audio
files on the USB device, turning the
TUNE/SCROLL knob in either direction will re-
turn to the first track on the USB device. TUNE/FOLDER knob (if so equipped)
If there are multiple folders with audio files on the
USB device, turn the TUNE/FOLDER knob to
change folders. Turn the knob to the left to skip
back a folder. Turn the knob to the right to skip
ahead a folder. If there is only one folder of audio
files on the USB device, turning the
TUNE/FOLDER knob in either direction will re-
turn to the first track on the USB device.
USB (Universal Serial Bus)
CONNECTION PORT (models with
Navigation System) (if so equipped)
Connecting a device to the USB
Connection Port
Page 310 of 671

CAUTION
●To avoid damage and loss of function
when using a USB device, note the fol-
lowing precautions.
● Do not force the USB device into the
USB port. Inserting the USB device
tilted or up-side-down into the port may
damage the port. Make sure that the
USB device is connected correctly into
the USB port.
● Do not grab the USB port cover (if so
equipped) when pulling the USB device
out of the port. This could damage the
port and the cover.
● Do not leave the USB cable in a place
where it can be pulled unintentionally.
Pulling the cable may damage the port.
For additional information, refer to your device
manufacturer’s owner information regarding the
proper use and care of the device.
The USB port is located on the center console
beneath the heater and air conditioner controls.
Insert the USB device into the connection port.
When a compatible storage device is plugged
into the connection port, compatible audio files
on the storage device can be played through the
vehicle’s audio system.
Audio file operation
AUX button
Place the ignition switch in the ON or ACC
position and press the AUX button to switch to
the USB input mode. If another audio source is
playing and a USB memory device is inserted,
press the AUX button until the center display
changes to the USB memory mode.
If the system has been turned off while the USB
memory was playing, press the POWER button
to restart the USB memory.
Play information
Information about the audio files being played is
shown on the display screen of the vehicle’s
audio system. Touch “Browse” to display the list
of folders and files on the USB device. Touch the
name of a song on the screen to begin playing
that song.
Page 348 of 671
Symptom Remedy
When a DVD is
inserted, a Pa-
rental Setting
message is
displayed, pro-
hibiting DVD
movie playback.Using the remote control, enter the
4–digit Parental Password (0000)
and then press Enter.
After the Paren-
tal Password is
entered, a Pass-
word Incorrect
message is dis-
played and DVD
movie will not
play. If the incorrect Parental Password is
entered more than two times, the
until will stop playback and return to
the splashscreen. Using the remote
control, press Play to initiate play-
back and display the Parental Set-
ting message. Using the remote
control, enter the 4–digit Parental
Password (0000) and then press
Enter.
SPECIFICATIONS
Page 381 of 671

Additional information:● Since the spare tire is not equipped
with the TPMS, the TPMS does not
monitor the tire pressure of the spare
tire.
● The TPMS will activate only when the vehicle
is driven at speeds above 16 mph (25 km/h).
Also, this system may not detect a sudden
drop in tire pressure (for example a flat tire
while driving) .
● The low tire pressure warning light does not
automatically turn off when the tire pressure
is adjusted. After your tires are inflated to the
recommended pressure, the vehicle must be
driven at speeds above 16 mph (25 km/h) to
activate the TPMS and turn off the low tire
pressure warning light. Use a tire pressure
gauge to check the tire pressure.
● The Tire Pressure Low Add Air warning ap-
pears in the vehicle information display when
the low tire pressure warning light is illumi-
nated and low tire pressure is detected. The
Tire Pressure Low Add Air warning turns off
when the low tire pressure warning light
turns off. ●
The Tire Pressure Low Add Air warning does
not appear if the low tire pressure warning
light illuminates to indicate a TPMS malfunc-
tion.
● Tire pressure rises and falls depending on
the heat caused by the vehicle’s operation
and the outside temperature. Do not reduce
the tire pressure after driving because the
tire pressure rises after driving. Low outside
temperature can lower the temperature of
the air inside the tire which can cause a
lower tire inflation pressure. This may cause
the low tire pressure warning light to illumi-
nate. If the warning light illuminates, check
the tire pressure for all four tires.
● The Tire and Loading Information label is
located in the driver’s door opening.
For additional information, refer to “Low tire pres-
sure warning light” in the “Instruments and con-
trols” section and “Tire Pressure Monitoring Sys-
tem (TPMS)” in the “In case of emergency”
section of this manual.

and then press")