2017 NISSAN TITAN mirror
[x] Cancel search: mirrorPage 7 of 40

5
When the vehicle’s outside mirrors are extended for towing, you may see the
mirrors in the bird’s-eye view or the front-side view.
For information regarding how to access additional viewing cycles, please see your Owner’s Manual.
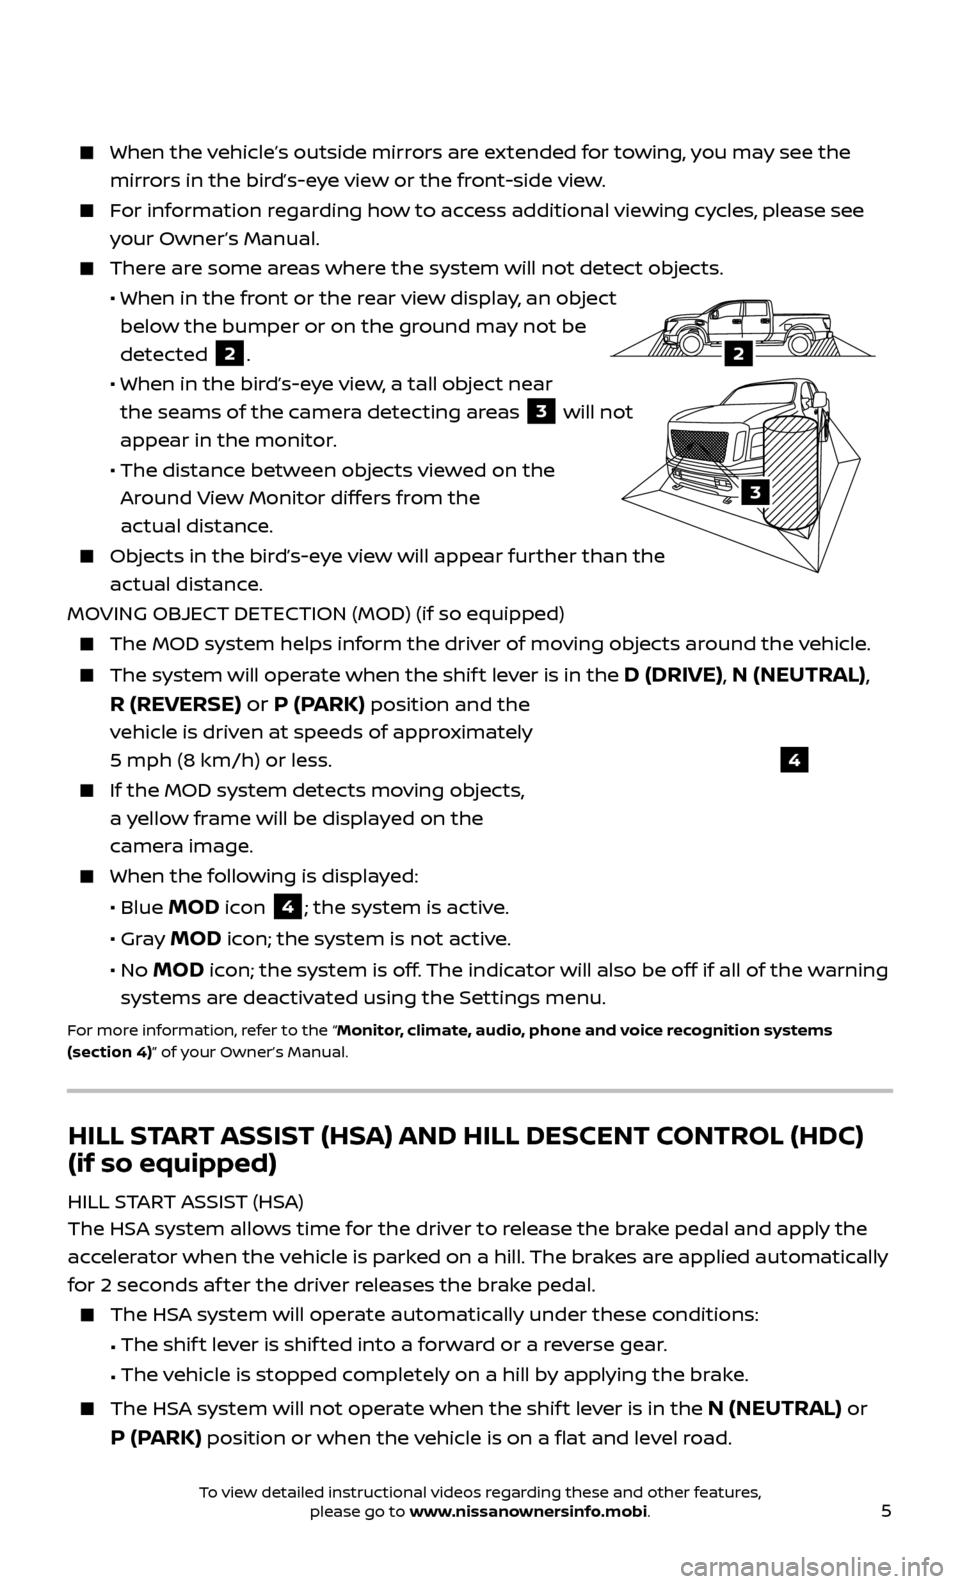
There are some areas where the system will not detect objects.
• When in the fr
ont or the rear view display, an object
below the bumper or on the ground may not be
detected
2.
• When in the bir
d’s-eye view, a tall object near
the seams of the camera detecting areas
3 will not
appear in the monitor.
• The distanc
e between objects viewed on the
Around View Monitor differs from the
actual distance.
Objects in the bird’s-eye view will appear further than the actual distance.
MOVING OBJECT DETECTION (MOD) (if so equipped)
The MOD system helps inf orm the driver of moving objects around the vehicle.
The system will operate when the shif t lever is in the D (DRIVE), N (NEUTRAL),
R (REVERSE) or P (PARK)
position and the
vehicle is driven at speeds of approximately
5 mph (8 km/h) or less.
If the MOD system detec ts moving objects,
a yellow frame will be displayed on the
camera image.
When the f ollowing is displayed:
• Blue MOD icon 4; the system is active.
• Gr
ay
MOD icon; the system is not active.
•
No
MOD icon; the system is off. The indicator will also be off if all of the warning
systems are deactivated using the Settings menu.
For more information, refer to the “Monitor, climate, audio, phone and voice recognition systems
(section 4)” of your Owner’s Manual.
4
HILL START ASSIST (HSA) AND HILL DESCENT CONTROL (HDC)
(if so equipped)
HILL START ASSIST (HSA)
The HSA system allows time for the driver to release the brake pedal and apply the
accelerator when the vehicle is parked on a hill. The brakes are applied automatically
for 2 seconds af ter the driver releases the brake pedal.
The HSA system will operate automatically under these conditions:
•
The shif
t lever is shif ted into a forward or a reverse gear.
•
The v
ehicle is stopped completely on a hill by applying the brake.
The HSA system will not operate when the shif t lever is in the N (NEUTRAL) or
P (PARK) position or when the vehicle is on a flat and level road.
LHA3807
2A
2
3
To view detailed instructional videos regarding these and other features, please go to www.nissanownersinfo.mobi.
Page 8 of 40

6
BLIND SPOT WARNING (BSW)1 WITH REAR CROSS TRAFFIC
ALERT (RCTA) (if so equipped)
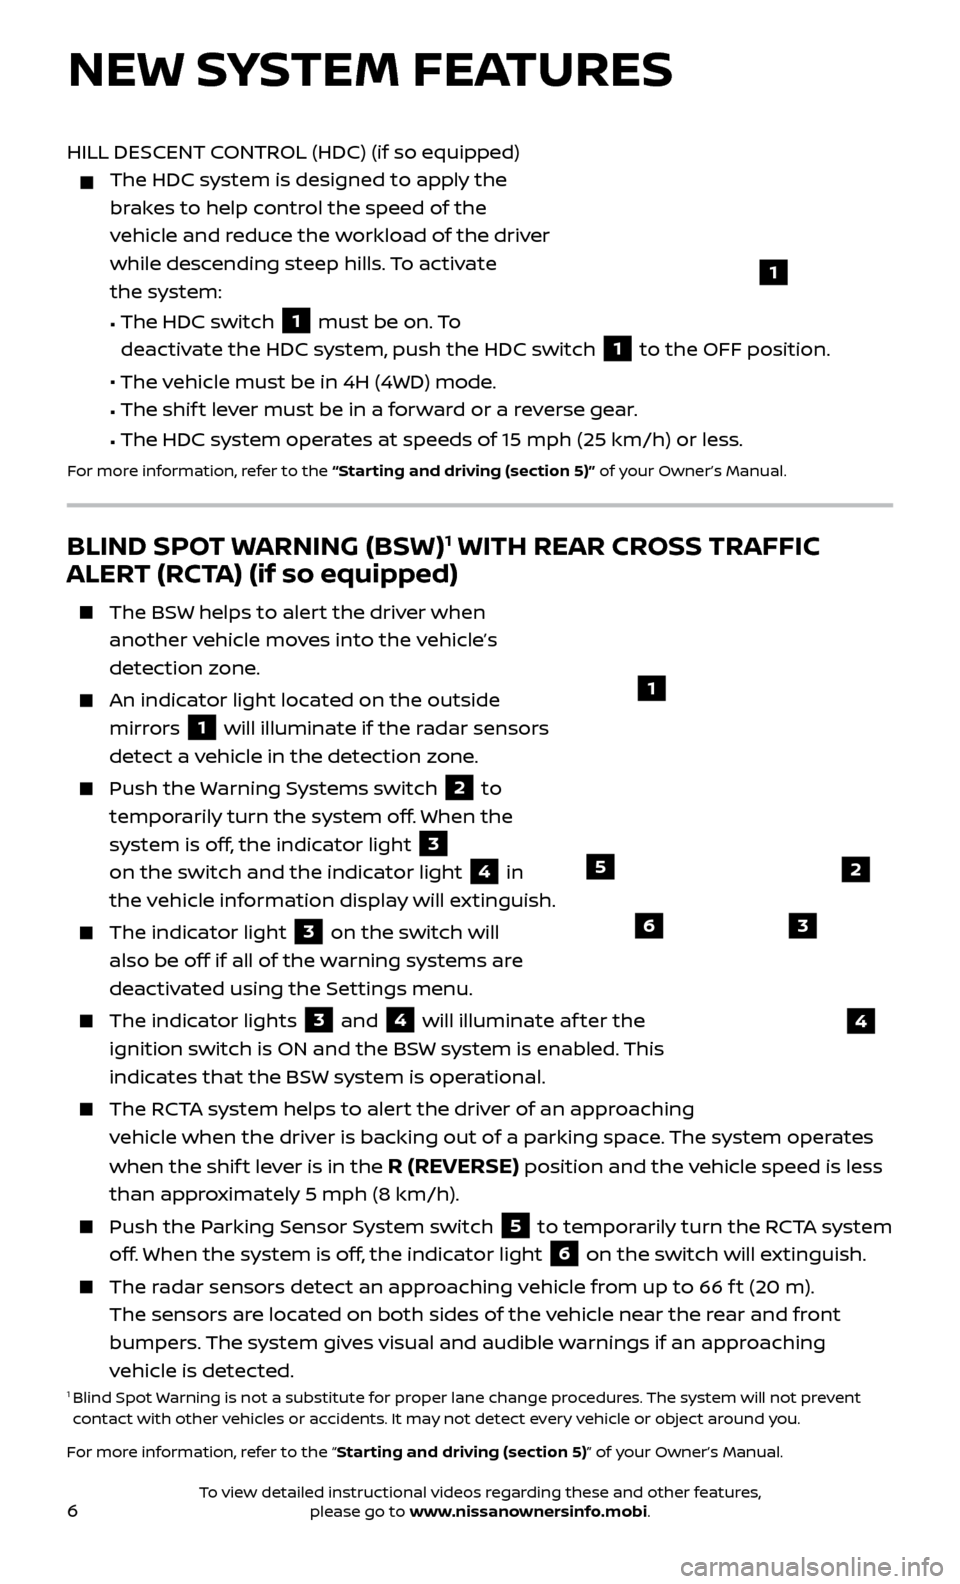
The BSW helps to alert the driver when
another vehicle moves into the vehicle’s
detection zone.
An indicator light located on the outside mirrors
1 will illuminate if the radar sensors
detect a vehicle in the detection zone.
Push the Warning Systems switch 2 to
temporarily turn the system off. When the
system is off, the indicator light
3
on the switch and the indicator light
4 in
the vehicle information display will extinguish.
The indic ator light 3 on the switch will
also be off if all of the warning systems are
deactivated using the Settings menu.
The indic ator lights 3 and 4 will illuminate af ter the
ignition switch is ON and the BSW system is enabled. This
indicates that the BSW system is operational.
The RCTA system helps to alert the driver of an approaching vehicle when the driver is backing out of a parking space. The system operates
when the shif t lever is in the
R (REVERSE) position and the vehicle speed is less
than approximately 5 mph (8 km/h).
Push the P arking Sensor System switch 5 to temporarily turn the RCTA system
off. When the system is off, the indicator light
6 on the switch will extinguish.
The radar sensors detect an approaching vehicle from up to 66 f t (20 m). The sensors are located on both sides of the vehicle near the rear and front
bumpers. The system gives visual and audible warnings if an approaching
vehicle is detected.
1 Blind Spot Warning is not a substitute for proper lane change procedures. The system will not prevent
contact with other vehicles or accidents. It may not detect every vehicle or object around you.
For more information, refer to the “Starting and driving (section 5)” of your Owner’s Manual.
1
NEW SYSTEM FEATURES
HILL DESCENT CONTROL (HDC) (if so equipped)
The HDC system is designed to appl y the
brakes to help control the speed of the
vehicle and reduce the workload of the driver
while descending steep hills. To activate
the system:
•
The HDC switch 1 must be on. To
deactivate the HDC system, push the HDC switch
1 to the OFF position.
•
The vehicle must be in 4H (4WD) mode.
•
The shif
t lever must be in a forward or a reverse gear.
•
The HDC system oper
ates at speeds of 15 mph (25 km/h) or less.
For more information, refer to the “Starting and driving (section 5)” of your Owner’s Manual.
1
4
5
6
2
3
To view detailed instructional videos regarding these and other features, please go to www.nissanownersinfo.mobi.
Page 17 of 40

15
REAR SEATS (if so equipped)
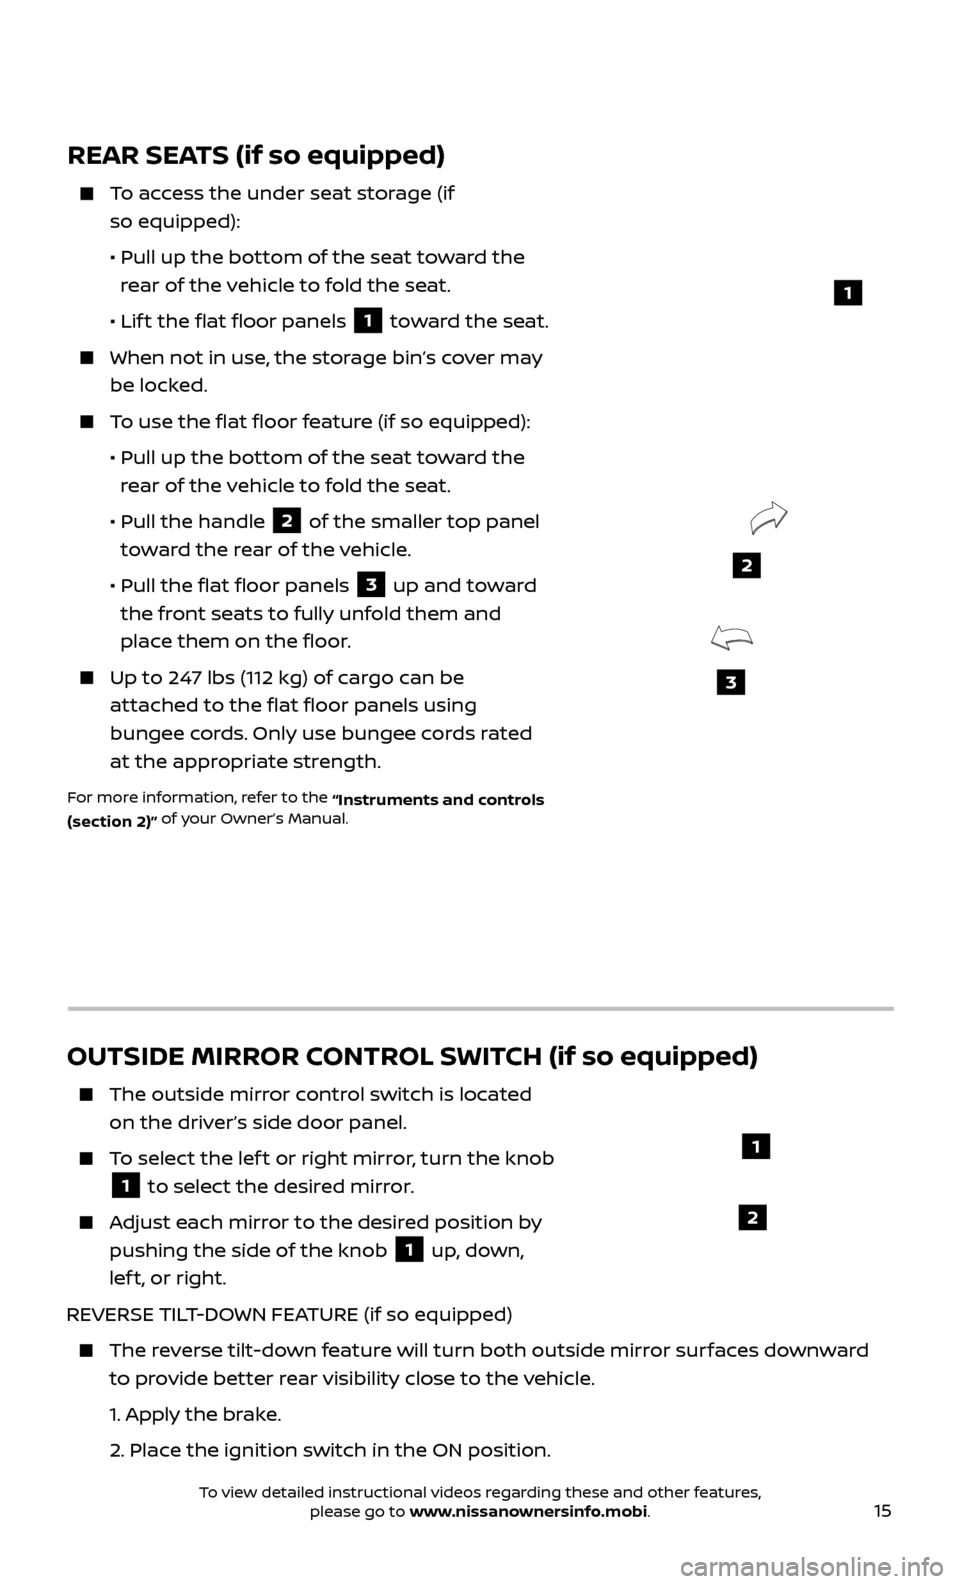
To access the under seat storage (if so equipped):
•
Pul
l up the bottom of the seat toward the
rear of the vehicle to fold the seat.
• Lif
t the flat floor panels
1 toward the seat.
When not in use, the storage bin’s cover may
be locked.
To use the flat floor feature (if so equipped):
•
Pul
l up the bottom of the seat toward the
rear of the vehicle to fold the seat.
•
Pul
l the handle
2 of the smaller top panel
toward the rear of the vehicle.
•
Pul
l the flat floor panels
3 up and toward
the front seats to fully unfold them and
place them on the floor.
Up to 247 lbs (112 kg) of cargo can be attached to the flat floor panels using
bungee cords. Only use bungee cords rated
at the appropriate strength.
For more information, refer to the “Instruments and controls
(section 2)” of your Owner’s Manual.
3
2
1
OUTSIDE MIRROR CONTROL SWITCH (if so equipped)
The outside mirr
or control switch is located
on the driver’s side door panel.
To select the lef t or right mirror, turn the knob
1 to select the desired mirror.
Adjust each mirror to the desired position by
pushing the side of the knob
1 up, down,
lef t, or right.
REVERSE TILT-DOWN FEATURE (if so equipped)
The reverse tilt-down feature will turn both outside mirror surfaces downward to provide better rear visibility close to the vehicle.
1.
Apply the brake.
2.
Place the ignition switch in the ON position.
1
2
To view detailed instructional videos regarding these and other features, please go to www.nissanownersinfo.mobi.
Page 18 of 40

16
FIRST DRIVE FEATURES
AUTOMATIC DRIVE POSITIONER (if so equipped)
Two positions for the driver’s seat, steering column and outside mirrors (if so equipped)
can be stored in the automatic drive
positioner memory.
Follow this procedure to set the memory positions:
•
C
onfirm that the shif t lever is in the
P (PARK) position.
• Plac
e the ignition switch in the ON or ACC position.
•
A
djust the driver’s seat, steering column and outside mirrors (if so equipped) to
the desired positions using the adjusting switches for each feature.
•
Push the SET switch, and within 5 seconds, push the memory switch (1 or 2) for
at least 1 second.
• The indic
ator light on the memory switch you select will illuminate for
approximately 5 seconds.
• The driv
er’s seat, steering column and outside mirror positions (if so equipped)
are now set to your preferences.
These memoriz ed positions can also be linked to your Nissan Intelligent Key ®
.
To link a memorized position to your Nissan Intelligent Key ®
, press the unlock
button on the key fob af ter completing the previous step.
For more information, refer to the “Pre-driving checks and adjustments (section 3)” of your
Owner’s Manual.
3. Move the shif t lever to the R (REVERSE) position.
4.
Both outside mirr
or surfaces will turn downward. (The mirror control switch
1 must be out of the center [neutral] position.)
The outside mirr or surfaces will return to their original positions when one of
the following conditions occurs:
• The shif
t lever is moved to any position other than
R (REVERSE).
•
The outside mirror control switch
1 is set to the center (neutral) position.
•
The ignition switch is placed in the
OFF position.
POWER FOLDING OUTSIDE MIRRORS (if so equipped)
To open or close the mirrors, push the switch 2.
For more information, refer to the “Pre-driving checks and adjustments (section 3)” of your
Owner’s Manual.
To view detailed instructional videos regarding these and other features, please go to www.nissanownersinfo.mobi.
Page 22 of 40

20
6 DEFROSTING/DEFOGGING FRONT AND SIDE WINDOWS
Press the front defroster button to turn the system on. The A/C
automatically turns on when the front defroster mode is selected. This
feature removes humidity from the air.
Set the temper ature control dial 2 and the fan speed control button 4 to
their maximum settings.
7 REAR WINDOW AND/OR OUTSIDE MIRROR DEFROSTER SWITCH
(if so equipped)
Push the r ear window defroster switch to turn the system on or off.
The rear window defroster automatically turns off af ter approximately
15 minutes.
8 FRESH AIR INTAKE CONTROL BUTTON
Press the fresh air intake control button to draw outside air into the
passenger compartment. The indicator light on the button will illuminate.
9 AIR RECIRCULATION BUTTON
Press the air recirculation button to recirculate air inside the vehicle.
The indicator light on the button will illuminate. This system is used to avoid
certain outside odors and to help adjust the inside vehicle temperature
more effectively.
Press the air recirculation button again to turn air recirculation off. This
allows outside air to be drawn into the passenger compartment to prevent
fogging in the front defroster, floor or front defroster/floor mode.
The air recirculation mode cannot be activated when the climate control system is in the front defroster mode
.
10 A/C BUTTON
Press the A/C button to manually turn the A/C on or off.
For more information, refer to the “Instruments and controls (section 2)” and the “Monitor, climate,
audio, phone and voice recognition systems (section 4)” of your Owner’s Manual.
USB (Universal Serial Bus) CONNECTION PORT/AUX JACK AND
iPod ®
INTERFACE1
The USB por t/Aux jack 1 is located on the control panel
below the climate controls.
When a c ompatible USB memory device or iPod ®
is plugged
into the USB port, compatible audio files stored on the device
can be played through the vehicle’s audio system and
front display.
1 Driving is serious business and r equires your full attention. If you have to use the
connected device while driving, exercise extreme caution at all times so full attention may be given to
vehicle operation. External device not included.
For more information, refer to the “Monitor, climate, audio, phone and voice recognition systems
(section 4)” of your Owner’s Manual.
1
FIRST DRIVE FEATURES
To view detailed instructional videos regarding these and other features, please go to www.nissanownersinfo.mobi.