2017 NISSAN TITAN key
[x] Cancel search: keyPage 3 of 40
v
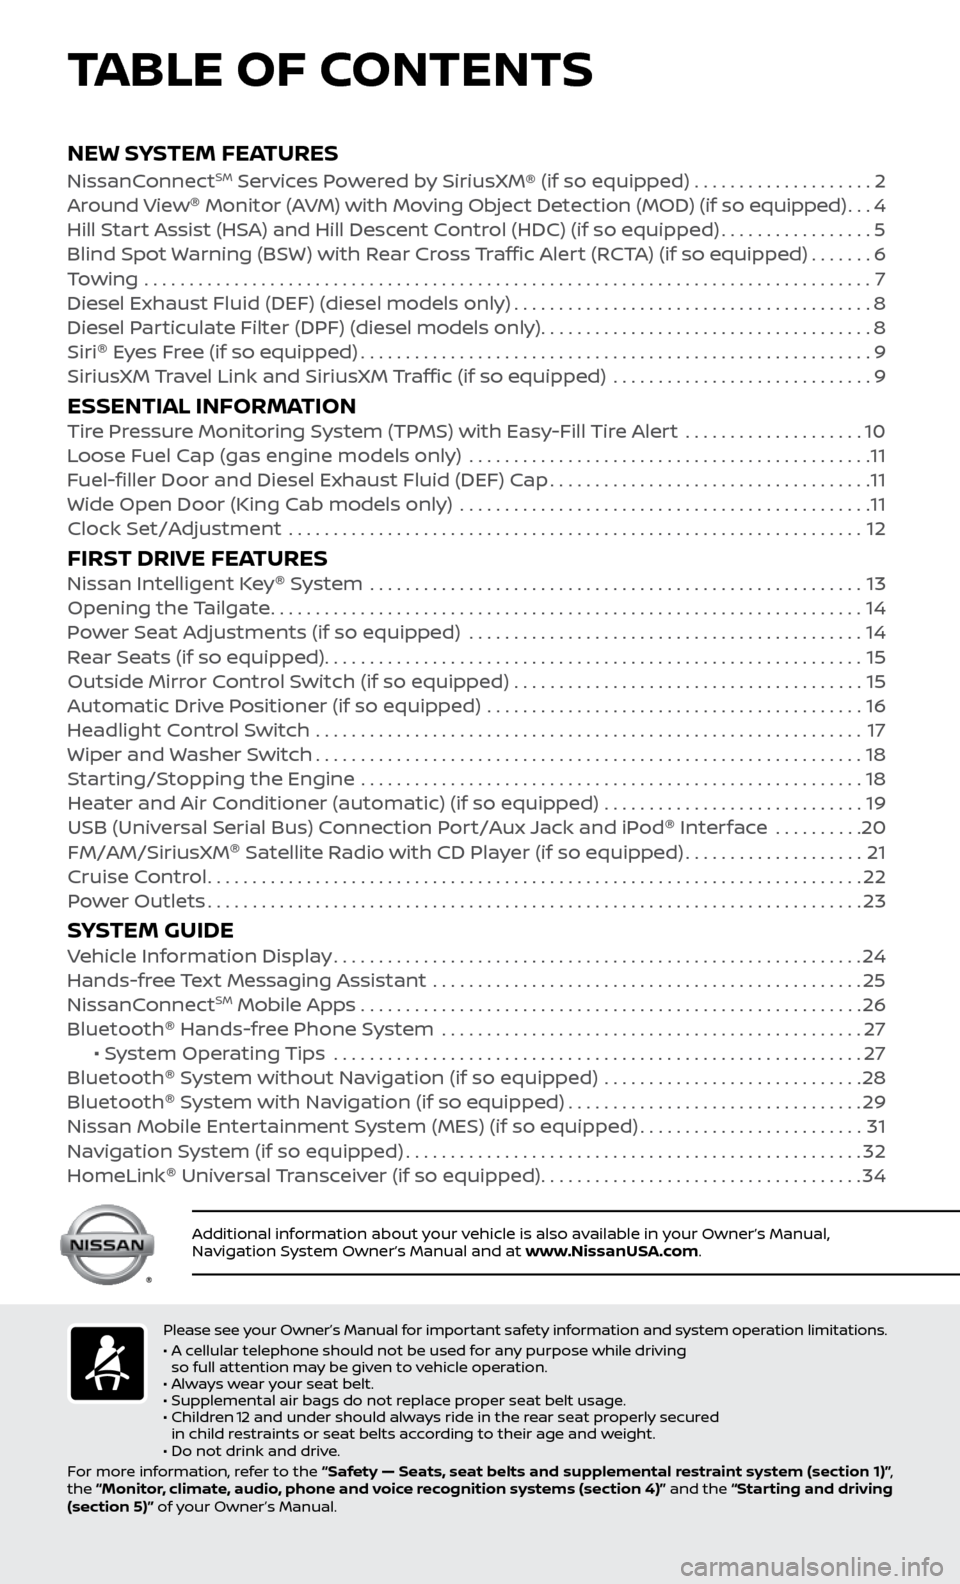
NEW SYSTEM FEATURESNissanConnectSM Services Powered by SiriusXM® (if so equipped) . . . . . . . . . . . . . . . . . . . . 2
Around View ®
Monitor (AVM) with Moving Object Detection (MOD) (if so equipped)...4
Hil
l Start Assist (HSA) and Hill Descent Control (HDC) (if so equipped)
.................5
Blind Spot
Warning (BSW) with Rear Cross Traffic Alert (RCTA) (if so equipped)
.......6
T
owing
.......................................................................\
..........
7
Diesel Exhaust Fluid (DEF) (diesel models onl
y)
........................................8
Diesel P
articulate Filter (DPF) (diesel models only)
.....................................8
Siri ®
E
yes Free (if so equipped)
.........................................................9
SiriusXM
Travel Link and SiriusXM Traffic (if so equipped) .............................
9
ESSENTIAL INFORMATIONTire Pressure Monitoring System (TPMS) with Easy-Fill Tire Alert ....................10
L oose Fuel Cap (gas engine models only) .............................................11
F
uel-filler Door and Diesel Exhaust Fluid (DEF) Cap
....................................11
Wide Open Door (King C
ab models only) ..............................................
11
Clock Set/A
djustment ................................................................
12
FIRST DRIVE FEATURESNissan Intelligent Key®
System .......................................................13
Opening the Tailgate..................................................................14
P
ower Seat Adjustments (if so equipped)
............................................14
R
ear Seats (if so equipped)
............................................................15
Outside Mirr
or Control Switch (if so equipped) . . . . . . . . . . . . . . . . . . . . . . . . . . . . . . . . . . . .\
. . . 15
Automatic Drive Positioner (if so equipped)
..........................................
16
He
adlight Control Switch .............................................................
17
Wiper and
Washer Switch
.............................................................18
S
tarting/Stopping the Engine ........................................................
18
He
ater and Air Conditioner (automatic) (if so equipped) .............................
19
USB (Univ
ersal Serial Bus) Connection Port/Aux Jack and iPod ®
Interface
..........
20
FM/AM/SiriusXM ®
Satel
lite Radio with CD Player (if so equipped)
....................21
Cruise C
ontrol
........................................................................\
.22
P
ower Outlets
........................................................................\
.23
SYSTEM GUIDEVehicle Information Display...........................................................24
Hands-fr ee Text Messaging Assistant ................................................25
NissanC
onnect
SM Mobile Apps . . . . . . . . . . . . . . . . . . . . . . . . . . . . . . . . . . . .\
. . . . . . . . . . . . . . . . . . . . 26
Bluetooth ®
Hands-free Phone System
...............................................27 • S
ystem Operating Tips ...........................................................
27
Bluetooth ®
S
ystem without Navigation (if so equipped) .............................
28
Bluetooth ®
S
ystem with Navigation (if so equipped)
.................................29
Nissan Mobile Enter
tainment System (MES) (if so equipped)
.........................31
Na
vigation System (if so equipped)
...................................................32
HomeLink ®
Univ
ersal Transceiver (if so equipped)
....................................34
TABLE OF CONTENTS
Please see your Owner’s Manual for important safety information and system operation limitations.
• A c ellular telephone should not be used for any purpose while driving
so full attention may be given to vehicle operation.
• Always wear your seat belt.
• Supplemental air bags do not replace proper seat belt usage.
•
Childr
en 12 and under should always ride in the rear seat properly secured
in child restraints or seat belts according to their age and weight.
• Do not drink and drive.
For more information, refer to the “Safety — Seats, seat belts and supplemental restraint system (section 1)” ,
the “Monitor, climate, audio, phone and voice recognition systems (section 4)” and the “Starting and driving
(section 5)” of your Owner’s Manual.
Additional information about your vehicle is also available in your Owner’s Manual,
Navigation System Owner’s Manual and at www.NissanUSA.com.
To view detailed instructional videos regarding these and other features, please go to www.nissanownersinfo.mobi.
Page 4 of 40

2
1
NEW SYSTEM FEATURES
NISSANCONNECTSM SERVICES1 POWERED by SiriusXM®
(if so equipped)
NissanConnect Services is a collection of security and convenience services that add
innovation to your daily drive.
To enroll in NissanConnect Services, create an account or log into your Nissan
Owner Portal with your Vehicle Identification Number or VIN. Under the
NissanConnect Services tab, select the red button next to Manage Subscription.
Follow the prompts to enroll in NissanConnect Services. Next, download the
NissanConnect Services companion app and log into it using your Nissan Owner
Portal ID and password.
For full details on NissanConnect Services or to enroll your vehicle, please visit
www.nissanusa.com/connect or call 855-426-6628.
Here is a quick overview of some of the features that may be available for your
vehicle. A full description of these and other NissanConnect Services can be found in
your Navigation System Owner’s Manual.
Automatic Collision Notification, a service that generates an automatic connection between
the vehicle and the Emergency Response
Center when the vehicle has been involved
in an accident that was severe enough to
deploy the air bags.
Emergency Call, which connects you to a NissanConnect Services Specialist who will
assist in the dispatch of emergency services to the vehicle location. To use this
feature, press the SOS button
1 on the overhead console. The SOS button
should only be used in emergency situations.
Roadside Assistance, which dispatches roadside assistance to the vehicle location
in non-emergency situations. Roadside
Assistance can be accessed by touching the
headset icon 2 on the map screen, via
mobile application or by calling the Roadside
Assistance provider directly.
Stolen Vehicle Locator, a service that works in coordination with law enforcement agencies
to assist in the recovery of a stolen vehicle.
Remote Door Lock/Unlock, for use when you forget to lock your car or if you need to open it and don’t have the keys. To use this feature, log in to the
NissanConnect Services companion app or website or contact a NissanConnect
Services Response Specialist.
Assisted Se arch, a feature that allows you to verbally request point-of-interest
or destination data from a live operator by touching the
headset icon 2on
the map screen.
2
To view detailed instructional videos regarding these and other features, please go to www.nissanownersinfo.mobi.
Page 5 of 40

3
Journey Planner, with which you can send a route with a destination and up to five way
points directly to the vehicle.
Boundar y Alert, a feature that allows you to
monitor the movement of your vehicle in
and out of specified regions you have set on
the Monitoring section of the NissanConnect
Services web portal or companion app, and
Speed Alert, which sends you alerts when your vehicle speed exceeds a threshold you have set on the web portal or
companion app.
To access these features in your vehicle:
•
Pr
ess the APPS button
3 on the control
panel, then
•
Touch the NissanConnect Services key
4.
1 Only use NissanConnectSM Services powered by SiriusXM®
and NissanConnectSM Mobile Apps when safe to do so.
NissanConnectSM Services and Mobile Apps availability is dependent on vehicle model, trim level,
packaging, and/or options. See www.NissanUSA.com/connect for complete product and service
availability details. Late availability for some features. Compatible smartphone required to operate
NissanConnect
SM Mobile Apps. Services require an operating vehicle device and cellular and GPS
coverage. Cellular network and GPS signals are not available in all areas and/or at all times. Neither
NISSAN nor SiriusXM are responsible for associated costs, if any, for continued operation due to cellular
network termination/changes. Cellular provider may terminate/restrict service without notice.
Certain services require a PIN for activation. Applicable Subscription Agreement required.
See www.NissanUSA.com/connect for details and service limitations. Enrollment is required to
receive the full suite of services. Text rates and/or data usage may apply.
For more information, refer to the “Information (section 5)” of your Navigation System Owner’s Manual.
4
3
To view detailed instructional videos regarding these and other features, please go to www.nissanownersinfo.mobi.
Page 9 of 40
7
TOWING1
TRAILER BRAKE CONTROLLER UNIT (if so equipped)
The
Trailer Brake Controller Unit will assist with effective and smooth braking while
towing a trailer.
Operating Modes
•
A
utomatic: Automatic operation of trailer brake pressure based on gain and
boost settings.
•
Manual
: Manually applies trailer brake pressure without pressing the vehicle’s
brake pedal.
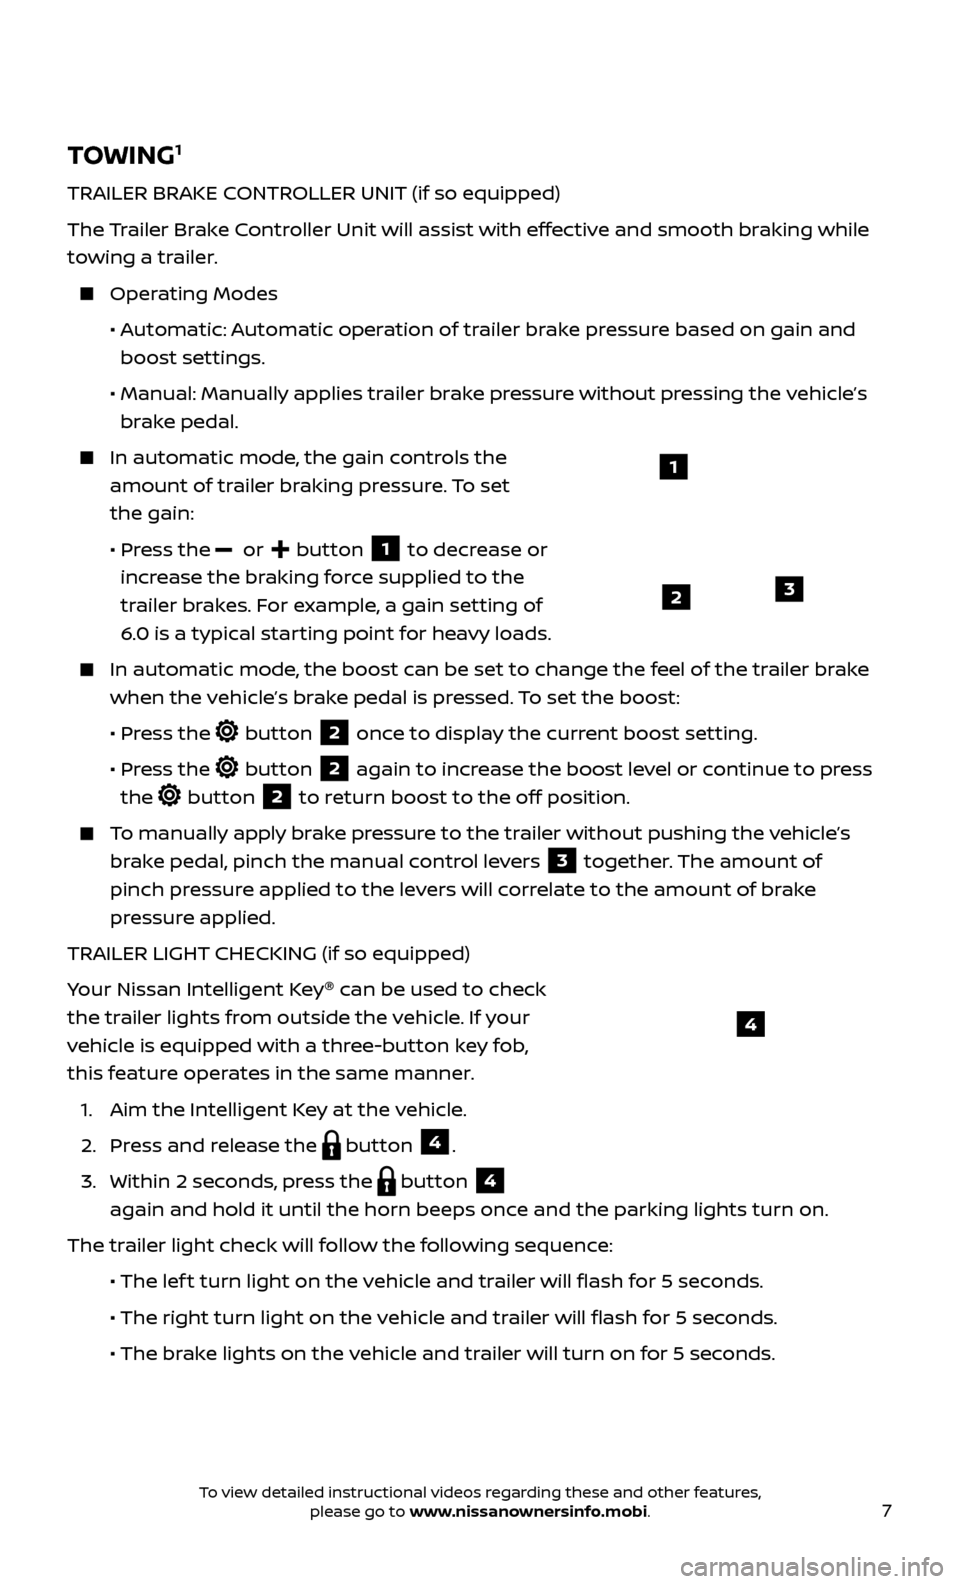
In automatic mode, the gain controls the
amount of trailer braking pressure. To set
the gain:
•
Pr
ess the
or button 1 to decrease or
increase the braking force supplied to the
trailer brakes. For example, a gain setting of
6.0 is a typical starting point for heavy loads.
In automatic mode, the boost can be set to change the feel of the trailer brake
when the vehicle’s brake pedal is pressed. To set the boost:
•
Pr
ess the
button 2 once to display the current boost setting.
•
Pr
ess the
button 2 again to increase the boost level or continue to press
the
button 2 to return boost to the off position.
To manually apply brake pressure to the trailer without pushing the vehicle’s brake pedal, pinch the manual control levers
3 together. The amount of
pinch pressure applied to the levers will correlate to the amount of brake
pressure applied.
TRAILER LIGHT CHECKING (if so equipped)
Your Nissan Intelligent Key ®
can be used to check
the trailer lights from outside the vehicle. If your
vehicle is equipped with a three-button key fob,
this feature operates in the same manner.
1. Aim the Intel
ligent Key at the vehicle.
2. Pr
ess and release the
button 4.
3.
Within 2 sec
onds, press the
button 4
again and hold it until the horn beeps once and the parking lights turn on.
The trailer light check will follow the following sequence:
• The lef
t turn light on the vehicle and trailer will flash for 5 seconds.
• The right turn light on the v
ehicle and trailer will flash for 5 seconds.
• The br
ake lights on the vehicle and trailer will turn on for 5 seconds.
1
23
4
To view detailed instructional videos regarding these and other features, please go to www.nissanownersinfo.mobi.
Page 14 of 40
12
CLOCK SET/ADJUSTMENT
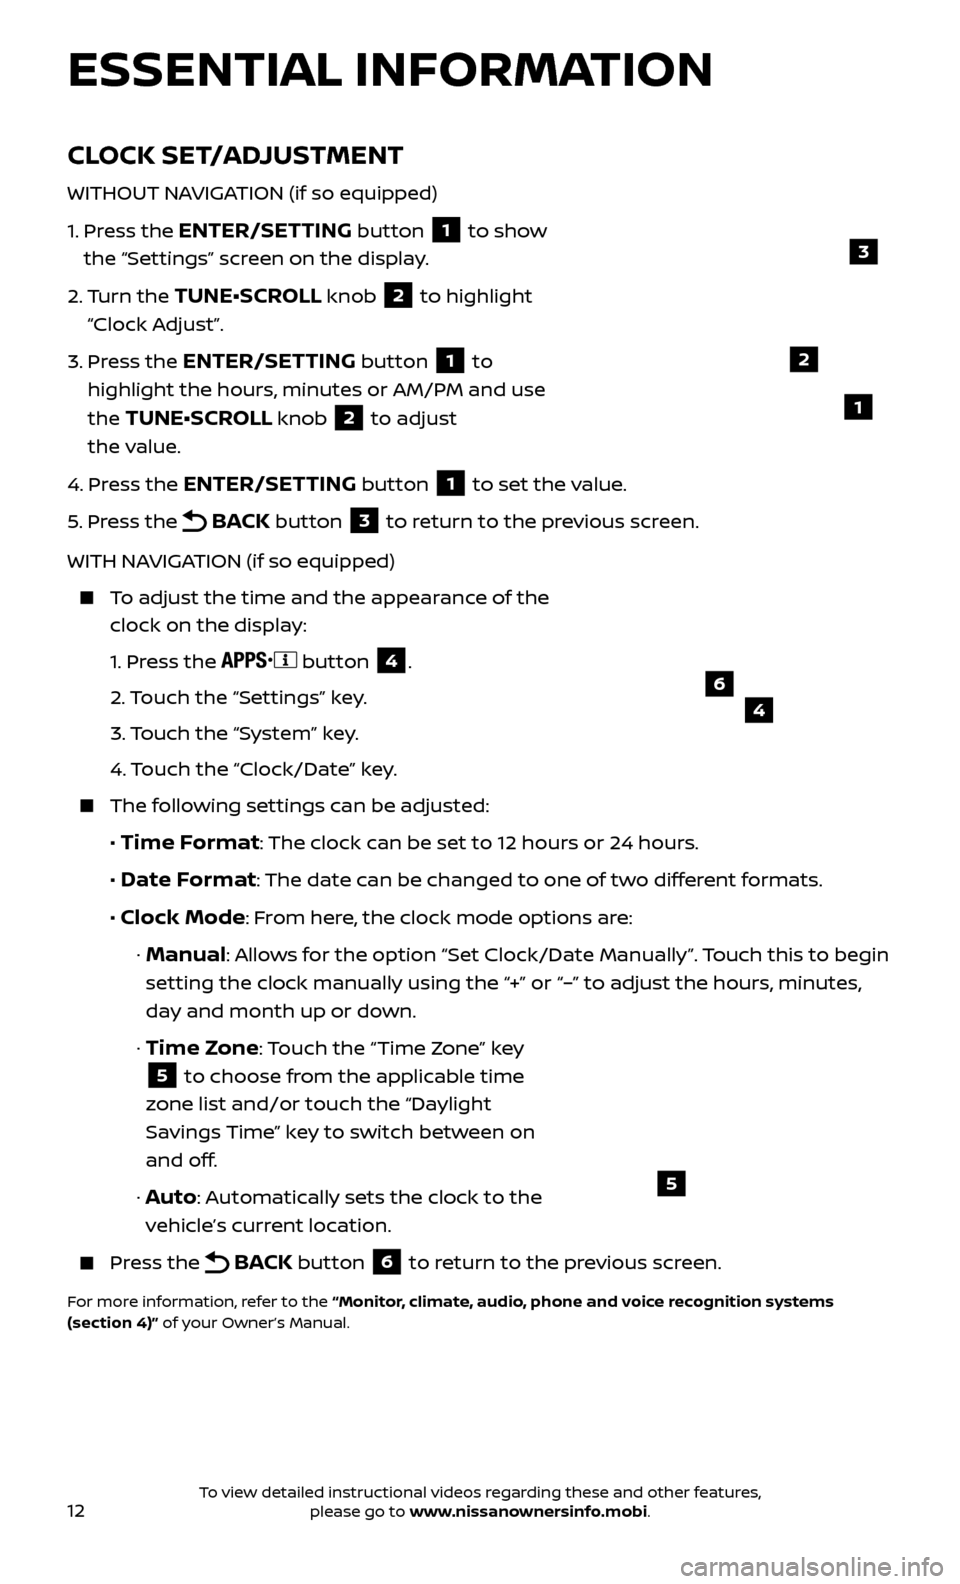
WITHOUT NAVIGATION (if so equipped)
1.
Pr
ess the
ENTER/SETTING button 1 to show
the “Settings” screen on the display.
2.
Turn the
TUNE•SCROLL knob 2 to highlight
“Clock Adjust”.
3.
Pr
ess the
ENTER/SETTING button 1 to
highlight the hours, minutes or AM/PM and use
the
TUNE•SCROLL knob 2 to adjust
the value.
4.
Pr
ess the
ENTER/SETTING button 1 to set the value.
5.
Pr
ess the
BACK button 3 to return to the previous screen.
WITH NAVIGATION (if so equipped)
To adjust the time and the appearance of the clock on the display:
1.
Press the
button 4.
2.
Touch the “Settings” key.
3.
Touch the “System” key.
4.
Touch the “Clock/Date” key.
The following settings can be adjusted:
•
Time Format: The clock can be set to 12 hours or 24 hours.
•
Date Format: The date can be changed to one of two different formats.
• Clock Mode: From here, the clock mode options are:
· Manual: Allows for the option “Set Clock/Date Manually”. Touch this to begin
setting the clock manually using the “+” or “–” to adjust the hours, minutes,
day and month up or down.
·
Time Zone: Touch the “Time Zone” key
5 to choose from the applicable time
zone list and/or touch the “Daylight
Savings Time” key to switch between on
and off.
· Auto: Automatically sets the clock to the
vehicle’s current location.
Press the BACK button 6 to return to the previous screen.
For more information, refer to the “Monitor, climate, audio, phone and voice recognition systems
(section 4)” of your Owner’s Manual.
5
2
ESSENTIAL INFORMATION
1
46
3
To view detailed instructional videos regarding these and other features, please go to www.nissanownersinfo.mobi.
Page 15 of 40
13
NISSAN INTELLIGENT KEY®
SYSTEM
The Nissan Intelligent Key ®
system allows you to lock or unlock the vehicle and start
the engine. It is important to make sure the Intelligent Key is with you (that is, in your
pocket or purse).
The oper ating range of the Intelligent Key is within 31.5 in (80 cm) of the
corresponding request switch.
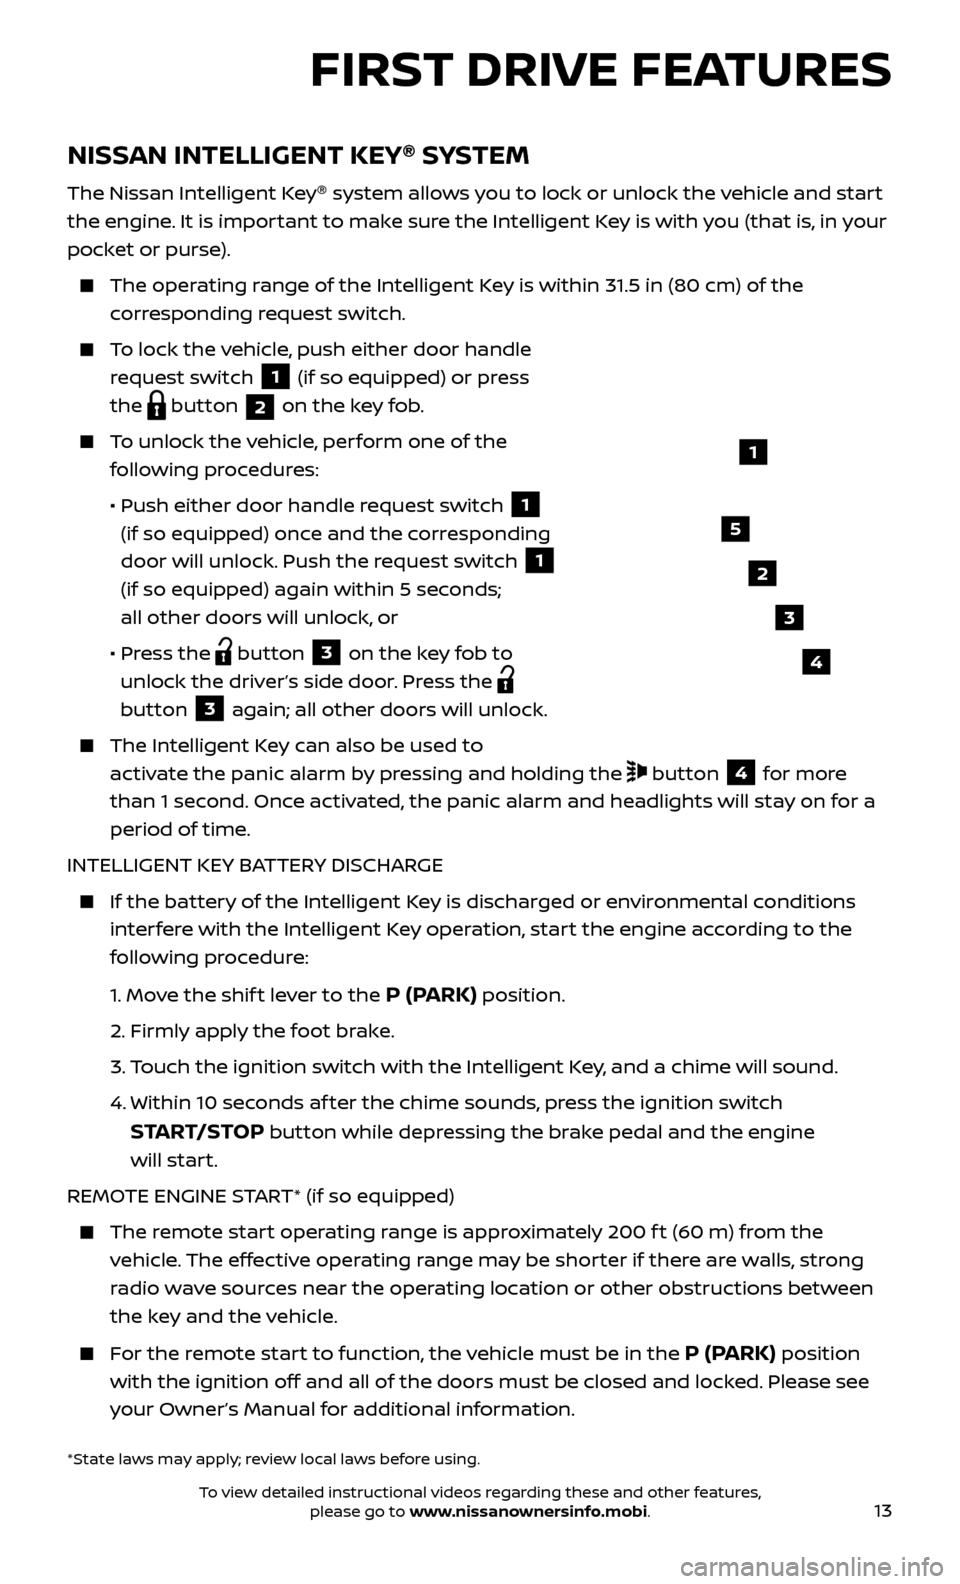
To lock the vehicle, push either door handle request switch
1 (if so equipped) or press
the
button 2 on the key fob.
To unlock the vehicle, perform one of the
following procedures:
•
Push either door hand
le request switch
1
(if so equipped) once and the corresponding
door will unlock. Push the request switch
1
(if so equipped) again within 5 seconds;
all other doors will unlock, or
•
Pr
ess the
button 3 on the key fob to
unlock the driver’s side door. Press the
button 3 again; all other doors will unlock.
The Intel ligent Key can also be used to
activate the panic alarm by pressing and holding the
button 4 for more
than 1 second. Once activated, the panic alarm and headlights will stay on for a
period of time.
INTELLIGENT KEY BATTERY DISCHARGE
If the bat tery of the Intelligent Key is discharged or environmental conditions
interfere with the Intelligent Key operation, start the engine according to the
following procedure:
1.
Move the shif t lever to the
P (PARK) position.
2.
Firmly apply the foot brake.
3.
T
ouch the ignition switch with the Intelligent Key, and a chime will sound.
4.
Within 10 sec
onds af ter the chime sounds, press the ignition switch
START/STOP button while depressing the brake pedal and the engine
will start.
REMOTE ENGINE START* (if so equipped)
The remote start operating range is approximately 200 f t (60 m) from the vehicle. The effective operating range may be shorter if there are walls, strong
radio wave sources near the operating location or other obstructions between
the key and the vehicle.
For the remote start to function, the vehicle must be in the P (PARK) position
with the ignition off and all of the doors must be closed and locked. Please see
your Owner’s Manual for additional information.
1
FIRST DRIVE FEATURES
2
3
4
5
*State laws may apply; review local laws before using.
To view detailed instructional videos regarding these and other features, please go to www.nissanownersinfo.mobi.
Page 18 of 40

16
FIRST DRIVE FEATURES
AUTOMATIC DRIVE POSITIONER (if so equipped)
Two positions for the driver’s seat, steering column and outside mirrors (if so equipped)
can be stored in the automatic drive
positioner memory.
Follow this procedure to set the memory positions:
•
C
onfirm that the shif t lever is in the
P (PARK) position.
• Plac
e the ignition switch in the ON or ACC position.
•
A
djust the driver’s seat, steering column and outside mirrors (if so equipped) to
the desired positions using the adjusting switches for each feature.
•
Push the SET switch, and within 5 seconds, push the memory switch (1 or 2) for
at least 1 second.
• The indic
ator light on the memory switch you select will illuminate for
approximately 5 seconds.
• The driv
er’s seat, steering column and outside mirror positions (if so equipped)
are now set to your preferences.
These memoriz ed positions can also be linked to your Nissan Intelligent Key ®
.
To link a memorized position to your Nissan Intelligent Key ®
, press the unlock
button on the key fob af ter completing the previous step.
For more information, refer to the “Pre-driving checks and adjustments (section 3)” of your
Owner’s Manual.
3. Move the shif t lever to the R (REVERSE) position.
4.
Both outside mirr
or surfaces will turn downward. (The mirror control switch
1 must be out of the center [neutral] position.)
The outside mirr or surfaces will return to their original positions when one of
the following conditions occurs:
• The shif
t lever is moved to any position other than
R (REVERSE).
•
The outside mirror control switch
1 is set to the center (neutral) position.
•
The ignition switch is placed in the
OFF position.
POWER FOLDING OUTSIDE MIRRORS (if so equipped)
To open or close the mirrors, push the switch 2.
For more information, refer to the “Pre-driving checks and adjustments (section 3)” of your
Owner’s Manual.
To view detailed instructional videos regarding these and other features, please go to www.nissanownersinfo.mobi.
Page 20 of 40
18
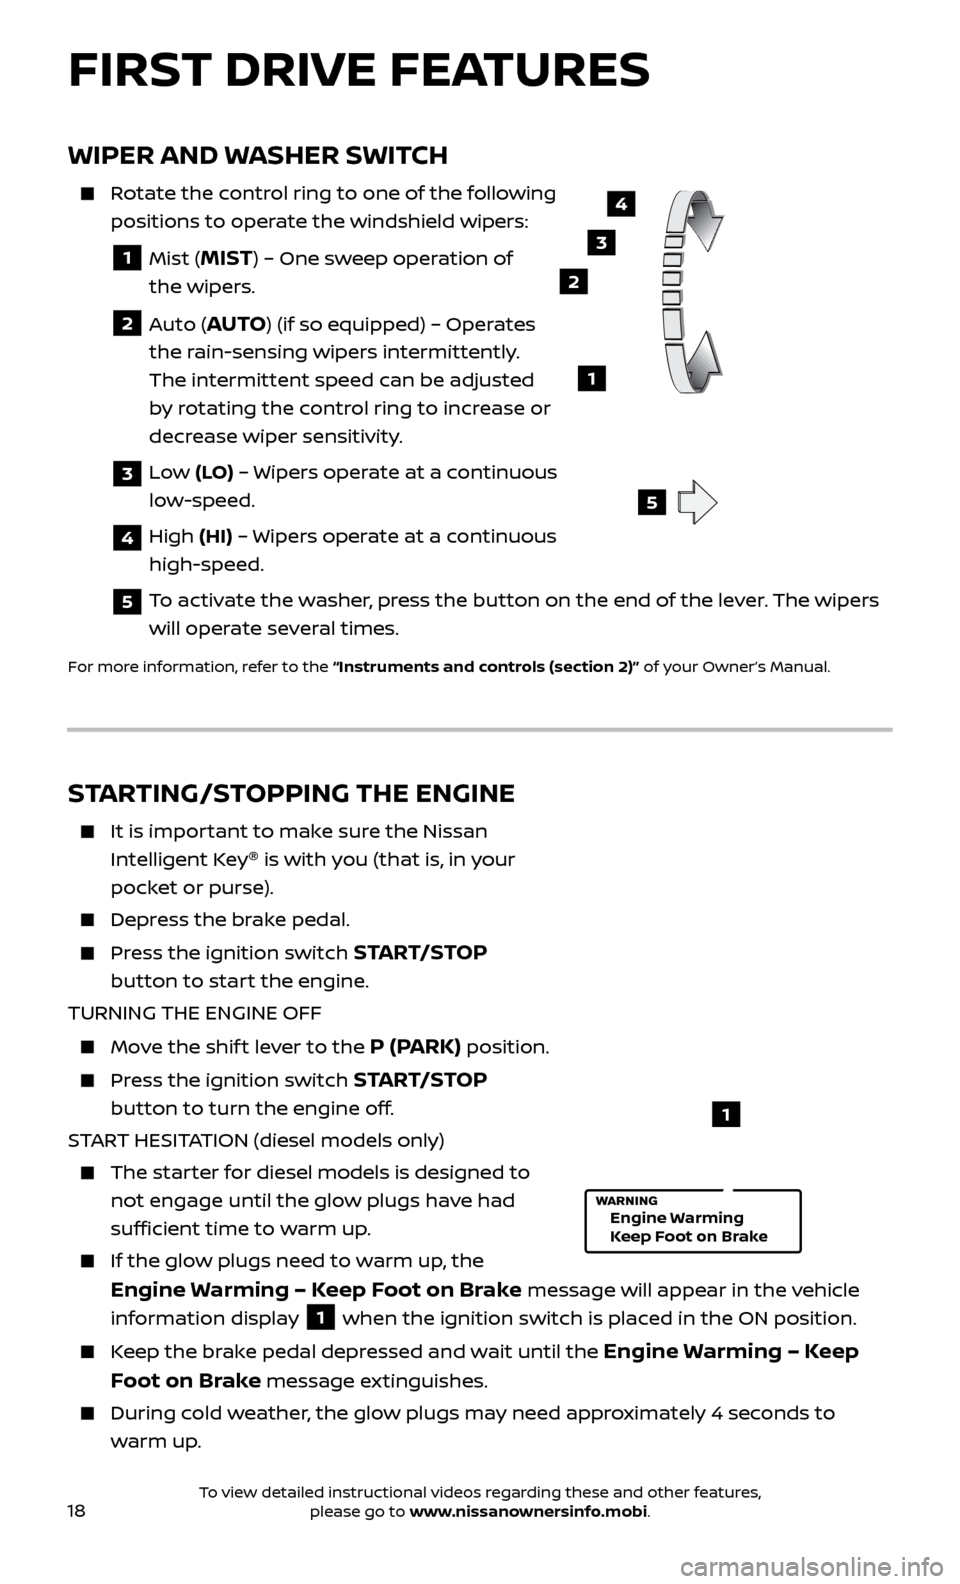
WIPER AND WASHER SWITCH
Rotate the control ring to one of the following positions to operate the windshield wipers:
1 Mist (MIST) – One sweep operation of
the wipers.
2 Auto (AUTO) (if so equipped) – Operates
the rain-sensing wipers intermittently.
The intermittent speed can be adjusted
by rotating the control ring to increase or
decrease wiper sensitivity.
3 Low (LO) – Wipers operate at a continuous
low-speed.
4 High (HI) – Wipers operate at a continuous
high-speed.
5 To activate the washer, press the button on the end of the lever. The wipers will operate several times.
For more information, refer to the “Instruments and controls (section 2)” of your Owner’s Manual.
3
2
1
4
LO HI
AUTO OFF
MIST
5
FIRST DRIVE FEATURES
STARTING/STOPPING THE ENGINE
It is impor tant to make sure the Nissan
Intelligent Key ®
is with you (that is, in your
pocket or purse).
Depress the brake pedal.
Press the ignition switch START/STOP
button to start the engine.
TURNING THE ENGINE OFF
Move the shif t lever to the P (PARK) position.
Press the ignition switch START/STOP
button to turn the engine off.
START HESITATION (diesel models only)
The starter for diesel models is designed to not engage until the glow plugs have had
sufficient time to warm up.
If the glo w plugs need to warm up, the
Engine Warming – Keep Foot on Brake message will appear in the vehicle
information display
1 when the ignition switch is placed in the ON position.
Keep the brake pedal depressed and wait until the Engine Warming – Keep
Foot on Brake
message extinguishes.
During cold weather, the glow plugs may need approximately 4 seconds to
warm up.
1
Engine Warming
Keep Foot on Brake
To view detailed instructional videos regarding these and other features, please go to www.nissanownersinfo.mobi.