2017 NISSAN TITAN ESP
[x] Cancel search: ESPPage 47 of 671
WARNING
Do not allow children to play with the seat
belts. Most seating positions are
equipped with Automatic Locking Retrac-
tor (ALR) mode seat belts. If the seat belt
becomes wrapped around a child’s neck
with the ALR mode activated, the child can
be seriously injured or killed if the seat
belt retracts and becomes tight. This can
occur even if the vehicle is parked. Un-
buckle the seat belt to release the child. If
the seat belt cannot be unbuckled or is
already unbuckled, release the child by
cutting the seat belt with a suitable tool
(such as a knife or scissors) to release the
seat belt.
Children need adults to help protect them.
They need to be properly restrained.
In addition to the general information in this
manual, child safety information is available from
many other sources, including doctors, teachers,
government traffic safety offices, and community
organizations. Every child is different, so be sure
to learn the best way to transport your child.
There are three basic types of child restraint
systems: ● Rear-facing child restraints ●
Forward-facing child restraints
● Booster seats
The proper restraint depends on the child’s size.
Generally, infants up to about 1 year and less
than 20 lbs (9 kg) should be placed in rear-facing
child restraints. Forward-facing child restraints
are available for children who outgrow rear-
facing child restraints and are at least 1 year old.
Booster seats are used to help position a vehicle
lap/shoulder belt on a child who can no longer
use a forward-facing child restraint.
WARNING
Infants and children need special protec-
tion. The vehicle’s seat belts may not fit
them properly. The shoulder belt may
come too close to the face or neck. The lap
belt may not fit over their small hip bones.
In an accident, an improperly fitting seat
belt could cause serious or fatal injury.
Always use appropriate child restraints.
All U.S. states and Canadian provinces or territo-
ries require the use of approved child restraints
for infants and small children. For additional infor-
mation, refer to “Child restraints” in this section. A child restraint may be secured in the vehicle by
using either the LATCH (Lower Anchors and
Tethers for CHildren) system or with the vehicle
seat belt. For additional information, refer to
“Child restraints” in this section.
NISSAN recommends that all pre-teens
and children be restrained in the rear seat
(if so equipped) . Studies show that children
are safer when properly restrained in the
rear seat than in the front seat.
This is especially important because your
vehicle has a supplemental restraint sys-
tem (air bag system) for the front passen-
ger. For additional information, refer to
“Supplemental Restraint System (SRS)” in
this section.
INFANTS
Infants up to at least 1 year old should be placed
in a rear-facing child restraint. NISSAN recom-
mends that infants be placed in child restraints
that comply with Federal Motor Vehicle Safety
Standards or Canadian Motor Vehicle Safety
Standards. You should choose a child restraint
that fits your vehicle and always follow the manu-
facturer’s instructions for installation and use.
CHILD SAFETY
1-24Safety—Seats, seat belts and supplemental restraint system
Page 80 of 671
WARNING
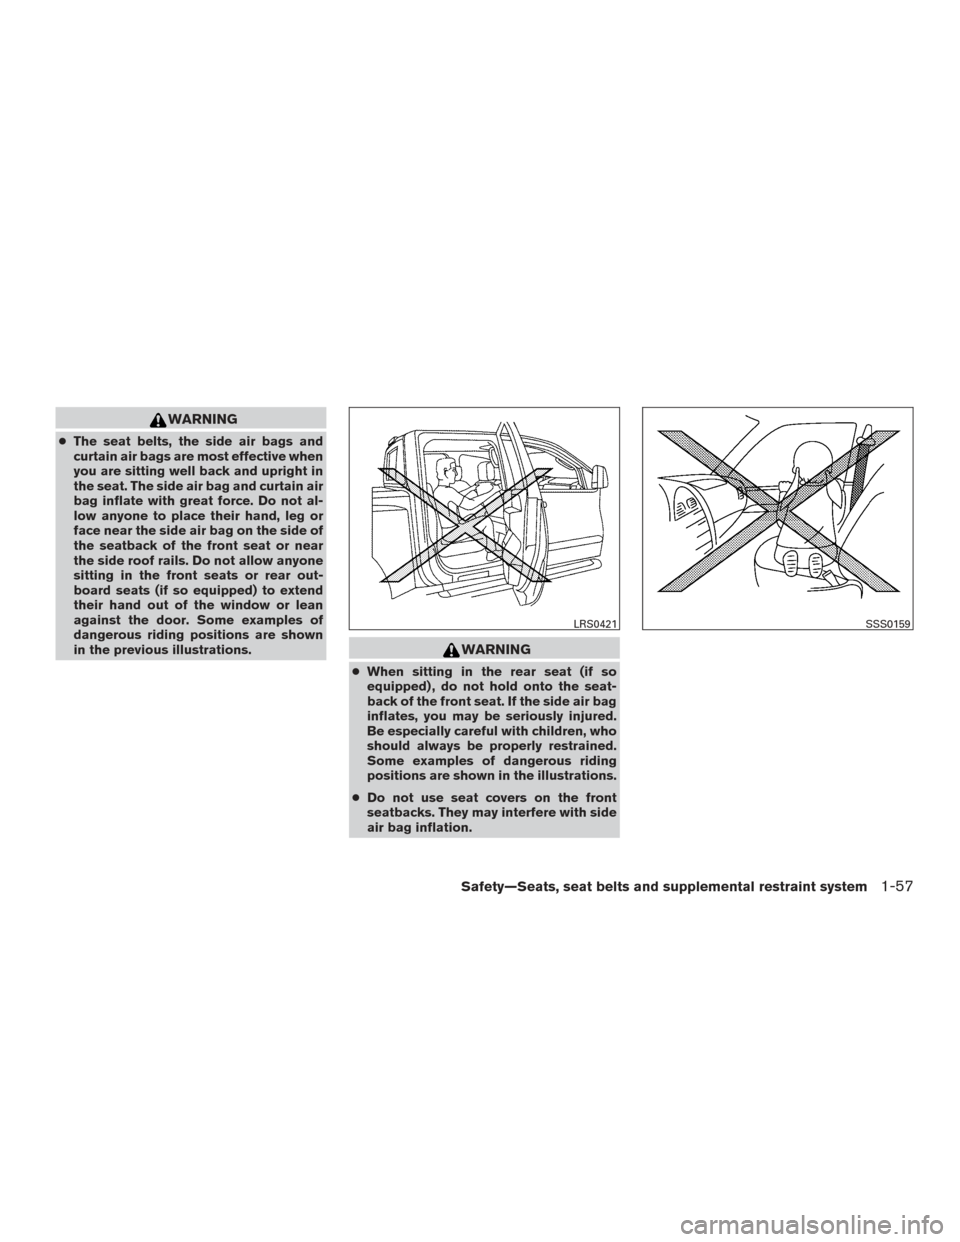
●The seat belts, the side air bags and
curtain air bags are most effective when
you are sitting well back and upright in
the seat. The side air bag and curtain air
bag inflate with great force. Do not al-
low anyone to place their hand, leg or
face near the side air bag on the side of
the seatback of the front seat or near
the side roof rails. Do not allow anyone
sitting in the front seats or rear out-
board seats (if so equipped) to extend
their hand out of the window or lean
against the door. Some examples of
dangerous riding positions are shown
in the previous illustrations.
WARNING
● When sitting in the rear seat (if so
equipped) , do not hold onto the seat-
back of the front seat. If the side air bag
inflates, you may be seriously injured.
Be especially careful with children, who
should always be properly restrained.
Some examples of dangerous riding
positions are shown in the illustrations.
● Do not use seat covers on the front
seatbacks. They may interfere with side
air bag inflation.
LRS0421SSS0159
Safety—Seats, seat belts and supplemental restraint system1-57
Page 94 of 671
WARNING
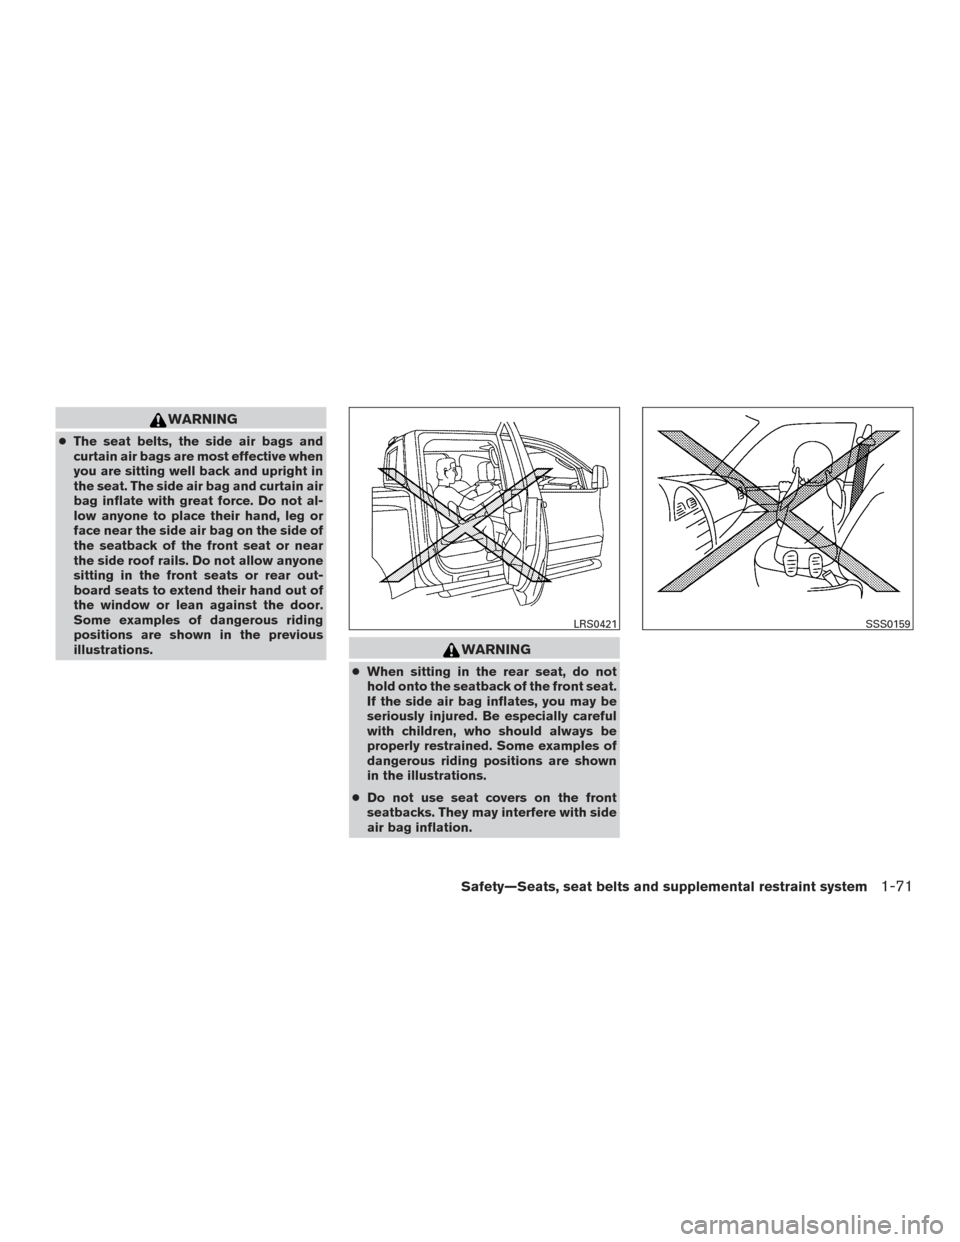
●The seat belts, the side air bags and
curtain air bags are most effective when
you are sitting well back and upright in
the seat. The side air bag and curtain air
bag inflate with great force. Do not al-
low anyone to place their hand, leg or
face near the side air bag on the side of
the seatback of the front seat or near
the side roof rails. Do not allow anyone
sitting in the front seats or rear out-
board seats to extend their hand out of
the window or lean against the door.
Some examples of dangerous riding
positions are shown in the previous
illustrations.
WARNING
● When sitting in the rear seat, do not
hold onto the seatback of the front seat.
If the side air bag inflates, you may be
seriously injured. Be especially careful
with children, who should always be
properly restrained. Some examples of
dangerous riding positions are shown
in the illustrations.
● Do not use seat covers on the front
seatbacks. They may interfere with side
air bag inflation.
LRS0421SSS0159
Safety—Seats, seat belts and supplemental restraint system1-71
Page 139 of 671
Vehicle Settings
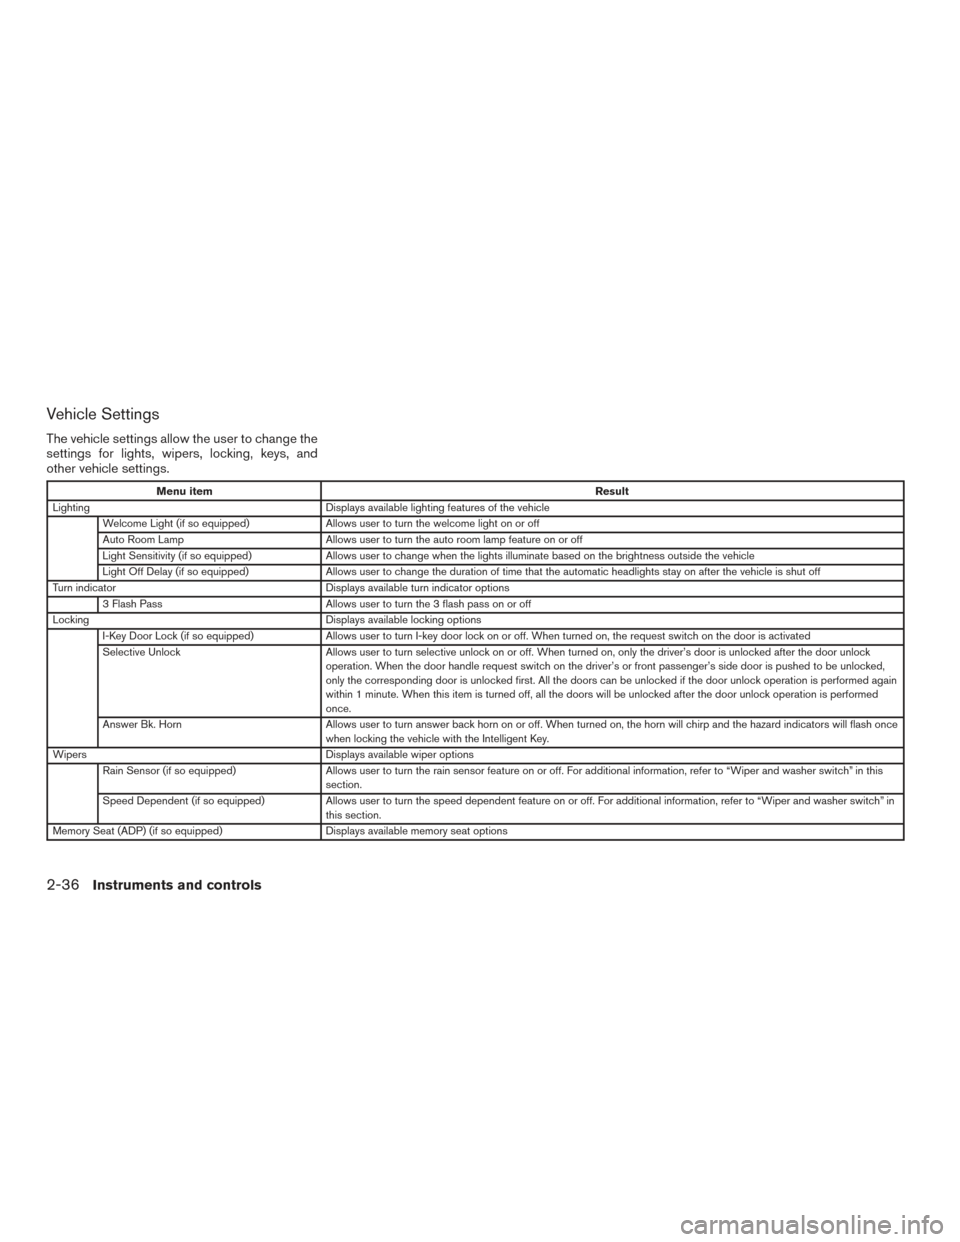
The vehicle settings allow the user to change the
settings for lights, wipers, locking, keys, and
other vehicle settings.
Menu itemResult
Lighting Displays available lighting features of the vehicle
Welcome Light (if so equipped) Allows user to turn the welcome light on or off
Auto Room Lamp Allows user to turn the auto room lamp feature on or off
Light Sensitivity (if so equipped) Allows user to change when the lights illuminate based on the brightness outside the vehicle
Light Off Delay (if so equipped) Allows user to change the duration of time that the automatic headlights stay on after the vehicle is shut off
Turn indicator Displays available turn indicator options
3 Flash Pass Allows user to turn the 3 flash pass on or off
Locking Displays available locking options
I-Key Door Lock (if so equipped) Allows user to turn I-key door lock on or off. When turned on, the request switch on the door is activated
Selective Unlock Allows user to turn selective unlock on or off. When turned on, only the driver’s door is unlocked after the door unlock
operation. When the door handle request switch on the driver’s or front passenger’s side door is pushed to be unlocked,
only the corresponding door is unlocked first. All the doors can be unlocked if the door unlock operation is performed again
within 1 minute. When this item is turned off, all the doors will be unlocked after the door unlock operation is performed
once.
Answer Bk. Horn Allows user to turn answer back horn on or off. When turned on, the horn will chirp and the hazard indicators will flash once
when locking the vehicle with the Intelligent Key.
Wipers Displays available wiper options
Rain Sensor (if so equipped) Allows user to turn the rain sensor feature on or off. For additional information, refer to “Wiper and washer switch” in thi s
section.
Speed Dependent (if so equipped) Allows user to turn the speed dependent feature on or off. For additional information, refer to “Wiper and washer switch” in
this section.
Memory Seat (ADP) (if so equipped) Displays available memory seat options
2-36Instruments and controls
Page 151 of 671
Vehicle security system activation
The vehicle security system will give the following
alarm:● The headlights blink and the horn sounds
intermittently.
● The alarm automatically turns off after a pe-
riod of time. However, the alarm reactivates if
the vehicle is tampered with again. The alarm
can be shut off by unlocking the driver’s door
with the key or by pressing the
button
on the key fob.
The alarm is activated by:
● Opening a door without using the key or key
fob (even if the door is unlocked by using the
inside lock knob or the power door lock
switch) .
How to stop an activated alarm
The alarm stops only by unlocking the driver’s
door with the key or by pressing the
button
on the key fob.
NISSAN VEHICLE IMMOBILIZER
SYSTEM
The NISSAN Vehicle Immobilizer System will not
allow the engine to start without the use of a
registered key.
If the engine fails to start using a registered key
(for example, when interference is caused by
another registered key, an automated toll road
device or automatic payment device on the key
ring) , restart the engine using the following pro-
cedures:
1. Leave the ignition switch placed in the ON position for approximately 5 seconds.
2. Place the ignition switch in the OFF or LOCK position and wait approximately
10 seconds.
3. Repeat steps 1 and 2.
4. Restart the engine while holding the device (which may have caused the interference)
separate from the registered key.
If the no start condition re-occurs, NISSAN rec-
ommends placing the registered key on a sepa-
rate key ring to avoid interference from other
devices. FCC Notice:
For USA:
This device complies with part 15 of the
FCC Rules. Operation is subject to the fol-
lowing two conditions: (1) This device may
not cause harmful interference, and (2) this
device must accept any interference re-
ceived, including interference that may
cause undesired operation.
NOTE:
Changes or modifications not expressly ap-
proved by the party responsible for compli-
ance could void the user’s authority to op-
erate the equipment.
For Canada:
This device complies with Industry Canada
licence-exempt RSS standard(s) . Opera-
tion is subject to the following two condi-
tions: (1) this device may not cause inter-
ference, and (2) this device must accept any
interference, including interference that
may cause undesired operation of the de-
vice.
2-48Instruments and controls
Page 167 of 671
Push the VDC OFF switch again or restart the
engine to turn on the system. For additional infor-
mation, refer to “Vehicle Dynamic Control (VDC)
system” in the “Starting and driving” section of
this manual.
WARNING
●Never rely solely on the hill descent
control system to control vehicle speed
when driving on steep downhill grades.
Always drive carefully when using the
hill descent control system and deceler-
ate the vehicle speed by depressing the
brake pedal if necessary. Be especially
careful when driving on frozen, muddy
or extremely steep downhill roads. Fail-
ure to control vehicle speed may result
in a loss of control of the vehicle and
possible serious injury or death. ●
The hill descent control may not control
the vehicle speed on a hill under all load
or road conditions. Always be prepared
to depress the brake pedal to control
vehicle speed. Failure to do so may re-
sult in a collision or serious personal
injury.
CAUTION
When the hill descent control system op-
erates continuously for a long time, the
temperature of the brake pads may in-
crease and the hill descent control system
may be temporarily disabled (the indicator
light will blink) . If the indicator light does
not come on continuously after blinking,
stop using the system.
The hill descent control system is designed to
reduce driver workload when going down steep
hills. The hill descent control system helps to
control vehicle speed so the driver can concen-
trate on steering the vehicle.
LIC3447
HILL DESCENT CONTROL SWITCH (if
so equipped)
2-64Instruments and controls
Page 169 of 671
When the E-Lock system switch is turned ON,
the indicator light will flash until the system en-
gages. However, if all operation conditions listed
above are not met or the system becomes disen-
gaged, the indicator light will continue to flash.
The Anti-Lock Brake (ABS) system is disabled
and the ABS light illuminates when the E-Lock
system is ON. Also, the Vehicle Dynamic Control
(VDC) system is disabled and the VDC light
illuminates when the E-Lock system is ON.
For additional information, refer to “Electronic
locking rear differential (E-Lock) system” in the
“Starting and driving” section of this manual for
further explanation and system limitations.
WARNING
●Never leave the E-Lock system ON when
driving on paved or hard-surfaced
roads. Turning the vehicle may result in
the rear wheels slipping and result in an
accident and personal injury. After us-
ing the E-Lock system to free the ve-
hicle, turn the system OFF. ●
Use the E-lock system only in an emer-
gency when it is not possible to free a
stuck vehicle even using 4LO. Never use
the E-Lock system on a slippery road
surface such as snow or ice surface.
Using the E-Lock system when driving
in these road conditions may cause un-
expected movement of the vehicle dur-
ing engine braking, accelerating or
turning, which may result in an accident
and serious personal injury.
● Observe the above warnings. Other-
wise, loss of normal steering control
may result. This may result in an acci-
dent and serious personal injury.
CAUTION
● After using the E-Lock system, or during
normal driving, turn the switch OFF to
prevent possible damage to drivetrain
components from extended use.
● When the E-Lock system is in operation,
turning the vehicle becomes difficult.
This can be dangerous, especially at
high speeds. Doing so could damage
drivetrain components. ●
Do not operate the E-Lock system when
the vehicle is turning or when one side
wheel is rotating. Otherwise, the drive-
train components could be damaged.
● The E-Lock system operates only when
the engine is running.
● In 4H mode, the E-Lock system does not
operate when the E-Lock system switch
is turned to the ON position. (The
E-Lock system indicator light will flash.)
● Avoid quick starts while the E-Lock sys-
tem is in operation. Otherwise the drive-
train components could be damaged.
● Observe the above cautions. Otherwise,
loss of normal steering may result.
2-66Instruments and controls
Page 172 of 671
The E-call (SOS) system switch is used in com-
bination with a NissanConnectSMServices sub-
scription to call for assistance in case of an
emergency.
Pushing the switch will (with a paid subscription)
reach a Response Specialist that will provide
assistance based on the situation described by
the vehicle’s occupant. For additional informa-
tion, or to enroll your vehicle, refer to
www.NissanUSA.com/connect or call
855–426–6628. The TBCU on the instrument panel allows the
driver to adjust the braking force applied to the
trailer brakes.
For additional information, refer to “Towing a
trailer” in the “Technical and consumer informa-
tion” section of this manual.12V OUTLETS
The power outlets are for powering electrical
accessories such as cellular telephones.
The power outlets located on the instrument
panel and inside the center armrest (if so
equipped) are powered only when the ignition
switch is placed in the ACC or ON position.
Open the cap to use a power outlet.
CAUTION
●
The outlet and plug may be hot during
or immediately after use.
LIC3376LIC3382
Instrument panel
LIC3383
E-CALL (SOS) SWITCH (if so
equipped) TRAILER BRAKE CONTROLLER UNIT
(TBCU) (if so equipped)POWER OUTLETS
Instruments and controls2-69