Page 17 of 36
 – Wipers operate at
a continuous high-speed.
6 Pull the lever toward you to activate
the washer. The wipers will operate
several times.
WIPER BLADE REPLACEMENT PROC")
15
6
5 High (HI) – Wipers operate at
a continuous high-speed.
6 Pull the lever toward you to activate
the washer. The wipers will operate
several times.
WIPER BLADE REPLACEMENT PROCEDURE
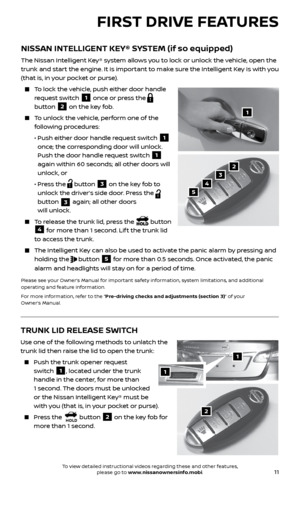
The windshield wipers must be in the service
position in order to replace the wiper blades.
To move the wiper blades to the service position,
follow this procedure:
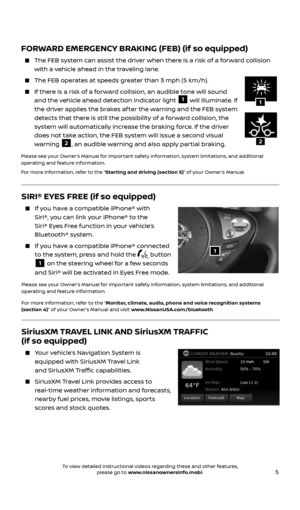
When the ignition switch is in the ON position
or within 60 seconds of placing the ignition
switch in the OFF position, lif t the windshield
wiper and washer lever up to the MIST position
1 two times in less than 0.5
seconds. The windshield wipers will move to the service position automatically,
and the wiper blades can now be replaced.
To move the wiper blades back to the original position:
Lif t the windshield wiper and washer lever up for more than 1 second or lower
the lever down to operate at any wiper speed.
Please see your Owner’s Manual for important safety information, system limitations, and additional
operating and feature information.
For more information, refer to the “Instruments and controls (section 2)” and the “Do-it-yourself
(section 8)” of your Owner’s Manual.
12
3
5
4
6
78
9
10
1112
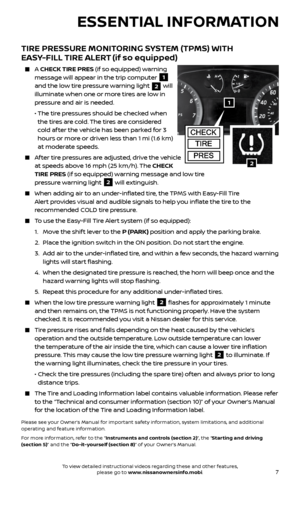
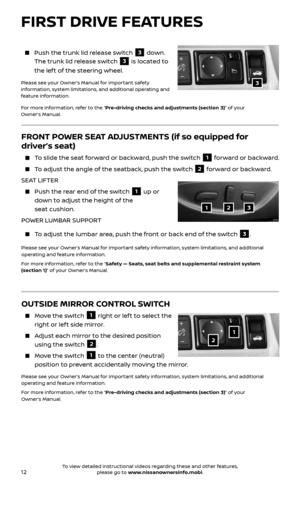
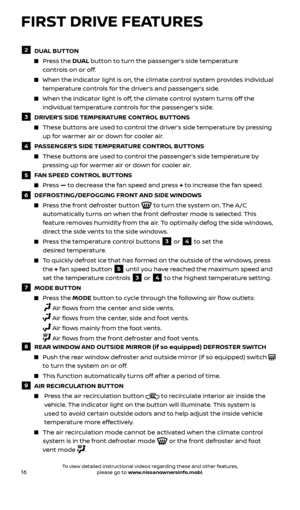
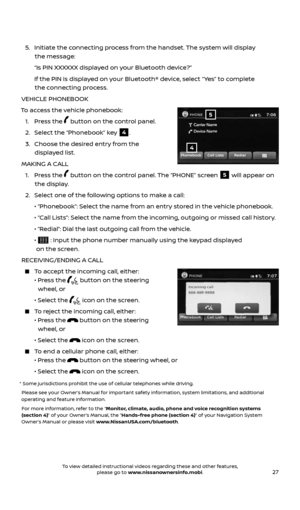
HEATER AND AIR CONDITIONER (automatic) (if so equipped)
1 AUTO BUTTON
This mode may be used year-round. Press the AUTO button to turn the
system on. The system will automatically control the inside temperature
(automatic cooling and/or dehumidified heating), air flow distribution and fan
speed. The A/C automatically turns on when the AUTO button is selected.
2434454_17b_Sentra_US_pQRG_101416.indd 1510/14/16 10:59 AM
To view detailed instructional videos regarding these and other features, please go to www.nissanownersinfo.mobi.
Page 18 of 36

16
2 DUAL BUTTON
Press the DUAL button to turn the passenger’s side temperature
controls on or off.
When the indicator light is on, the climate control system provides individual
temperature controls for the driver’s and passenger’s side.
When the indicator light is off, the climate control system turns off the
individual temperature controls for the passenger’s side.
3 DRIVER’S SIDE TEMPERATURE CONTROL BUTTONS
These buttons are used to control the driver’s side temperature by pressing
up for warmer air or down for cooler air.
4 PASSENGER’S SIDE TEMPERATURE CONTROL BUTTONS
These buttons are used to control the passenger’s side temperature by
pressing up for warmer air or down for cooler air.
5 FAN SPEED CONTROL BUTTONS
Press — to decrease the fan speed and press + to increase the fan speed.
6 DEFROSTING/DEFOGGING FRONT AND SIDE WINDOWS
Press the front defroster button to turn the system on. The A/C
automatically turns on when the front defroster mode is selected. This
feature removes humidity from the air. To optimally defog the side windows,
direct the side vents to the side windows.
Press the temperature control buttons 3 or 4 to set the
desired temperature.
To quickly defrost ice that has formed on the outside of the windows, press
the + fan speed button
5 until you have reached the maximum speed and
set the temperature controls
3 or 4 to the highest temperature setting.
7 MODE BUTTON
Press the MODE button to cycle through the following air flow outlets:
Air flows from the center and side vents.
Air flows from the center, side and foot vents.
Air flows mainly from the foot vents.
Air flows from the front defroster and foot vents. 8 REAR WINDOW AND OUTSIDE MIRROR (if so equipped) DEFROSTER SWITCH
Push the rear window defroster and outside mirror (if so equipped) switch
to turn the system on or off.
This function automatically turns off af ter a period of time.
9 AIR RECIRCULATION BUTTON
Press the air recirculation button to recirculate interior air inside the
vehicle. The indicator light on the button will illuminate. This system is
used to avoid certain outside odors and to help adjust the inside vehicle
temperature more effectively.
The air recirculation mode cannot be activated when the climate control
system is in the front defroster mode
or the front defroster and foot
vent mode
.
FIRST DRIVE FEATURES
2434454_17b_Sentra_US_pQRG_101416.indd 1610/14/16 11:00 AM
To view detailed instructional videos regarding these and other features, please go to www.nissanownersinfo.mobi.
Page 19 of 36

17
10 FRESH AIR INTAKE BUTTON
Press the fresh air intake button to draw outside air into the passenger
compartment. The indicator light on the button will illuminate.
11 A/C BUTTON
Press the A/C button to turn the air conditioner system on or off.
12 ONOFF BUTTON
Press the ONOFF button to turn the system on or off.
Please see your Owner’s Manual for important safety information, system limitations, and additional
operating and feature information.
For more information, refer to the “Monitor, climate, audio, phone and voice recognition systems
(section 4)” of your Owner’s Manual.
56
3
1
4
2
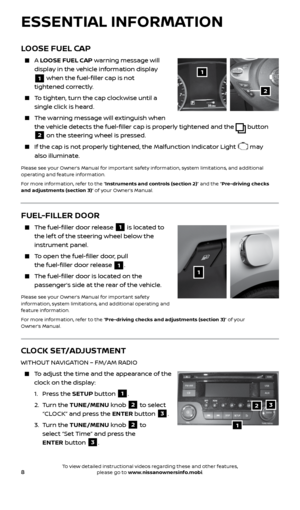
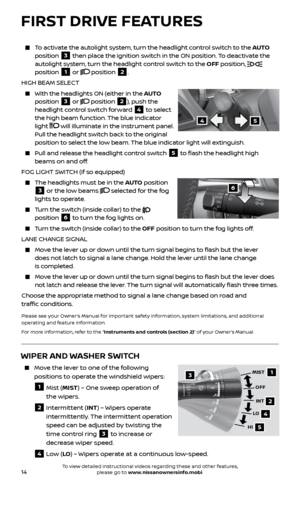
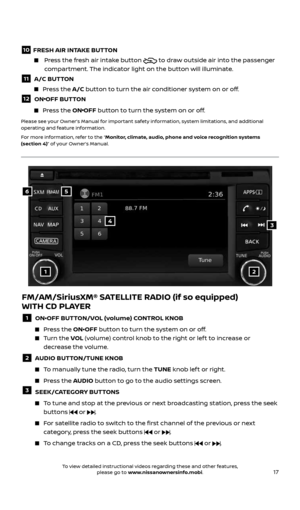
FM/AM/SiriusXM® SATELLITE RADIO (if so equipped)
WITH CD PLAYER
1 ON•OFF BUTTON/VOL (volume) CONTROL KNOB
Press the ON•OFF button to turn the system on or off.
Turn the VOL (volume) control knob to the right or lef t to increase or
decrease the volume.
2 AUDIO BUTTON/TUNE KNOB
To manually tune the radio, turn the TUNE knob lef t or right.
Press the AUDIO button to go to the audio settings screen.
3 SEEK/CATEGORY BUTTONS
To tune and stop at the previous or next broadcasting station, press the seek
buttons
or .
For satellite radio to switch to the first channel of the previous or next
category, press the seek buttons
or .
To change tracks on a CD, press the seek buttons or .
2434454_17b_Sentra_US_pQRG_101416.indd 1710/14/16 11:00 AM
To view detailed instructional videos regarding these and other features, please go to www.nissanownersinfo.mobi.
Page 20 of 36

The cruise control system enables you to set
a constant cruising speed once the vehicle
has reached 25 mph (40 km/h).
The system will automatically maint")
18
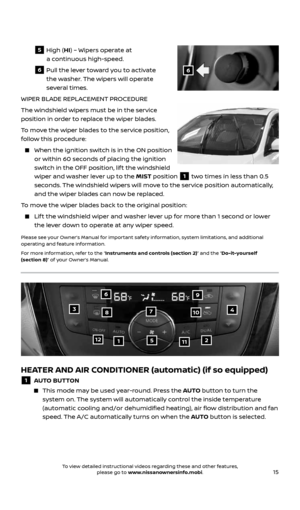
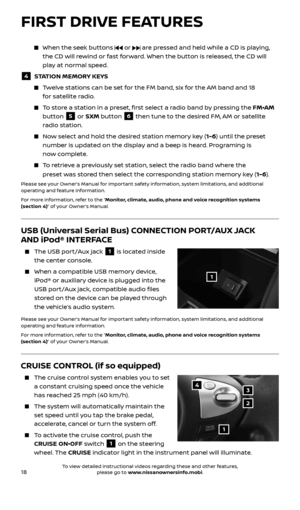
CRUISE CONTROL (if so equipped)
The cruise control system enables you to set
a constant cruising speed once the vehicle
has reached 25 mph (40 km/h).
The system will automatically maintain the
set speed until you tap the brake pedal,
accelerate, cancel or turn the system off.
To activate the cruise control, push the
CRUISE ON•OFF switch
1 on the steering
wheel. The CRUISE indicator light in the instrument panel will illuminate.
1
4
2
3
FIRST DRIVE FEATURES
USB (Universal Serial Bus) CONNECTION PORT/AUX JACK
AND iPod® INTERFACE
The USB port/Aux jack 1 is located inside
the center console.
When a compatible USB memory device,
iPod® or auxiliary device is plugged into the
USB port/Aux jack, compatible audio files
stored on the device can be played through
the vehicle’s audio system.
Please see your Owner’s Manual for important safety information, system limitations, and additional
operating and feature information.
For more information, refer to the “Monitor, climate, audio, phone and voice recognition systems
(section 4)” of your Owner’s Manual.
1
When the seek buttons or are pressed and held while a CD is playing,
the CD will rewind or fast forward. When the button is released, the CD will
play at normal speed.
4 STATION MEMORY KEYS
Twelve stations can be set for the FM band, six for the AM band and 18
for satellite radio.
To store a station in a preset, first select a radio band by pressing the FM•AM
button
5 or SXM button 6 then tune to the desired FM, AM or satellite
radio station.
Now select and hold the desired station memory key (1-6) until the preset
number is updated on the display and a beep is heard. Programing is
now complete.
To retrieve a previously set station, select the radio band where the
preset was stored then select the corresponding station memory key (1-6).
Please see your Owner’s Manual for important safety information, system limitations, and additional
operating and feature information.
For more information, refer to the “Monitor, climate, audio, phone and voice recognition systems
(section 4)” of your Owner’s Manual.
2434454_17b_Sentra_US_pQRG_101416.indd 1810/14/16 11:00 AM
To view detailed instructional videos regarding these and other features, please go to www.nissanownersinfo.mobi.
Page 21 of 36

19
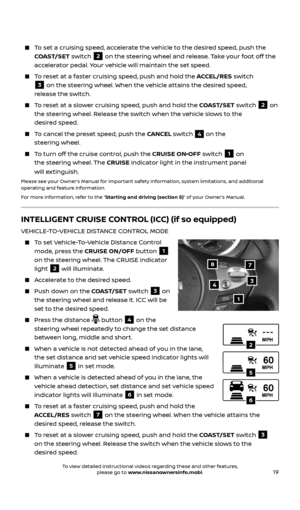
To set a cruising speed, accelerate the vehicle to the desired speed, push the
COAST/SET switch
2 on the steering wheel and release. Take your foot off the
accelerator pedal. Your vehicle will maintain the set speed.
To reset at a faster cruising speed, push and hold the ACCEL/RES switch
3 on the steering wheel. When the vehicle attains the desired speed,
release the switch.
To reset at a slower cruising speed, push and hold the COAST/SET switch 2 on
the steering wheel. Release the switch when the vehicle slows to the
desired speed.
To cancel the preset speed, push the CANCEL switch 4 on the
steering wheel.
To turn o� the cruise control, push the CRUISE ON•OFF switch 1 on
the steering wheel. The CRUISE indicator light in the instrument panel
will extinguish.
Please see your Owner’s Manual for important safety information, system limitations, and additional
operating and feature information.
For more information, refer to the “Starting and driving (section 5)” of your Owner’s Manual.
INTELLIGENT CRUISE CONTROL (ICC) (if so equipped)
VEHICLE-TO-VEHICLE DISTANCE CONTROL MODE
To set Vehicle-To-Vehicle Distance Control
mode, press the CRUISE ON/OFF button
1
on the steering wheel. The CRUISE indicator
light
2 will illuminate.
Accelerate to the desired speed.
Push down on the COAST/SET switch 3 on
the steering wheel and release it. ICC will be
set to the desired speed.
Press the distance button 4 on the
steering wheel repeatedly to change the set distance
between long, middle and short.
When a vehicle is not detected ahead of you in the lane,
the set distance and set vehicle speed indicator lights will
illuminate
5 in set mode.
When a vehicle is detected ahead of you in the lane, the
vehicle ahead detection, set distance and set vehicle speed
indicator lights will illuminate
6 in set mode.
To reset at a faster cruising speed, push and hold the
ACCEL/RES switch
7 on the steering wheel. When the vehicle attains the
desired speed, release the switch.
To reset at a slower cruising speed, push and hold the COAST/SET switch 3
on the steering wheel. Release the switch when the vehicle slows to the
desired speed.
2
5
6
1
4
87
3
2434454_17b_Sentra_US_pQRG_101416.indd 1910/14/16 11:00 AM
To view detailed instructional videos regarding these and other features, please go to www.nissanownersinfo.mobi.
Page 22 of 36
20
FIRST DRIVE FEATURES
To cancel the preset speed, push the CANCEL switch 8 on the steering wheel
or tap the brake pedal. The set vehicle speed indicator
5 will extinguish.
To turn off ICC, press the CRUISE ON/OFF button 1 on the steering wheel. The
CRUISE indicator light
2 in the instrument panel will extinguish.
Please see your Owner’s Manual for important safety information, system limitations, and additional
operating and feature information.
For more information, refer to the “Starting and driving (section 5)” of your Owner’s Manual.
2434454_17b_Sentra_US_pQRG_101416.indd 2010/14/16 11:00 AM
To view detailed instructional videos regarding these and other features, please go to www.nissanownersinfo.mobi.
Page 23 of 36

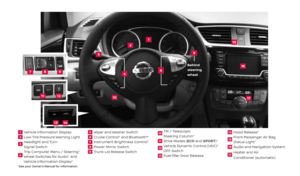
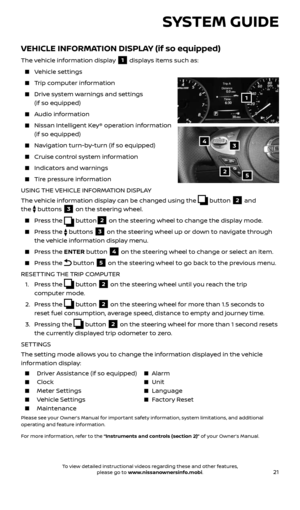
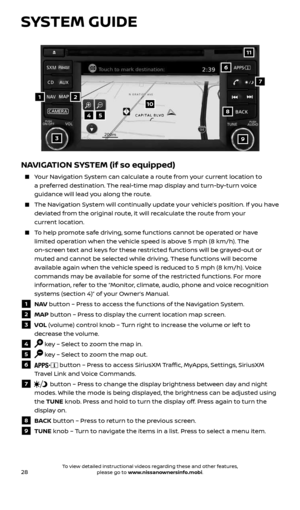
The vehicle information display 1 displays items such as:
Vehicle settings
Trip computer information
Drive system warnings an")
21
SYSTEM GUIDE
VEHICLE INFORMATION DISPLAY (if so equipped)
The vehicle information display 1 displays items such as:
Vehicle settings
Trip computer information
Drive system warnings and settings
(if so equipped)
Audio information
Nissan Intelligent Key® operation information
(if so equipped)
Navigation turn-by-turn (if so equipped)
Cruise control system information
Indicators and warnings
Tire pressure information
USING THE VEHICLE INFORMATION DISPLAY
The vehicle information display can be changed using the
button 2 and
the
buttons 3 on the steering wheel.
Press the button2 on the steering wheel to change the display mode.
Press the buttons 3 on the steering wheel up or down to navigate through
the vehicle information display menu.
Press the ENTER button 4 on the steering wheel to change or select an item.
Press the button 5 on the steering wheel to go back to the previous menu.
RESETTING THE TRIP COMPUTER
1. Press the
button 2 on the steering wheel until you reach the trip
computer mode.
2. Press the
button 2 on the steering wheel for more than 1.5 seconds to
reset fuel consumption, average speed, distance to empty and journey time.
3. Pressing the
button 2 on the steering wheel for more than 1 second resets
the currently displayed trip odometer to zero.
SETTINGS
The setting mode allows you to change the information displayed in the vehicle
information display:
Driver Assistance (if so equipped) Alarm
Clock Unit
Meter Settings Language
Vehicle Settings Factory Reset
Maintenance
Please see your Owner’s Manual for important safety information, system limitations, and additional
operating and feature information.
For more information, refer to the “Instruments and controls (section 2)” of your Owner’s Manual.
2
1
34
5
2434454_17b_Sentra_US_pQRG_101416.indd 2110/14/16 11:00 AM
To view detailed instructional videos regarding these and other features, please go to www.nissanownersinfo.mobi.
Page 24 of 36

This system allows for sending and receiving
text messages through the vehicle’s interface.
Using predefined or custom messages,")
22
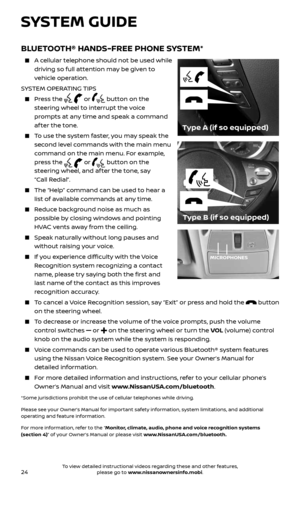
HANDS-FREE TEXT MESSAGING ASSISTANT* (if so equipped)
This system allows for sending and receiving
text messages through the vehicle’s interface.
Using predefined or custom messages, send
a text to an entry stored in your Bluetooth®
Hands-free Phone System.
Once enabled, the text message, sender and
delivery time are shown on the control panel
display when the vehicle speed is less than 5 mph (8 km/h).
Text messages have the option of being read aloud at all vehicle speeds.
Many cellular phones may require special permission to enable text messaging.
Check the cellular phone’s screen during Bluetooth® pairing. For some cellular
phones, you need to enable “Notifications” in the cellular phone’s Bluetooth®
menu for text messages to appear on the touch-screen display. For more
information and instructions, refer to your cellular phone’s Owner’s Manual.
Text message integration requires that the cellular phone support Message
Access Profile (MAP) for both receiving and sending text messages. Some
cellular phones may not support all text messaging features. Please see
www.NissanUSA.com/bluetooth for compatibility information as well
as your device’s Owner’s Manual.
* Laws in some jurisdictions may restrict the use of “Text‐to‐Speech”. Some of the applications and
features, such as social networking and texting, may also be restricted. Check local regulations for any
requirements before using these features.
Please see your Owner’s Manual for important safety information, system limitations, and additional
operating and feature information.
For more information, refer to the “Monitor, climate, audio, phone and voice recognition systems
(section 4)” of your Owner’s Manual.
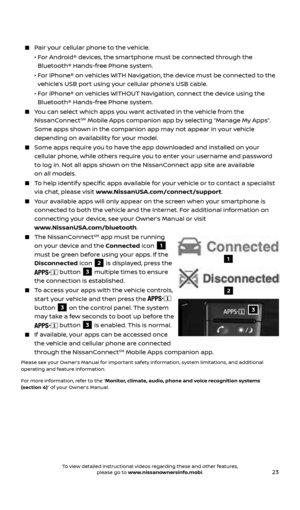
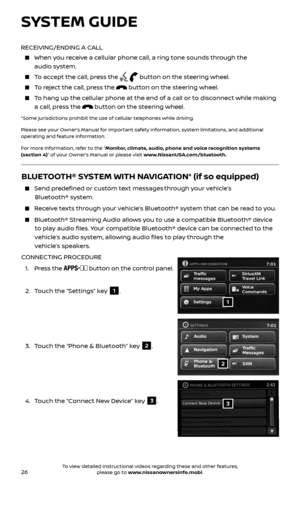
NISSANCONNECTSM MOBILE APPS (if so equipped)
Your vehicle may be equipped with NissanConnectSM Mobile Apps, allowing you
to control various compatible smartphone apps through the vehicle’s display
screen. A basic package is included for a period of time from the original in-
service date of the vehicle.
To enroll in NissanConnectSM Mobile Apps:
1. Create a Nissan Owner Portal account at owners.NissanUSA.com.
· Make sure to include your vehicle’s VIN when creating your account.
2. Under the NissanConnect Mobile Apps tab, select the red button next to
Manage Subscription to enroll.
3. Next, download the NissanConnect
SM Mobile Apps companion app from
Google Play or the Apple App Store. Log into the companion app using your
Nissan Owner Portal ID and password.
4. Launch the app, select “United States” and accept the Terms and Conditions.
5. Select “Sign In”, then sign in with the email username and password you
created when registering on the Nissan Owner Portal website.
SYSTEM GUIDE
2434454_17b_Sentra_US_pQRG_101416.indd 2210/14/16 11:00 AM
To view detailed instructional videos regarding these and other features, please go to www.nissanownersinfo.mobi.