Page 9 of 36
7
ESSENTIAL INFORMATION
TIRE PRESSURE MONITORING SYSTEM (TPMS) WITH
EASY-FILL TIRE ALERT (if so equipped)
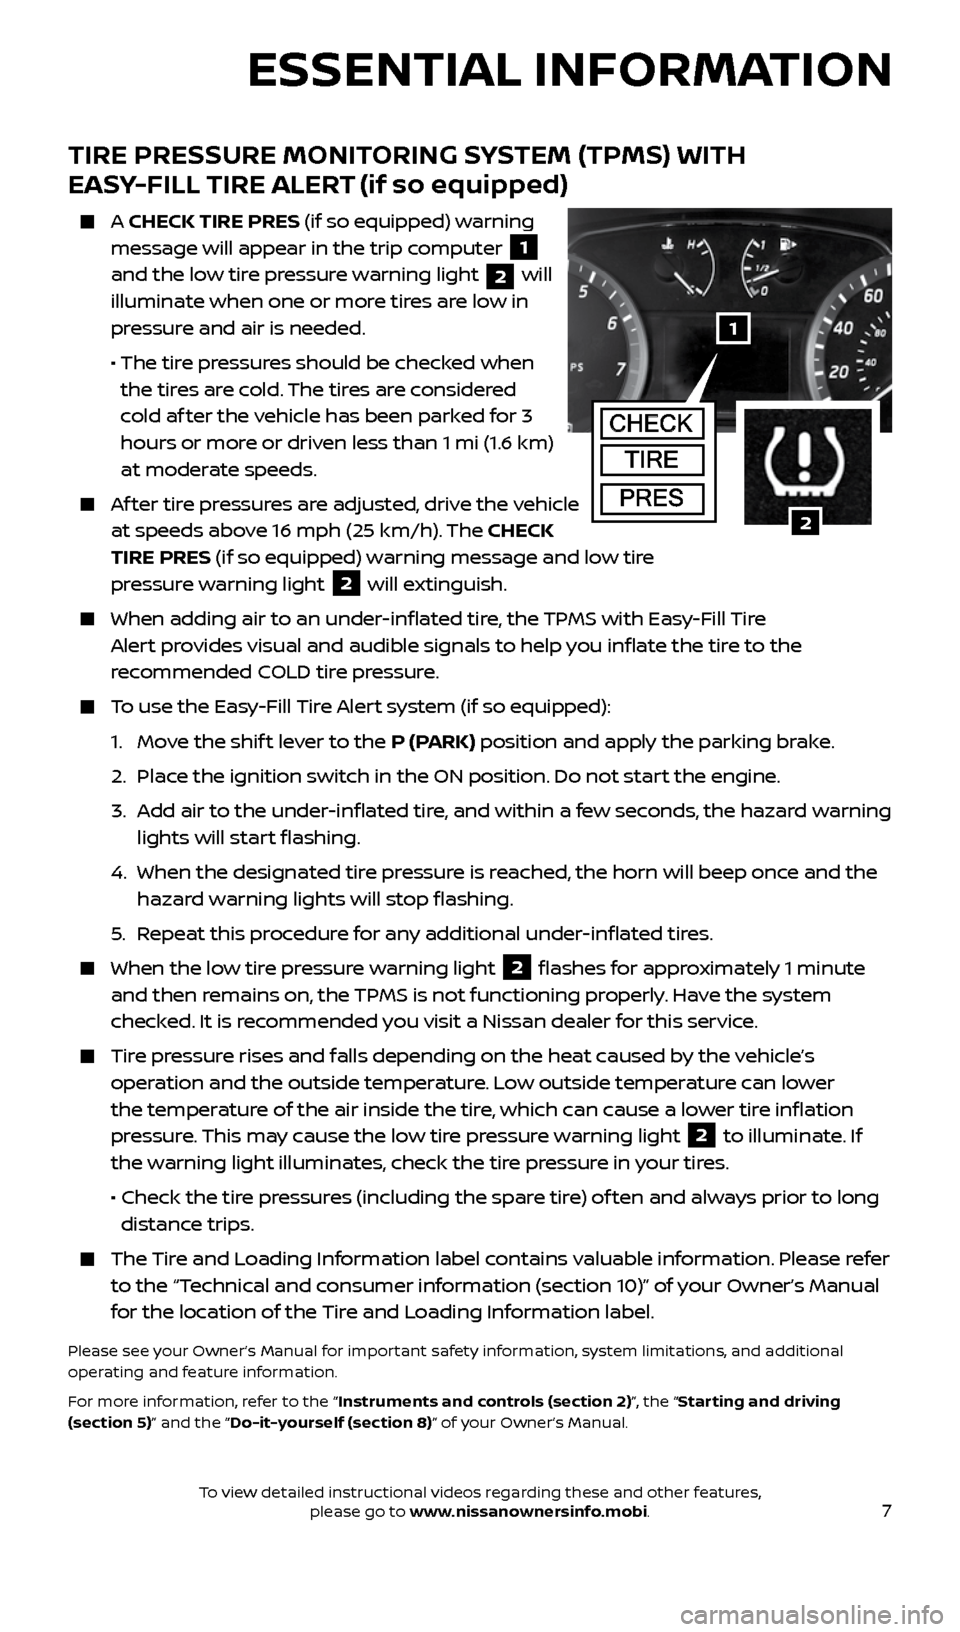
A CHECK TIRE PRES (if so equipped) warning
message will appear in the trip computer 1
and the low tire pressure warning light
2 will
illuminate when one or more tires are low in
pressure and air is needed.
• The tire pressures should be checked when
the tires are cold. The tires are considered
cold af ter the vehicle has been parked for 3
hours or more or driven less than 1 mi (1.6 km)
at moderate speeds.
Af ter tire pressures are adjusted, drive the vehicle
at speeds above 16 mph (25 km/h). The CHECK
TIRE PRES (if so equipped) warning message and low tire
pressure warning light
2 will extinguish.
When adding air to an under-inflated tire, the TPMS with Easy-Fill Tire
Alert provides visual and audible signals to help you inflate the tire to the
recommended COLD tire pressure.
To use the Easy-Fill Tire Alert system (if so equipped):
1. Move the shif t lever to the P (PARK) position and apply the parking brake.
2. Place the ignition switch in the ON position. Do not start the engine.
3. Add air to the under-inflated tire, and within a few seconds, the hazard warning
lights will start flashing.
4. When the designated tire pressure is reached, the horn will beep once and the
hazard warning lights will stop flashing.
5. Repeat this procedure for any additional under-inflated tires.
When the low tire pressure warning light 2 flashes for approximately 1 minute
and then remains on, the TPMS is not functioning properly. Have the system
checked. It is recommended you visit a Nissan dealer for this service.
Tire pressure rises and falls depending on the heat caused by the vehicle’s
operation and the outside temperature. Low outside temperature can lower
the temperature of the air inside the tire, which can cause a lower tire inflation
pressure. This may cause the low tire pressure warning light
2 to illuminate. If
the warning light illuminates, check the tire pressure in your tires.
• Check the tire pressures (including the spare tire) of ten and always prior to long
distance trips.
The Tire and Loading Information label contains valuable information. Please refer
to the “Technical and consumer information (section 10)” of your Owner’s Manual
for the location of the Tire and Loading Information label.
Please see your Owner’s Manual for important safety information, system limitations, and additional
operating and feature information.
For more information, refer to the “Instruments and controls (section 2)”, the “Starting and driving
(section 5)” and the “Do-it-yourself (section 8)” of your Owner’s Manual.
1
CHECK
TIRE
PRES2
2434454_17b_Sentra_US_pQRG_101416.indd 710/14/16 10:59 AM
To view detailed instructional videos regarding these and other features, please go to www.nissanownersinfo.mobi.
Page 10 of 36
8
CLOCK SET/ADJUSTMENT
WITHOUT NAVIGATION – FM/AM RADIO
To adjust the time and the appearance of the
clock on the display:
1. Press the SETUP button
1.
2. Turn the TUNE/MENU knob
2 to select
“CLOCK” and press the ENTER button
3.
3. Turn the TUNE/MENU knob
2 to
select “Set Time” and press the
ENTER button
3.
LOOSE FUEL CAP
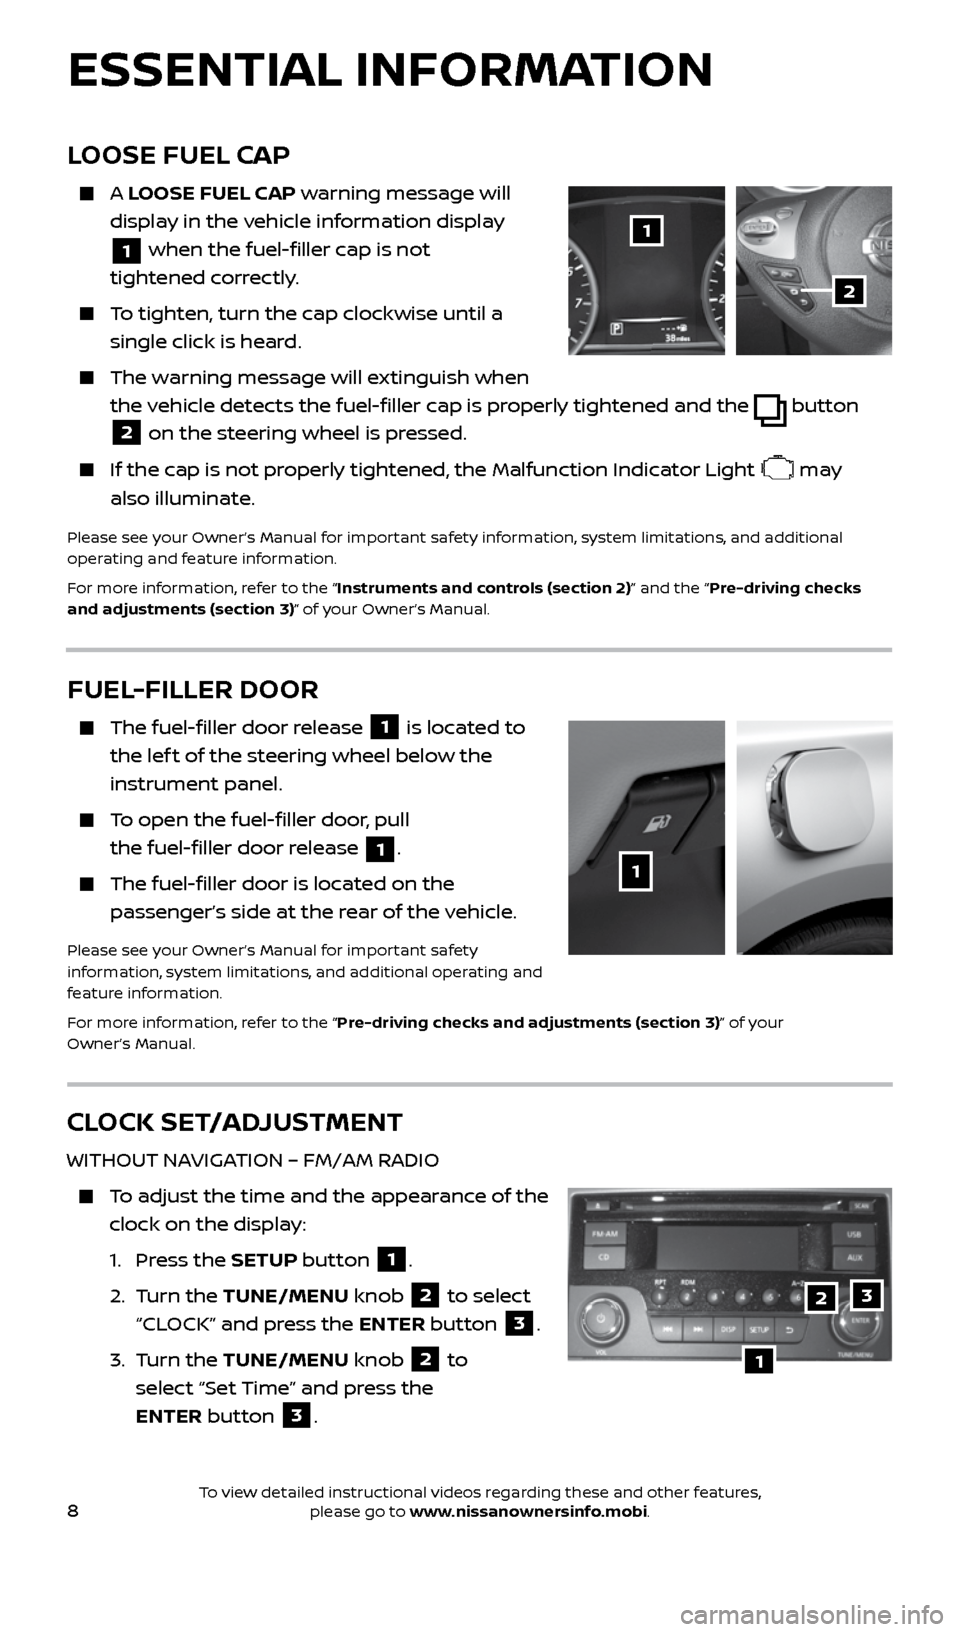
A LOOSE FUEL CAP warning message will
display in the vehicle information display
1 when the fuel-filler cap is not
tightened correctly.
To tighten, turn the cap clockwise until a
single click is heard.
The warning message will extinguish when
the vehicle detects the fuel-filler cap is properly tightened and the
button
2 on the steering wheel is pressed.
If the cap is not properly tightened, the Malfunction Indicator Light may
also illuminate.
Please see your Owner’s Manual for important safety information, system limitations, and additional
operating and feature information.
For more information, refer to the “Instruments and controls (section 2)” and the “Pre-driving checks
and adjustments (section 3)” of your Owner’s Manual.
1
2
FUEL-FILLER DOOR
The fuel-filler door release 1 is located to
the lef t of the steering wheel below the
instrument panel.
To open the fuel-filler door, pull
the fuel-filler door release
1.
The fuel-filler door is located on the
passenger’s side at the rear of the vehicle.
Please see your Owner’s Manual for important safety
information, system limitations, and additional operating and
feature information.
For more information, refer to the “Pre-driving checks and adjustments (section 3)” of your
Owner’s Manual.
1
ESSENTIAL INFORMATION
1
23
2434454_17b_Sentra_US_pQRG_101416.indd 810/14/16 10:59 AM
To view detailed instructional videos regarding these and other features, please go to www.nissanownersinfo.mobi.
Page 11 of 36
9
The following settings can be adjusted:
• By turning the TUNE/MENU knob
2, the hours can be adjusted. Pressing
the ENTER button
3 will allow the minutes to be adjusted by the
TUNE/MENU knob
2.
• Press the ENTER button
3 to finish.
The display will return to the regular display af ter 10 seconds.
WITHOUT NAVIGATION – FM/AM/SiriusXM® SATELLITE RADIO
To adjust the time and the appearance of the clock on the display:
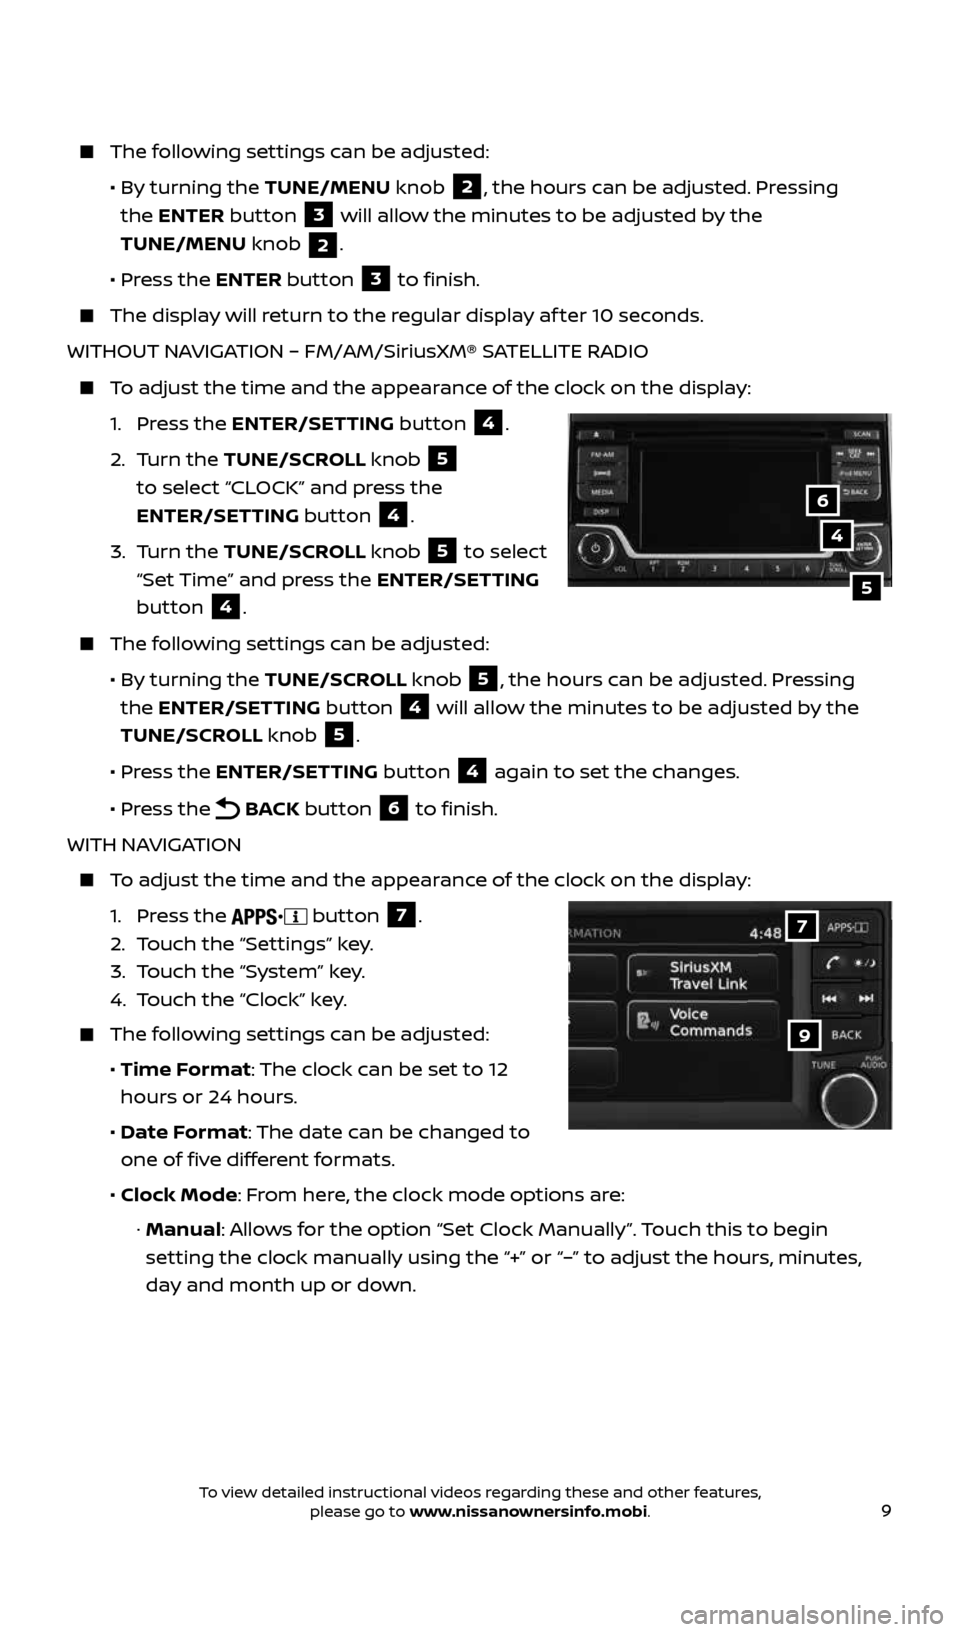
1. Press the ENTER/SETTING button
4.
2. Turn the TUNE/SCROLL knob
5
to select “CLOCK” and press the
ENTER/SETTING button
4.
3. Turn the TUNE/SCROLL knob
5 to select
“Set Time” and press the ENTER/SETTING
button
4.
The following settings can be adjusted:
• By turning the TUNE/SCROLL knob
5, the hours can be adjusted. Pressing
the ENTER/SETTING button
4 will allow the minutes to be adjusted by the
TUNE/SCROLL knob
5.
• Press the ENTER/SETTING button
4 again to set the changes.
• Press the
BACK button 6 to finish.
WITH NAVIGATION
To adjust the time and the appearance of the clock on the display:
1. Press the
button 7.
2. Touch the “Settings” key.
3. Touch the “System” key.
4. Touch the “Clock” key.
The following settings can be adjusted:
• Time Format: The clock can be set to 12
hours or 24 hours.
• Date Format: The date can be changed to
one of five different formats.
• Clock Mode: From here, the clock mode options are:
· Manual: Allows for the option “Set Clock Manually”. Touch this to begin
setting the clock manually using the “+” or “–” to adjust the hours, minutes,
day and month up or down.
4
5
6
9
7
2434454_17b_Sentra_US_pQRG_101416.indd 910/14/16 10:59 AM
To view detailed instructional videos regarding these and other features, please go to www.nissanownersinfo.mobi.
Page 12 of 36
10
ESSENTIAL INFORMATION
· Time Zone: Touch the “Time Zone” key 8
to choose from the applicable time zone
list and/or touch the “Daylight Savings
Time” key to switch between ON and OFF.
· Auto: Automatically sets the clock to the
vehicle’s current location.
Press the BACK button 9 to return to the
previous screen.
Please see your Owner’s Manual for important safety information, system limitations, and additional
operating and feature information.
For more information, refer to the “Monitor, climate, audio, phone and voice recognition systems
(section 4)” of your Owner’s Manual.
8
2434454_17b_Sentra_US_pQRG_101416.indd 1010/14/16 10:59 AM
To view detailed instructional videos regarding these and other features, please go to www.nissanownersinfo.mobi.
Page 13 of 36
11
NISSAN INTELLIGENT KEY® SYSTEM (if so equipped)
The Nissan Intelligent Key® system allows you to lock or unlock the vehicle, open the
trunk and start the engine. It is important to make sure the Intelligent Key is with you
(that is, in your pocket or purse).
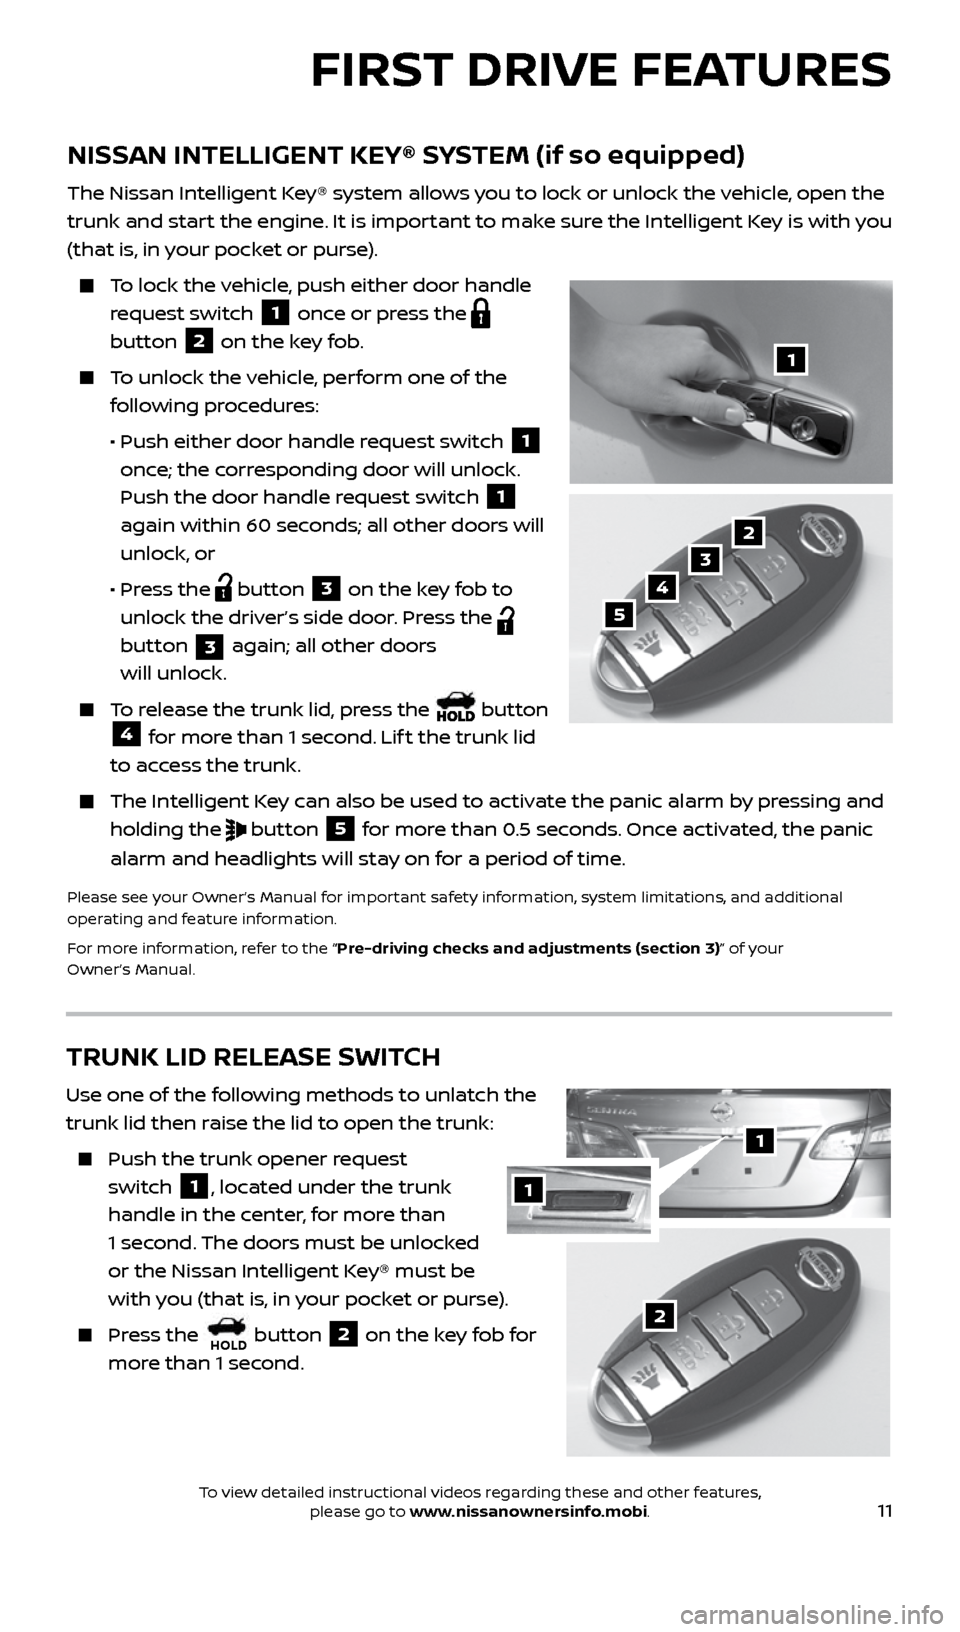
To lock the vehicle, push either door handle
request switch
1 once or press the
button
2 on the key fob.
To unlock the vehicle, perform one of the
following procedures:
• Push either door handle request switch
1
once; the corresponding door will unlock.
Push the door handle request switch
1
again within 60 seconds; all other doors will
unlock, or
• Press the
button 3 on the key fob to
unlock the driver’s side door. Press the
button
3 again; all other doors
will unlock.
To release the trunk lid, press the button 4 for more than 1 second. Lif t the trunk lid
to access the trunk.
The Intelligent Key can also be used to activate the panic alarm by pressing and
holding the
button 5 for more than 0.5 seconds. Once activated, the panic
alarm and headlights will stay on for a period of time.
Please see your Owner’s Manual for important safety information, system limitations, and additional
operating and feature information.
For more information, refer to the “Pre-driving checks and adjustments (section 3)” of your
Owner’s Manual.
1
2
3
4
5
FIRST DRIVE FEATURES
TRUNK LID RELEASE SWITCH
Use one of the following methods to unlatch the
trunk lid then raise the lid to open the trunk:
Push the trunk opener request
switch
1, located under the trunk
handle in the center, for more than
1 second. The doors must be unlocked
or the Nissan Intelligent Key® must be
with you (that is, in your pocket or purse).
Press the HOLD button 2 on the key fob for
more than 1 second.2
1
1
2434454_17b_Sentra_US_pQRG_101416.indd 1110/14/16 10:59 AM
To view detailed instructional videos regarding these and other features, please go to www.nissanownersinfo.mobi.
Page 14 of 36
12
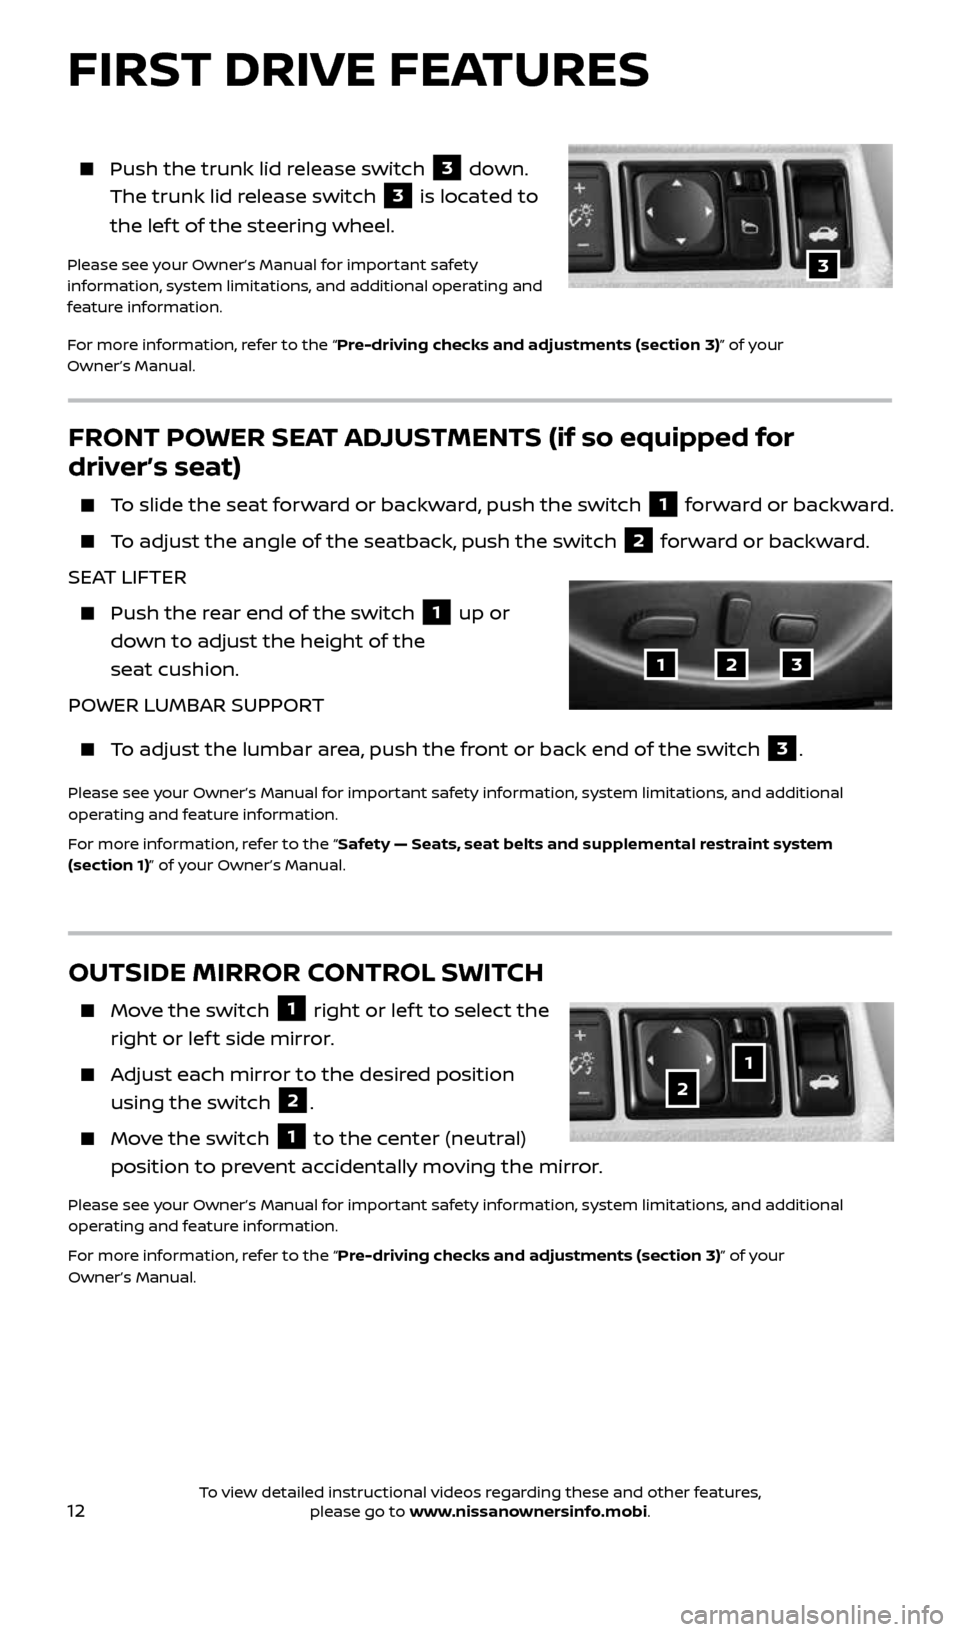
FRONT POWER SEAT ADJUSTMENTS (if so equipped for
driver’s seat)
To slide the seat forward or backward, push the switch 1 forward or backward.
To adjust the angle of the seatback, push the switch 2 forward or backward.
SEAT LIFTER
Push the rear end of the switch 1 up or
down to adjust the height of the
seat cushion.
POWER LUMBAR SUPPORT
To adjust the lumbar area, push the front or back end of the switch 3.
Please see your Owner’s Manual for important safety information, system limitations, and additional
operating and feature information.
For more information, refer to the “Safety — Seats, seat belts and supplemental restraint system
(section 1)” of your Owner’s Manual.
231
OUTSIDE MIRROR CONTROL SWITCH
Move the switch 1 right or lef t to select the
right or lef t side mirror.
Adjust each mirror to the desired position
using the switch 2.
Move the switch 1 to the center (neutral)
position to prevent accidentally moving the mirror.
Please see your Owner’s Manual for important safety information, system limitations, and additional
operating and feature information.
For more information, refer to the “Pre-driving checks and adjustments (section 3)” of your
Owner’s Manual.
21
FIRST DRIVE FEATURES
Push the trunk lid release switch 3 down.
The trunk lid release switch
3 is located to
the lef t of the steering wheel.
Please see your Owner’s Manual for important safety
information, system limitations, and additional operating and
feature information.
For more information, refer to the “Pre-driving checks and adjustments (section 3)” of your
Owner’s Manual.3
2434454_17b_Sentra_US_pQRG_101416.indd 1210/14/16 10:59 AM
To view detailed instructional videos regarding these and other features, please go to www.nissanownersinfo.mobi.
Page 15 of 36
13
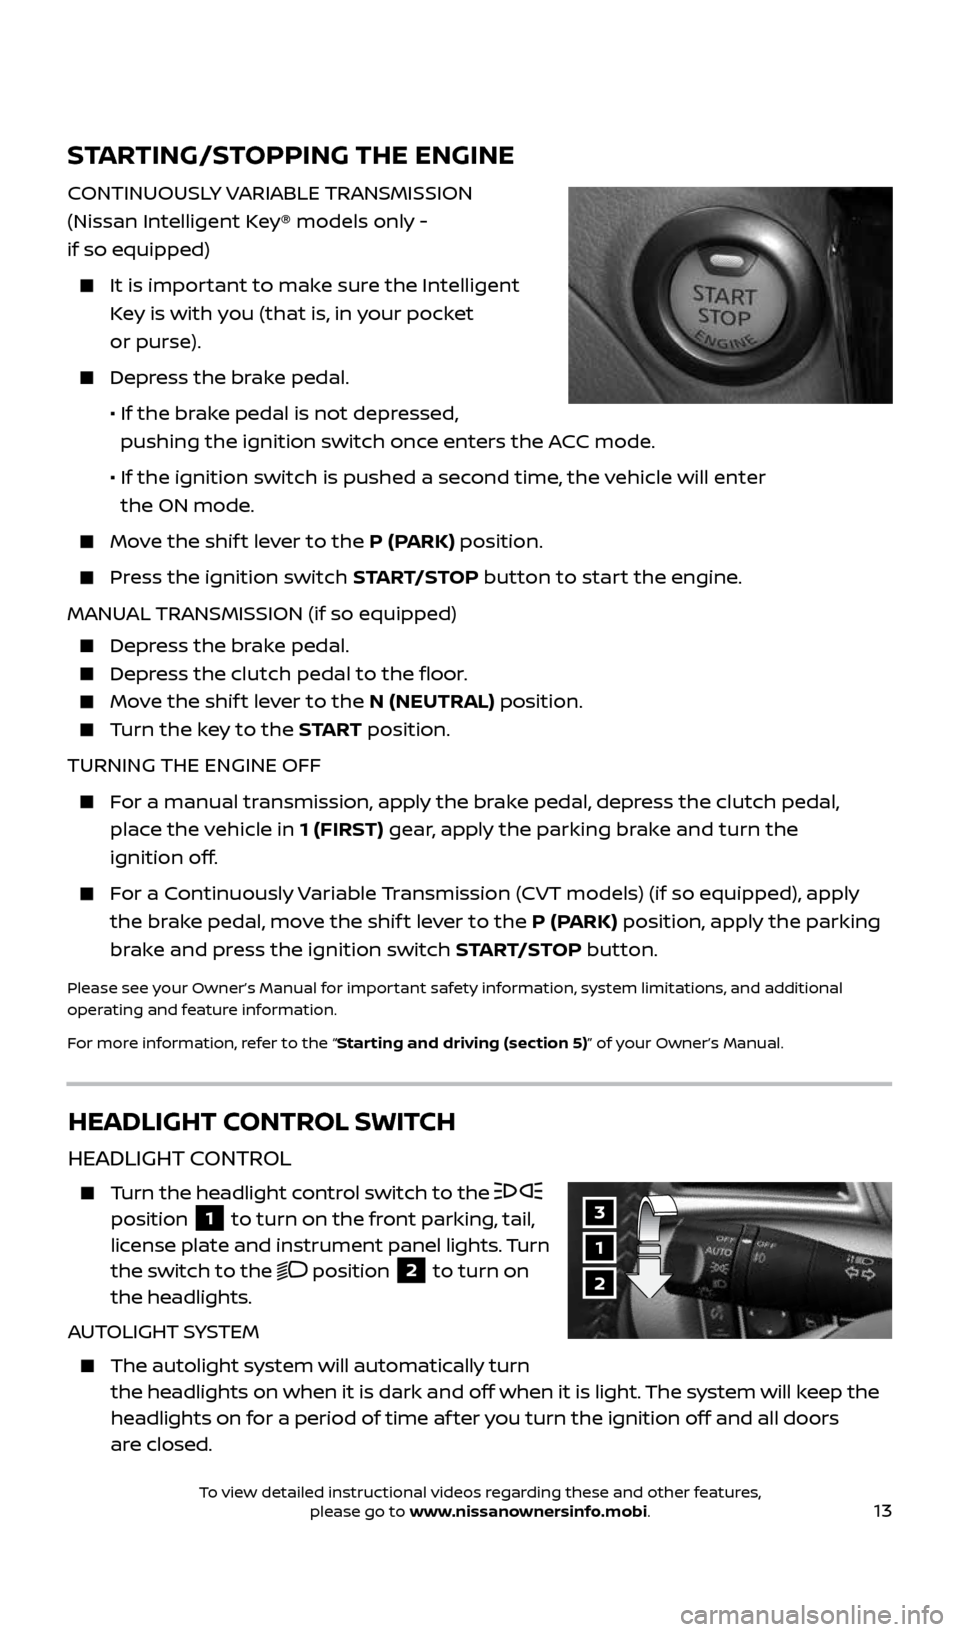
STARTING/STOPPING THE ENGINE
CONTINUOUSLY VARIABLE TRANSMISSION
(Nissan Intelligent Key® models only -
if so equipped)
It is important to make sure the Intelligent
Key is with you (that is, in your pocket
or purse).
Depress the brake pedal.
• If the brake pedal is not depressed,
pushing the ignition switch once enters the ACC mode.
• If the ignition switch is pushed a second time, the vehicle will enter
the ON mode.
Move the shif t lever to the P (PARK) position.
Press the ignition switch START/STOP button to start the engine.
MANUAL TRANSMISSION (if so equipped)
Depress the brake pedal.
Depress the clutch pedal to the floor.
Move the shif t lever to the N (NEUTRAL) position.
Turn the key to the S TA R T position.
TURNING THE ENGINE OFF
For a manual transmission, apply the brake pedal, depress the clutch pedal,
place the vehicle in 1 (FIRST) gear, apply the parking brake and turn the
ignition off.
For a Continuously Variable Transmission (CVT models) (if so equipped), apply
the brake pedal, move the shif t lever to the P (PARK) position, apply the parking
brake and press the ignition switch START/STOP button.
Please see your Owner’s Manual for important safety information, system limitations, and additional
operating and feature information.
For more information, refer to the “Starting and driving (section 5)” of your Owner’s Manual.
HEADLIGHT CONTROL SWITCH
HEADLIGHT CONTROL
Turn the headlight control switch to the
position 1 to turn on the front parking, tail,
license plate and instrument panel lights. Turn
the switch to the
position 2 to turn on
the headlights.
AUTOLIGHT SYSTEM
The autolight system will automatically turn
the headlights on when it is dark and off when it is light. The system will keep the
headlights on for a period of time af ter you turn the ignition off and all doors
are closed.
1
2
3
2434454_17b_Sentra_US_pQRG_101416.indd 1310/14/16 10:59 AM
To view detailed instructional videos regarding these and other features, please go to www.nissanownersinfo.mobi.
Page 16 of 36
14
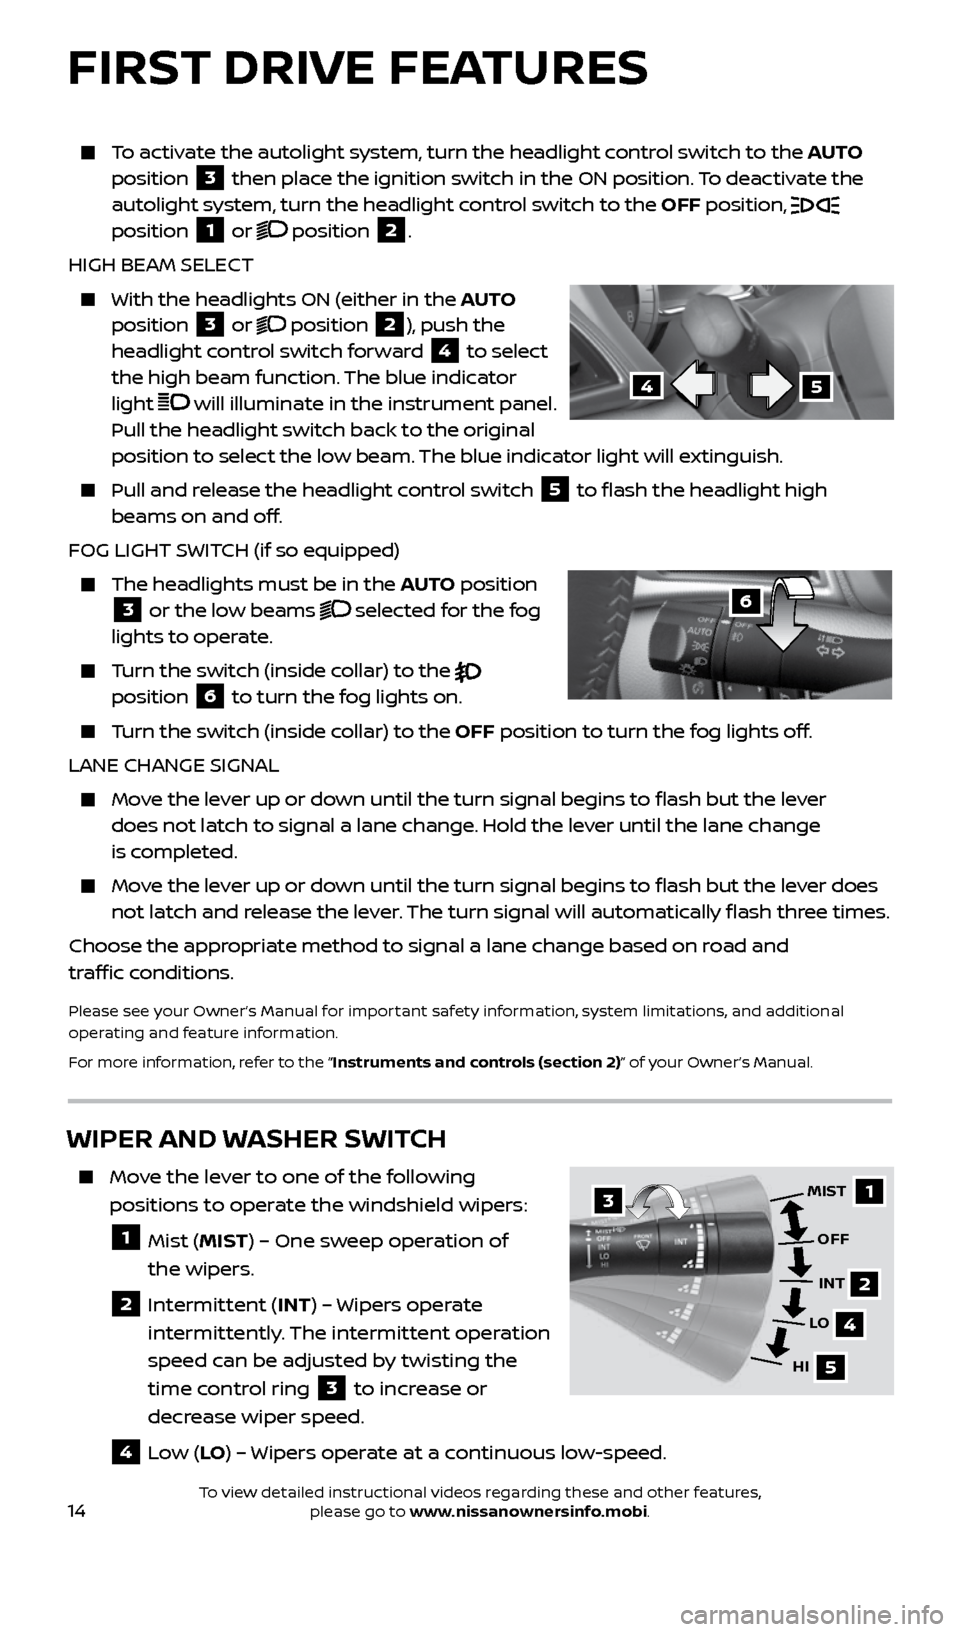
To activate the autolight system, turn the headlight control switch to the AUTO
position 3 then place the ignition switch in the ON position. To deactivate the
autolight system, turn the headlight control switch to the OFF position,
position 1 or position 2.
HIGH BEAM SELECT
With the headlights ON (either in the AUTO
position 3 or position 2), push the
headlight control switch forward 4 to select
the high beam function. The blue indicator
light
will illuminate in the instrument panel.
Pull the headlight switch back to the original
position to select the low beam. The blue indicator light will extinguish.
Pull and release the headlight control switch 5 to flash the headlight high
beams on and off.
FOG LIGHT SWITCH (if so equipped)
The headlights must be in the AUTO position 3 or the low beams selected for the fog
lights to operate.
Turn the switch (inside collar) to the
position 6 to turn the fog lights on.
Turn the switch (inside collar) to the OFF position to turn the fog lights off.
LANE CHANGE SIGNAL
Move the lever up or down until the turn signal begins to flash but the lever
does not latch to signal a lane change. Hold the lever until the lane change
is completed.
Move the lever up or down until the turn signal begins to flash but the lever does
not latch and release the lever. The turn signal will automatically flash three times.
Choose the appropriate method to signal a lane change based on road and
traffic conditions.
Please see your Owner’s Manual for important safety information, system limitations, and additional
operating and feature information.
For more information, refer to the “Instruments and controls (section 2)” of your Owner’s Manual.
6
45
WIPER AND WASHER SWITCH
Move the lever to one of the following
positions to operate the windshield wipers:
1 Mist (MIST) – One sweep operation of
the wipers.
2 Intermittent (INT) – Wipers operate
intermittently. The intermittent operation
speed can be adjusted by twisting the
time control ring
3 to increase or
decrease wiper speed.
4 Low ( LO) – Wipers operate at a continuous low-speed.
1
2
4
5
MIST
OFFINT
LO
HI3
FIRST DRIVE FEATURES
2434454_17b_Sentra_US_pQRG_101416.indd 1410/14/16 10:59 AM
To view detailed instructional videos regarding these and other features, please go to www.nissanownersinfo.mobi.