2017 NISSAN SENTRA window
[x] Cancel search: windowPage 210 of 491
MANUAL OPERATION
Fan speed control
Press thefan control buttons to manually
control the fan speed.
Press the AUTO button to return to automatic
control of the fan speed.
Air recirculation
Press theair recirculation button to recir-
culate interior air inside the vehicle.
The air recirculation cannot be activated when
the air conditioner is in the
front defogging
mode.
Fresh air intake
Press thefresh air intake button to draw
outside air into the passenger compartment.
Automatic intake air control
In the AUTO mode, the intake air will be con-
trolled automatically. To manually control the in-
take air, press the
air recirculation button.
To return to the automatic control mode, press
and hold the
air recirculation button or
press and hold the
fresh air intake button
for about 2 seconds. The indicator lights (both air
recirculation and fresh air intake buttons) will
flash twice and then the intake air will be con-
trolled automatically.
Air flow control
Pressing the MODE button manually controls air
flow and selects the air outlet:
— Air flows from center and side
vents.
— Air flows from center and sidevents and foot outlets.
— Air flows mainly from foot outlets.
— Air flows from defroster and footoutlets.
Temperature control
Press the temperature control buttons,
to set the desired temperature.
To turn system off
Press the ON-OFF button.
Rear window and outside mirror
defroster switch
For additional information, refer to “Rear window
and outside mirror (if so equipped) defroster
switch” in the “Instruments and controls” section
of this manual.
OPERATING TIPS
●When the engine coolant temperature and
outside air temperature are low, the air flow
from the foot outlets may not operate for a
maximum of 150 seconds. However, this is
not a malfunction. After the coolant tempera-
ture warms up, air flow from the foot outlets
will operate normally.
Monitor, climate, audio, phone and voice recognition systems4-33
Page 214 of 491
CHECK DISC
●Confirm that the CD is inserted cor-
rectly (the label side is facing up,
etc.) .
● Confirm that the CD is not bent or
warped and it is free of scratches.
PRESS EJECT
This is an error due to excessive tem-
perature inside the player. Remove the
CD by pressing the EJECT button. After
a short time, reinsert the CD. The CD
can be played when the temperature of
the player returns to normal.
UNPLAYABLE
The file is unplayable in this audio sys-
tem (only MP3 or WMA (if so equipped)
CD) .Compact disc with MP3 or WMA
Terms ● MP3 — MP3 is short for Moving Pictures
Experts Group Audio Layer 3. MP3 is the
most well-known compressed digital audio
file format. This format allows for near “CD
quality” sound, but at a fraction of the size of
normal audio files. MP3 conversion of an
audio track from CD-ROM can reduce the
file size by approximately a 10:1 ratio with
virtually no perceptible loss in quality. MP3
compression removes the redundant and
irrelevant parts of a sound signal that the
human ear doesn’t hear.
● WMA — Windows Media Audio (WMA)* is a
compressed audio format created by Micro-
soft as an alternative to MP3. The WMA
codec offers greater file compression than
the MP3 codec, enabling storage of more
digital audio tracks in the same amount of
space when compared to MP3s at the same
level of quality.
● Bit rate — Bit rate denotes the number of
bits per second used by a digital music file.
The size and quality of a compressed digital
audio file is determined by the bit rate used
when encoding the file. ●
Sampling frequency — Sampling frequency
is the rate at which the samples of a signal
are converted from analog to digital (A/D
conversion) per second.
● Multisession — Multisession is one of the
methods for writing data to media. Writing
data once to the media is called a single
session, and writing more than once is called
a multisession.
● ID3/WMA Tag — The ID3/WMA tag is the
part of the encoded MP3 or WMA file that
contains information about the digital music
file such as song title, artist, encoding bit
rate, track time duration, etc. ID3 tag infor-
mation is displayed on the Artist/song title
line on the display.
* Windows® and Windows Media® are regis-
tered trademarks and trademarks in the United
States of America and other countries of Micro-
soft Corporation of the USA.
Monitor, climate, audio, phone and voice recognition systems4-37
Page 223 of 491
TUNE/MENU knob/Enter button
Turn the TUNE/MENU knob to the left or right to
scroll and then press ENTER to select desired
item.
A–Z button
When listening to music via USB or iPod®,
pressing the A-Z button will launch a quick
search function in music browser that will allow
user to search for music alphabetically using the
TUNE/MENU knob.
RDM (random) and RPT (repeat) button
When listening to music via USB or iPod®,
pressing the RDM button will shuffle the songs
being played. Pressing the RPT button will repeat
the song being played.
(back) button
Pressing the
(back) button will return the
user to the previous menu.
FM/AM radio operation
FM-AM button
Press the FM·AM button to change the band as
follows:
AM →FM1 →FM2 →AM
If another audio source is playing when the
FM·AM button is pressed, the audio source play- ing will automatically be turned off and the last
radio station played will begin playing.
If the FM-AM button is pressed for more than
1.5 seconds, the AUTOSTORE function will be
initiated. The “AST” icon will appear and “AU-
TOSTORE” may appear on the display screen, a
beep is heard and the radio mutes. The system
will then automatically detect the 6 stations with
the strongest frequency and save them as pre-
sets. Once AUTOSTORE is complete, the “AST”
icon will disappear and “AUTOSTORE COM-
PLETE” may appear on the display screen.
TUNE/MENU knob (Tuning)
Turn the TUNE/MENU knob to the left or right for
manual tuning.
SEEK tuning
Press the SEEK/TRACK button
orto tune from low to high or high to low frequen-
cies and to stop at the next broadcasting station.
Hold either button to tune continuously. Then
release button once desired frequency is
reached.
Station select (1 to 6) memory operations
Twelve stations can be set for the FM band (6 for
FM1, 6 for FM2) and six stations can be set for
the AM band. 1. Choose the radio band AM, FM1 or FM2
using the AM or FM button.
2. Tune to the desired station using manual or SEEK tuning. Press and hold any of the
desired station memory buttons (1 – 6) until
a beep sound is heard.
3. The station memory position (P1–P6) will now be displayed next to the band. Pro-
gramming is now complete.
4. Other buttons can be set in the same man- ner.
If the battery cable is disconnected or if the fuse
opens, the radio memory will be canceled. In that
case, reset the desired stations.
SCAN (tuning) button
Press the SCAN button. SCAN illuminates in the
display window. Scan tuning begins from low to
high frequencies. Scan tuning stops for 5 sec-
onds at each broadcasting station that has suffi-
cient signal strength. When scanning, SCAN
blinks in the display. Pressing the SCAN button
again during this 5 second period stops scan
tuning and the radio remains tuned to that station.
Compact disc (CD) player operation
If the radio is already operating, it automatically
turns off and the compact disc begins to play.
4-46Monitor, climate, audio, phone and voice recognition systems
Page 250 of 491
Volume control switch
Push the volume control switch to increase or
decrease the volume.
Tuning switch
While the display is showing a map or audio
screen, tilt the Tuning switch upward or down-
ward to select a station, track, CD or folder. For
most audio sources, tilting the switch up/down
for more than 1.5 seconds provides a different
function than a tilting up/down for less than
1.5 seconds.
AM and FM● Tilt up/down for less than 1.5 seconds to
increase or decrease the preset station.
● Tilt up/down for more than 1.5 seconds to
seek up or down to the next station.
XM/SXM (if so equipped) ● Tilt up/down for less than 1.5 seconds to
increase or decrease the preset station.
● Tilt up/down for more than 1.5 seconds to
go to the next or previous category. iPod®
● Tilt up/down for less than 1.5 seconds to
increase or decrease the track number.
● Tilt up/down for more than 1.5 seconds to
fast forward or rewind the current track.
CD ● Tilt up/down for less than 1.5 seconds to
increase or decrease the track number.
● Tilt up/down for more than 1.5 seconds to
increase or decrease the folder number (if
playing compressed audio files) or to fast
forward or rewind the current track.
USB ● Tilt up/down for less than 1.5 seconds to
increase or decrease the track number.
● Tilt up/down for more than 1.5 seconds to
fast forward or rewind the current track.
Bluetooth® Audio (if so equipped) ● Tilt up/down for less than 1.5 seconds to
skip ahead or back to the next song.
ANTENNA
The antenna pattern is printed inside the rear
window.
CAUTION
● Do not place metalized film near the
rear window glass or attach any metal
parts to it. This may cause poor recep-
tion or noise.
● When cleaning the inside of the rear
window, be careful not to scratch or
damage the rear window antenna.
Lightly wipe along the antenna with a
dampened soft cloth.
Monitor, climate, audio, phone and voice recognition systems4-73
Page 252 of 491
Apple Siri® Eyes Free personal assistant can be
accessed from the vehicle. Siri Eyes Free can be
accessed in Siri Eyes Free mode to reduce user
distraction. In this mode, Siri Eyes Free is avail-
able for interaction by voice control. After con-
necting a compatible Apple device by using
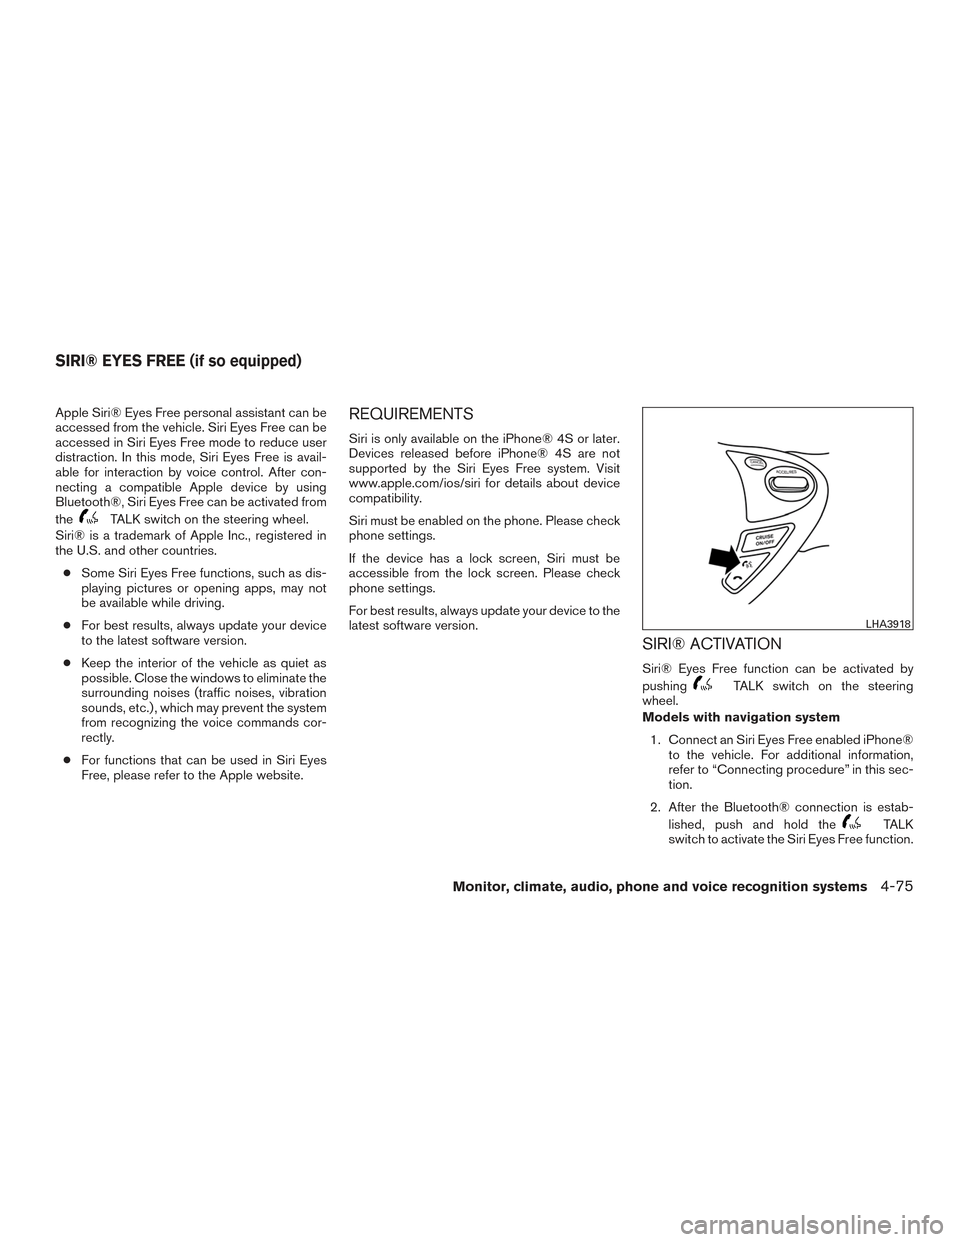
Bluetooth®, Siri Eyes Free can be activated from
the
TALK switch on the steering wheel.
Siri® is a trademark of Apple Inc., registered in
the U.S. and other countries.
● Some Siri Eyes Free functions, such as dis-
playing pictures or opening apps, may not
be available while driving.
● For best results, always update your device
to the latest software version.
● Keep the interior of the vehicle as quiet as
possible. Close the windows to eliminate the
surrounding noises (traffic noises, vibration
sounds, etc.) , which may prevent the system
from recognizing the voice commands cor-
rectly.
● For functions that can be used in Siri Eyes
Free, please refer to the Apple website.
REQUIREMENTS
Siri is only available on the iPhone® 4S or later.
Devices released before iPhone® 4S are not
supported by the Siri Eyes Free system. Visit
www.apple.com/ios/siri for details about device
compatibility.
Siri must be enabled on the phone. Please check
phone settings.
If the device has a lock screen, Siri must be
accessible from the lock screen. Please check
phone settings.
For best results, always update your device to the
latest software version.
SIRI® ACTIVATION
Siri® Eyes Free function can be activated by
pushing
TALK switch on the steering
wheel.
Models with navigation system
1. Connect an Siri Eyes Free enabled iPhone® to the vehicle. For additional information,
refer to “Connecting procedure” in this sec-
tion.
2. After the Bluetooth® connection is estab- lished, push and hold the
TALK
switch to activate the Siri Eyes Free function.
LHA3918
SIRI® EYES FREE (if so equipped)
Monitor, climate, audio, phone and voice recognition systems4-75
Page 258 of 491
Initialization
When the ignition switch is placed in the ON
position, NISSAN Voice Recognition is initialized,
which takes a few seconds. If the
(Type A)
or the
(Type B) button is pressed before
the initialization completes, the system will an-
nounce “Hands-free phone system not ready”
and will not react to voice commands.
Operating tips
To get the best performance out of the NISSAN
Voice Recognition system, observe the following:
● Keep the interior of the vehicle as quiet as
possible. Close the windows to eliminate
surrounding noises (traffic noises, vibration
sounds, etc.) and keep vents pointed away
from the microphone, which may prevent the
system from recognizing voice commands
correctly.
● Wait until the tone sounds before speaking a
command. Otherwise, the command will not
be received properly.
● Start speaking a command within 5 seconds
after the tone sounds.
● Speak in a natural voice without pausing
between words.
Giving voice commands
To operate NISSAN Voice Recognition, press
and release the
(Type A) or the(Type B) button located on the steering wheel.
After the tone sounds, speak a command.
The command given is picked up by the micro-
phone, and voice feedback is given when the
command is accepted.
● If you need to hear the available commands
for the current menu again, say “Help” and
the system will repeat them.
● If a command is not recognized, the system
announces, “Command not recognized.
Please try again.” Make sure the command is
said exactly as prompted by the system and
repeat the command in a clear voice.
● If you want to go back to the previous com-
mand, you can say “Go back” or “Correc-
tion” any time the system is waiting for a
response. ●
You can cancel a command when the sys-
tem is waiting for a response by saying,
“Cancel” or “Quit.” The system announces
“Cancel” and ends the Voice Recognition
session. You can also press and hold
the
button on the steering wheel for
5 seconds at any time to end the Voice
Recognition session. Whenever the Voice
Recognition session is cancelled, a double
beep is played to indicate you have exited
the system.
● If you want to adjust the volume of the voice
feedback, press the volume control switches
(+ or -) on the steering wheel while being
provided with feedback. You can also use
the radio volume control knob.
How to say numbers
NISSAN Voice Recognition requires a certain
way to speak numbers in voice commands. Refer
to the following rules and examples. ● Either “zero” or “oh” can be used for “0”.
Example: 1-800-662-6200
– “One eight oh oh six six two six two oh oh”, or
– “One eight zero zero six six two six two oh oh”
Monitor, climate, audio, phone and voice recognition systems4-81
Page 270 of 491
SymptomSolution
System fails to interpret the command correctly. 1. Ensure that the command is valid. For additional information, refer to “List of voice commands” in this section.
2. Ensure that the command is spoken after the tone.
3. Speak clearly without pausing between words and at a level appropriate to the ambient noise level in the vehicle.
4. Ensure that the ambient noise level is not excessive (for example, windows open or defroster on) . NOTE: If it is too
noisy to use the phone, it is likely that the voice commands will not be recognized.
5. If more than one command was said at a time, try saying the commands separately.
6. If the system consistently fails to recognize commands, the voice training procedure should be carried out to im-
prove the recognition response for the speaker. For additional information, refer to “Voice Adaptation (VA) mode” in
this section.
The system consistently selects the wrong entry from the
phone book. 1. Ensure that the phone book entry name requested matches what was originally stored. This can be confirmed by
using the “List Names” command. For additional information, refer to “Phonebook” in this section.
2. Replace one of the names being confused with a new name.
Monitor, climate, audio, phone and voice recognition systems4-93
Page 273 of 491
IC Regulatory information
– Operation is subject to the following two con-ditions: (1) this device may not cause interfer-
ence, and (2) this device must accept any
interference, including interference that may
cause undesired operation of the device.
– This Class B digital apparatus meets all re- quirements of the Canadian Interference-
Causing Equipment Regulations.
BLUETOOTH® is a
trademark owned by
Bluetooth SIG, Inc.
and licensed to
Visteon.
USING THE SYSTEM
The system allows hands-free operation of the
Bluetooth® Hands-Free Phone System.
If the vehicle is in motion, some commands may
not be available so full attention may be given to
vehicle operation.
Initialization
When the ignition switch is placed in the ON
position, NISSAN Voice Recognition is initialized,
which takes a few seconds. If the
(Type A)
or the
(Type B) button is pressed before the initialization completes, the system will an-
nounce “Hands-free phone system not ready”
and will not react to voice commands.
Operating tips
To get the best performance out of the NISSAN
Voice Recognition system, observe the following:
● Keep the interior of the vehicle as quiet as
possible. Close the windows to eliminate
surrounding noises (traffic noises, vibration
sounds, etc.) , which may prevent the system
from recognizing voice commands correctly.
● Wait until the tone sounds before speaking a
command. Otherwise, the command will not
be received properly.
● Start speaking a command within 5 seconds
after the tone sounds.
● Speak in a natural voice without pausing
between words.
Giving voice commands
To operate NISSAN Voice Recognition, press
and release the
(Type A) or the(Type B) button located on the steering wheel.
After the tone sounds, speak a command.
The command given is picked up by the micro-
phone, and voice feedback is given when the
command is accepted. ●
If you need to hear the available commands
for the current menu again, say “Help” and
the system will repeat them.
● If a command is not recognized, the system
announces, “Command not recognized.
Please try again.” Make sure the command is
said exactly as prompted by the system and
repeat the command in a clear voice.
● If you want to go back to the previous com-
mand, you can say “Go back” or “Correc-
tion” any time the system is waiting for a
response.
● You can cancel a command when the sys-
tem is waiting for a response by saying,
“Cancel” or “Quit.” The system announces
“Cancel” and ends the Voice Recognition
session. You can also press and hold
the
button on the steering wheel for
5 seconds at any time to end the Voice
Recognition session. Whenever the Voice
Recognition session is canceled, a double
beep is played to indicate you have exited
the system.
● If you want to adjust the volume of the voice
feedback, press the volume control switches
(+ or -) on the steering wheel while being
provided with feedback. You can also use
the radio volume control knob.
4-96Monitor, climate, audio, phone and voice recognition systems