2017 NISSAN SENTRA Transmission
[x] Cancel search: TransmissionPage 17 of 491
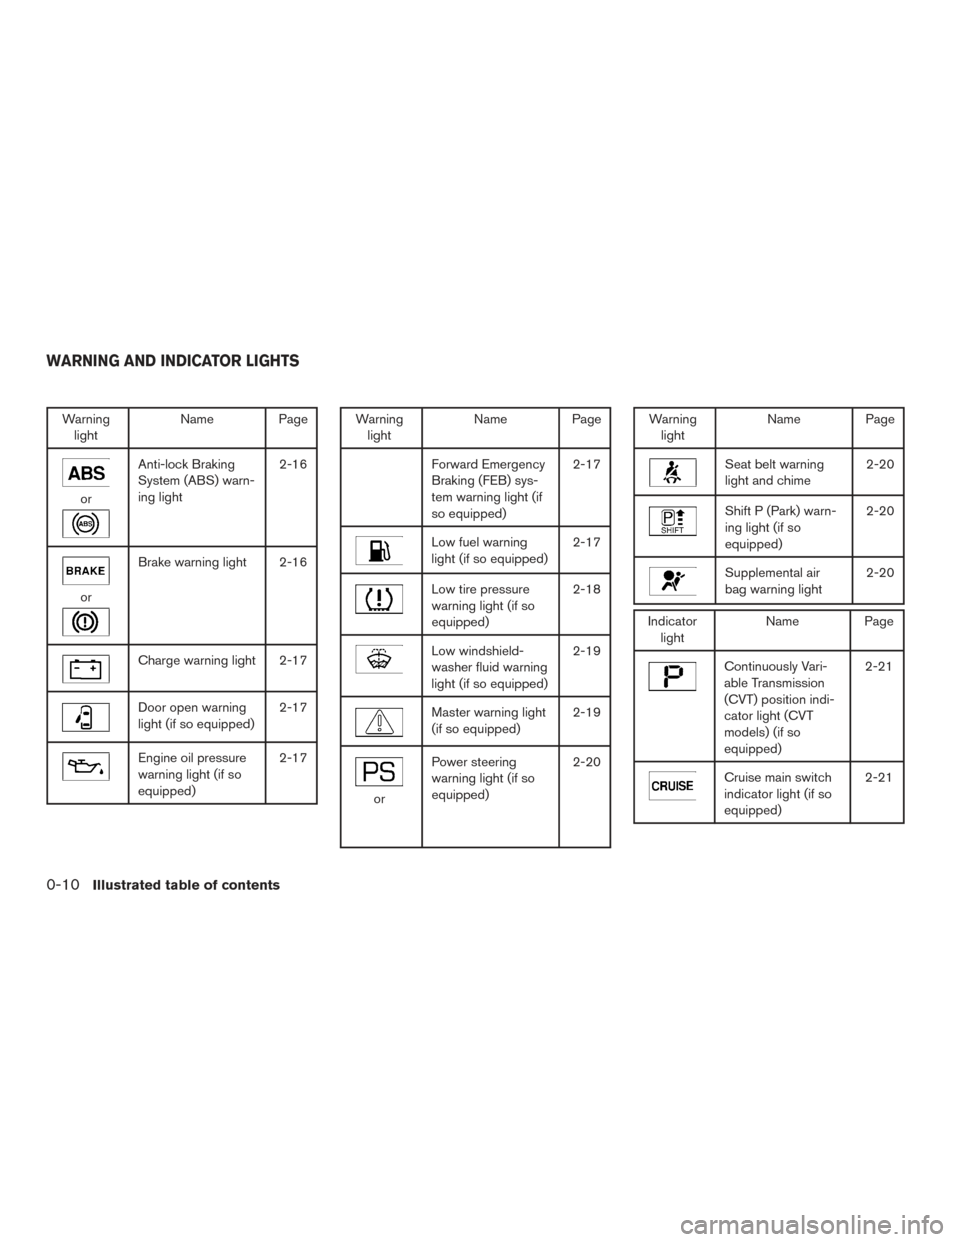
Warninglight Name Page
or
Anti-lock Braking
System (ABS) warn-
ing light 2-16
or
Brake warning light 2-16
Charge warning light 2-17
Door open warning
light (if so equipped)
2-17
Engine oil pressure
warning light (if so
equipped)2-17
Warning
light Name Page
Forward Emergency
Braking (FEB) sys-
tem warning light (if
so equipped) 2-17
Low fuel warning
light (if so equipped)
2-17
Low tire pressure
warning light (if so
equipped)2-18
Low windshield-
washer fluid warning
light (if so equipped)2-19
Master warning light
(if so equipped)
2-19
or
Power steering
warning light (if so
equipped)2-20
Warning
light Name Page
Seat belt warning
light and chime 2-20
Shift P (Park) warn-
ing light (if so
equipped)2-20
Supplemental air
bag warning light
2-20
Indicator
light Name Page
Continuously Vari-
able Transmission
(CVT) position indi-
cator light (CVT
models) (if so
equipped) 2-21
Cruise main switch
indicator light (if so
equipped)
2-21
WARNING AND INDICATOR LIGHTS
0-10Illustrated table of contents
Page 94 of 491
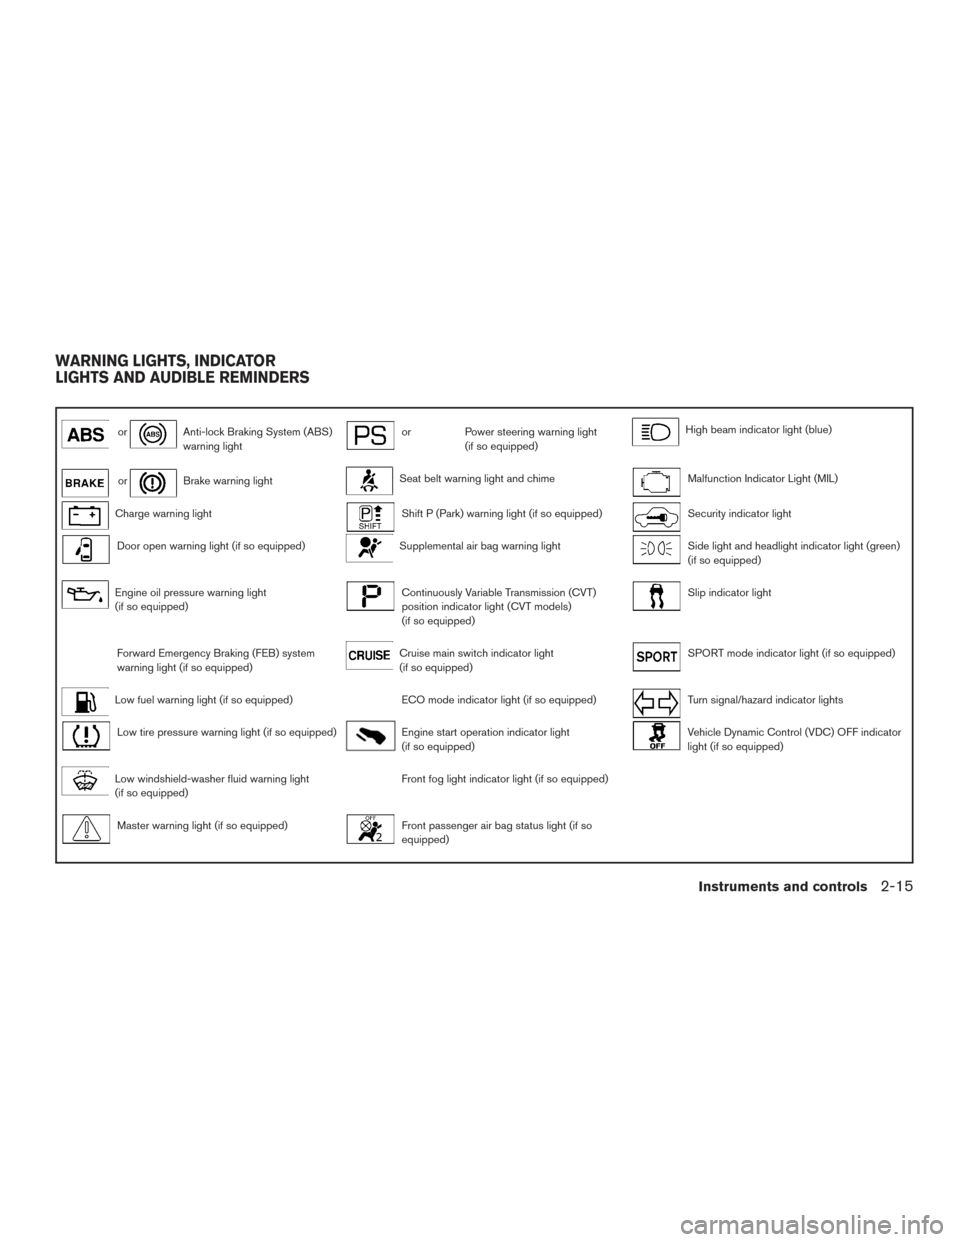
orAnti-lock Braking System (ABS)
warning lightorPower steering warning light
(if so equipped)High beam indicator light (blue)
orBrake warning lightSeat belt warning light and chimeMalfunction Indicator Light (MIL)
Charge warning lightShift P (Park) warning light (if so equipped)Security indicator light
Door open warning light (if so equipped)Supplemental air bag warning lightSide light and headlight indicator light (green)
(if so equipped)
Engine oil pressure warning light
(if so equipped)Continuously Variable Transmission (CVT)
position indicator light (CVT models)
(if so equipped)Slip indicator light
Forward Emergency Braking (FEB) system
warning light (if so equipped)Cruise main switch indicator light
(if so equipped)SPORT mode indicator light (if so equipped)
Low fuel warning light (if so equipped)ECO mode indicator light (if so equipped)Turn signal/hazard indicator lights
Low tire pressure warning light (if so equipped)Engine start operation indicator light
(if so equipped)Vehicle Dynamic Control (VDC) OFF indicator
light (if so equipped)
Low windshield-washer fluid warning light
(if so equipped)Front fog light indicator light (if so equipped)
Master warning light (if so equipped)Front passenger air bag status light (if so
equipped)
WARNING LIGHTS, INDICATOR
LIGHTS AND AUDIBLE REMINDERS
Instruments and controls2-15
Page 100 of 491
If any of the following conditions occur, the front
air bag, side air bag, curtain air bag, and preten-
sioner seat belt systems need servicing.● The supplemental air bag warning light re-
mains on after approximately 7 seconds.
● The supplemental air bag warning light
flashes intermittently.
● The supplemental air bag warning light does
not come on at all.
It is recommended that you visit a NISSAN dealer
for these services. Unless checked and repaired,
the supplemental restraint system (air bag sys-
tem) and/or the pretensioners may not function
properly. For additional information, refer to
“Supplemental restraint system (SRS)” in the
“Safety—Seats, seat belts and supplemental re-
straint system” section of this manual.
WARNING
If the supplemental air bag warning light
is on, it could mean that the front air bag,
side air bag, curtain air bag systems
and/or pretensioner systems will not op-
erate in an accident. To help avoid injury to
yourself or others, have your vehicle
checked as soon as possible. It is recom-
mended that you visit a NISSAN dealer for
this service.
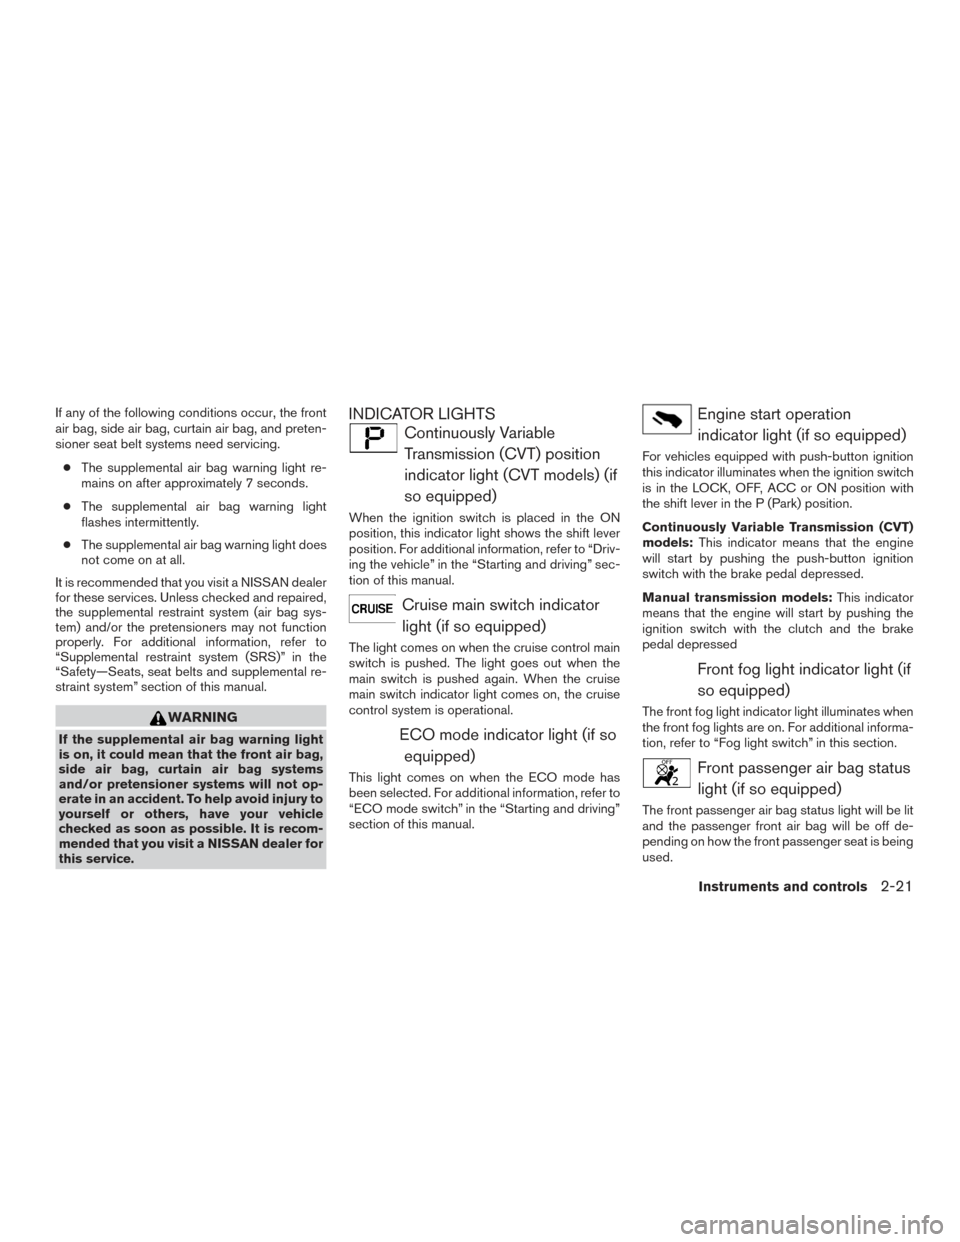
INDICATOR LIGHTS
Continuously Variable Transmission (CVT) position
indicator light (CVT models) (if
so equipped)
When the ignition switch is placed in the ON
position, this indicator light shows the shift lever
position. For additional information, refer to “Driv-
ing the vehicle” in the “Starting and driving” sec-
tion of this manual.
Cruise main switch indicatorlight (if so equipped)
The light comes on when the cruise control main
switch is pushed. The light goes out when the
main switch is pushed again. When the cruise
main switch indicator light comes on, the cruise
control system is operational.
ECO mode indicator light (if so equipped)
This light comes on when the ECO mode has
been selected. For additional information, refer to
“ECO mode switch” in the “Starting and driving”
section of this manual.
Engine start operationindicator light (if so equipped)
For vehicles equipped with push-button ignition
this indicator illuminates when the ignition switch
is in the LOCK, OFF, ACC or ON position with
the shift lever in the P (Park) position.
Continuously Variable Transmission (CVT)
models: This indicator means that the engine
will start by pushing the push-button ignition
switch with the brake pedal depressed.
Manual transmission models: This indicator
means that the engine will start by pushing the
ignition switch with the clutch and the brake
pedal depressed
Front fog light indicator light (if
so equipped)
The front fog light indicator light illuminates when
the front fog lights are on. For additional informa-
tion, refer to “Fog light switch” in this section.
Front passenger air bag statuslight (if so equipped)
The front passenger air bag status light will be lit
and the passenger front air bag will be off de-
pending on how the front passenger seat is being
used.
Instruments and controls2-21
Page 102 of 491
For vehicles with Intelligent Key: This light blinks
when the ignition switch is placed in the LOCK
position with the key removed from the ignition
switch.
The blinking security indicator light indicates that
the security systems equipped on the vehicle are
operational.
For additional information, refer to “Security sys-
tems” in this section.
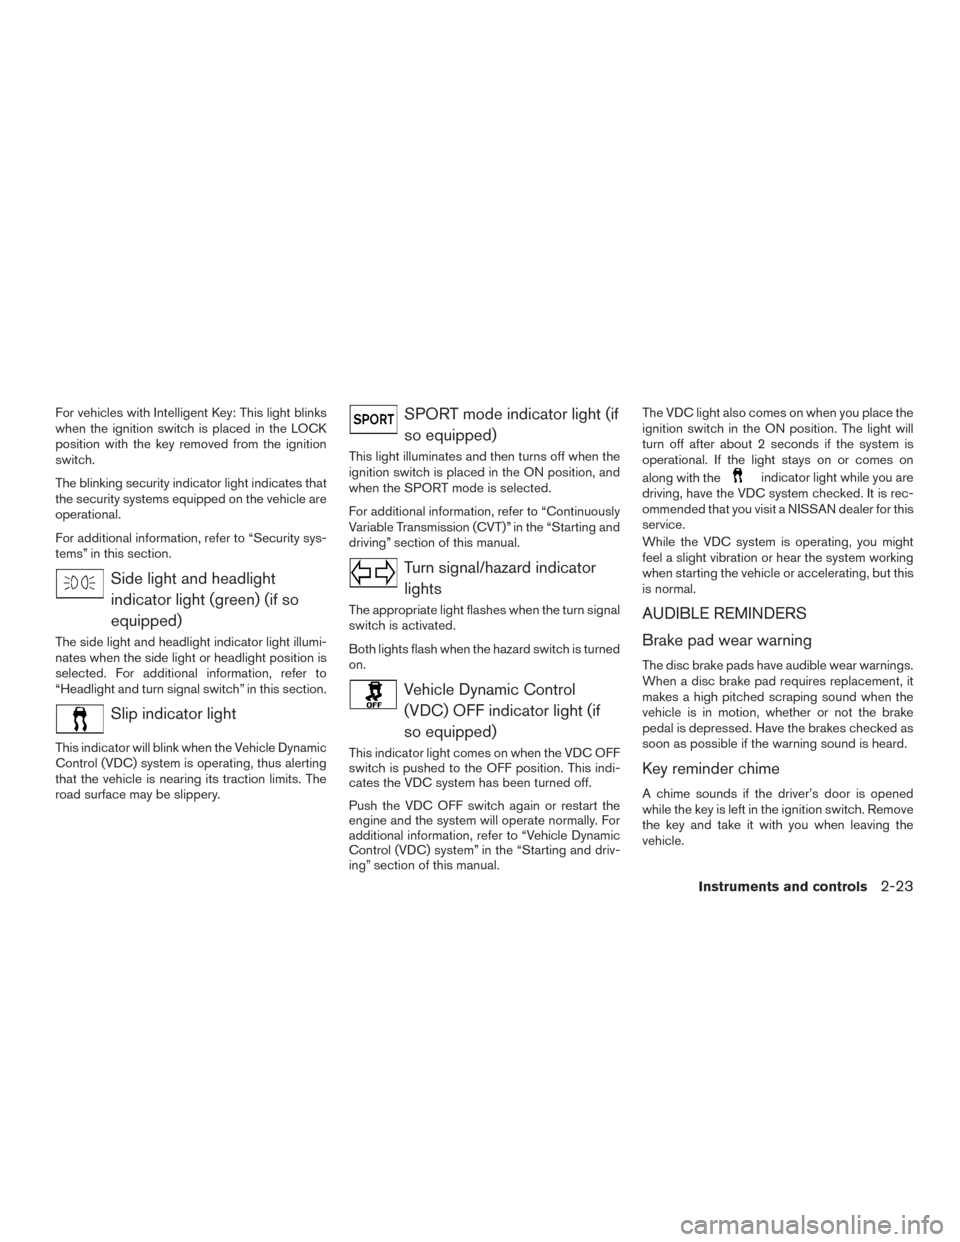
Side light and headlightindicator light (green) (if so
equipped)
The side light and headlight indicator light illumi-
nates when the side light or headlight position is
selected. For additional information, refer to
“Headlight and turn signal switch” in this section.
Slip indicator light
This indicator will blink when the Vehicle Dynamic
Control (VDC) system is operating, thus alerting
that the vehicle is nearing its traction limits. The
road surface may be slippery.
SPORT mode indicator light (ifso equipped)
This light illuminates and then turns off when the
ignition switch is placed in the ON position, and
when the SPORT mode is selected.
For additional information, refer to “Continuously
Variable Transmission (CVT)” in the “Starting and
driving” section of this manual.
Turn signal/hazard indicatorlights
The appropriate light flashes when the turn signal
switch is activated.
Both lights flash when the hazard switch is turned
on.
Vehicle Dynamic Control(VDC) OFF indicator light (if
so equipped)
This indicator light comes on when the VDC OFF
switch is pushed to the OFF position. This indi-
cates the VDC system has been turned off.
Push the VDC OFF switch again or restart the
engine and the system will operate normally. For
additional information, refer to “Vehicle Dynamic
Control (VDC) system” in the “Starting and driv-
ing” section of this manual. The VDC light also comes on when you place the
ignition switch in the ON position. The light will
turn off after about 2 seconds if the system is
operational. If the light stays on or comes on
along with the
indicator light while you are
driving, have the VDC system checked. It is rec-
ommended that you visit a NISSAN dealer for this
service.
While the VDC system is operating, you might
feel a slight vibration or hear the system working
when starting the vehicle or accelerating, but this
is normal.
AUDIBLE REMINDERS
Brake pad wear warning
The disc brake pads have audible wear warnings.
When a disc brake pad requires replacement, it
makes a high pitched scraping sound when the
vehicle is in motion, whether or not the brake
pedal is depressed. Have the brakes checked as
soon as possible if the warning sound is heard.
Key reminder chime
A chime sounds if the driver’s door is opened
while the key is left in the ignition switch. Remove
the key and take it with you when leaving the
vehicle.
Instruments and controls2-23
Page 112 of 491
10. Low Fuel
11. Loose Fuel Cap
12. Low Oil Pressure: See Owner’s Manual
13. Low Washer Fluid
14. Tire Pressure Low — Add Air
15. TPMS Error: See Owner’s Manual
16. Door Open
17. Alarm — Time for a break?
18. Power will turn off to save the battery
19. Power turned off to save the battery
20. Reminder: Turn OFF headlights
21. Headlight System Error: See Owner’sManual (if so equipped)
22. Blind Spot Warning (BSW) and Rear Cross Traffic Alert (RCTA) indicator (if so
equipped)
23. BSW/RCTA System Malfunction: See Owner’s Manual (if so equipped)
24. Side Radar Obstruction (if so equipped)
25. Cruise control indicator (if so equipped)
26. Intelligent Cruise Control (ICC) (if so equipped) 27. Shipping Mode On Push Storage Fuse
28. Transmission Shift Position indicator
29. CVT Error: See Owner’s Manual (if so
equipped)
30. Illumination indicator
31. Outside Temperature Display
32. Low Outside Temperature
33. Forward Emergency Braking (FEB) indicator (if so equipped)
34. Unavailable: Front Radar Obstruction (if so equipped)
No Key Detected
This warning appears when the Intelligent Key is
left outside the vehicle with the ignition switch in
the ON position. Make sure the Intelligent Key is
inside the vehicle.
For additional information, refer to “NISSAN In-
telligent Key®” in the “Pre-driving checks and
adjustments” section of this manual.
Key ID Incorrect
This warning appears when the ignition switch is
placed from the OFF position and the Intelligent
Key is not recognized by the system. You cannot
start the engine with an unregistered key. For additional information, refer to “NISSAN In-
telligent Key®” in the “Pre-driving checks and
adjustments” section of this manual.
Key Battery Low
This indicator illuminates when the Intelligent Key
battery is running out of power.
If this indicator illuminates, replace the battery
with a new one. For additional information, refer
to “Battery replacement” in the “Do-it-yourself”
section of this manual.
I-Key System Error: See Owner’s Manual
After the ignition switch is pushed to the ON
position, this light comes on for a period of time
and then turns off.
The I-Key System Error message warns of a
malfunction with the Intelligent Key system. If the
light comes on while the engine is stopped, it may
be impossible to start the engine.
If the light comes on while the engine is running,
you can drive the vehicle. However in these
cases, have the system checked. It is recom-
mended that you visit a NISSAN dealer for this
service.
Instruments and controls2-33
Page 115 of 491
be displayed to show the speed the vehicle will
return to if the resume button is activated.
Intelligent Cruise Control (ICC) indicator
(if so equipped)
This indicator shows the Intelligent Cruise Con-
trol (ICC) system status. The status is shown by
the color. For additional information, refer to “In-
telligent Cruise Control (ICC)” in the “Starting
and driving” section of this manual.
Shipping Mode On Push Storage Fuse
This warning may appear if the extended storage
switch is not pushed in. When this warning ap-
pears, push in the extended storage switch to
turn off the warning. For additional information,
refer to “Fuses” in the “Do-it-yourself” section of
this manual.
Transmission Shift Position indicator
This indicator shows the transmission shift posi-
tion.
CVT Error: See Owner’s Manual (if so
equipped)
This warning illuminates when there is a problem
with the CVT system. If this warning comes on,
have the system checked. It is recommended that
you visit a NISSAN dealer for this service.Illumination indicator
This indicator appears when the vehicle informa-
tion display screen brightness is being adjusted.
Outside Temperature Display
The outside temperature display appears in the
center region of the vehicle information display.
Low Outside Temperature
This warning appears if the outside temperature
is below 37°F (3°C) . The temperature can be
changed to display in Celsius or Fahrenheit. For
additional information, refer to “Settings” in this
section.
Forward Emergency Braking (FEB) indica-
tor (if so equipped)
This indicator shows when the FEB systems are
engaged.
For additional information, refer to “Forward
Emergency Braking (FEB)” in the “Starting and
driving” section of this manual.
Unavailable: Front Radar Obstruction (if
so equipped)
This warning appears when there is a radar ob-
struction detected. For additional information, re-
fer to “Forward Emergency Braking (FEB)” or
“Intelligent Cruise Control (ICC)” in the “Starting
and driving” section of this manual.
Your vehicle may have two types of security sys-
tems:
● Vehicle security system (if so equipped)
● NISSAN Vehicle Immobilizer System
VEHICLE SECURITY SYSTEM (if so
equipped)
The vehicle security system provides visual and
audible alarm signals if someone opens the doors
when the system is armed. It is not, however, a
motion detection type system that activates when
a vehicle is moved or when a vibration occurs.
LIC0301
SECURITY SYSTEMS
2-36Instruments and controls
Page 141 of 491
The HomeLink® Universal Transceiver provides
a convenient way to consolidate the functions of
up to three individual hand-held transmitters into
one built-in device.
HomeLink® Universal Transceiver:● Will operate most radio frequency devices
such as garage doors, gates, home and of-
fice lighting, entry door locks and security
systems.
● Is powered by your vehicle’s battery. No
separate batteries are required. If the vehi-
cle’s battery is discharged or is discon-
nected, HomeLink® will retain all program-
ming.
When the HomeLink® Universal Trans-
ceiver is programmed, retain the original
transmitter for future programming proce-
dures (Example: new vehicle purchases) .
Upon sale of the vehicle, the programmed
HomeLink® Universal Transceiver buttons
should be erased for security purposes. For
additional information, refer to “Program-
ming HomeLink®” in this section.WARNING
● Do not use the HomeLink® Universal
Transceiver with any garage door
opener that lacks safety stop and re-
verse features as required by federal
safety standards. (These standards be-
came effective for opener models
manufactured after April 1, 1982) . A ga-
rage door opener which cannot detect
an object in the path of a closing garage
door and then automatically stop and
reverse, does not meet current federal
safety standards. Using a garage door
opener without these features in-
creases the risk of serious injury or
death.
● During the programming procedure
your garage door or security gate will
open and close (if the transmitter is
within range) . Make sure that people or
objects are clear of the garage door,
gate, etc. that you are programming.
● Your vehicle’s engine should be turned
off while programming the HomeLink®
Universal Transceiver. Do not breathe
exhaust gases; they contain colorless
and odorless carbon monoxide. Carbon
monoxide is dangerous. It can cause
unconsciousness or death.
PROGRAMMING HOMELINK®
If you have any questions or are having difficulty
programming your HomeLink® buttons, refer to
the HomeLink® web site at: www.homelink.com
or call 1-800-355-3515.
NOTE:
Place the ignition switch in the ACC posi-
tion when programming HomeLink®. It is
also recommended that a new battery be
placed in the hand-held transmitter of the
device being programmed to HomeLink®
for quicker programming and accurate
transmission of the radio frequency.
HOMELINK® UNIVERSAL
TRANSCEIVER (if so equipped)
2-62Instruments and controls
Page 143 of 491
6. Return to the vehicle and firmly press andhold the trained HomeLink® button for
2 seconds and release. Repeat the
“press/hold/release” sequence up to three
times to complete the training process.
HomeLink® should now activate your rolling
code equipped device.
7. If you have any questions or are having diffi- culty programming your HomeLink® but-
tons, refer to the HomeLink® web site at:
www.homelink.com or call 1-800-355-
3515.
PROGRAMMING HOMELINK® FOR
CANADIAN CUSTOMERS AND
GATE OPENERS
Canadian radio-frequency laws require transmit-
ter signals to “time-out” (or quit) after several
seconds of transmission – which may not be long
enough for HomeLink® to pick up the signal
during training. Similar to this Canadian law,
some U.S. gate operators are designed to “tim-
eout” in the same manner. If you live in Canada or you are having difficulties
training a gate operator
orgarage door opener
by using the “Training” procedures, replace
“Programming HomeLink®” Step 2with the fol-
lowing:
NOTE:
When programming a garage door opener,
etc., unplug the device during the “cycling”
process to prevent possible damage to the
garage door opener components.
1. For additional information, refer to “Pro- gramming HomeLink®” step 1 in this sec-
tion.
2. Using both hands, simultaneously press and hold the desired HomeLink® button and the
hand-held transmitter button. During train-
ing, your hand-held transmitter may auto-
matically stop transmitting. Continue to
press and hold the desired HomeLink® but-
ton while you press and re-press (“cycle”)
your hand-held transmitter every 2 seconds
until the frequency signal has been learned.
The HomeLink® indicator light will flash
slowly and then rapidly after several seconds
upon successful training. DO NOT release
until the HomeLink® indicator light flashes
slowly and then rapidly. When the indicator
light flashes rapidly, both buttons may be released. The rapid flashing indicates suc-
cessful training.
Proceed with “Programming HomeLink®”
step 3 to complete.
If the device was unplugged during the pro-
gramming procedure, remember to plug it
back in when programming is completed.
OPERATING THE HOMELINK®
UNIVERSAL TRANSCEIVER
The HomeLink® Universal Transceiver, after it is
programmed, can be used to activate the pro-
grammed device. To operate, simply press and
release the appropriate programmed
HomeLink® Universal Transceiver button. The
amber indicator light will illuminate while the sig-
nal is being transmitted.
For convenience, the hand-held transmitter of the
device may also be used at any time.
PROGRAMMING TROUBLE-
DIAGNOSIS
If the HomeLink® does not quickly learn the
hand-held transmitter information:
● replace the hand-held transmitter batteries
with new batteries.
2-64Instruments and controls