2017 NISSAN QUEST ignition
[x] Cancel search: ignitionPage 214 of 520
WARNING
Failure to follow the warnings and
instructions for proper use of the Rear-
View Monitor system could result in
serious injury or death.
.The RearView Monitor is a conve-
nience but it is not a substitute for
proper backing. Always turn and
look out the windows, and check
mirrors to be sure that it is safe to
move before operating the vehicle.
Always back up slowly.
. The system is designed as an aid to
the driver in showing large station-
ary objects directly behind the vehi-
cle, to help avoid damaging the
vehicle.
. The distance guide line and the
vehicle width line should be used
as a reference only when the vehicle
is on a level paved surface. The
distance viewed on the monitor is
for reference only and may be
different than the actual distance
between the vehicle and displayed
objects.
CAUTION
Do not scratch the camera lens when
cleaning dirt or snow from the front of
the camera.
The RearView Monitor system automatically
shows a rear view of the vehicle when the shift
lever is placed in the R (Reverse) position.
The radio can still be heard while the RearView
Monitor is active.
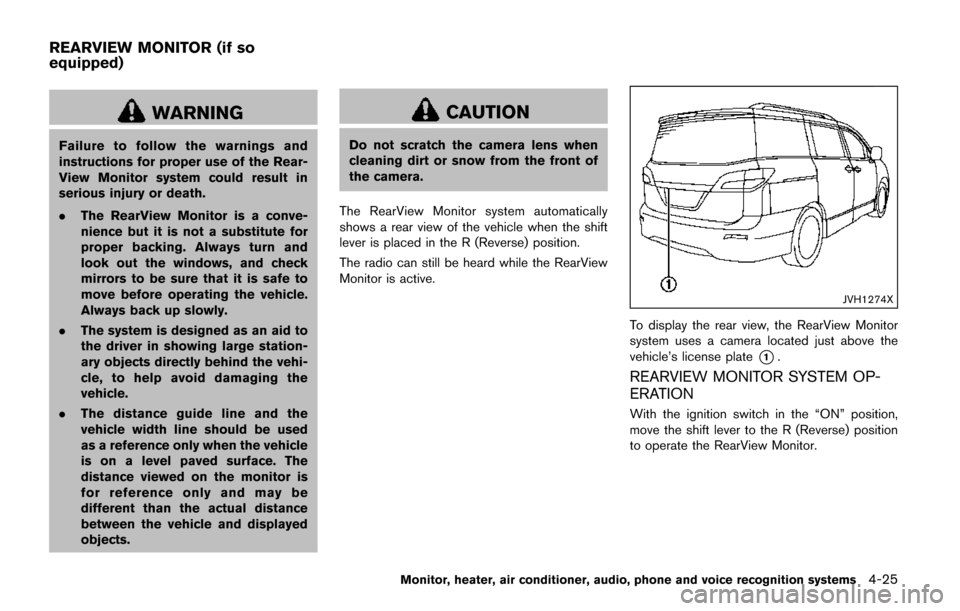
JVH1274X
To display the rear view, the RearView Monitor
system uses a camera located just above the
vehicle’s license plate
*1.
REARVIEW MONITOR SYSTEM OP-
ERATION
With the ignition switch in the “ON” position,
move the shift lever to the R (Reverse) position
to operate the RearView Monitor.
Monitor, heater, air conditioner, audio, phone and voice recognition systems4-25
REARVIEW MONITOR (if so
equipped)
Page 222 of 520
Available views:
.Front View
The view to the front of the vehicle.
. Rear View
The view to the rear of the vehicle.
. Bird’s-Eye View
The surrounding view of the vehicle.
. Front-side View
The view around and ahead of the front
passenger’s side wheel.
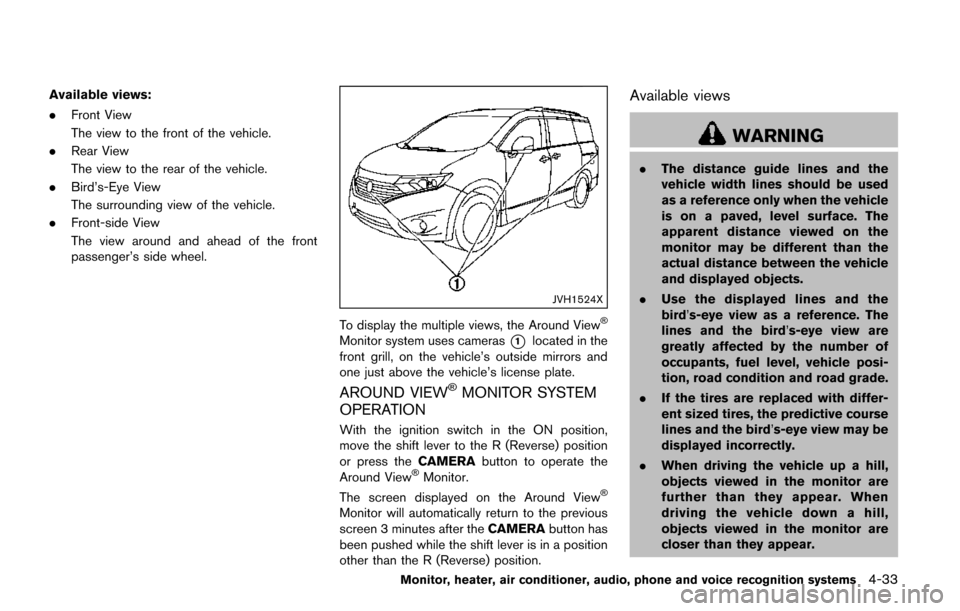
JVH1524X
To display the multiple views, the Around View�Š
Monitor system uses cameras*1located in the
front grill, on the vehicle’s outside mirrors and
one just above the vehicle’s license plate.
AROUND VIEW�ŠMONITOR SYSTEM
OPERATION
With the ignition switch in the ON position,
move the shift lever to the R (Reverse) position
or press the CAMERAbutton to operate the
Around View
�ŠMonitor.
The screen displayed on the Around View�Š
Monitor will automatically return to the previous
screen 3 minutes after the CAMERAbutton has
been pushed while the shift lever is in a position
other than the R (Reverse) position.
Available views
WARNING
. The distance guide lines and the
vehicle width lines should be used
as a reference only when the vehicle
is on a paved, level surface. The
apparent distance viewed on the
monitor may be different than the
actual distance between the vehicle
and displayed objects.
. Use the displayed lines and the
bird’s-eye view as a reference. The
lines and the bird’s-eye view are
greatly affected by the number of
occupants, fuel level, vehicle posi-
tion, road condition and road grade.
. If the tires are replaced with differ-
ent sized tires, the predictive course
lines and the bird’s-eye view may be
displayed incorrectly.
. When driving the vehicle up a hill,
objects viewed in the monitor are
further than they appear. When
driving the vehicle down a hill,
objects viewed in the monitor are
closer than they appear.
Monitor, heater, air conditioner, audio, phone and voice recognition systems4-33
Page 224 of 520
degrees or less from the straight ahead
position, both the right and left predictive
course lines
*6are displayed. When the
steering wheel turns about 90 degrees or
more, a line is displayed only on the
opposite side of the turn.
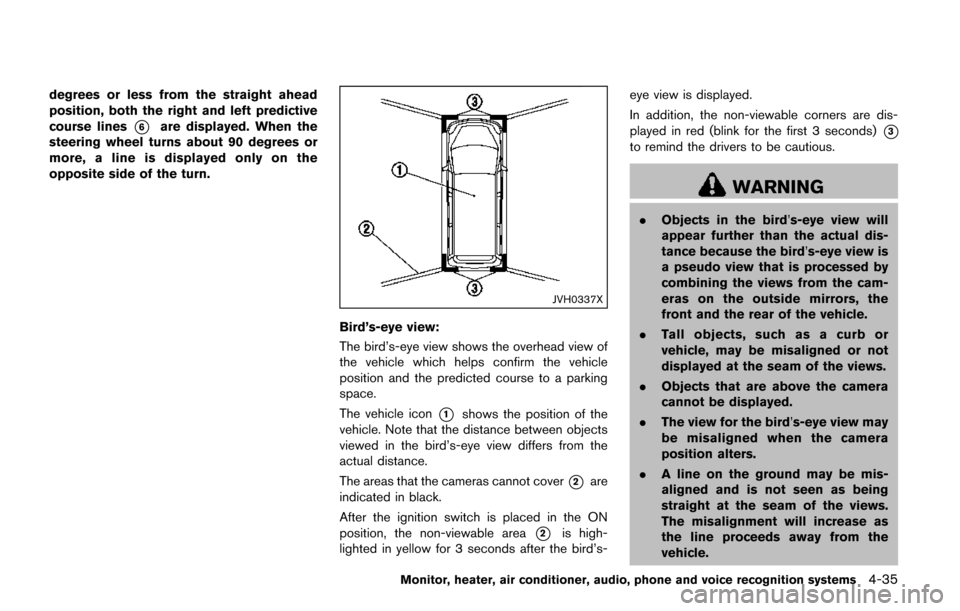
JVH0337X
Bird’s-eye view:
The bird’s-eye view shows the overhead view of
the vehicle which helps confirm the vehicle
position and the predicted course to a parking
space.
The vehicle icon
*1shows the position of the
vehicle. Note that the distance between objects
viewed in the bird’s-eye view differs from the
actual distance.
The areas that the cameras cannot cover
*2are
indicated in black.
After the ignition switch is placed in the ON
position, the non-viewable area
*2is high-
lighted in yellow for 3 seconds after the bird’s- eye view is displayed.
In addition, the non-viewable corners are dis-
played in red (blink for the first 3 seconds)
*3
to remind the drivers to be cautious.
WARNING
.
Objects in the bird’s-eye view will
appear further than the actual dis-
tance because the bird’s-eye view is
a pseudo view that is processed by
combining the views from the cam-
eras on the outside mirrors, the
front and the rear of the vehicle.
. Tall objects, such as a curb or
vehicle, may be misaligned or not
displayed at the seam of the views.
. Objects that are above the camera
cannot be displayed.
. The view for the bird’s-eye view may
be misaligned when the camera
position alters.
. A line on the ground may be mis-
aligned and is not seen as being
straight at the seam of the views.
The misalignment will increase as
the line proceeds away from the
vehicle.
Monitor, heater, air conditioner, audio, phone and voice recognition systems4-35
Page 232 of 520
vehicle. When maneuvering, always
use the outside mirror and rearview
mirror and turn and check the sur-
rounding to ensure it is safe to
maneuver.
. The system is deactivated at speeds
above 5 MPH (8 km/h) . It is reacti-
vated at lower speeds.
. The MOD system is not designed to
detect the surrounding stationary
objects.
The Moving Object Detection (MOD) system
can inform the driver of the moving objects
surrounding the vehicle when driving out of
garages, maneuvering into parking lots and in
other such instances.
The MOD system detects moving objects by
using image processing technology on the
image shown on the display.MOD SYSTEM OPERATION
The MOD system will turn on automatically
under the following conditions:
. When the shift lever is in the R (Reverse)
position.
. When the CAMERA button is pushed, the
camera view is activated on the display.
. When vehicle speed decreases below
approximately 5 MPH (8 km/h) .
The MOD system operates in the following
conditions when the camera view is displayed:
. When the shift lever is in the P (Park) or N
(Neutral) position and the vehicle is
stopped, the MOD system detects the
moving objects in the bird’s-eye view. The
MOD system will not operate if the outside
mirrors are moving in or out or if either door
is opened.
. When the shift lever is in the D (Drive)
position, and the vehicle speed is below
approximately 5 MPH (8 km/h) , the MOD
system detects moving objects in the front
view.
. When the shift lever is in the R (Reverse)
position and the vehicle speed is below
approximately 5 MPH (8 km/h) , the MOD
system detects moving objects in the rear
view. The MOD system will not operate if the
liftgate is open. .
When the ignition switch is placed in the
“OFF” position and then back to the “ON”
position.
The MOD system does not detect moving
objects in the front-side view. The MOD icon
is not displayed on the screen when in this view.
When the MOD system detects a moving object
near the vehicle, the yellow frame will be
displayed on the view where the objects are
detected and a chime will sound once. While the
MOD system continues to detect moving
objects, the yellow frame continues to be
displayed.
Monitor, heater, air conditioner, audio, phone and voice recognition systems4-43
Page 236 of 520
SAA3055
Rear
REAR VENTILATORS
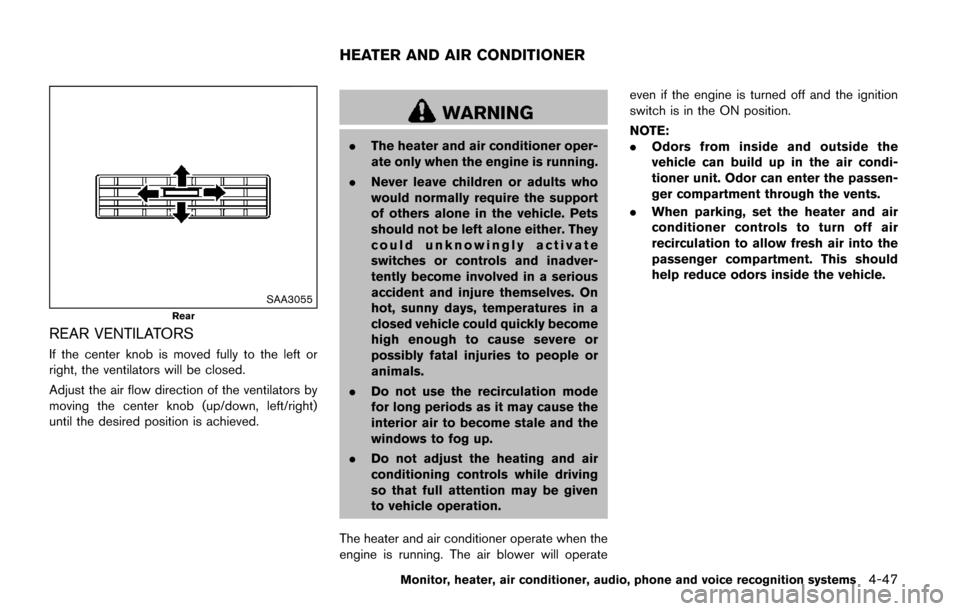
If the center knob is moved fully to the left or
right, the ventilators will be closed.
Adjust the air flow direction of the ventilators by
moving the center knob (up/down, left/right)
until the desired position is achieved.
WARNING
.The heater and air conditioner oper-
ate only when the engine is running.
. Never leave children or adults who
would normally require the support
of others alone in the vehicle. Pets
should not be left alone either. They
could unknowingly activate
switches or controls and inadver-
tently become involved in a serious
accident and injure themselves. On
hot, sunny days, temperatures in a
closed vehicle could quickly become
high enough to cause severe or
possibly fatal injuries to people or
animals.
. Do not use the recirculation mode
for long periods as it may cause the
interior air to become stale and the
windows to fog up.
. Do not adjust the heating and air
conditioning controls while driving
so that full attention may be given
to vehicle operation.
The heater and air conditioner operate when the
engine is running. The air blower will operate even if the engine is turned off and the ignition
switch is in the ON position.
NOTE:
.
Odors from inside and outside the
vehicle can build up in the air condi-
tioner unit. Odor can enter the passen-
ger compartment through the vents.
. When parking, set the heater and air
conditioner controls to turn off air
recirculation to allow fresh air into the
passenger compartment. This should
help reduce odors inside the vehicle.
Monitor, heater, air conditioner, audio, phone and voice recognition systems4-47
HEATER AND AIR CONDITIONER
Page 250 of 520
AUDIO OPERATION PRECAUTIONS
Radio
Push the ignition switch to the ACC or ON
position and push the radio band select button
to turn on the radio. If you listen to the radio with
the engine not running, the ignition switch
should be pushed to the ACC position.
Radio reception is affected by station signal
strength, distance from radio transmitter, build-
ings, bridges, mountains and other external
influences. Intermittent changes in reception
quality normally are caused by these external
influences.
Using a cellular phone in or near the
vehicle may influence radio reception
quality.
Radio reception:
Your vehicle radio system is equipped with
state-of-the-art electronic circuits to enhance
radio reception. These circuits are designed to
extend reception range, and to enhance the
quality of that reception.
However there are some general characteristics
of both FM and AM radio signals that can affect
radio reception quality in a moving vehicle, even
when the finest equipment is used. These
characteristics are completely normal in a given
reception area, and do not indicate any mal-function in your vehicle radio system.
Reception conditions will constantly change
because of vehicle movement. Buildings, terrain,
signal distance and interference from other
vehicles can work against ideal reception.
Described below are some of the factors that
can affect your radio reception.
Some cellular phones or other devices may
cause interference or a buzzing noise to come
from the audio system speakers. Storing the
device in a different location may reduce or
eliminate the noise.
SAA0306
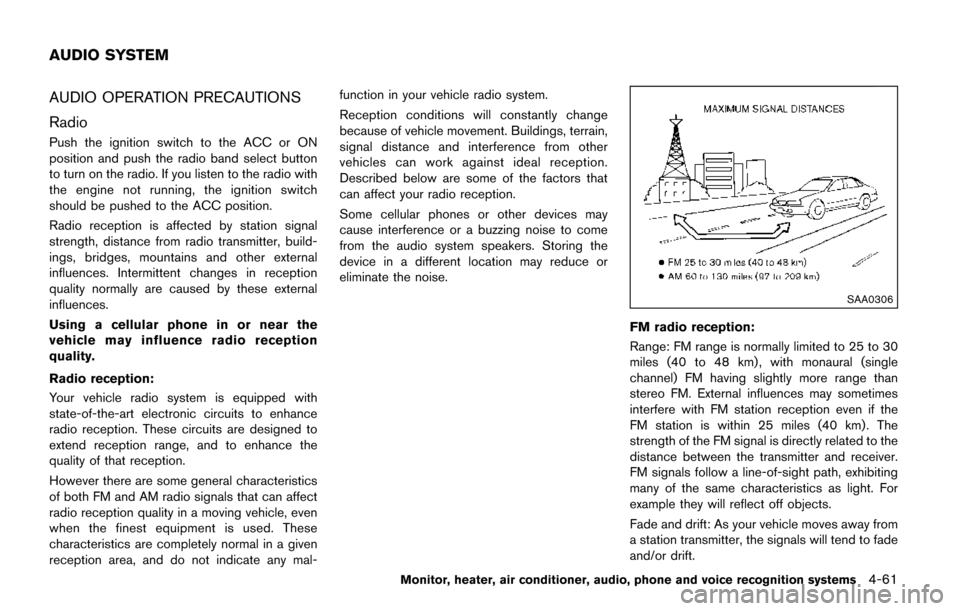
FM radio reception:
Range: FM range is normally limited to 25 to 30
miles (40 to 48 km) , with monaural (single
channel) FM having slightly more range than
stereo FM. External influences may sometimes
interfere with FM station reception even if the
FM station is within 25 miles (40 km). The
strength of the FM signal is directly related to the
distance between the transmitter and receiver.
FM signals follow a line-of-sight path, exhibiting
many of the same characteristics as light. For
example they will reflect off objects.
Fade and drift: As your vehicle moves away from
a station transmitter, the signals will tend to fade
and/or drift.
Monitor, heater, air conditioner, audio, phone and voice recognition systems4-61
AUDIO SYSTEM
Page 263 of 520
4-74Monitor, heater, air conditioner, audio, phone and voice recognition systems
JVH0335X
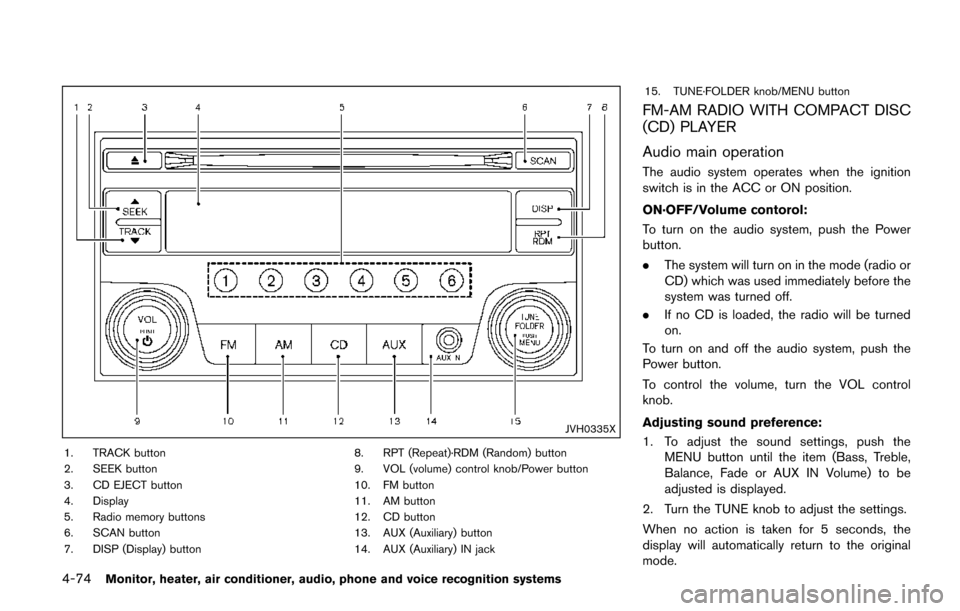
1. TRACK button
2. SEEK button
3. CD EJECT button
4. Display
5. Radio memory buttons
6. SCAN button
7. DISP (Display) button8. RPT (Repeat)·RDM (Random) button
9. VOL (volume) control knob/Power button
10. FM button
11. AM button
12. CD button
13. AUX (Auxiliary) button
14. AUX (Auxiliary) IN jack15. TUNE·FOLDER knob/MENU button
FM-AM RADIO WITH COMPACT DISC
(CD) PLAYER
Audio main operation
The audio system operates when the ignition
switch is in the ACC or ON position.
ON·OFF/Volume contorol:
To turn on the audio system, push the Power
button.
.
The system will turn on in the mode (radio or
CD) which was used immediately before the
system was turned off.
. If no CD is loaded, the radio will be turned
on.
To turn on and off the audio system, push the
Power button.
To control the volume, turn the VOL control
knob.
Adjusting sound preference:
1. To adjust the sound settings, push the MENU button until the item (Bass, Treble,
Balance, Fade or AUX IN Volume) to be
adjusted is displayed.
2. Turn the TUNE knob to adjust the settings.
When no action is taken for 5 seconds, the
display will automatically return to the original
mode.
Page 265 of 520
4-76Monitor, heater, air conditioner, audio, phone and voice recognition systems
Compact Disc (CD) player operation
Place the ignition switch in the ACC or ON
position, and insert the CD into the slot with the
label side facing up. The CD will be guided
automatically into the slot and start playing. After
loading the disc, the number of tracks on the
disc will appear on the display.
If the radio is already operating, it will auto-
matically turn off and the CD will play.
If the system has been turned off while the CD
was playing, pushing the Power button will start
the CD.
CD PLAY:
When the CD button is pushed while a CD is
loaded, the CD will start playing.
CD DISPLAY information:
When the DISP is pushed while a CD with title
information is playing, the information text on the
display will change as follows:
CD:
Track time ?Album Title ?Artist Name ?
Song Title ?Track time
CD with MP3/WMA:
Track time ?Folder Title ?Album Title ?Artist
Name ?Song Title ?Track time
/Next/Previous Track and Fast
Forward/Rewind:
Fast forward/Rewind:
Push and hold the FF or REW button for more
than 1.5 seconds to fast forward or rewind
through the track. Release the button to play the
CD at normal speed.
Track up/down:
To play the next track, push the FF button for
less than 1.5 seconds while a CD is playing.
To play the previous track, push the REW button
for less than 1.5 seconds within 2 seconds after
the current track started playing. To return to the
beginning of the current track, push the REW
button for less than 1.5 seconds after 2 seconds
from when the current track started playing.
Folder Selector Knob (CD with MP3/
WMA):
To skip to the next folder, turn the
TUNE·FOLDER knob.
To skip to the next or previous track within the
folder, push SEEK/TRACK button
REPEAT (RPT) , RANDOM (RDM):
When the RPT/RDM button is pushed while a
CD is playing, the play mode will change as
follows: CD:
DISC REPEAT
?TRACK REPEAT ?DISC
RANDOM ?DISC REPEAT
CD with MP3/WMA:
DISC REPEAT ?FOLDER REPEAT ?TRACK
REPEAT ?DISC RANDOM ?FOLDER
RANDOM ?DISC REPEAT
SCAN tuning:
When the SCAN button is pushed while a CD is
being played, the first 10 seconds of all the
tracks will be played.
When the SCAN button is pushed again, the
CD will return to the regular play mode.
CD EJECT button:
When the CD EJECT button is pushed with the
CD loaded, the CD will be ejected.
When this button is pushed while the CD is
being played, the CD will come out and the
system will turn off.
If the CD comes out and is not removed, it
will be pulled back into the slot to protect
it.