2017 NISSAN QUEST tire pressure
[x] Cancel search: tire pressurePage 458 of 520
SDI2197
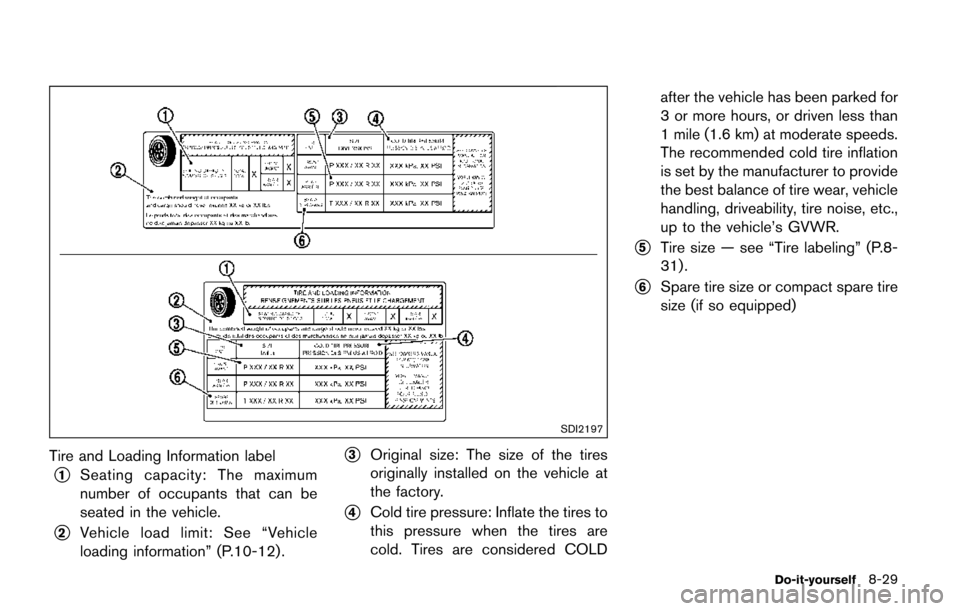
Tire and Loading Information label
*1Seating capacity: The maximum
number of occupants that can be
seated in the vehicle.
*2Vehicle load limit: See “Vehicle
loading information” (P.10-12) .
*3Original size: The size of the tires
originally installed on the vehicle at
the factory.
*4Cold tire pressure: Inflate the tires to
this pressure when the tires are
cold. Tires are considered COLDafter the vehicle has been parked for
3 or more hours, or driven less than
1 mile (1.6 km) at moderate speeds.
The recommended cold tire inflation
is set by the manufacturer to provide
the best balance of tire wear, vehicle
handling, driveability, tire noise, etc.,
up to the vehicle’s GVWR.
*5Tire size — see “Tire labeling” (P.8-
31) .
*6Spare tire size or compact spare tire
size (if so equipped)
Do-it-yourself8-29
Page 459 of 520
8-30Do-it-yourself
SDI1949
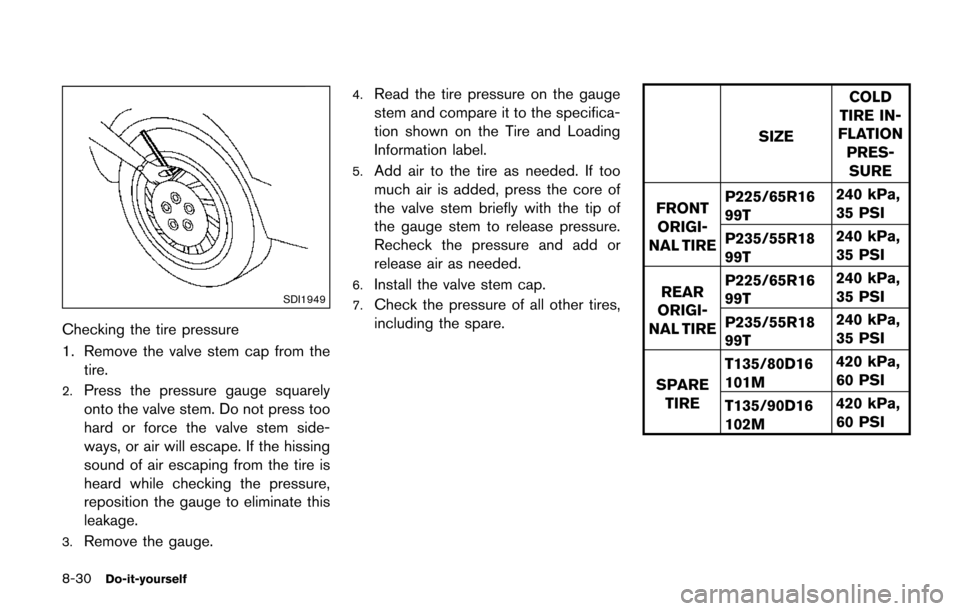
Checking the tire pressure
1. Remove the valve stem cap from thetire.
2.Press the pressure gauge squarely
onto the valve stem. Do not press too
hard or force the valve stem side-
ways, or air will escape. If the hissing
sound of air escaping from the tire is
heard while checking the pressure,
reposition the gauge to eliminate this
leakage.
3.Remove the gauge.
4.Read the tire pressure on the gauge
stem and compare it to the specifica-
tion shown on the Tire and Loading
Information label.
5.Add air to the tire as needed. If too
much air is added, press the core of
the valve stem briefly with the tip of
the gauge stem to release pressure.
Recheck the pressure and add or
release air as needed.
6.Install the valve stem cap.
7.Check the pressure of all other tires,
including the spare.
SIZE COLD
TIRE IN-
FLATION
PRES-SURE
FRONT ORIGI-
NAL TIRE P225/65R16
99T
240 kPa,
35 PSI
P235/55R18
99T 240 kPa,
35 PSI
REAR
ORIGI-
NAL TIRE P225/65R16
99T
240 kPa,
35 PSI
P235/55R18
99T 240 kPa,
35 PSI
SPARE TIRE T135/80D16
101M
420 kPa,
60 PSI
T135/90D16
102M 420 kPa,
60 PSI
Page 461 of 520
8-32Do-it-yourself
JVM0694X
Example
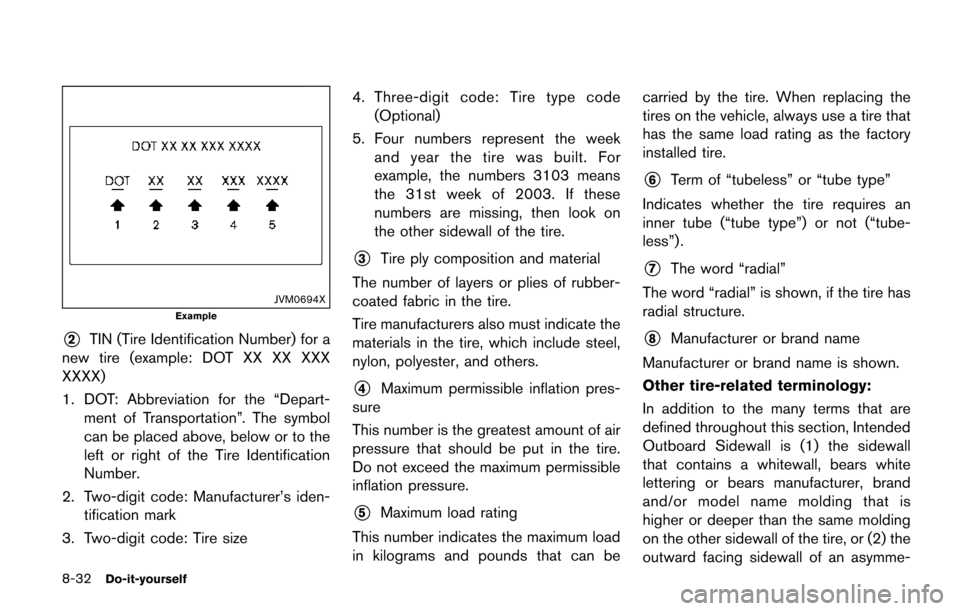
*2TIN (Tire Identification Number) for a
new tire (example: DOT XX XX XXX
XXXX)
1. DOT: Abbreviation for the “Depart- ment of Transportation”. The symbol
can be placed above, below or to the
left or right of the Tire Identification
Number.
2. Two-digit code: Manufacturer’s iden- tification mark
3. Two-digit code: Tire size 4. Three-digit code: Tire type code
(Optional)
5. Four numbers represent the week and year the tire was built. For
example, the numbers 3103 means
the 31st week of 2003. If these
numbers are missing, then look on
the other sidewall of the tire.
*3Tire ply composition and material
The number of layers or plies of rubber-
coated fabric in the tire.
Tire manufacturers also must indicate the
materials in the tire, which include steel,
nylon, polyester, and others.
*4Maximum permissible inflation pres-
sure
This number is the greatest amount of air
pressure that should be put in the tire.
Do not exceed the maximum permissible
inflation pressure.
*5Maximum load rating
This number indicates the maximum load
in kilograms and pounds that can be carried by the tire. When replacing the
tires on the vehicle, always use a tire that
has the same load rating as the factory
installed tire.
*6Term of “tubeless” or “tube type”
Indicates whether the tire requires an
inner tube (“tube type”) or not (“tube-
less”) .
*7The word “radial”
The word “radial” is shown, if the tire has
radial structure.
*8Manufacturer or brand name
Manufacturer or brand name is shown.
Other tire-related terminology:
In addition to the many terms that are
defined throughout this section, Intended
Outboard Sidewall is (1) the sidewall
that contains a whitewall, bears white
lettering or bears manufacturer, brand
and/or model name molding that is
higher or deeper than the same molding
on the other sidewall of the tire, or (2) the
outward facing sidewall of an asymme-
Page 464 of 520
a tight fit. Loose end links of the tire chain must
be secured or removed to prevent the possibility
of whipping action damage to the fenders or
underbody. If possible, avoid fully loading your
vehicle when using tire chains. In addition, drive
at a reduced speed. Otherwise, your vehicle may
be damaged and/or vehicle handling and
performance may be adversely affected.
Tire chains must be installed only on the
front wheels and not on the rear wheels.
Never install tire chains on a TEMPORARY USE
ONLY spare tire.
Do not use tire chains on dry roads. Driving with
tire chains in such conditions can cause damage
to the various mechanisms of the vehicle due to
some overstress.
SDI1662
CHANGING WHEELS AND TIRES
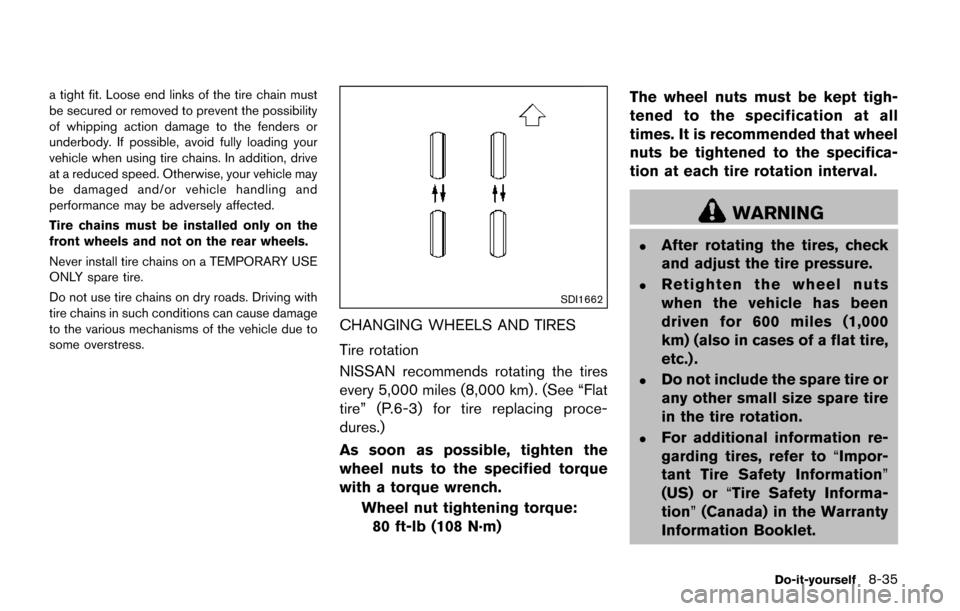
Tire rotation
NISSAN recommends rotating the tires
every 5,000 miles (8,000 km) . (See “Flat
tire” (P.6-3) for tire replacing proce-
dures.)
As soon as possible, tighten the
wheel nuts to the specified torque
with a torque wrench.Wheel nut tightening torque:80 ft-lb (108 N·m) The wheel nuts must be kept tigh-
tened to the specification at all
times. It is recommended that wheel
nuts be tightened to the specifica-
tion at each tire rotation interval.
WARNING
.After rotating the tires, check
and adjust the tire pressure.
.Retighten the wheel nuts
when the vehicle has been
driven for 600 miles (1,000
km) (also in cases of a flat tire,
etc.) .
.Do not include the spare tire or
any other small size spare tire
in the tire rotation.
.For additional information re-
garding tires, refer to
“Impor-
tant Tire Safety Information”
(US) or “Tire Safety Informa-
tion” (Canada) in the Warranty
Information Booklet.
Do-it-yourself8-35
Page 466 of 520
.If your vehicle was originally
equipped with 4 tires that were the
same size and you are only repla-
cing 2 of the 4 tires, install the new
tires on the rear axle. Placing new
tires on the front axle may cause
loss of vehicle control in some
driving conditions and cause an
accident and personal injury.
. If the wheels are changed for any
reason, always replace with wheels
which have the same off-set dimen-
sion. Wheels of a different off-set
could cause premature tire wear,
degrade vehicle handling character-
istics and/or interference with the
brake discs/drums. Such interfer-
ence can lead to decreased braking
efficiency and/or early brake pad/
shoe wear. See “Wheels and tires”
(P.10-7) of this manual for wheel off-
set dimensions.
. Since the spare tire is not equipped
with the TPMS, when a spare tire is
mounted or a wheel is replaced, the
TPMS will not function and the low
tire pressure warning light will flash
for approximately 1 minute. The
light will remain on after 1 minute. Have your tires replaced and/or
TPMS system reset as soon as
possible. It is recommended you
visit a NISSAN dealer for this ser-
vice.
. Replacing tires with those not ori-
ginally specified by NISSAN could
affect the proper operation of the
TPMS.
. The TPMS sensor may be damaged
if it is not handled correctly. Be
careful when handling the TPMS
sensor.
. When replacing the TPMS sensor,
the ID registration may be required.
It is recommended you visit a
NISSAN dealer for ID registration.
. Do not use a valve stem cap that is
not specified by NISSAN. The valve
stem cap may become stuck.
. Be sure that the valve stem caps are
correctly fitted. otherwise the valve
may be clogged up with dirt and
cause a malfunction or loss of
pressure.
. Do not install a damaged or de-
formed wheel or tire even if it has
been repaired. Such wheels or tires could have structural damage and
could fail without warning.
. The use of retread tire is not re-
commended.
. For additional information regard-
ing tires, refer to “Important Tire
Safety Information” (US) or“Tire
Safety Information” (Canada) in the
Warranty Information Booklet.
Wheel balance
Unbalanced wheels may affect vehicle handling
and tire life. Even with regular use, wheels can
get out of balance. Therefore, they should be
balanced as required.
Wheel balance service should be per-
formed with the wheels off the vehicle.
Spin balancing the wheels on the vehicle
could lead to mechanical damage.
For additional information regarding tires, refer
to “Important Tire Safety Information” (US) or
“Tire Safety Information” (Canada) in the War-
ranty Information Booklet.
Do-it-yourself8-37
Page 467 of 520
8-38Do-it-yourself
Care of wheels
See “Cleaning exterior” (P.7-2) for details about
care of the wheels.
Spare tire
Since the spare tire is not equipped with the
TPMS, when a spare tire is mounted (TEMPOR-
ARY USE ONLY or conventional) , the TPMS will
not function.
Observe the following precautions if the TEM-
PORARY USE ONLY spare tire must be used,
otherwise your vehicle could be damaged or
involved in an accident.
WARNING
.The TEMPORARY USE ONLY spare
tire should be used for emergency
use. It should be replaced with the
standard tire at the first opportunity
to avoid possible tire or differential
damage.
. Drive carefully while the TEMPOR-
ARY USE ONLY spare tire is in-
stalled. Avoid sharp turns and
abrupt braking while driving.
. Periodically check spare tire infla-
tion pressure. Always keep the
pressure of the TEMPORARY USE ONLY spare tire at 60 psi (420 kPa,
4.2 bar) . Always keep the pressure
of the full size spare tire (if so
equipped) at the recommended
pressure for standard tires, as in-
dicated on the Tire and Loading
Information label.
. With the TEMPORARY USE ONLY
spare tire installed do not drive your
vehicle at speeds faster than 50
MPH (80 km/h) .
. When driving on roads covered with
snow or ice, the TEMPORARY USE
ONLY spare tire should be used on
the rear wheels and original tire
used on the front wheels (drive
wheels) . Use tire chains only on
the front (original) tires.
. Tire tread of the TEMPORARY USE
ONLY spare tire will wear at a faster
rate than the standard tire. Replace
the spare tire as soon as the tread
wear indicators appear.
. Do not use the spare tire on other
vehicles.
. Do not use more than one spare tire
at the same time. .
Do not tow a trailer while the
TEMPORARY USE ONLY spare tire
is installed.
CAUTION
.Do not use tire chains on a TEM-
PORARY USE ONLY spare tire. Tire
chains will not fit properly and may
cause damage to the vehicle.
. Because the TEMPORARY USE
ONLY spare tire is smaller than the
original tire, ground clearance is
reduced. To avoid damage to the
vehicle, do not drive over obstacles.
Also do not drive the vehicle
through an automatic car wash
since it may get caught.
Page 470 of 520
corrosive materials, check lubrication frequently.
Lights*:Clean the headlights on a regular basis.
Make sure that the headlights, stop lights, tail
lights, turn signal lights, and other lights are all
operating properly and installed securely. Also
check headlight aim.
Road wheel nuts (lug nuts)*: When checking
the tires, make sure no wheel nuts are missing,
and check for any loose wheel nuts. Tighten if
necessary.
Tire rotation*: Tires should be rotated every
5,000 miles (8,000 km) .
Tires*: Check the pressure with a gauge often
and always prior to long distance trips. If
necessary, adjust the pressure in all tires,
including the spare, to the pressure specified.
Check carefully for damage, cuts or excessive
wear.
Tire Pressure Monitoring System (TPMS)
transmitter components: Replace the TPMS
transmitter grommet seal, valve core and cap
when the tires are replaced due to wear or age.
Wheel alignment and balance: If the vehicle
should pull to either side while driving on a
straight and level road, or if you detect uneven or
abnormal tire wear, there may be a need for
wheel alignment.
If the steering wheel or seat vibrates at normal highway speeds, wheel balancing may be
needed.
For additional information regarding tires, refer
to “Important Tire Safety Information” (US) in the
NISSAN Warranty Information Booklet.
Windshield:
Clean the windshield on a regular
basis. Check the windshield at least every six
months for cracks or other damage. Have a
damaged windshield repaired by a qualified
repair facility.
Windshield wiper blades*: Check for cracks
or wear if they do not wipe properly.
Inside the vehicle
The maintenance items listed here should be
checked on a regular basis, such as when
performing scheduled maintenance, cleaning
the vehicle, etc.
Accelerator pedal: Check the pedal for
smooth operation and make sure the pedal
does not catch or require uneven effort. Keep
the floor mat away from the pedal.
Brake pedal: Check the pedal for smooth
operation. If the brake pedal suddenly goes
down further than normal, the pedal feels
spongy or the vehicle seems to take longer to
stop, have your vehicle checked immediately. It
is recommended you visit a NISSAN dealer for
this service. Keep the floor mat away from the pedal.
Brakes:
Check that the brakes do not pull the
vehicle to one side when applied.
Continuously Variable Transmission (CVT)
P (Park) position mechanism: On a fairly
steep hill, check that the vehicle is held securely
with the shift lever in the P (Park) position
without applying any brakes.
Parking brake: Check the parking brake
operation regularly. The vehicle should be
securely held on a fairly steep hill with only the
parking brake applied. If the parking brake needs
adjusted, it is recommended you visit a NISSAN
dealer for this service.
Seat belts: Check that all parts of the seat belt
system (for example, buckles, anchors, adjusters
and retractors) operate properly and smoothly,
and are installed securely. Check the belt
webbing for cuts, fraying, wear or damage.
Seats: Check seat position controls such as
seat adjusters, seatback recliners, etc. to ensure
they operate smoothly and that all latches lock
securely in every position. Check that the head
restraints move up and down smoothly and that
the locks (if so equipped) hold securely in all
latched positions.
Steering wheel: Check for changes in the
steering conditions, such as excessive free play,
hard steering or strange noises.
Maintenance and schedules9-3
Page 490 of 520
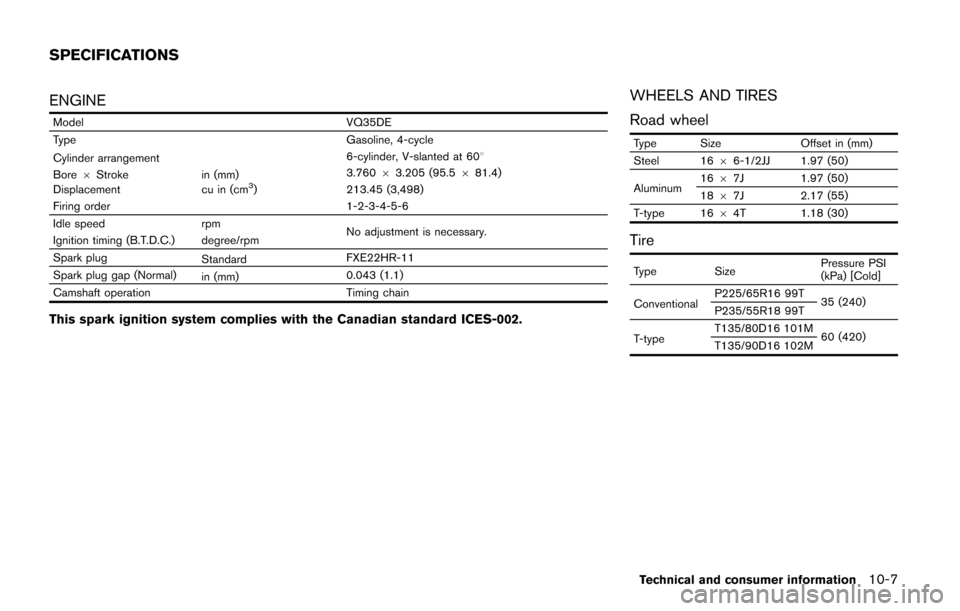
ENGINE
ModelVQ35DE
Type Gasoline, 4-cycle
Cylinder arrangement 6-cylinder, V-slanted at 608
Bore 6Stroke in (mm) 3.760
63.205 (95.5 681.4)
Displacement cu in (cm
3)213.45 (3,498)
Firing order 1-2-3-4-5-6
Idle speed rpm
No adjustment is necessary.
Ignition timing (B.T.D.C.) degree/rpm
Spark plug StandardFXE22HR-11
Spark plug gap (Normal) in (mm)0.043 (1.1)
Camshaft operation Timing chain
This spark ignition system complies with the Canadian standard ICES-002.
WHEELS AND TIRES
Road wheel
Type SizeOffset in (mm)
Steel 16 66-1/2JJ 1.97 (50)
Aluminum 16
67J 1.97 (50)
18 67J 2.17 (55)
T-type 16 64T 1.18 (30)
Tire
Type Size Pressure PSI
(kPa) [Cold]
Conventional P225/65R16 99T
35 (240)
P235/55R18 99T
T-type T135/80D16 101M
60 (420)
T135/90D16 102M
Technical and consumer information10-7
SPECIFICATIONS