2017 NISSAN QUEST radio antenna
[x] Cancel search: radio antennaPage 13 of 520
0-4Illustrated table of contents
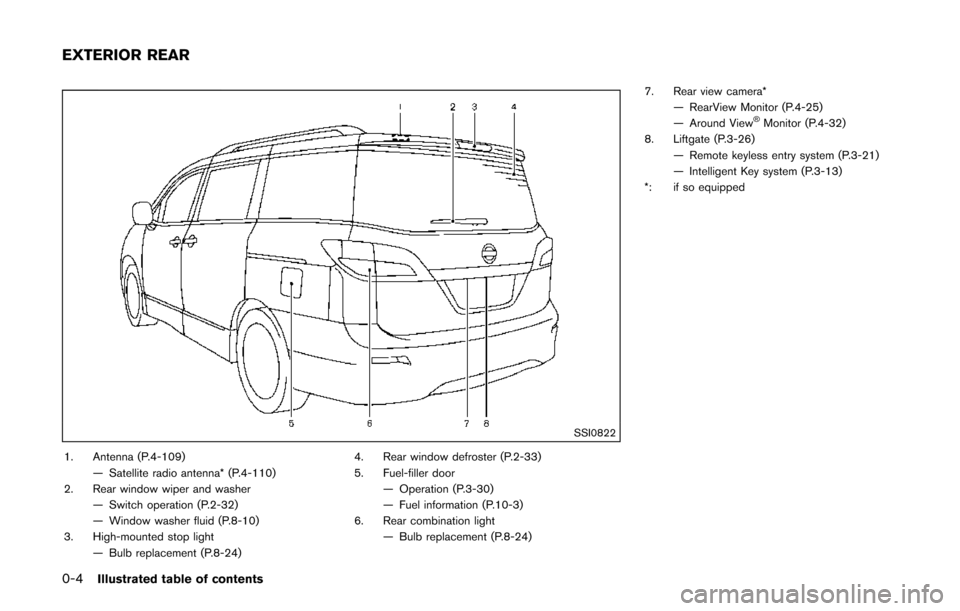
SSI0822
1. Antenna (P.4-109)— Satellite radio antenna* (P.4-110)
2. Rear window wiper and washer
— Switch operation (P.2-32)
— Window washer fluid (P.8-10)
3. High-mounted stop light — Bulb replacement (P.8-24) 4. Rear window defroster (P.2-33)
5. Fuel-filler door
— Operation (P.3-30)
— Fuel information (P.10-3)
6. Rear combination light — Bulb replacement (P.8-24) 7. Rear view camera*
— RearView Monitor (P.4-25)
— Around View
�ŠMonitor (P.4-32)
8. Liftgate (P.3-26) — Remote keyless entry system (P.3-21)
— Intelligent Key system (P.3-13)
*: if so equipped
EXTERIOR REAR
Page 149 of 520
2-62Instruments and controls
4. At the receiver located on the garage dooropener motor in the garage, locate the
“learn” or “smart” button (the name and
color of the button may vary by manufacturer
but it is usually located near where the
hanging antenna wire is attached to the
unit) . If there is difficulty locating the button,
reference the garage door opener’s manual.
5. Press and release the “learn” or “smart” button.
NOTE:
Once the button is pressed, you have
approximately 30 seconds to initiate
the next step.
6. Return to the vehicle and firmly press and hold the programmed HomeLink
�Šbutton for
two seconds and release. Repeat the
“press/hold/release” sequence up to 3
times to complete the programming pro-
cess. HomeLink
�Šshould now activate your
rolling code equipped device.
7. If you have any questions or are having difficulty programming your HomeLink
�Šbut-
tons, refer to the HomeLink�Šweb site at:
www.homelink.com or call 1-800-355-
3515.
PROGRAMMING HomeLink�ŠFOR CA-
NADIAN CUSTOMERS AND GATE
OPENERS
Canadian radio-frequency laws require trans-
mitter signals to “time-out” (or quit) after several
seconds of transmission – which may not be
long enough for HomeLink
�Što pick up the signal
during programming. Similar to this Canadian
law, some U.S. gate operators are designed to
“time-out” in the same manner.
If you live in Canada or you are having difficulties
programming a gate operator or garage door
opener by using the “Programming HomeLink
�Š”
procedures, replace “Programming HomeLink�Š”
Step 2 with the following:
NOTE:
When programming a garage door opener,
etc., unplug the device during the “cycling”
process to prevent possible damage to the
garage door opener components.
Step 2: Using both hands, simultaneously press
and hold the desired HomeLink
�Šbutton and the
hand-held transmitter button. During program-
ming, your hand-held transmitter may automati-
cally stop transmitting. Continue to press and
hold the desired HomeLink
�Šbutton while you
press and re-press (“cycle”) your hand-held
transmitter every two seconds until the fre-
quency signal has been learned. The HomeLink
�Š
indicator light will flash slowly and then rapidly
after several seconds upon successful program-
ming. DO NOT release until the HomeLink
�Š
indicator light flashes slowly and then rapidly.
When the indicator light flashes rapidly, both
buttons may be released. The rapid flashing
indicates successful programming.
Proceed with “Programming HomeLink
�Š” step 3
to complete.
Remember to plug the device back in when
programming is completed.
OPERATING THE HomeLink�ŠUNIVER-
SAL TRANSCEIVER
The HomeLink�ŠUniversal Transceiver, after it is
programmed, can be used to activate the
programmed device. To operate, simply press
and release the appropriate programmed
HomeLink
�ŠUniversal Transceiver button. The
amber indicator light will illuminate while the
signal is being transmitted.
For convenience, the hand-held transmitter of
the device may also be used at any time.
Page 191 of 520
FM-AM radio with Compact Disc (CD) player ......... 4-74
FM-AM-SAT radio with Compact Disc (CD) player
(Type A) ........................................................................\
...... 4-77
FM-AM-SAT radio with Compact Disc (CD) player
(Type B) ........................................................................\
...... 4-87
DVD (Digital Versatile Disc) player operation (if
so equipped) ..................................................................... 4-91
USB (Universal Serial Bus) connection port
(models with center multi-function control panel) ..... 4-94
iPod
�Šplayer operation (models with center
multi-function control panel) ......................................... 4-99
Bluetooth
�Šstreaming audio (models with
navigation system) ........................................................ 4-101
Auxiliary input jacks (if so equipped) ....................... 4-106
CD/DVD/USB memory care and cleaning ............. 4-107
Steering-wheel-mounted controls for audio (if
so equipped) .................................................................. 4-108
Antenna ........................................................................\
.... 4-109
NISSAN Mobile Entertainment System (MES) (if
so equipped) ........................................................................\
4-110 Digital Versatile Disc (DVD)
system components ...................................................... 4-111
Before operating the DVD Mobile
Entertainment System .................................................. 4-116
Playing a DVD ................................................................ 4-117
Care and maintenance ................................................. 4-121
Car phone or CB radio ..................................................... 4-121
Bluetooth
�Šhands-free phone system (Type A) (if
so equipped) ........................................................................\
4-122
Regulatory information ................................................. 4-123 Voice commands ......................................................... 4-124
Control buttons ............................................................ 4-124
Connecting procedure ............................................... 4-124
Phone selection ........................................................... 4-125
Quick Dial ..................................................................... 4-125
Making a call ................................................................ 4-128
Receiving a call ........................................................... 4-129
During a call ................................................................. 4-129
Phone setting ............................................................... 4-130
Troubleshooting guide ............................................... 4-132
Bluetooth
�Šhands-free phone system (Type B) (if
so equipped) ....................................................................... 4-133
Regulatory information ............................................... 4-134
Using the system ........................................................ 4-135
Control buttons ............................................................ 4-137
Getting started ............................................................ 4-137
List of voice commands ............................................ 4-139
Speaker adaptation (SA) mode ............................... 4-142
Troubleshooting guide ............................................... 4-145
Bluetooth
�Šhands-free phone system (Type C) (if
so equipped) ....................................................................... 4-146
Regulatory information ............................................... 4-147
Using the system ........................................................ 4-147
NISSAN Voice Recognition system (models with
navigation system) ............................................................. 4-154 NISSAN Voice Recognition standard mode ........ 4-155
Using the system ........................................................ 4-157
NISSAN Voice Recognition alternate
command mode ........................................................... 4-166
Page 251 of 520
4-62Monitor, heater, air conditioner, audio, phone and voice recognition systems
Static and flutter: During signal interference from
buildings, large hills or due to antenna position,
usually in conjunction with increased distance
from the station transmitter, static or flutter can
be heard. This can be reduced by lowering the
treble setting to reduce the treble response.
Multipath reception: Because of the reflective
characteristics of FM signals, direct and re-
flected signals reach the receiver at the same
time. The signals may cancel each other,
resulting in momentary flutter or loss of sound.
AM radio reception:
AM signals, because of their low frequency, can
bend around objects and skip along the ground.
In addition, the signals can be bounced off the
ionosphere and bent back to earth. Because of
these characteristics. AM signals are also
subject to interference as they travel from
transmitter to receiver.
Fading: Occurs while the vehicle is passing
through freeway underpasses or in areas with
many tall buildings. It can also occur for several
seconds during ionospheric turbulence even in
areas where no obstacles exist.
Static: Caused by thunderstorms, electrical
power lines, electric signs and even traffic lights.Satellite radio reception (if so equipped):
When the satellite radio is used for the first time
or the battery has been replaced, the satellite
radio may not work properly. This is not a
malfunction. Wait more than 10 minutes with the
satellite radio ON and the vehicle outside of any
metal or large building for the satellite radio to
receive all of the necessary data.
The satellite radio mode requires an active
SiriusXM Satellite Radio subscription. The sa-
tellite radio is not available in Alaska, Hawaii and
Guam.
The satellite radio performance may be affected
if cargo carried on the roof blocks the satellite
radio signal.
If possible, do not put cargo near the satellite
antenna.
A build up of ice on the satellite radio antenna
can affect satellite radio performance. Remove
the ice to restore satellite radio reception.
SAA0480
Compact Disc (CD) player
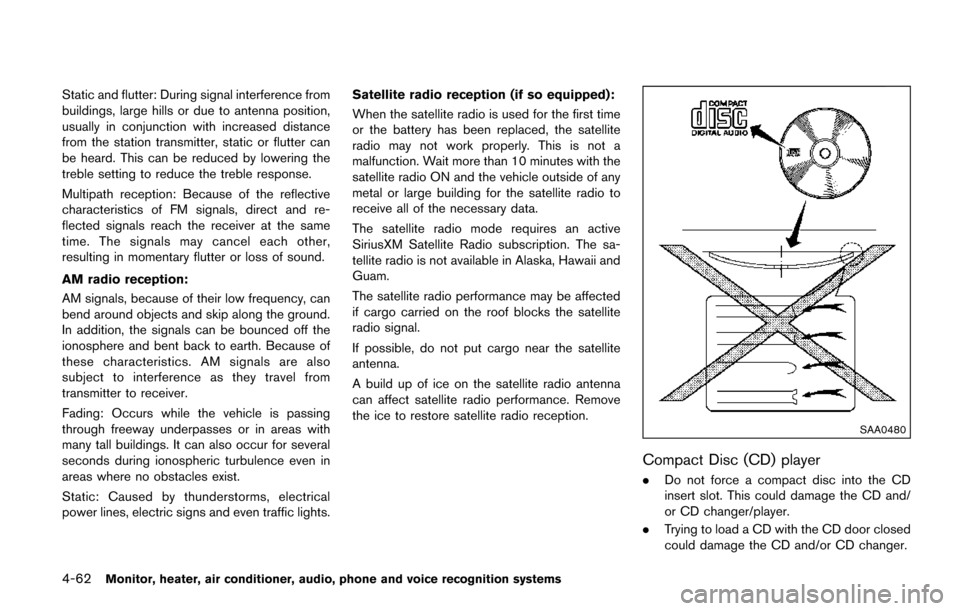
.
Do not force a compact disc into the CD
insert slot. This could damage the CD and/
or CD changer/player.
. Trying to load a CD with the CD door closed
could damage the CD and/or CD changer.
Page 266 of 520
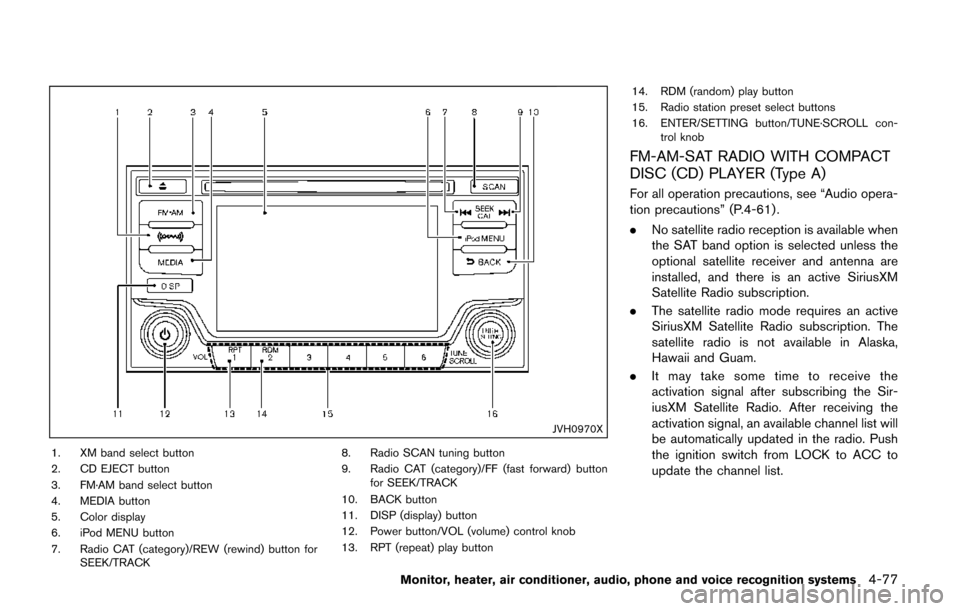
JVH0970X
1. XM band select button
2. CD EJECT button
3. FM·AM band select button
4. MEDIA button
5. Color display
6. iPod MENU button
7. Radio CAT (category)/REW (rewind) button forSEEK/TRACK 8. Radio SCAN tuning button
9. Radio CAT (category)/FF (fast forward) button
for SEEK/TRACK
10. BACK button
11. DISP (display) button
12. Power button/VOL (volume) control knob
13. RPT (repeat) play button 14. RDM (random) play button
15. Radio station preset select buttons
16. ENTER/SETTING button/TUNE·SCROLL con-
trol knob
FM-AM-SAT RADIO WITH COMPACT
DISC (CD) PLAYER (Type A)
For all operation precautions, see “Audio opera-
tion precautions” (P.4-61) .
.No satellite radio reception is available when
the SAT band option is selected unless the
optional satellite receiver and antenna are
installed, and there is an active SiriusXM
Satellite Radio subscription.
. The satellite radio mode requires an active
SiriusXM Satellite Radio subscription. The
satellite radio is not available in Alaska,
Hawaii and Guam.
. It may take some time to receive the
activation signal after subscribing the Sir-
iusXM Satellite Radio. After receiving the
activation signal, an available channel list will
be automatically updated in the radio. Push
the ignition switch from LOCK to ACC to
update the channel list.
Monitor, heater, air conditioner, audio, phone and voice recognition systems4-77
Page 277 of 520
4-88Monitor, heater, air conditioner, audio, phone and voice recognition systems
Turn the VOL control knob to adjust the volume.
Adjusting tone quality and speaker bal-
ance:
To adjust Bass, Treble, Balance and Fade, push
the Audio control knob. When the display shows
the setting you want to change (Bass, Treble,
Balance and Fade) , rotate the Audio control
knob to set the desired setting. For the other
setting methods, see “How to use SETTING
button” (P.4-15).
This vehicle has some sound effect functions as
follows:
.Speed Sensitive Vol.
For more details, see “Vehicle information and
settings (models with center multi-function
control panel)” (P.4-10) .
Switching the display:
Pushing the DISC·AUX button will switch the
displays as follows:
iPod
�Š/USB ?CD/DVD ?Bluetooth�ŠAudio (if
so equipped) ?AUX ?iPod�Š/USB
FM-AM-SAT radio operation
When the radio band select button is pushed
while the ignition switch is in the ACC or ON
position, the radio will come on at the channel
last played.
The last channel played will also come on when
the ON·OFF button is pushed to ON.
If another audio source is playing when the radio
band select button is turned on, the audio
source will automatically be turned off and the
last radio channel played will come on.
When the stereo broadcast signal is weak, the
radio will automatically change from stereo to
monaural reception.
radio (FM/AM) band select:
Pushing the radio band select button will
change the band as follows:
AM ?FM1 ?FM2 ?AM
radio (SAT) band select:
Pushing the radio band select button will
change the band as follows:
XM1 ?XM2 ?XM3 ?XM1
The satellite radio is not available in Alaska,
Hawaii and Guam. TUNE (Tuning):
.
For AM and FM radio
Turn the radio TUNE knob for manual tuning.
. For SiriusXM Satellite Radio
Turn the radio TUNE knob to seek channels
from all of the categories when any category
is not selected.
or/SEEK tuning/CATE-
GORY (CAT):
. For AM and FM radio
Push the SEEK button
orto tune
from low to high or high to low frequencies
and to stop at the next broadcasting station.
. For SiriusXM Satellite Radio
Push the SEEK button
orto tune
to the first channel of the next or previous
category.
During satellite radio reception, the following
notices will be displayed under certain condi-
tions.
. NO SIGNAL (No signal is received while the
SAT tuner is connected.)
. OFF AIR (Broadcasting signed off)
. CHECK ANTENNA (Antenna connection
error)
. LOADING (When the initial setting is
performed)
Page 311 of 520
4-122Monitor, heater, air conditioner, audio, phone and voice recognition systems
CAUTION
.Keep the antenna as far away as
possible from the electronic control
modules.
. Keep the antenna wire more than 8
in (20 cm) away from the electronic
control system harness. Do not
route the antenna wire next to any
harness.
. Adjust the antenna standing-wave
ratio as recommended by the man-
ufacturer.
. Connect the ground wire from the
CB radio chassis to the body.
. For details, it is recommended you
visit a NISSAN dealer. *Type A is models with navigation system.WARNING
.
Use a phone after stopping your
vehicle in a safe location. If you
have to use a phone while driving,
exercise extreme caution at all
times so full attention may be given
to vehicle operation.
. If you find yourself unable to devote
full attention to vehicle operation
while talking on the phone, pull off
the road to a safe location and stop
your vehicle before doing so.
CAUTION
To avoid draining the vehicle battery,
use a phone after starting the engine.
Your vehicle is equipped with Bluetooth
�Š
Hands-Free Phone System. If you are an owner
of a compatible Bluetooth�Šenabled cellular
phone, you can set up the wireless connection
between your cellular phone and the in-vehicle
phone module. With Bluetooth
�Šwireless tech-
nology, you can make or receive a telephone call with your cellular phone in your pocket.
Once a cellular phone is connected to the in-
vehicle phone module, no phone connecting
procedure is required anymore. Your phone is
automatically connected with the in-vehicle
phone module when the ignition switch is
pushed to the ON position with the registered
cellular phone turned on and carried in the
vehicle.
You can register up to 5 different Bluetooth
�Š
cellular phones in the in-vehicle phone module.
However, you can talk on only one cellular phone
at a time.
The NISSAN Voice Recognition system sup-
ports the phone commands, so dialing a phone
number using your voice is possible. For more
details, see “NISSAN Voice Recognition system
(models with navigation system)” (P.4-154).
Before using the Bluetooth
�ŠHands-Free Phone
System, refer to the following notes.
. Wireless LAN (Wi-Fi) and the Bluetooth
�Š
functions share the same frequency band
(2.4 GHz) . Using the Bluetooth�Šand the
wireless LAN functions at the same time may
slow down or disconnect the communica-
tion and cause undesired noise. It is
recommended that you turn off the wireless
LAN (Wi-Fi) when using the Bluetooth
�Š
functions.
Bluetooth�ŠHANDS-FREE PHONE
SYSTEM (Type A) (if so equipped)
Page 312 of 520
.Set up the wireless connection between a
compatible cellular phone and the in-vehicle
phone module before using the Bluetooth
�Š
Hands-Free Phone System.
. Some Bluetooth�Šenabled cellular phones
may not be recognized by the in-vehicle
phone module. Please visit
www.nissanusa.com/bluetooth for a recom-
mended phone list.
. You will not be able to use a hands-free
phone under the following conditions:
— Your vehicle is outside of the telephone
service area.
— Your vehicle is in an area where it is difficult to receive radio waves; such as in
a tunnel, in an underground parking
garage, behind a tall building or in a
mountainous area.
— Your cellular phone is locked in order not to be dialed.
. When the radio wave reception is not good
or ambient sound is too loud, it may be
difficult to hear the other person’s voice
during a call.
. Immediately after the ignition switch is
pushed to the ON position, it may be
impossible to receive a call for a short
period of time. .
Do not place the cellular phone in an area
surrounded by metal or far away from the in-
vehicle phone module to prevent tone quality
degradation and wireless connection dis-
ruption.
. While a cellular phone is connected through
the Bluetooth
�Šwireless connection, the
battery power of the cellular phone may
discharge quicker than usual.
. If the Bluetooth
�ŠHands-Free Phone System
seems to be malfunctioning, please visit
www.nissanusa.com/bluetooth for trouble-
shooting help.
. Some cellular phones or other devices may
cause interference or a buzzing noise to
come from the audio system speakers.
Storing the device in a different location
may reduce or eliminate the noise.
. Refer to the cellular phone Owner’s Manual
regarding the telephone pairing procedure
specific to your phone, battery charging,
cellular phone antenna, etc.
. The antenna display on the monitor will not
coincide with the antenna display of some
cellular phones.
. Keep the interior of the vehicle as quiet as
possible to hear the caller’s voice clearly as
well as to minimize its echoes. .
If reception between callers is unclear,
adjusting the incoming or outgoing call
volume may improve the clarity.
REGULATORY INFORMATION
FCC Regulatory information
.CAUTION: To maintain compliance with
FCC’s RF exposure guidelines, use only
the supplied antenna. Unauthorized antenna,
modification, or attachments could damage
the transmitter and may violate FCC regula-
tions.
. Operation is subject to the following two
conditions:
1. this device may not cause interference and
2. this device must accept any interference, including interference that may cause un-
desired operation of the device
IC Regulatory information
.Operation is subject to the following two
conditions: (1) this device may not cause
interference, and (2) this device must accept
any interference, including interference that
may cause undesired operation of the
device.
. This Class B digital apparatus meets all
requirements of the Canadian Interference-
Causing Equipment Regulations.
Monitor, heater, air conditioner, audio, phone and voice recognition systems4-123