2017 NISSAN QUEST mirror
[x] Cancel search: mirrorPage 228 of 520
SAA1898
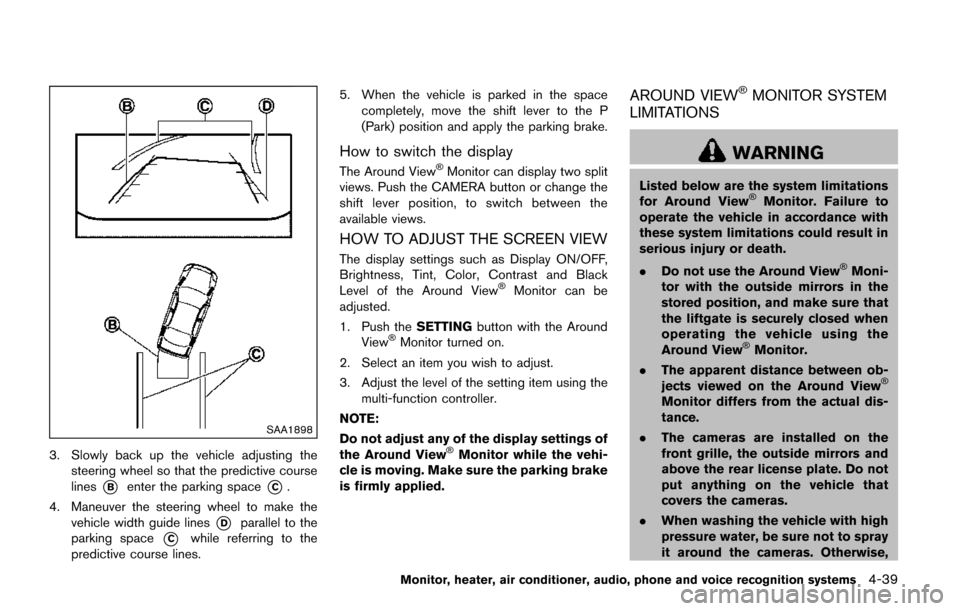
3. Slowly back up the vehicle adjusting thesteering wheel so that the predictive course
lines
*Benter the parking space*C.
4. Maneuver the steering wheel to make the vehicle width guide lines
*Dparallel to the
parking space
*Cwhile referring to the
predictive course lines. 5. When the vehicle is parked in the space
completely, move the shift lever to the P
(Park) position and apply the parking brake.
How to switch the display
The Around View�ŠMonitor can display two split
views. Push the CAMERA button or change the
shift lever position, to switch between the
available views.
HOW TO ADJUST THE SCREEN VIEW
The display settings such as Display ON/OFF,
Brightness, Tint, Color, Contrast and Black
Level of the Around View
�ŠMonitor can be
adjusted.
1. Push the SETTINGbutton with the Around
View
�ŠMonitor turned on.
2. Select an item you wish to adjust.
3. Adjust the level of the setting item using the multi-function controller.
NOTE:
Do not adjust any of the display settings of
the Around View
�ŠMonitor while the vehi-
cle is moving. Make sure the parking brake
is firmly applied.
AROUND VIEW�ŠMONITOR SYSTEM
LIMITATIONS
WARNING
Listed below are the system limitations
for Around View�ŠMonitor. Failure to
operate the vehicle in accordance with
these system limitations could result in
serious injury or death.
. Do not use the Around View
�ŠMoni-
tor with the outside mirrors in the
stored position, and make sure that
the liftgate is securely closed when
operating the vehicle using the
Around View
�ŠMonitor.
. The apparent distance between ob-
jects viewed on the Around View
�Š
Monitor differs from the actual dis-
tance.
. The cameras are installed on the
front grille, the outside mirrors and
above the rear license plate. Do not
put anything on the vehicle that
covers the cameras.
. When washing the vehicle with high
pressure water, be sure not to spray
it around the cameras. Otherwise,
Monitor, heater, air conditioner, audio, phone and voice recognition systems4-39
Page 232 of 520
vehicle. When maneuvering, always
use the outside mirror and rearview
mirror and turn and check the sur-
rounding to ensure it is safe to
maneuver.
. The system is deactivated at speeds
above 5 MPH (8 km/h) . It is reacti-
vated at lower speeds.
. The MOD system is not designed to
detect the surrounding stationary
objects.
The Moving Object Detection (MOD) system
can inform the driver of the moving objects
surrounding the vehicle when driving out of
garages, maneuvering into parking lots and in
other such instances.
The MOD system detects moving objects by
using image processing technology on the
image shown on the display.MOD SYSTEM OPERATION
The MOD system will turn on automatically
under the following conditions:
. When the shift lever is in the R (Reverse)
position.
. When the CAMERA button is pushed, the
camera view is activated on the display.
. When vehicle speed decreases below
approximately 5 MPH (8 km/h) .
The MOD system operates in the following
conditions when the camera view is displayed:
. When the shift lever is in the P (Park) or N
(Neutral) position and the vehicle is
stopped, the MOD system detects the
moving objects in the bird’s-eye view. The
MOD system will not operate if the outside
mirrors are moving in or out or if either door
is opened.
. When the shift lever is in the D (Drive)
position, and the vehicle speed is below
approximately 5 MPH (8 km/h) , the MOD
system detects moving objects in the front
view.
. When the shift lever is in the R (Reverse)
position and the vehicle speed is below
approximately 5 MPH (8 km/h) , the MOD
system detects moving objects in the rear
view. The MOD system will not operate if the
liftgate is open. .
When the ignition switch is placed in the
“OFF” position and then back to the “ON”
position.
The MOD system does not detect moving
objects in the front-side view. The MOD icon
is not displayed on the screen when in this view.
When the MOD system detects a moving object
near the vehicle, the yellow frame will be
displayed on the view where the objects are
detected and a chime will sound once. While the
MOD system continues to detect moving
objects, the yellow frame continues to be
displayed.
Monitor, heater, air conditioner, audio, phone and voice recognition systems4-43
Page 234 of 520
.The MOD system performance will
be limited according to environmen-
tal conditions and surrounding ob-
jects such as:
— When there is low contrast be-
tween background and the mov-
ing objects.
— When there is blinking source of light.
— When strong light such as an- other vehicle’s headlight or sun-
light is present.
— When camera orientation is not in its usual position, such as
when mirror is folded.
— When there is dirt, water drops or snow on the camera lens.
— When the position of the moving objects in the display is not
changed.
. The MOD system might detect flow-
ing water droplets on the camera
lens, white smoke from the muffler,
moving shadows, etc.
. The MOD system may not function
properly depending on the speed,
direction, distance or shape of the moving objects.
. If your vehicle sustains damage to
the parts where the camera is
installed, leaving it misaligned or
bent, the sensing zone may be
altered and the MOD system may
not detect objects properly.
. When the temperature is extremely
high or low, the screen may not
display objects clearly. This is not a
malfunction.
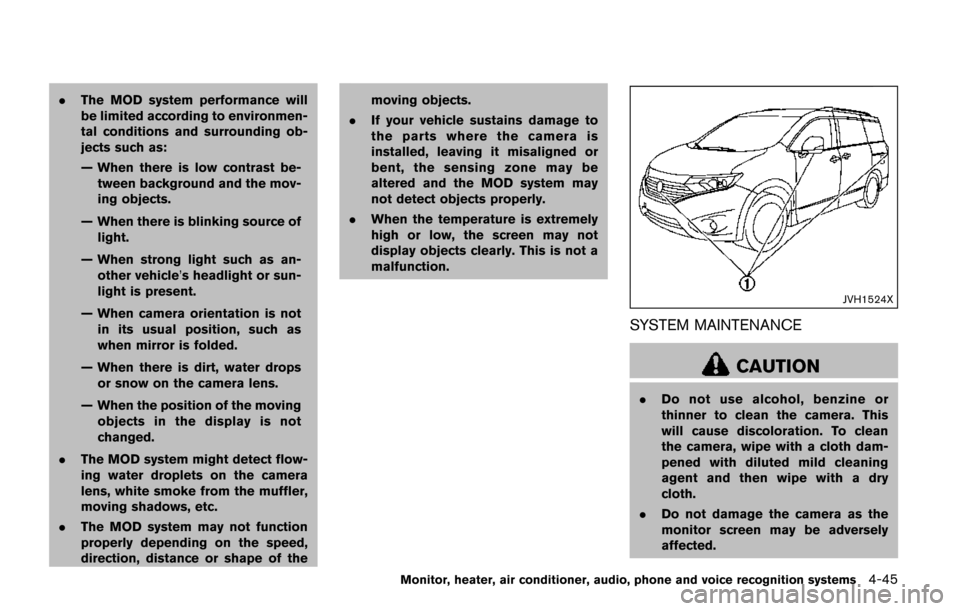
JVH1524X
SYSTEM MAINTENANCE
CAUTION
.Do not use alcohol, benzine or
thinner to clean the camera. This
will cause discoloration. To clean
the camera, wipe with a cloth dam-
pened with diluted mild cleaning
agent and then wipe with a dry
cloth.
. Do not damage the camera as the
monitor screen may be adversely
affected.
Monitor, heater, air conditioner, audio, phone and voice recognition systems4-45
Page 238 of 520
SAA3596
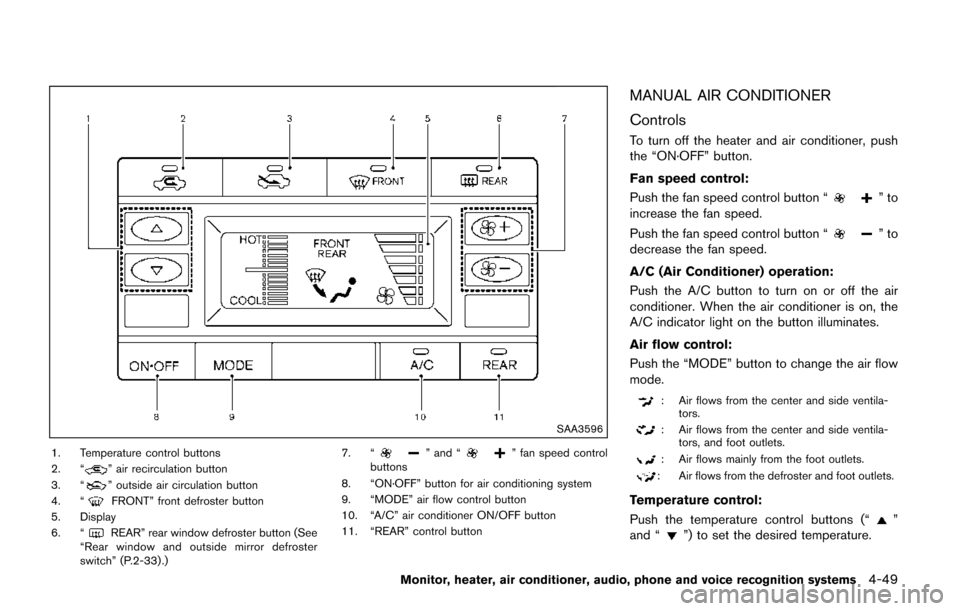
1. Temperature control buttons
2. “” air recirculation button
3. “” outside air circulation button
4. “FRONT” front defroster button
5. Display
6. “
REAR” rear window defroster button (See
“Rear window and outside mirror defroster
switch” (P.2-33) .) 7. “
” and “” fan speed control
buttons
8. “ON·OFF” button for air conditioning system
9. “MODE” air flow control button
10. “A/C” air conditioner ON/OFF button
11. “REAR” control button
MANUAL AIR CONDITIONER
Controls
To turn off the heater and air conditioner, push
the “ON·OFF” button.
Fan speed control:
Push the fan speed control button “
”to
increase the fan speed.
Push the fan speed control button “
”to
decrease the fan speed.
A/C (Air Conditioner) operation:
Push the A/C button to turn on or off the air
conditioner. When the air conditioner is on, the
A/C indicator light on the button illuminates.
Air flow control:
Push the “MODE” button to change the air flow
mode.
: Air flows from the center and side ventila- tors.
: Air flows from the center and side ventila-tors, and foot outlets.
: Air flows mainly from the foot outlets.
: Air flows from the defroster and foot outlets.
Temperature control:
Push the temperature control buttons (“
”
and “”) to set the desired temperature.
Monitor, heater, air conditioner, audio, phone and voice recognition systems4-49
Page 243 of 520
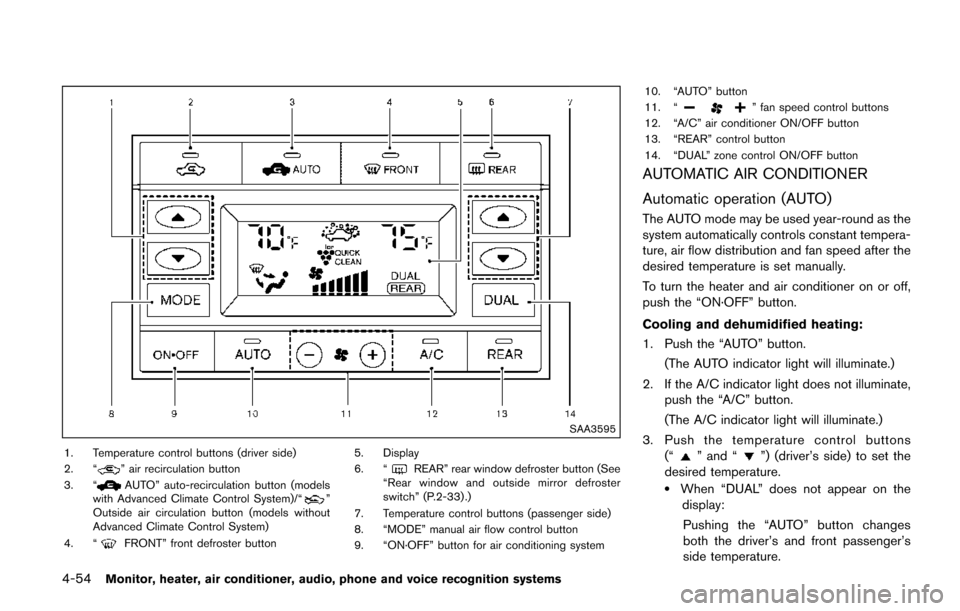
4-54Monitor, heater, air conditioner, audio, phone and voice recognition systems
SAA3595
1. Temperature control buttons (driver side)
2. “” air recirculation button
3. “AUTO” auto-recirculation button (models
with Advanced Climate Control System)/“”
Outside air circulation button (models without
Advanced Climate Control System)
4. “
FRONT” front defroster button 5. Display
6. “
REAR” rear window defroster button (See
“Rear window and outside mirror defroster
switch” (P.2-33) .)
7. Temperature control buttons (passenger side)
8. “MODE” manual air flow control button
9. “ON·OFF” button for air conditioning system 10. “AUTO” button
11. “
” fan speed control buttons
12. “A/C” air conditioner ON/OFF button
13. “REAR” control button
14. “DUAL” zone control ON/OFF button
AUTOMATIC AIR CONDITIONER
Automatic operation (AUTO)
The AUTO mode may be used year-round as the
system automatically controls constant tempera-
ture, air flow distribution and fan speed after the
desired temperature is set manually.
To turn the heater and air conditioner on or off,
push the “ON·OFF” button.
Cooling and dehumidified heating:
1. Push the “AUTO” button.
(The AUTO indicator light will illuminate.)
2. If the A/C indicator light does not illuminate, push the “A/C” button.
(The A/C indicator light will illuminate.)
3. Push the temperature control buttons (“
” and “”) (driver’s side) to set the
desired temperature.
.When “DUAL” does not appear on the display:
Pushing the “AUTO” button changes
both the driver’s and front passenger’s
side temperature.
Page 380 of 520
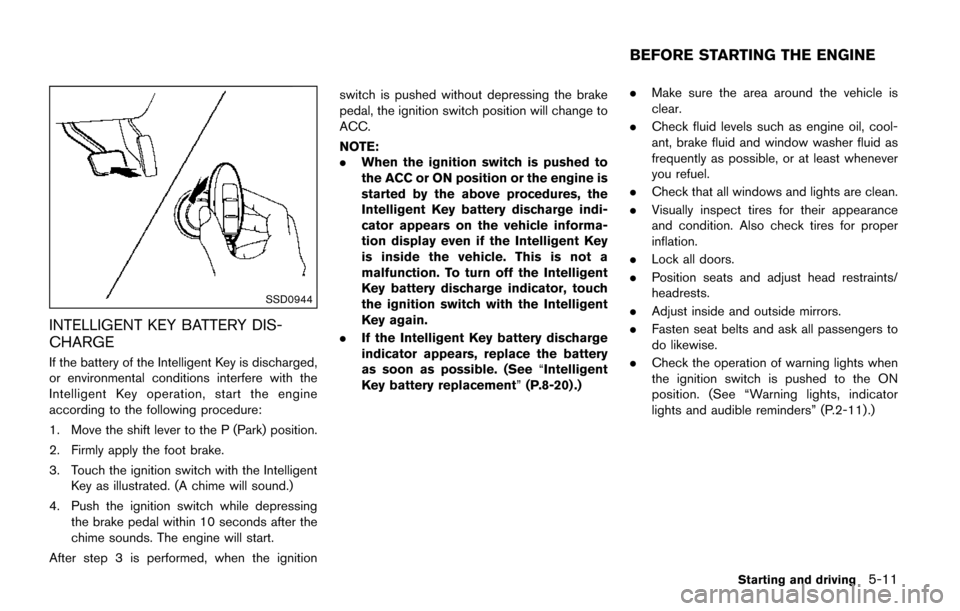
SSD0944
INTELLIGENT KEY BATTERY DIS-
CHARGE
If the battery of the Intelligent Key is discharged,
or environmental conditions interfere with the
Intelligent Key operation, start the engine
according to the following procedure:
1. Move the shift lever to the P (Park) position.
2. Firmly apply the foot brake.
3. Touch the ignition switch with the IntelligentKey as illustrated. (A chime will sound.)
4. Push the ignition switch while depressing the brake pedal within 10 seconds after the
chime sounds. The engine will start.
After step 3 is performed, when the ignition switch is pushed without depressing the brake
pedal, the ignition switch position will change to
ACC.
NOTE:
.
When the ignition switch is pushed to
the ACC or ON position or the engine is
started by the above procedures, the
Intelligent Key battery discharge indi-
cator appears on the vehicle informa-
tion display even if the Intelligent Key
is inside the vehicle. This is not a
malfunction. To turn off the Intelligent
Key battery discharge indicator, touch
the ignition switch with the Intelligent
Key again.
. If the Intelligent Key battery discharge
indicator appears, replace the battery
as soon as possible. (See “Intelligent
Key battery replacement” (P.8-20) .).
Make sure the area around the vehicle is
clear.
. Check fluid levels such as engine oil, cool-
ant, brake fluid and window washer fluid as
frequently as possible, or at least whenever
you refuel.
. Check that all windows and lights are clean.
. Visually inspect tires for their appearance
and condition. Also check tires for proper
inflation.
. Lock all doors.
. Position seats and adjust head restraints/
headrests.
. Adjust inside and outside mirrors.
. Fasten seat belts and ask all passengers to
do likewise.
. Check the operation of warning lights when
the ignition switch is pushed to the ON
position. (See “Warning lights, indicator
lights and audible reminders” (P.2-11) .)
Starting and driving5-11
BEFORE STARTING THE ENGINE
Page 386 of 520
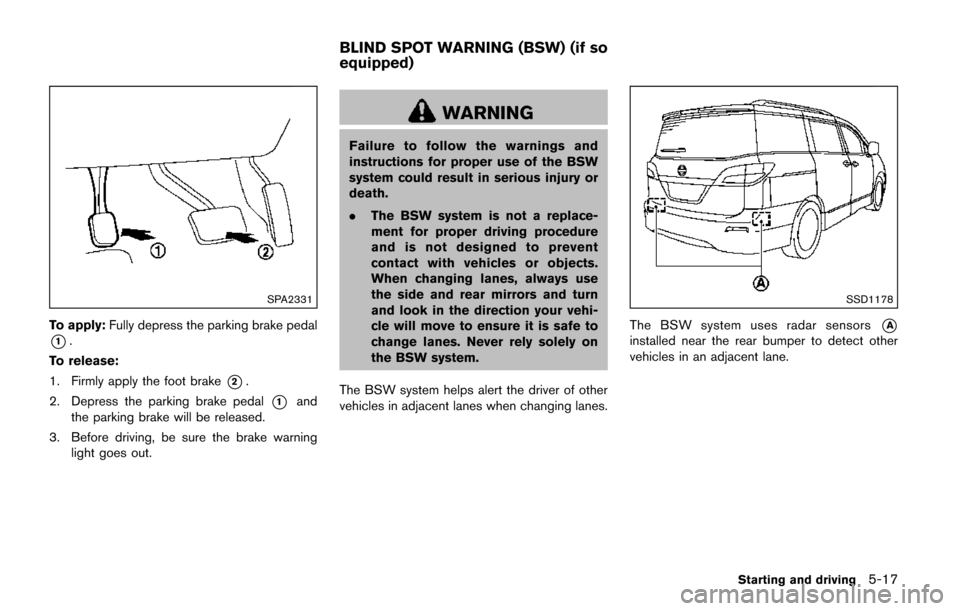
SPA2331
To apply:Fully depress the parking brake pedal
*1.
To release:
1. Firmly apply the foot brake
*2.
2. Depress the parking brake pedal
*1and
the parking brake will be released.
3. Before driving, be sure the brake warning light goes out.
WARNING
Failure to follow the warnings and
instructions for proper use of the BSW
system could result in serious injury or
death.
.The BSW system is not a replace-
ment for proper driving procedure
and is not designed to prevent
contact with vehicles or objects.
When changing lanes, always use
the side and rear mirrors and turn
and look in the direction your vehi-
cle will move to ensure it is safe to
change lanes. Never rely solely on
the BSW system.
The BSW system helps alert the driver of other
vehicles in adjacent lanes when changing lanes.
SSD1178
The BSW system uses radar sensors*A
installed near the rear bumper to detect other
vehicles in an adjacent lane.
Starting and driving5-17
BLIND SPOT WARNING (BSW) (if so
equipped)
Page 387 of 520
5-18Starting and driving
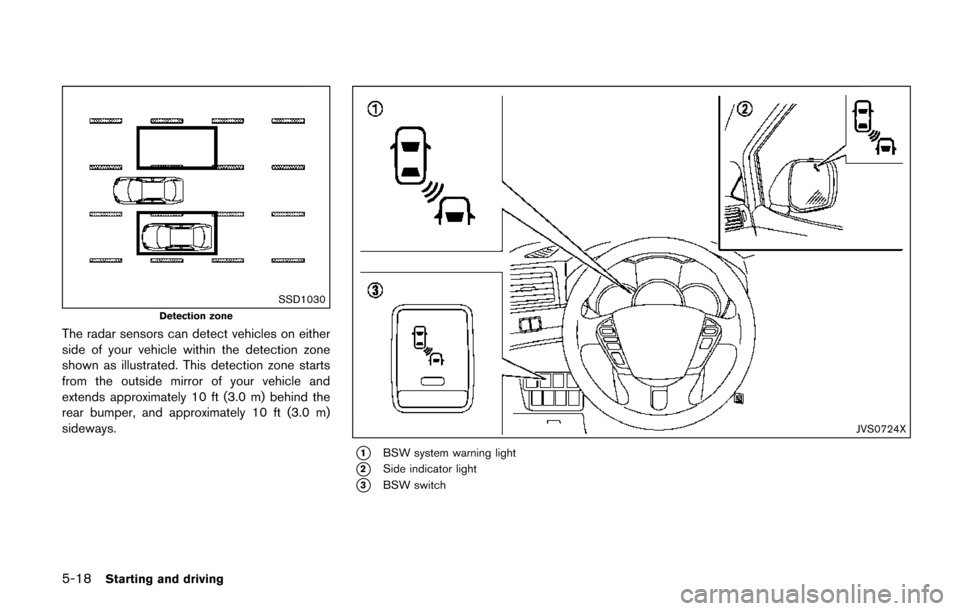
SSD1030
Detection zone
The radar sensors can detect vehicles on either
side of your vehicle within the detection zone
shown as illustrated. This detection zone starts
from the outside mirror of your vehicle and
extends approximately 10 ft (3.0 m) behind the
rear bumper, and approximately 10 ft (3.0 m)
sideways.
JVS0724X
*1BSW system warning light
*2Side indicator light
*3BSW switch