2017 NISSAN QUEST lights
[x] Cancel search: lightsPage 144 of 520
3. Release the moonroof switch, then continueto push on the
*Bside again. The moonroof
will operate in the close direction. (The
moonroof operates inch by inch.)
4. After the moonroof stops moving, release the moonroof switch and within 4 seconds,
push side
*Bagain. The moonroof will
automatically open once.
5. Within 0.5 seconds after the moonroof stops moving, release the moonroof switch.
6. Check that the moonroof now operates normally.
If the moonroof does not operate properly after
performing the procedure above, have your
moonroof checked and repaired. It is recom-
mended you visit a NISSAN dealer for this
service.
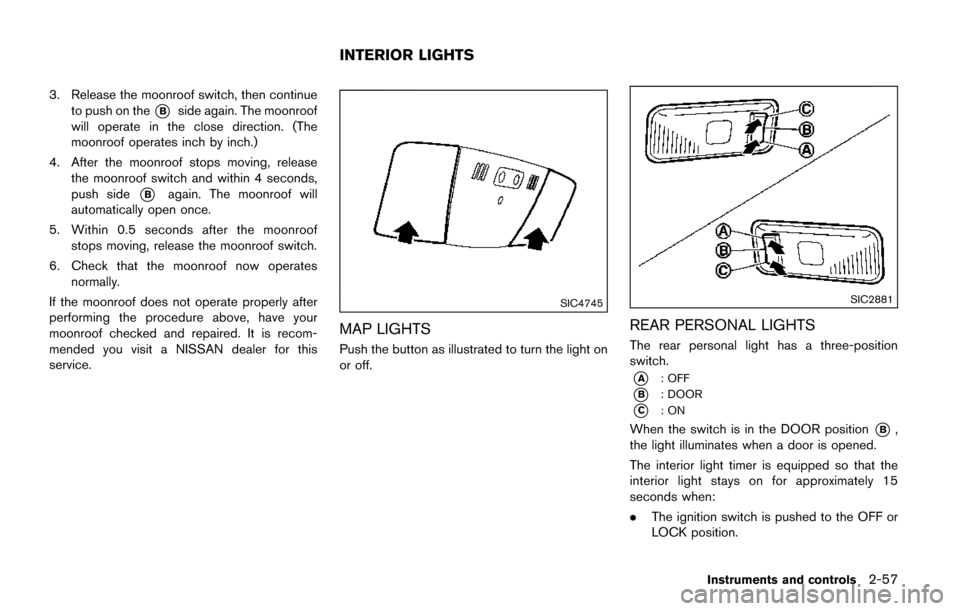
SIC4745
MAP LIGHTS
Push the button as illustrated to turn the light on
or off.
SIC2881
REAR PERSONAL LIGHTS
The rear personal light has a three-position
switch.
*A: OFF
*B: DOOR
*C:ON
When the switch is in the DOOR position*B,
the light illuminates when a door is opened.
The interior light timer is equipped so that the
interior light stays on for approximately 15
seconds when:
. The ignition switch is pushed to the OFF or
LOCK position.
Instruments and controls2-57
INTERIOR LIGHTS
Page 145 of 520
2-58Instruments and controls
.The driver’s door is unlocked.
. The last open door excluding the liftgate is
closed.
The interior light timer will be cancelled when:
. The driver’s door is locked.
. The ignition switch is pushed to the ON
position.
When the rear personal light switch is in the ON
position
*C, the rear personal lights illuminate,
regardless of any condition.
When the switch is in the OFF position
*A, the
rear personal lights do not illuminate, regardless
of any condition.
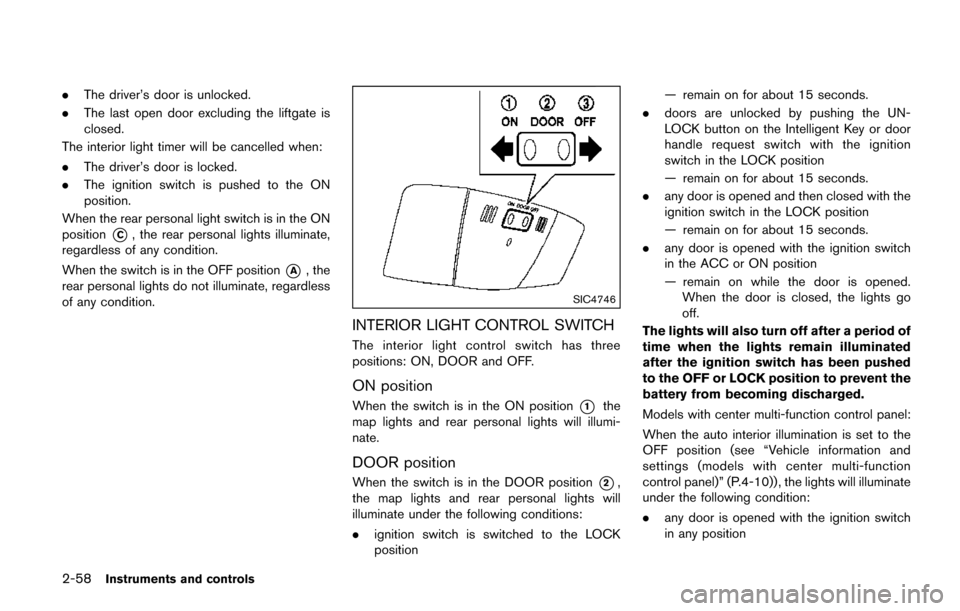
SIC4746
INTERIOR LIGHT CONTROL SWITCH
The interior light control switch has three
positions: ON, DOOR and OFF.
ON position
When the switch is in the ON position*1the
map lights and rear personal lights will illumi-
nate.
DOOR position
When the switch is in the DOOR position*2,
the map lights and rear personal lights will
illuminate under the following conditions:
. ignition switch is switched to the LOCK
position — remain on for about 15 seconds.
. doors are unlocked by pushing the UN-
LOCK button on the Intelligent Key or door
handle request switch with the ignition
switch in the LOCK position
— remain on for about 15 seconds.
. any door is opened and then closed with the
ignition switch in the LOCK position
— remain on for about 15 seconds.
. any door is opened with the ignition switch
in the ACC or ON position
— remain on while the door is opened.
When the door is closed, the lights go
off.
The lights will also turn off after a period of
time when the lights remain illuminated
after the ignition switch has been pushed
to the OFF or LOCK position to prevent the
battery from becoming discharged.
Models with center multi-function control panel:
When the auto interior illumination is set to the
OFF position (see “Vehicle information and
settings (models with center multi-function
control panel)” (P.4-10)) , the lights will illuminate
under the following condition:
. any door is opened with the ignition switch
in any position
Page 146 of 520
— remain on while the door is opened.When the door is closed, the lights go
off.
OFF position
When the switch is in the OFF position*3, the
lights will not illuminate, regardless of the
condition.
CAUTION
Do not use for extended periods of time
with the engine stopped. This could
result in a discharged battery.
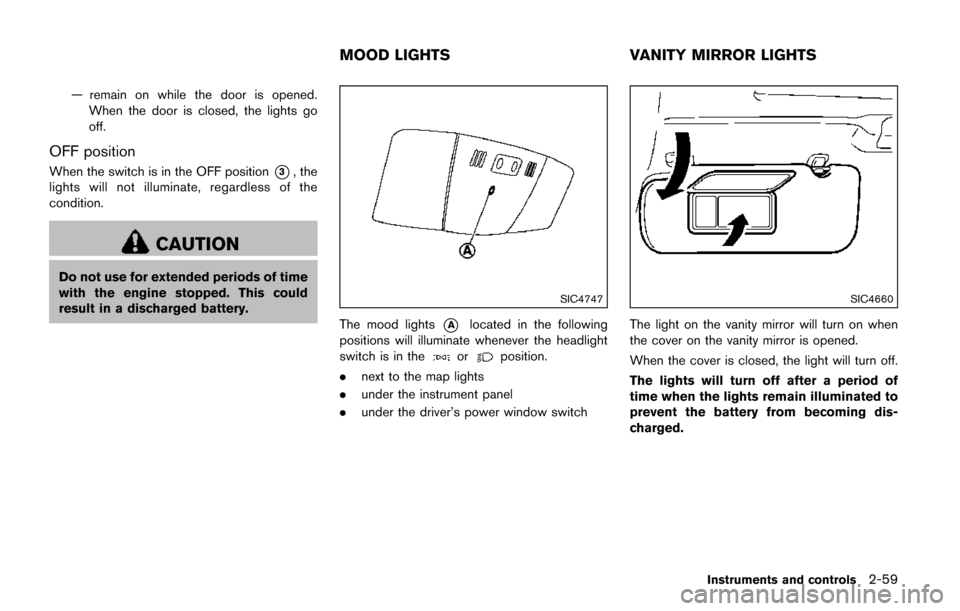
SIC4747
The mood lights*Alocated in the following
positions will illuminate whenever the headlight
switch is in the
orposition.
. next to the map lights
. under the instrument panel
. under the driver’s power window switch
SIC4660
The light on the vanity mirror will turn on when
the cover on the vanity mirror is opened.
When the cover is closed, the light will turn off.
The lights will turn off after a period of
time when the lights remain illuminated to
prevent the battery from becoming dis-
charged.
Instruments and controls2-59
MOOD LIGHTS VANITY MIRROR LIGHTS
Page 147 of 520
2-60Instruments and controls
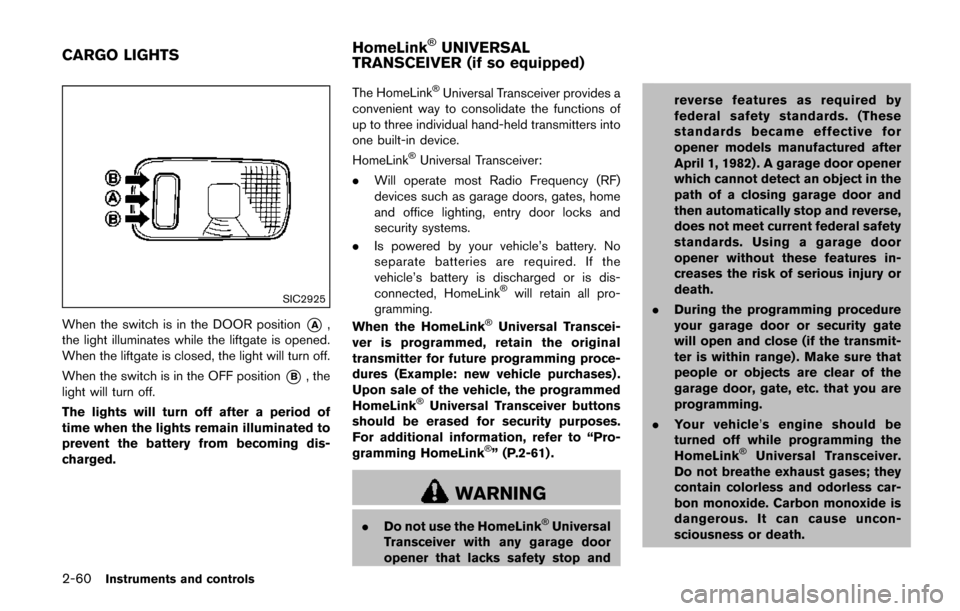
SIC2925
When the switch is in the DOOR position*A,
the light illuminates while the liftgate is opened.
When the liftgate is closed, the light will turn off.
When the switch is in the OFF position
*B, the
light will turn off.
The lights will turn off after a period of
time when the lights remain illuminated to
prevent the battery from becoming dis-
charged. The HomeLink
�ŠUniversal Transceiver provides a
convenient way to consolidate the functions of
up to three individual hand-held transmitters into
one built-in device.
HomeLink
�ŠUniversal Transceiver:
. Will operate most Radio Frequency (RF)
devices such as garage doors, gates, home
and office lighting, entry door locks and
security systems.
. Is powered by your vehicle’s battery. No
separate batteries are required. If the
vehicle’s battery is discharged or is dis-
connected, HomeLink
�Šwill retain all pro-
gramming.
When the HomeLink
�ŠUniversal Transcei-
ver is programmed, retain the original
transmitter for future programming proce-
dures (Example: new vehicle purchases) .
Upon sale of the vehicle, the programmed
HomeLink
�ŠUniversal Transceiver buttons
should be erased for security purposes.
For additional information, refer to “Pro-
gramming HomeLink
�Š” (P.2-61) .
WARNING
. Do not use the HomeLink�ŠUniversal
Transceiver with any garage door
opener that lacks safety stop and reverse features as required by
federal safety standards. (These
standards became effective for
opener models manufactured after
April 1, 1982) . A garage door opener
which cannot detect an object in the
path of a closing garage door and
then automatically stop and reverse,
does not meet current federal safety
standards. Using a garage door
opener without these features in-
creases the risk of serious injury or
death.
. During the programming procedure
your garage door or security gate
will open and close (if the transmit-
ter is within range) . Make sure that
people or objects are clear of the
garage door, gate, etc. that you are
programming.
. Your vehicle’ s engine should be
turned off while programming the
HomeLink
�ŠUniversal Transceiver.
Do not breathe exhaust gases; they
contain colorless and odorless car-
bon monoxide. Carbon monoxide is
dangerous. It can cause uncon-
sciousness or death.
CARGO LIGHTS HomeLink�ŠUNIVERSAL
TRANSCEIVER (if so equipped)
Page 174 of 520
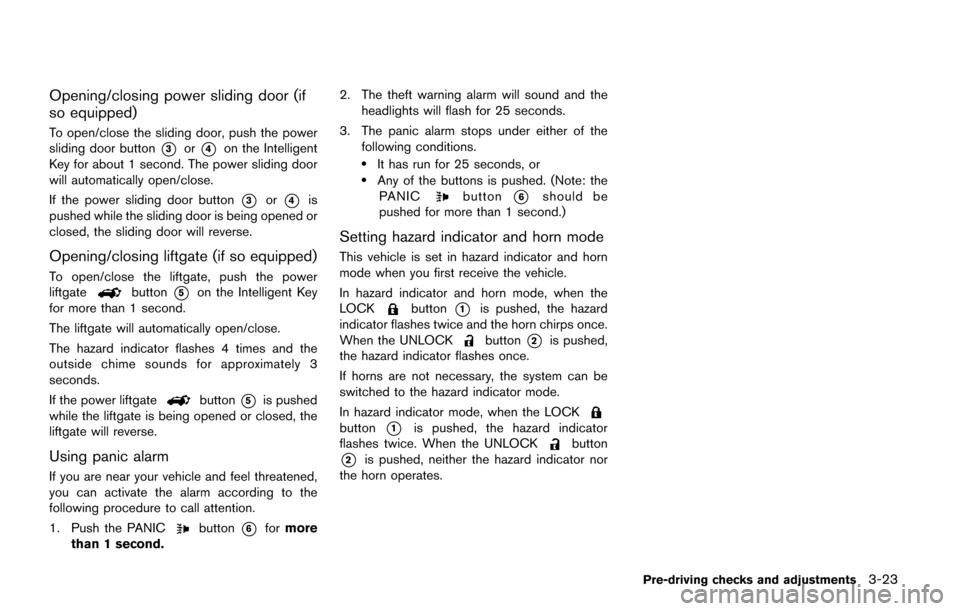
Opening/closing power sliding door (if
so equipped)
To open/close the sliding door, push the power
sliding door button
*3or*4on the Intelligent
Key for about 1 second. The power sliding door
will automatically open/close.
If the power sliding door button
*3or*4is
pushed while the sliding door is being opened or
closed, the sliding door will reverse.
Opening/closing liftgate (if so equipped)
To open/close the liftgate, push the power
liftgatebutton*5on the Intelligent Key
for more than 1 second.
The liftgate will automatically open/close.
The hazard indicator flashes 4 times and the
outside chime sounds for approximately 3
seconds.
If the power liftgate
button*5is pushed
while the liftgate is being opened or closed, the
liftgate will reverse.
Using panic alarm
If you are near your vehicle and feel threatened,
you can activate the alarm according to the
following procedure to call attention.
1. Push the PANIC
button*6for more
than 1 second. 2. The theft warning alarm will sound and the
headlights will flash for 25 seconds.
3. The panic alarm stops under either of the following conditions.
.It has run for 25 seconds, or.Any of the buttons is pushed. (Note: thePANICbutton*6should be
pushed for more than 1 second.)
Setting hazard indicator and horn mode
This vehicle is set in hazard indicator and horn
mode when you first receive the vehicle.
In hazard indicator and horn mode, when the
LOCK
button*1is pushed, the hazard
indicator flashes twice and the horn chirps once.
When the UNLOCK
button*2is pushed,
the hazard indicator flashes once.
If horns are not necessary, the system can be
switched to the hazard indicator mode.
In hazard indicator mode, when the LOCK
button*1is pushed, the hazard indicator
flashes twice. When the UNLOCKbutton
*2is pushed, neither the hazard indicator nor
the horn operates.
Pre-driving checks and adjustments3-23
Page 185 of 520
3-34Pre-driving checks and adjustments
SPA2143
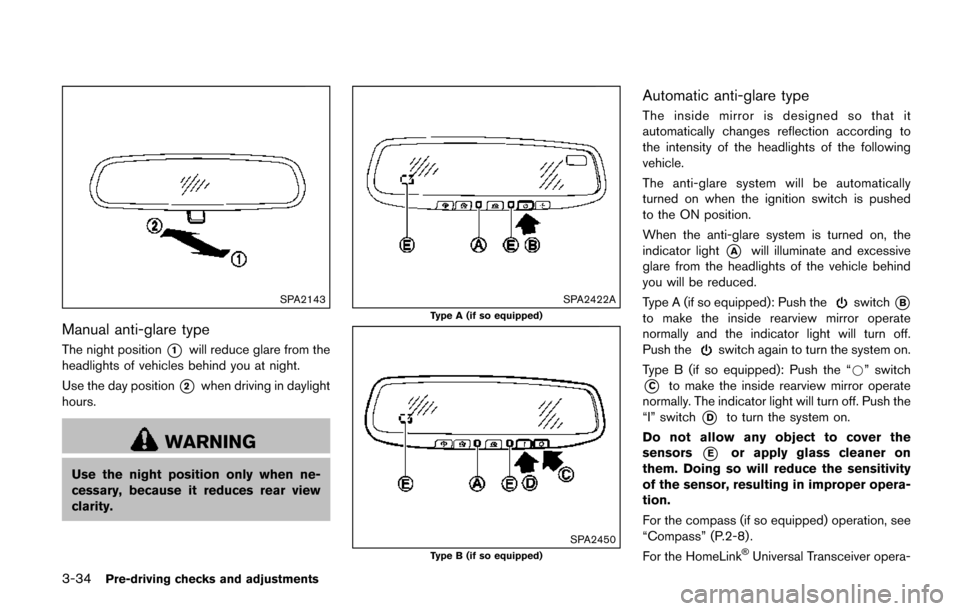
Manual anti-glare type
The night position*1will reduce glare from the
headlights of vehicles behind you at night.
Use the day position
*2when driving in daylight
hours.
WARNING
Use the night position only when ne-
cessary, because it reduces rear view
clarity.
SPA2422A
Type A (if so equipped)
SPA2450Type B (if so equipped)
Automatic anti-glare type
The inside mirror is designed so that it
automatically changes reflection according to
the intensity of the headlights of the following
vehicle.
The anti-glare system will be automatically
turned on when the ignition switch is pushed
to the ON position.
When the anti-glare system is turned on, the
indicator light
*Awill illuminate and excessive
glare from the headlights of the vehicle behind
you will be reduced.
Type A (if so equipped): Push the
switch*B
to make the inside rearview mirror operate
normally and the indicator light will turn off.
Push the
switch again to turn the system on.
Type B (if so equipped): Push the “*” switch
*Cto make the inside rearview mirror operate
normally. The indicator light will turn off. Push the
“I” switch
*Dto turn the system on.
Do not allow any object to cover the
sensors
*Eor apply glass cleaner on
them. Doing so will reduce the sensitivity
of the sensor, resulting in improper opera-
tion.
For the compass (if so equipped) operation, see
“Compass” (P.2-8) .
For the HomeLink
�ŠUniversal Transceiver opera-
Page 209 of 520
4-20Monitor, heater, air conditioner, audio, phone and voice recognition systems
When any mode button is pushed with the
screen off, the screen turns on for further
operation. The screen will turn off automatically
5 seconds after the operation is finished.
To turn on the screen, set this item to the ON
position, or push and hold the “
OFF”
button.
. Brightness/Contrast/Background Color
To adjust the brightness and contrast of the
screen, select the “Brightness” or “Contrast”
key.
Then, you can adjust the brightness and the
contrast using the multi-function controller.
For information on the “Background Color” key,
refer to the separate Navigation System Own-
er’s Manual.
Color Theme:
Choose the theme color of the menu screen.
SAA2488
Models with navigation system
JVH0182MModels without navigation system
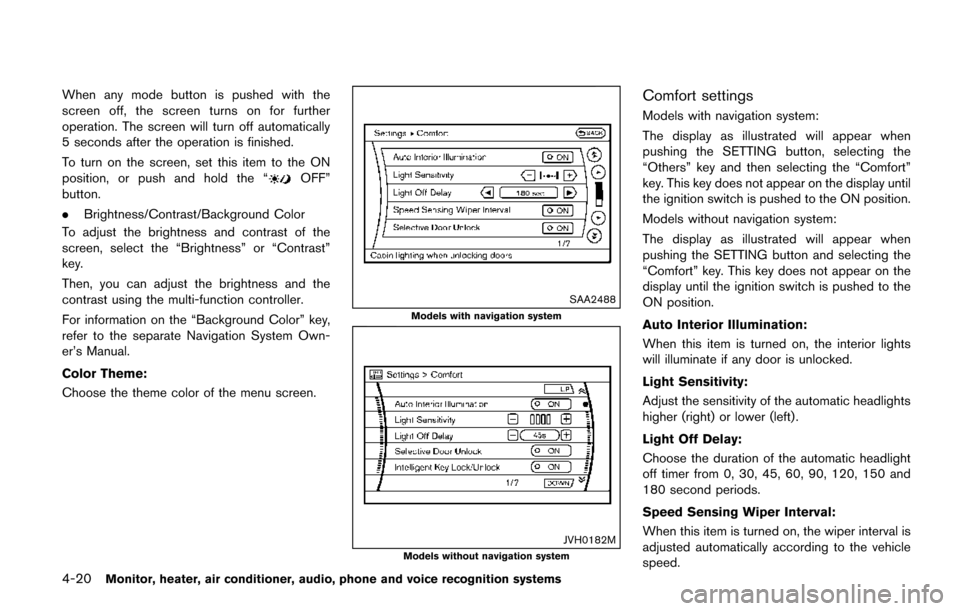
Comfort settings
Models with navigation system:
The display as illustrated will appear when
pushing the SETTING button, selecting the
“Others” key and then selecting the “Comfort”
key. This key does not appear on the display until
the ignition switch is pushed to the ON position.
Models without navigation system:
The display as illustrated will appear when
pushing the SETTING button and selecting the
“Comfort” key. This key does not appear on the
display until the ignition switch is pushed to the
ON position.
Auto Interior Illumination:
When this item is turned on, the interior lights
will illuminate if any door is unlocked.
Light Sensitivity:
Adjust the sensitivity of the automatic headlights
higher (right) or lower (left) .
Light Off Delay:
Choose the duration of the automatic headlight
off timer from 0, 30, 45, 60, 90, 120, 150 and
180 second periods.
Speed Sensing Wiper Interval:
When this item is turned on, the wiper interval is
adjusted automatically according to the vehicle
speed.
Page 244 of 520
— Pushing the “DUAL” button allows theuser to independently change the front
passenger’s side temperature with the
passenger side temperature control but-
tons (“
” and “”) . (“DUAL” will
appear on the display.)
To cancel the separate temperature
setting, push the “DUAL” button (“DUAL”
will disappear from the display) and the
driver’s side temperature setting will be
applied to both the driver’s and front
passenger’s sides.
4. Models with Advanced Climate Control System:
.Push the “AUTO” auto-recirculation
button. The indicator light on the “
AUTO” auto-recirculation button will illu-
minate. In this mode, the sensor detects
odors and gas to automatically switch
between the air recirculation mode and
the outside air circulation mode. (See
“Advanced climate control system” (P.4-
57) for details.)
Models without Advanced Climate Control
System:
.Push and hold the air recirculation “”
button or outside air circulation “”
button (the one with the indicator light
on) for more than 2 seconds to set the
automatic control between the air recir- culation and outside air circulation
modes. (The “
” and “” indicator
lights will blink twice.)
The following conditions need to be met for the
automatic air intake control mode to function
properly.
. The air flow control is not in the front
defroster mode (the indicator light on the
front defroster “
FRONT” button is
turned off).
. The outside temperature is approximately
328F(0 8C) or above.
A visible mist may be seen coming from the
ventilators in hot, humid conditions as the air is
cooled rapidly. This does not indicate a mal-
function.
Heating (A/C off):
1. Push the “AUTO” button.
(The AUTO indicator light will illuminate.)
2. If the A/C indicator light illuminates, push the “A/C” button.
(The A/C indicator light will turn off.)
3. Push the temperature control buttons (“
” and “”) (driver’s side) to set the
desired temperature.
When the DUAL mode is turned off (“DUAL”
does not appear on the display):
.Pushing the “AUTO” button changes both the driver’s and front passenger’s
side temperature.
.Pushing the “DUAL” button allows the user to independently change the front
passenger’s side temperature with the
passenger side temperature control but-
tons (“
”or“”) . (“DUAL” will
appear on the display.)
To cancel the separate temperature
setting, push the “DUAL” button (“DUAL”
will disappear from the display) and the
driver’s side temperature setting will be
applied to both the driver’s and front
passenger’s sides.
4. Models with Advanced Climate Control System:
.Push the “AUTO” auto-recirculation
button. The indicator light on the “
AUTO” auto-recirculation button will illu-
minate. In this mode, the sensor detects
odors and gas to automatically switch
between the air recirculation mode and
the outside air circulation mode. (See
“Advanced climate control system” (P.4-
57) for details.)
Models without Advanced Climate Control
System:
.Push and hold the air recirculation “”
button or outside air circulation “”
Monitor, heater, air conditioner, audio, phone and voice recognition systems4-55