2017 NISSAN QUEST lights
[x] Cancel search: lightsPage 246 of 520
button will illuminate.
The air recirculation mode cannot be activated
when the air conditioner is in the front defrosting
mode.
Outside air circulation:
.Models with Advanced Climate Control
System:
Push the air recirculation “
” button twice
to draw outside air into the passenger
compartment. The indicator light on the air
recirculation “
” button will turn off.
. Models without Advanced Climate Control
System:
Push the outside air circulation “
” button
to draw outside air into the passenger
compartment. The indicator light on the
outside air circulation “
” button will turn
on.
Automatic air intake control:
. Models with Advanced Climate Control
System:
Push the “
AUTO” auto-recirculation”
button to switch to the automatic air intake
control mode. The indicator light on the
“
AUTO” auto-recirculation button will
illuminate. In this mode, the sensor detects
odors and gas to automatically switch
between the air recirculation mode and the outside air circulation mode. (See “Ad-
vanced climate control system” (P.4-57) for
details.)
. Models without Advanced Climate Control
System:
To switch to the automatic control mode,
push the air recirculation “
” button to
recirculate interior air inside the vehicle. The
indicator light on the air recirculation “
”
button for about 2 seconds. The indicator
lights (both air recirculation “
” and
outside air circulation “” buttons) will
flash twice, and then the intake air will be
controlled automatically.
The following conditions need to be met for the
automatic air intake control mode to function
properly.
. The air flow control is not in the front
defroster mode (the indicator light on the
front defroster “
FRONT” button is
turned off).
. The outside temperature is approximately
328F(0 8C) or above.
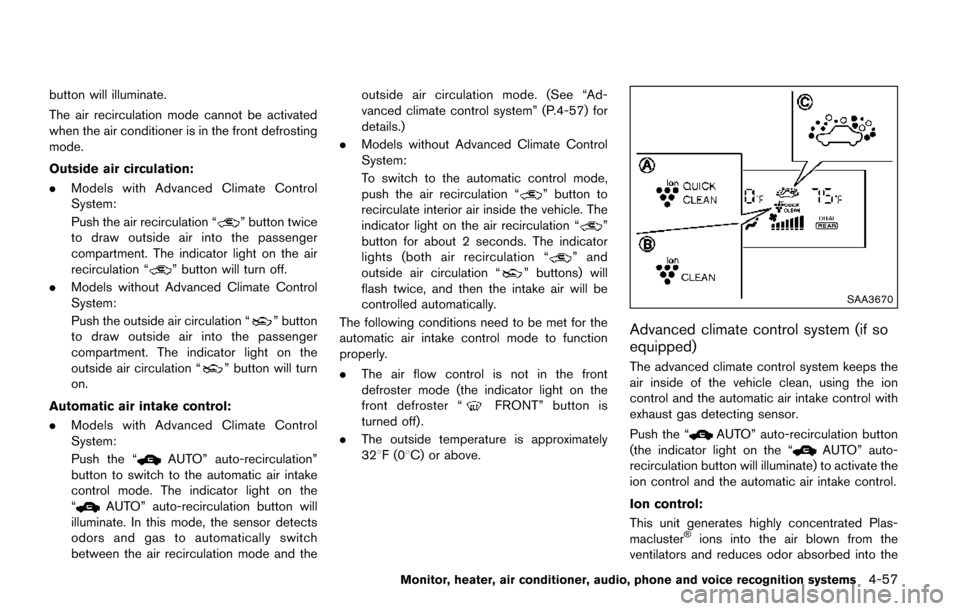
SAA3670
Advanced climate control system (if so
equipped)
The advanced climate control system keeps the
air inside of the vehicle clean, using the ion
control and the automatic air intake control with
exhaust gas detecting sensor.
Push the “
AUTO” auto-recirculation button
(the indicator light on the “AUTO” auto-
recirculation button will illuminate) to activate the
ion control and the automatic air intake control.
Ion control:
This unit generates highly concentrated Plas-
macluster
�Šions into the air blown from the
ventilators and reduces odor absorbed into the
Monitor, heater, air conditioner, audio, phone and voice recognition systems4-57
Page 251 of 520
4-62Monitor, heater, air conditioner, audio, phone and voice recognition systems
Static and flutter: During signal interference from
buildings, large hills or due to antenna position,
usually in conjunction with increased distance
from the station transmitter, static or flutter can
be heard. This can be reduced by lowering the
treble setting to reduce the treble response.
Multipath reception: Because of the reflective
characteristics of FM signals, direct and re-
flected signals reach the receiver at the same
time. The signals may cancel each other,
resulting in momentary flutter or loss of sound.
AM radio reception:
AM signals, because of their low frequency, can
bend around objects and skip along the ground.
In addition, the signals can be bounced off the
ionosphere and bent back to earth. Because of
these characteristics. AM signals are also
subject to interference as they travel from
transmitter to receiver.
Fading: Occurs while the vehicle is passing
through freeway underpasses or in areas with
many tall buildings. It can also occur for several
seconds during ionospheric turbulence even in
areas where no obstacles exist.
Static: Caused by thunderstorms, electrical
power lines, electric signs and even traffic lights.Satellite radio reception (if so equipped):
When the satellite radio is used for the first time
or the battery has been replaced, the satellite
radio may not work properly. This is not a
malfunction. Wait more than 10 minutes with the
satellite radio ON and the vehicle outside of any
metal or large building for the satellite radio to
receive all of the necessary data.
The satellite radio mode requires an active
SiriusXM Satellite Radio subscription. The sa-
tellite radio is not available in Alaska, Hawaii and
Guam.
The satellite radio performance may be affected
if cargo carried on the roof blocks the satellite
radio signal.
If possible, do not put cargo near the satellite
antenna.
A build up of ice on the satellite radio antenna
can affect satellite radio performance. Remove
the ice to restore satellite radio reception.
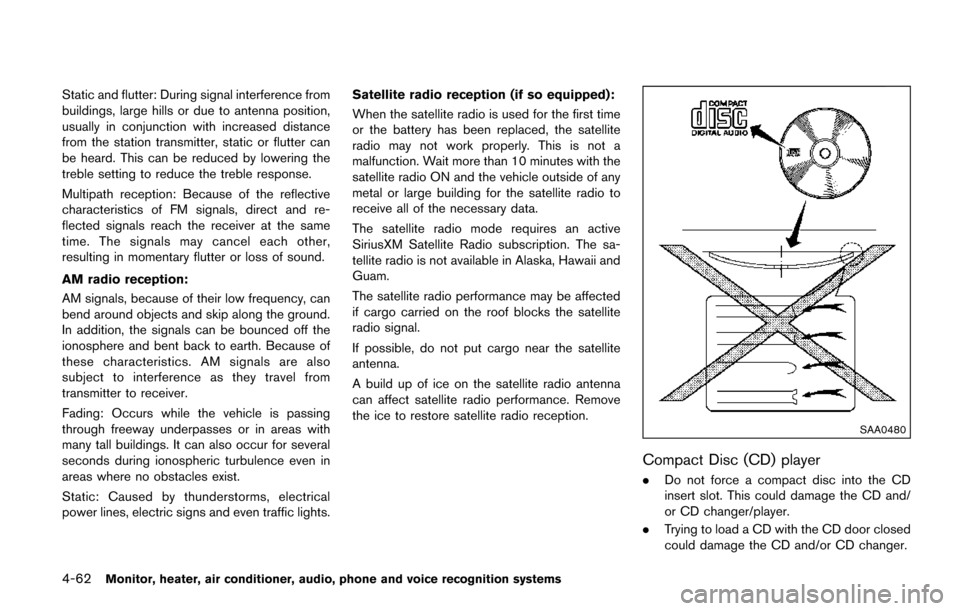
SAA0480
Compact Disc (CD) player
.
Do not force a compact disc into the CD
insert slot. This could damage the CD and/
or CD changer/player.
. Trying to load a CD with the CD door closed
could damage the CD and/or CD changer.
Page 337 of 520
4-148Monitor, heater, air conditioner, audio, phone and voice recognition systems
quit the Voice Recognition system at any time.
Microphone:
Microphone is located near the map lights.
Manual control:
While using the Voice Recognition system, it is
possible to select menu options by using the
steering wheel controls instead of speaking
voice commands. To activate manual control
mode, push the
button on the steering
wheel to access the phone menu and then tilt
the tuning switch (
or) up or down.
The manual control mode does not allow dialing
a phone number by digits. The user may select
an entry from the Phonebook or Recent Calls
lists. To reactivate Voice Recognition, exit the
manual control mode by pushing and holding the
button. At that time, pushing thebutton
will start the Hands Free Phone System.
Choosing a language
You can interact with the Bluetooth�ŠHands-
Free Phone System using several languages
that are available. For operations to change the
language, see “Audio main operation” (P.4-78).
Changing voice feedback volume
If you want to adjust the volume of the voice
feedback, push the volume control switch on the
steering wheel while being provided with feed-
back. You can also use the VOL (volume) control
knob on the audio unit.
Initialization
When the ignition switch is placed in the ACC
or ON position, the Voice Recognition system is
initialized, which takes a few seconds. If the
button is pushed before the initialization com-
pletes, the system will announce “Hands-free
phone system not ready” and will not react to
voice commands.
Connecting procedure:
NOTE:
The connecting procedure must be per-
formed when the vehicle is stationary. If
the vehicle starts moving during the pro-
cedure, the procedure will be cancelled.
You can register up to 5 different Bluetooth
�Š
cellular phones in the in-vehicle phone module.
However, you can talk on only one cellular phone
at a time. To connect a phone to the Bluetooth
�ŠHands-
Free Phone System;
1. Push the ENTER/SETTING button.
2. Use the TUNE·SCROLL control knob to select “Bluetooth” and then push the
ENTER/SETTING button.
3. Select “Add Phone” and then push the ENTER/SETTING button.
4. When a message with a PIN appears on the screen, operate the Bluetooth
�Šphone to
enter the PIN.
The connecting procedure varies according to
each phone. See the phone’s Owner’s Manual
for details.
Giving voice commands
To operate voice recognition, push and release
thebutton located on the steering wheel.
After the tone sounds, speak a command.
The command given is picked up by the
microphone, and voice feedback is given when
the command is accepted.
. If you need to hear the available commands
for the current menu again, say “Help” and
the system will repeat them.
. If a command is not recognized, the system
announces, “Command not recognized.
Please try again.” Make sure the command
Page 380 of 520
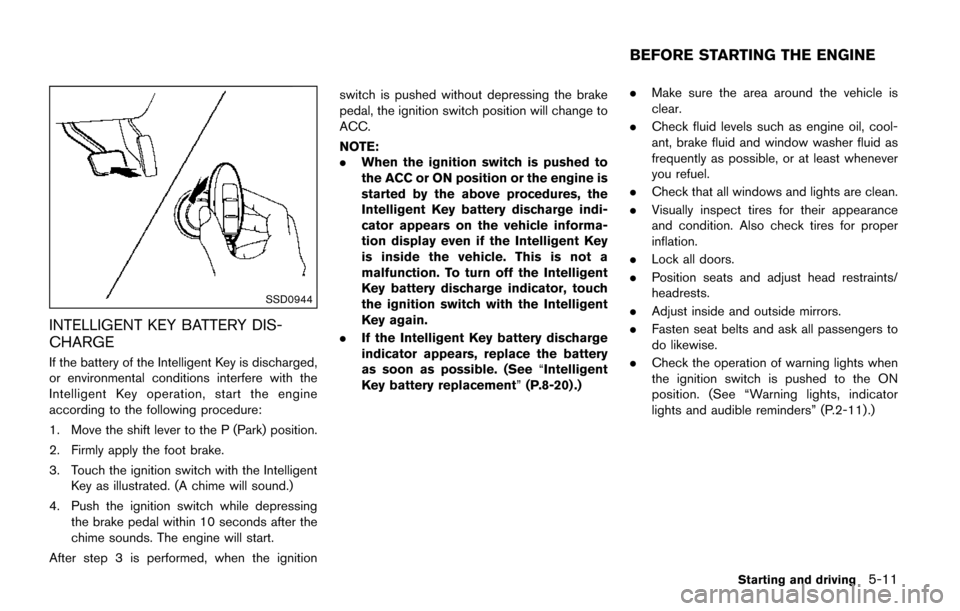
SSD0944
INTELLIGENT KEY BATTERY DIS-
CHARGE
If the battery of the Intelligent Key is discharged,
or environmental conditions interfere with the
Intelligent Key operation, start the engine
according to the following procedure:
1. Move the shift lever to the P (Park) position.
2. Firmly apply the foot brake.
3. Touch the ignition switch with the IntelligentKey as illustrated. (A chime will sound.)
4. Push the ignition switch while depressing the brake pedal within 10 seconds after the
chime sounds. The engine will start.
After step 3 is performed, when the ignition switch is pushed without depressing the brake
pedal, the ignition switch position will change to
ACC.
NOTE:
.
When the ignition switch is pushed to
the ACC or ON position or the engine is
started by the above procedures, the
Intelligent Key battery discharge indi-
cator appears on the vehicle informa-
tion display even if the Intelligent Key
is inside the vehicle. This is not a
malfunction. To turn off the Intelligent
Key battery discharge indicator, touch
the ignition switch with the Intelligent
Key again.
. If the Intelligent Key battery discharge
indicator appears, replace the battery
as soon as possible. (See “Intelligent
Key battery replacement” (P.8-20) .).
Make sure the area around the vehicle is
clear.
. Check fluid levels such as engine oil, cool-
ant, brake fluid and window washer fluid as
frequently as possible, or at least whenever
you refuel.
. Check that all windows and lights are clean.
. Visually inspect tires for their appearance
and condition. Also check tires for proper
inflation.
. Lock all doors.
. Position seats and adjust head restraints/
headrests.
. Adjust inside and outside mirrors.
. Fasten seat belts and ask all passengers to
do likewise.
. Check the operation of warning lights when
the ignition switch is pushed to the ON
position. (See “Warning lights, indicator
lights and audible reminders” (P.2-11) .)
Starting and driving5-11
BEFORE STARTING THE ENGINE
Page 385 of 520
5-16Starting and driving
SSD1177
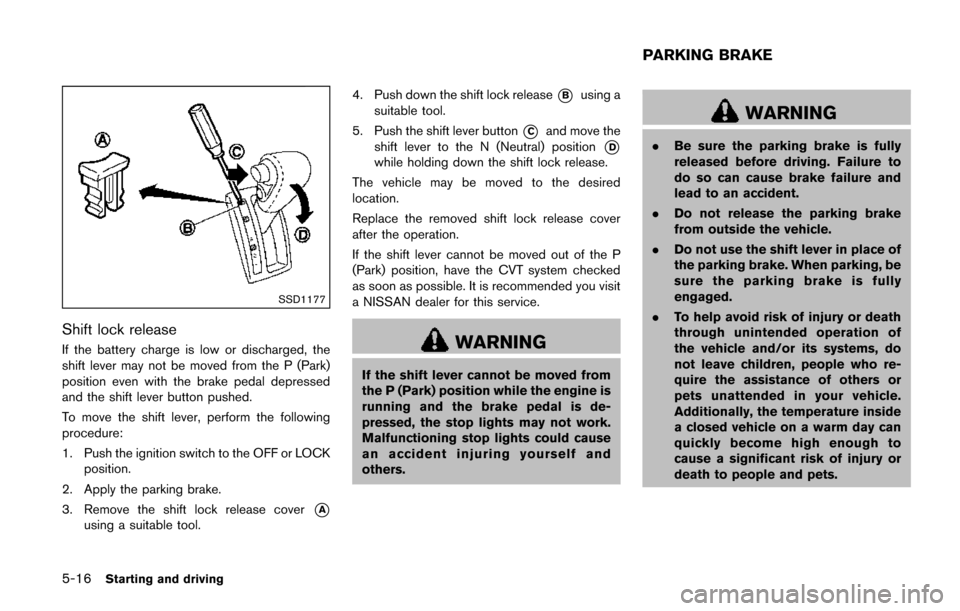
Shift lock release
If the battery charge is low or discharged, the
shift lever may not be moved from the P (Park)
position even with the brake pedal depressed
and the shift lever button pushed.
To move the shift lever, perform the following
procedure:
1. Push the ignition switch to the OFF or LOCKposition.
2. Apply the parking brake.
3. Remove the shift lock release cover
*A
using a suitable tool. 4. Push down the shift lock release
*Busing a
suitable tool.
5. Push the shift lever button
*Cand move the
shift lever to the N (Neutral) position
*D
while holding down the shift lock release.
The vehicle may be moved to the desired
location.
Replace the removed shift lock release cover
after the operation.
If the shift lever cannot be moved out of the P
(Park) position, have the CVT system checked
as soon as possible. It is recommended you visit
a NISSAN dealer for this service.
WARNING
If the shift lever cannot be moved from
the P (Park) position while the engine is
running and the brake pedal is de-
pressed, the stop lights may not work.
Malfunctioning stop lights could cause
an accident injuring yourself and
others.
WARNING
. Be sure the parking brake is fully
released before driving. Failure to
do so can cause brake failure and
lead to an accident.
. Do not release the parking brake
from outside the vehicle.
. Do not use the shift lever in place of
the parking brake. When parking, be
sure the parking brake is fully
engaged.
. To help avoid risk of injury or death
through unintended operation of
the vehicle and/or its systems, do
not leave children, people who re-
quire the assistance of others or
pets unattended in your vehicle.
Additionally, the temperature inside
a closed vehicle on a warm day can
quickly become high enough to
cause a significant risk of injury or
death to people and pets.
PARKING BRAKE
Page 396 of 520
To reset at a faster cruising speed,use one
of the following methods:
. Depress the accelerator pedal. When the
vehicle attains the desired speed, push and
release the COAST/SET switch.
. Push and hold the ACCELERATE/RESUME
switch. When the vehicle attains the desired
speed, release the switch.
. Push, then quickly release the ACCELER-
ATE/RESUME switch. Each time you do
this, the set speed will increase by about 1
MPH (1.6 km/h) .
To reset at a slower cruising speed, use one
of the following methods:
. Lightly tap the brake pedal. When the
vehicle attains the desired speed, push the
COAST/SET switch and release it.
. Push and hold the COAST/SET switch.
Release the switch when the vehicle slows
down to the desired speed.
. Push, then quickly release the COAST/SET
switch. Each time you do this, the set speed
will decrease by about 1 MPH (1.6 km/h) .
To resume the preset speed, push and
release the ACCELERATE/RESUME switch.
The vehicle will resume the last set cruising
speed when the vehicle speed is over 25 MPH
(40 km/h) .
CAUTION
During the first 1,200 miles (2,000 km) ,
follow these recommendations to ob-
tain maximum engine performance and
ensure the future reliability and econo-
my of your new vehicle. Failure to
follow these recommendations may
result in shortened engine life and
reduced engine performance.
. Avoid driving for long periods at constant
speed, either fast or slow. Do not run the
engine over 4,000 rpm.
. Do not accelerate at full throttle in any gear.
. Avoid quick starts.
. Avoid hard braking as much as possible.
. Do not tow a trailer for the first 500 miles
(800 km) . Your engine, axle or other parts
could be damaged. Follow these easy-to-use Fuel Efficient Driving
Tips to help you achieve the most fuel economy
from your vehicle.
1. Use smooth accelerator and brake pedal
application.
.Avoid rapid starts and stops..Use smooth, gentle accelerator andbrake application whenever possible.
.Maintain constant speed while commut-
ing and coast whenever possible.
2. Maintain constant speed.
.Look ahead to try and anticipate and minimize stops.
.Synchronizing your speed with traffic
lights allows you to reduce your number
of stops.
.Maintaining a steady speed can minimize red light stops and improve fuel effi-
ciency.
3. Use air conditioning (A/C) at higher vehicle speeds.
.Below 40 MPH (64 km/h) , it is moreefficient to open windows to cool the
vehicle due to reduced engine load.
.Above 40 MPH (64 km/h) , it is moreefficient to use A/C to cool the vehicle
due to increased aerodynamic drag.
Starting and driving5-27
BREAK-IN SCHEDULE FUEL EFFICIENT DRIVING TIPS
Page 407 of 520
6-2In case of emergency
SIC2574
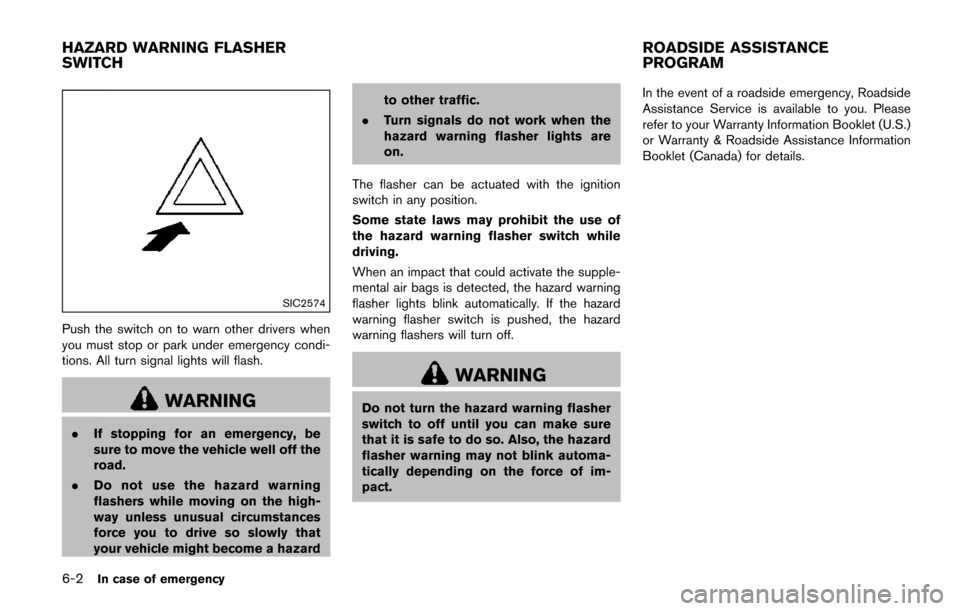
Push the switch on to warn other drivers when
you must stop or park under emergency condi-
tions. All turn signal lights will flash.
WARNING
.If stopping for an emergency, be
sure to move the vehicle well off the
road.
. Do not use the hazard warning
flashers while moving on the high-
way unless unusual circumstances
force you to drive so slowly that
your vehicle might become a hazard to other traffic.
. Turn signals do not work when the
hazard warning flasher lights are
on.
The flasher can be actuated with the ignition
switch in any position.
Some state laws may prohibit the use of
the hazard warning flasher switch while
driving.
When an impact that could activate the supple-
mental air bags is detected, the hazard warning
flasher lights blink automatically. If the hazard
warning flasher switch is pushed, the hazard
warning flashers will turn off.
WARNING
Do not turn the hazard warning flasher
switch to off until you can make sure
that it is safe to do so. Also, the hazard
flasher warning may not blink automa-
tically depending on the force of im-
pact. In the event of a roadside emergency, Roadside
Assistance Service is available to you. Please
refer to your Warranty Information Booklet (U.S.)
or Warranty & Roadside Assistance Information
Booklet (Canada) for details.
HAZARD WARNING FLASHER
SWITCH
ROADSIDE ASSISTANCE
PROGRAM
Page 408 of 520
To shut off the engine in an emergency situation
while driving perform the following procedure:
.Rapidly push the push-button ignition switch
3 consecutive times in less than 1.5
seconds, or
. Push and hold the push-button ignition
switch for more than 2 seconds.TIRE PRESSURE MONITORING SYS-
TEM (TPMS)
This vehicle is equipped with the Tire Pressure
Monitoring System (TPMS) . It monitors tire
pressure of all tires except the spare. When
the low tire pressure warning light is lit and the
CHECK TIRE PRESSURE warning appears on
the vehicle information display, one or more of
your tires is significantly under-inflated. If the
vehicle is being driven with low tire pressure, the
TPMS will activate and warn you of it by the low
tire pressure warning light. This system will
activate only when the vehicle is driven at
speeds above 16 MPH (25 km/h) . For more
details, see “Warning lights, indicator lights and
audible reminders” (P.2-11) and “Tire Pressure
Monitoring System (TPMS)” (P.5-3) .
WARNING
.If the low tire pressure warning light
illuminates while driving, avoid sud-
den steering maneuvers or abrupt
braking, reduce vehicle speed, pull
off the road to a safe location and
stop the vehicle as soon as possi-
ble. Driving with under-inflated tires
may permanently damage the tires
and increase the likelihood of tire failure. Serious vehicle damage
could occur and may lead to an
accident and could result in serious
personal injury. Check the tire pres-
sure for all four tires. Adjust the tire
pressure to the recommended COLD
tire pressure shown on the Tire and
Loading Information label to turn
the low tire pressure warning light
OFF. If the light still illuminates
while driving after adjusting the tire
pressure, a tire may be flat. If you
have a flat tire, replace it with a
spare tire as soon as possible.
. Since the spare tire is not equipped
with the TPMS, when a spare tire is
mounted or a wheel is replaced, the
TPMS will not function and the low
tire pressure warning light will flash
for approximately 1 minute. The
light will remain on after 1 minute.
Have your tires replaced and/or
TPMS system reset as soon as
possible. It is recommended you
visit a NISSAN dealer for these
services.
. Replacing tires with those not ori-
ginally specified by NISSAN could
affect the proper operation of the
In case of emergency6-3
EMERGENCY ENGINE SHUT OFF FLAT TIRE