2017 NISSAN QUEST wheel
[x] Cancel search: wheelPage 191 of 520
FM-AM radio with Compact Disc (CD) player ......... 4-74
FM-AM-SAT radio with Compact Disc (CD) player
(Type A) ........................................................................\
...... 4-77
FM-AM-SAT radio with Compact Disc (CD) player
(Type B) ........................................................................\
...... 4-87
DVD (Digital Versatile Disc) player operation (if
so equipped) ..................................................................... 4-91
USB (Universal Serial Bus) connection port
(models with center multi-function control panel) ..... 4-94
iPod
�Šplayer operation (models with center
multi-function control panel) ......................................... 4-99
Bluetooth
�Šstreaming audio (models with
navigation system) ........................................................ 4-101
Auxiliary input jacks (if so equipped) ....................... 4-106
CD/DVD/USB memory care and cleaning ............. 4-107
Steering-wheel-mounted controls for audio (if
so equipped) .................................................................. 4-108
Antenna ........................................................................\
.... 4-109
NISSAN Mobile Entertainment System (MES) (if
so equipped) ........................................................................\
4-110 Digital Versatile Disc (DVD)
system components ...................................................... 4-111
Before operating the DVD Mobile
Entertainment System .................................................. 4-116
Playing a DVD ................................................................ 4-117
Care and maintenance ................................................. 4-121
Car phone or CB radio ..................................................... 4-121
Bluetooth
�Šhands-free phone system (Type A) (if
so equipped) ........................................................................\
4-122
Regulatory information ................................................. 4-123 Voice commands ......................................................... 4-124
Control buttons ............................................................ 4-124
Connecting procedure ............................................... 4-124
Phone selection ........................................................... 4-125
Quick Dial ..................................................................... 4-125
Making a call ................................................................ 4-128
Receiving a call ........................................................... 4-129
During a call ................................................................. 4-129
Phone setting ............................................................... 4-130
Troubleshooting guide ............................................... 4-132
Bluetooth
�Šhands-free phone system (Type B) (if
so equipped) ....................................................................... 4-133
Regulatory information ............................................... 4-134
Using the system ........................................................ 4-135
Control buttons ............................................................ 4-137
Getting started ............................................................ 4-137
List of voice commands ............................................ 4-139
Speaker adaptation (SA) mode ............................... 4-142
Troubleshooting guide ............................................... 4-145
Bluetooth
�Šhands-free phone system (Type C) (if
so equipped) ....................................................................... 4-146
Regulatory information ............................................... 4-147
Using the system ........................................................ 4-147
NISSAN Voice Recognition system (models with
navigation system) ............................................................. 4-154 NISSAN Voice Recognition standard mode ........ 4-155
Using the system ........................................................ 4-157
NISSAN Voice Recognition alternate
command mode ........................................................... 4-166
Page 198 of 520
SAA3673
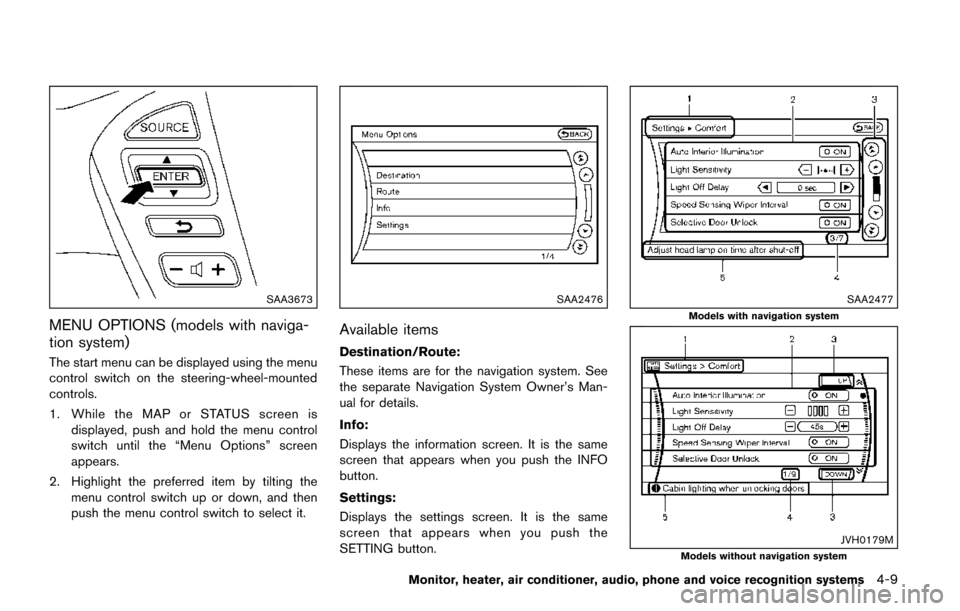
MENU OPTIONS (models with naviga-
tion system)
The start menu can be displayed using the menu
control switch on the steering-wheel-mounted
controls.
1. While the MAP or STATUS screen isdisplayed, push and hold the menu control
switch until the “Menu Options” screen
appears.
2. Highlight the preferred item by tilting the menu control switch up or down, and then
push the menu control switch to select it.
SAA2476
Available items
Destination/Route:
These items are for the navigation system. See
the separate Navigation System Owner’s Man-
ual for details.
Info:
Displays the information screen. It is the same
screen that appears when you push the INFO
button.
Settings:
Displays the settings screen. It is the same
screen that appears when you push the
SETTING button.
SAA2477
Models with navigation system
JVH0179MModels without navigation system
Monitor, heater, air conditioner, audio, phone and voice recognition systems4-9
Page 215 of 520
4-26Monitor, heater, air conditioner, audio, phone and voice recognition systems
SAA1896
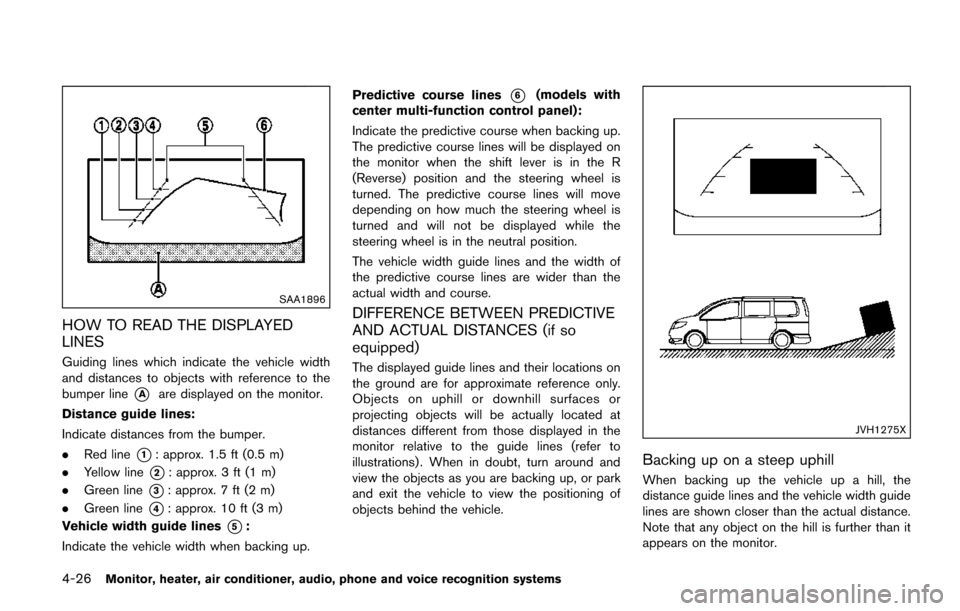
HOW TO READ THE DISPLAYED
LINES
Guiding lines which indicate the vehicle width
and distances to objects with reference to the
bumper line
*Aare displayed on the monitor.
Distance guide lines:
Indicate distances from the bumper.
. Red line
*1: approx. 1.5 ft (0.5 m)
. Yellow line
*2: approx. 3 ft (1 m)
. Green line
*3: approx. 7 ft (2 m)
. Green line
*4: approx. 10 ft (3 m)
Vehicle width guide lines
*5:
Indicate the vehicle width when backing up. Predictive course lines
*6(models with
center multi-function control panel):
Indicate the predictive course when backing up.
The predictive course lines will be displayed on
the monitor when the shift lever is in the R
(Reverse) position and the steering wheel is
turned. The predictive course lines will move
depending on how much the steering wheel is
turned and will not be displayed while the
steering wheel is in the neutral position.
The vehicle width guide lines and the width of
the predictive course lines are wider than the
actual width and course.
DIFFERENCE BETWEEN PREDICTIVE
AND ACTUAL DISTANCES (if so
equipped)
The displayed guide lines and their locations on
the ground are for approximate reference only.
Objects on uphill or downhill surfaces or
projecting objects will be actually located at
distances different from those displayed in the
monitor relative to the guide lines (refer to
illustrations) . When in doubt, turn around and
view the objects as you are backing up, or park
and exit the vehicle to view the positioning of
objects behind the vehicle.
JVH1275X
Backing up on a steep uphill
When backing up the vehicle up a hill, the
distance guide lines and the vehicle width guide
lines are shown closer than the actual distance.
Note that any object on the hill is further than it
appears on the monitor.
Page 217 of 520
4-28Monitor, heater, air conditioner, audio, phone and voice recognition systems
course.
HOW TO PARK WITH PREDICTIVE
COURSE LINES (models with center
multi-function control panel)
WARNING
.If the tires are replaced with differ-
ent sized tires, the predictive course
line may not be displayed correctly.
. On a snow-covered or slippery road,
there may be a difference between
the predictive course line and the
actual course line.
. The displayed lines will appear
slightly off to the right because the
rearview camera is not installed in
the rear center of the vehicle.
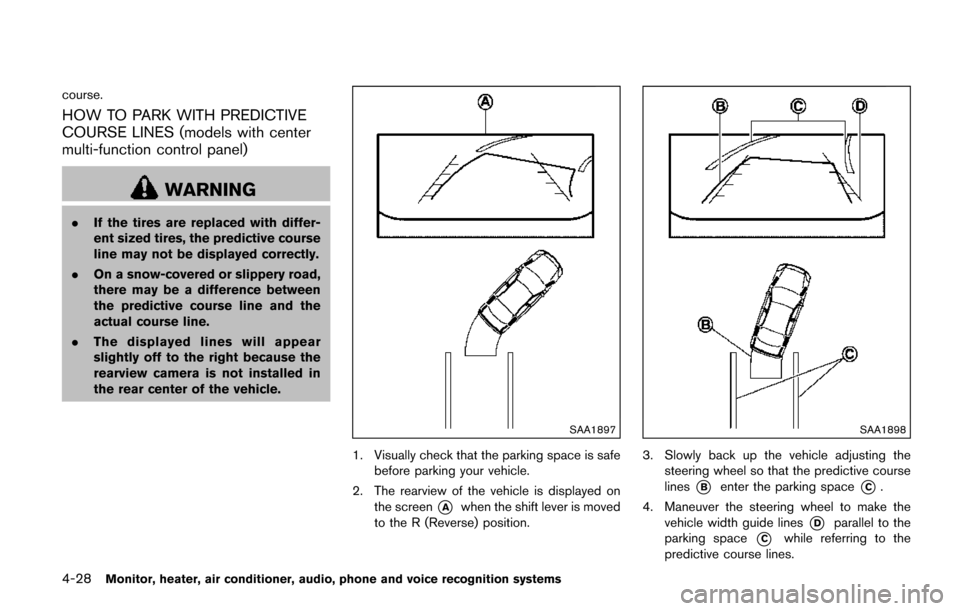
SAA1897
1. Visually check that the parking space is safe
before parking your vehicle.
2. The rearview of the vehicle is displayed on the screen
*Awhen the shift lever is moved
to the R (Reverse) position.
SAA1898
3. Slowly back up the vehicle adjusting the steering wheel so that the predictive course
lines
*Benter the parking space*C.
4. Maneuver the steering wheel to make the vehicle width guide lines
*Dparallel to the
parking space
*Cwhile referring to the
predictive course lines.
Page 222 of 520
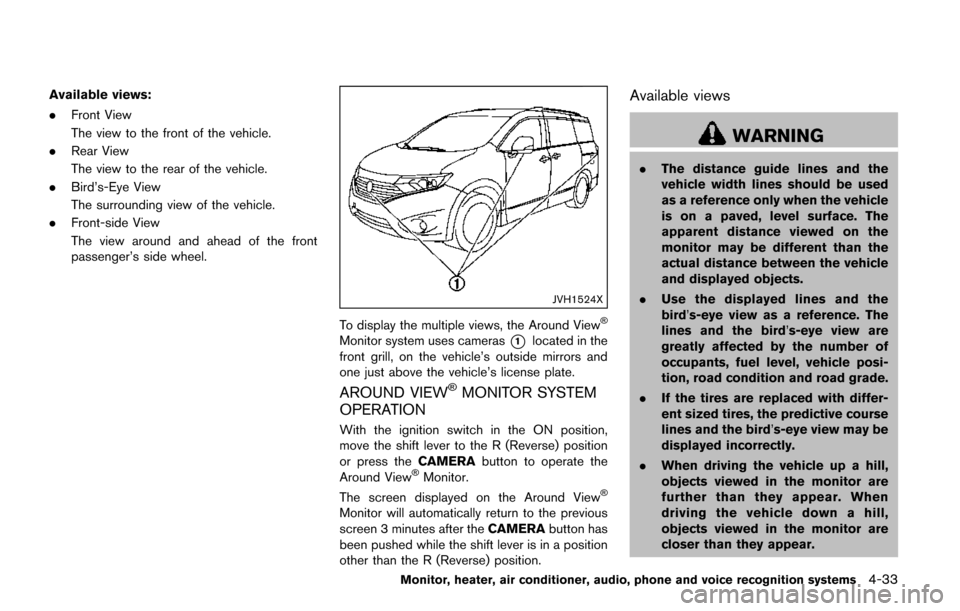
Available views:
.Front View
The view to the front of the vehicle.
. Rear View
The view to the rear of the vehicle.
. Bird’s-Eye View
The surrounding view of the vehicle.
. Front-side View
The view around and ahead of the front
passenger’s side wheel.
JVH1524X
To display the multiple views, the Around View�Š
Monitor system uses cameras*1located in the
front grill, on the vehicle’s outside mirrors and
one just above the vehicle’s license plate.
AROUND VIEW�ŠMONITOR SYSTEM
OPERATION
With the ignition switch in the ON position,
move the shift lever to the R (Reverse) position
or press the CAMERAbutton to operate the
Around View
�ŠMonitor.
The screen displayed on the Around View�Š
Monitor will automatically return to the previous
screen 3 minutes after the CAMERAbutton has
been pushed while the shift lever is in a position
other than the R (Reverse) position.
Available views
WARNING
. The distance guide lines and the
vehicle width lines should be used
as a reference only when the vehicle
is on a paved, level surface. The
apparent distance viewed on the
monitor may be different than the
actual distance between the vehicle
and displayed objects.
. Use the displayed lines and the
bird’s-eye view as a reference. The
lines and the bird’s-eye view are
greatly affected by the number of
occupants, fuel level, vehicle posi-
tion, road condition and road grade.
. If the tires are replaced with differ-
ent sized tires, the predictive course
lines and the bird’s-eye view may be
displayed incorrectly.
. When driving the vehicle up a hill,
objects viewed in the monitor are
further than they appear. When
driving the vehicle down a hill,
objects viewed in the monitor are
closer than they appear.
Monitor, heater, air conditioner, audio, phone and voice recognition systems4-33
Page 223 of 520
4-34Monitor, heater, air conditioner, audio, phone and voice recognition systems
.Objects in the monitor will appear
visually opposite compared to when
viewed in the rear view and outside
mirrors.
. Use the mirrors or actually look to
properly judge distances to other
objects.
. The distance between objects
viewed in the rear view differs from
actual distance because a wide-
angle lens is used.
. On a snow-covered or slippery road,
there may be a difference between
the predictive course line and the
actual course line.
. The vehicle width and predictive
course lines are wider than the
actual width and course.
. The displayed lines on the rear view
will appear slightly off to the right
because the rear view camera is not
installed in the rear center of the
vehicle.
SAA1840
Front view
SAA1896Rear view
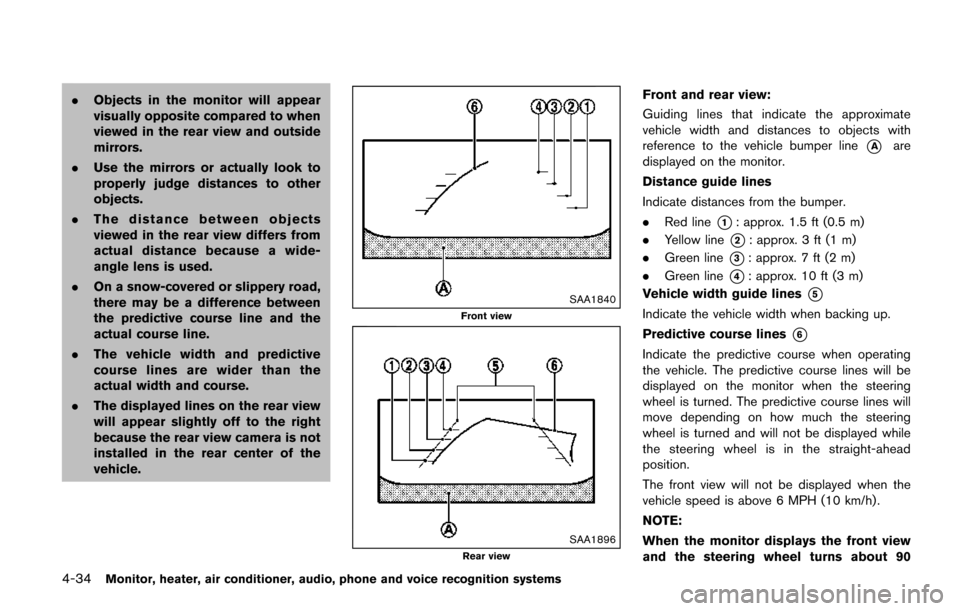
Front and rear view:
Guiding lines that indicate the approximate
vehicle width and distances to objects with
reference to the vehicle bumper line
*Aare
displayed on the monitor.
Distance guide lines
Indicate distances from the bumper.
. Red line
*1: approx. 1.5 ft (0.5 m)
. Yellow line
*2: approx. 3 ft (1 m)
. Green line
*3: approx. 7 ft (2 m)
. Green line
*4: approx. 10 ft (3 m)
Vehicle width guide lines
*5
Indicate the vehicle width when backing up.
Predictive course lines
*6
Indicate the predictive course when operating
the vehicle. The predictive course lines will be
displayed on the monitor when the steering
wheel is turned. The predictive course lines will
move depending on how much the steering
wheel is turned and will not be displayed while
the steering wheel is in the straight-ahead
position.
The front view will not be displayed when the
vehicle speed is above 6 MPH (10 km/h) .
NOTE:
When the monitor displays the front view
and the steering wheel turns about 90
Page 224 of 520
degrees or less from the straight ahead
position, both the right and left predictive
course lines
*6are displayed. When the
steering wheel turns about 90 degrees or
more, a line is displayed only on the
opposite side of the turn.
JVH0337X
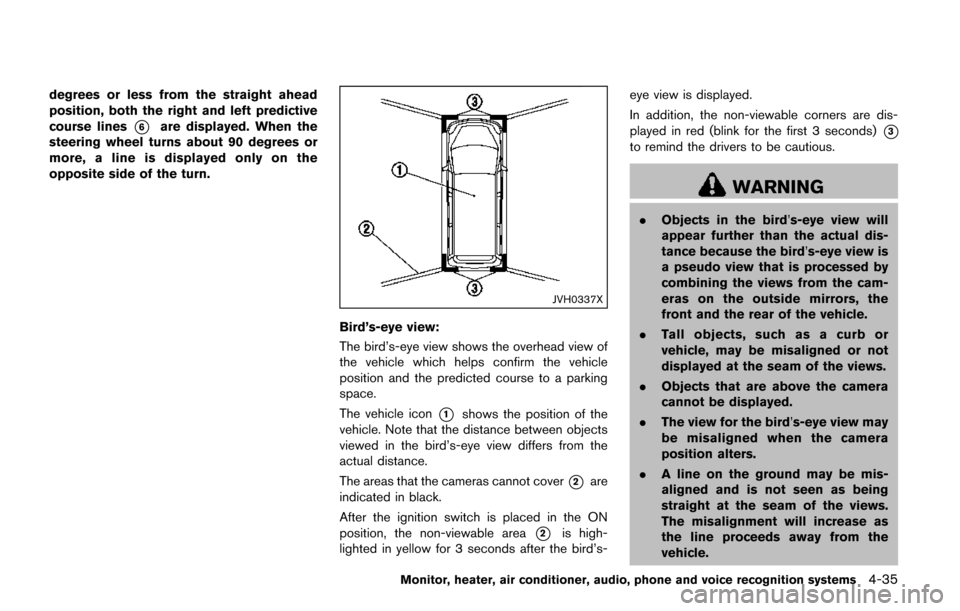
Bird’s-eye view:
The bird’s-eye view shows the overhead view of
the vehicle which helps confirm the vehicle
position and the predicted course to a parking
space.
The vehicle icon
*1shows the position of the
vehicle. Note that the distance between objects
viewed in the bird’s-eye view differs from the
actual distance.
The areas that the cameras cannot cover
*2are
indicated in black.
After the ignition switch is placed in the ON
position, the non-viewable area
*2is high-
lighted in yellow for 3 seconds after the bird’s- eye view is displayed.
In addition, the non-viewable corners are dis-
played in red (blink for the first 3 seconds)
*3
to remind the drivers to be cautious.
WARNING
.
Objects in the bird’s-eye view will
appear further than the actual dis-
tance because the bird’s-eye view is
a pseudo view that is processed by
combining the views from the cam-
eras on the outside mirrors, the
front and the rear of the vehicle.
. Tall objects, such as a curb or
vehicle, may be misaligned or not
displayed at the seam of the views.
. Objects that are above the camera
cannot be displayed.
. The view for the bird’s-eye view may
be misaligned when the camera
position alters.
. A line on the ground may be mis-
aligned and is not seen as being
straight at the seam of the views.
The misalignment will increase as
the line proceeds away from the
vehicle.
Monitor, heater, air conditioner, audio, phone and voice recognition systems4-35
Page 228 of 520
SAA1898
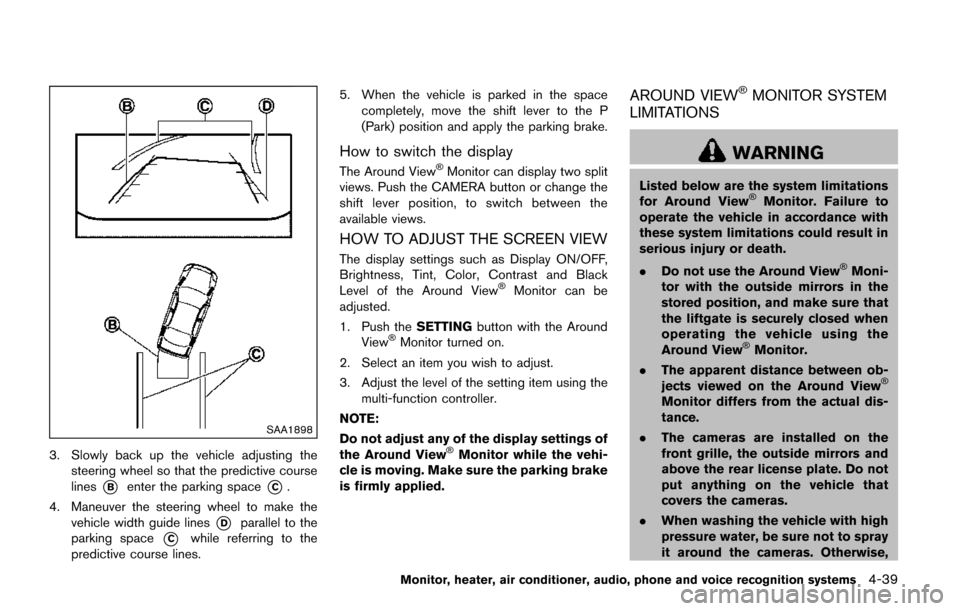
3. Slowly back up the vehicle adjusting thesteering wheel so that the predictive course
lines
*Benter the parking space*C.
4. Maneuver the steering wheel to make the vehicle width guide lines
*Dparallel to the
parking space
*Cwhile referring to the
predictive course lines. 5. When the vehicle is parked in the space
completely, move the shift lever to the P
(Park) position and apply the parking brake.
How to switch the display
The Around View�ŠMonitor can display two split
views. Push the CAMERA button or change the
shift lever position, to switch between the
available views.
HOW TO ADJUST THE SCREEN VIEW
The display settings such as Display ON/OFF,
Brightness, Tint, Color, Contrast and Black
Level of the Around View
�ŠMonitor can be
adjusted.
1. Push the SETTINGbutton with the Around
View
�ŠMonitor turned on.
2. Select an item you wish to adjust.
3. Adjust the level of the setting item using the multi-function controller.
NOTE:
Do not adjust any of the display settings of
the Around View
�ŠMonitor while the vehi-
cle is moving. Make sure the parking brake
is firmly applied.
AROUND VIEW�ŠMONITOR SYSTEM
LIMITATIONS
WARNING
Listed below are the system limitations
for Around View�ŠMonitor. Failure to
operate the vehicle in accordance with
these system limitations could result in
serious injury or death.
. Do not use the Around View
�ŠMoni-
tor with the outside mirrors in the
stored position, and make sure that
the liftgate is securely closed when
operating the vehicle using the
Around View
�ŠMonitor.
. The apparent distance between ob-
jects viewed on the Around View
�Š
Monitor differs from the actual dis-
tance.
. The cameras are installed on the
front grille, the outside mirrors and
above the rear license plate. Do not
put anything on the vehicle that
covers the cameras.
. When washing the vehicle with high
pressure water, be sure not to spray
it around the cameras. Otherwise,
Monitor, heater, air conditioner, audio, phone and voice recognition systems4-39