2017 NISSAN QUEST trailer
[x] Cancel search: trailerPage 181 of 520
3-30Pre-driving checks and adjustments
SPA2824
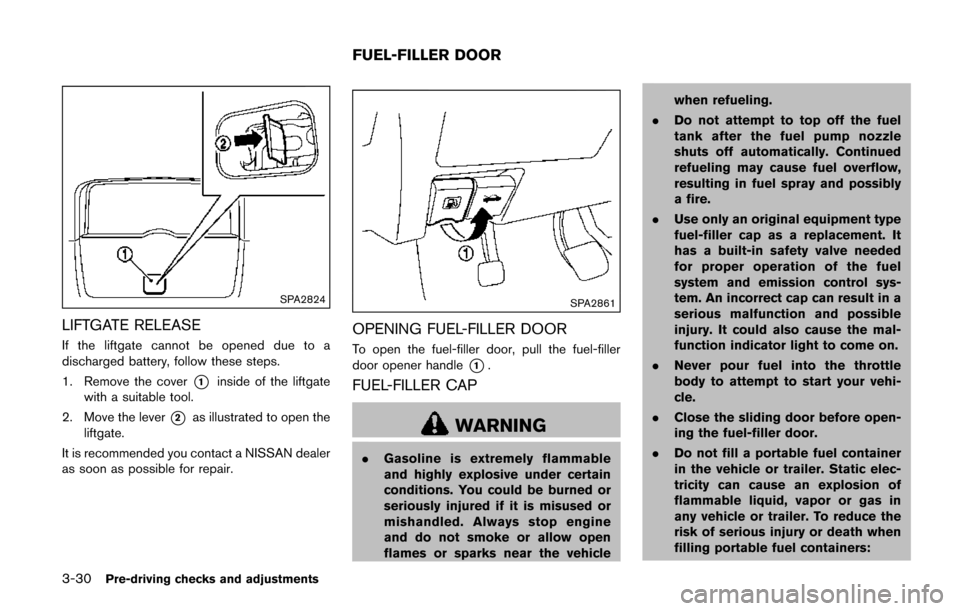
LIFTGATE RELEASE
If the liftgate cannot be opened due to a
discharged battery, follow these steps.
1. Remove the cover
*1inside of the liftgate
with a suitable tool.
2. Move the lever
*2as illustrated to open the
liftgate.
It is recommended you contact a NISSAN dealer
as soon as possible for repair.
SPA2861
OPENING FUEL-FILLER DOOR
To open the fuel-filler door, pull the fuel-filler
door opener handle
*1.
FUEL-FILLER CAP
WARNING
. Gasoline is extremely flammable
and highly explosive under certain
conditions. You could be burned or
seriously injured if it is misused or
mishandled. Always stop engine
and do not smoke or allow open
flames or sparks near the vehicle when refueling.
. Do not attempt to top off the fuel
tank after the fuel pump nozzle
shuts off automatically. Continued
refueling may cause fuel overflow,
resulting in fuel spray and possibly
a fire.
. Use only an original equipment type
fuel-filler cap as a replacement. It
has a built-in safety valve needed
for proper operation of the fuel
system and emission control sys-
tem. An incorrect cap can result in a
serious malfunction and possible
injury. It could also cause the mal-
function indicator light to come on.
. Never pour fuel into the throttle
body to attempt to start your vehi-
cle.
. Close the sliding door before open-
ing the fuel-filler door.
. Do not fill a portable fuel container
in the vehicle or trailer. Static elec-
tricity can cause an explosion of
flammable liquid, vapor or gas in
any vehicle or trailer. To reduce the
risk of serious injury or death when
filling portable fuel containers:
FUEL-FILLER DOOR
Page 233 of 520
4-44Monitor, heater, air conditioner, audio, phone and voice recognition systems
JVH1256X
Front and bird’s-eye views
JVH1286XRear and bird’s-eye views
JVH1257X
Rear and front-side views
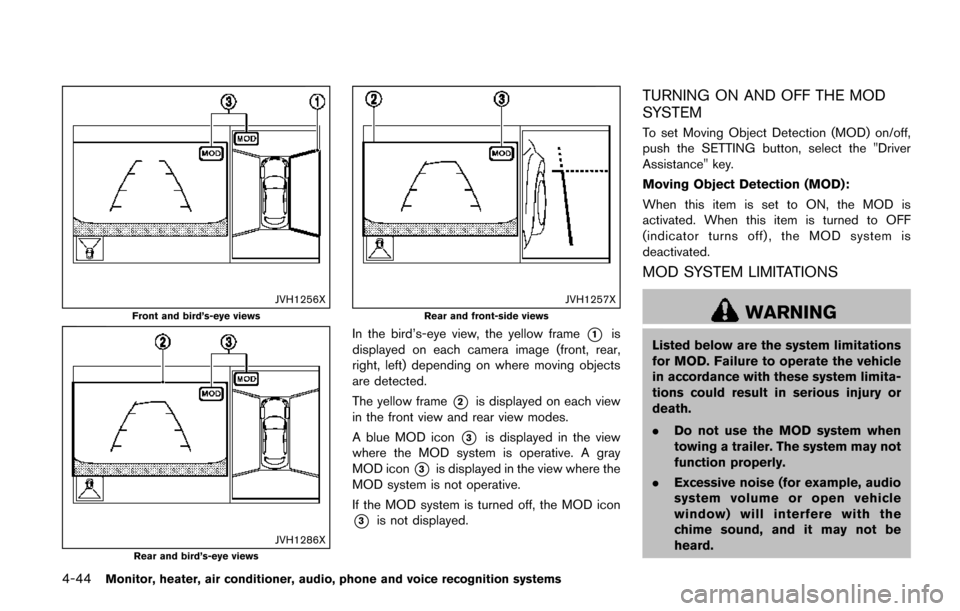
In the bird’s-eye view, the yellow frame*1is
displayed on each camera image (front, rear,
right, left) depending on where moving objects
are detected.
The yellow frame
*2is displayed on each view
in the front view and rear view modes.
A blue MOD icon
*3is displayed in the view
where the MOD system is operative. A gray
MOD icon
*3is displayed in the view where the
MOD system is not operative.
If the MOD system is turned off, the MOD icon
*3is not displayed.
TURNING ON AND OFF THE MOD
SYSTEM
To set Moving Object Detection (MOD) on/off,
push the SETTING button, select the "Driver
Assistance" key.
Moving Object Detection (MOD):
When this item is set to ON, the MOD is
activated. When this item is turned to OFF
(indicator turns off) , the MOD system is
deactivated.
MOD SYSTEM LIMITATIONS
WARNING
Listed below are the system limitations
for MOD. Failure to operate the vehicle
in accordance with these system limita-
tions could result in serious injury or
death.
. Do not use the MOD system when
towing a trailer. The system may not
function properly.
. Excessive noise (for example, audio
system volume or open vehicle
window) will interfere with the
chime sound, and it may not be
heard.
Page 371 of 520
5-2Starting and driving
WARNING
.Do not leave children or adults who
would normally require the support
of others alone in your vehicle. Pets
should not be left alone either. They
could accidentally injure themselves
or others through inadvertent op-
eration of the vehicle. Also, on hot,
sunny days, temperatures in a
closed vehicle could quickly become
high enough to cause severe or
possibly fatal injuries to people or
animals.
. Properly secure all cargo with ropes
or straps to help prevent it from
sliding or shifting. Do not place
cargo higher than the seatbacks. In
a sudden stop or collision, unse-
cured cargo could cause personal
injury.
EXHAUST GAS (carbon monoxide)
WARNING
.Do not breathe exhaust gases; they
contain colorless and odorless car-
bon monoxide. Carbon monoxide is
dangerous. It can cause uncon-
sciousness or death.
. If you suspect that exhaust fumes
are entering the vehicle, drive with
all windows fully open, and have the
vehicle inspected immediately.
. Do not run the engine in closed
spaces such as a garage.
. Do not park the vehicle with the
engine running for any extended
length of time.
. Keep the liftgate closed while driv-
ing, otherwise exhaust gases could
be drawn into the passenger com-
partment. If you must drive with the
liftgate open, follow these precau-
tions:
1. Open all the windows.
2. Set the
air recirculation to off
and the fan control to high to circulate the air.
. If electrical wiring or other cable
connections must pass to a trailer
through the seal on the liftgate or
the body, follow the manufacturer’s
recommendation to prevent carbon
monoxide entry into the vehicle.
. If a special body, camper or other
equipment is added for recreational
or other usage, follow the manufac-
turer’s recommendation to prevent
carbon monoxide entry into the
vehicle. (Some recreational vehicle
appliances such as stoves, refrig-
erators, heaters, etc. may also gen-
erate carbon monoxide.)
. The exhaust system and body
should be inspected by a qualified
mechanic whenever:
— The vehicle is raised for service.
— You suspect that exhaust fumes
are entering into the passenger
compartment.
— You notice a change in the sound of the exhaust system.
— You have had an accident invol- ving damage to the exhaust
PRECAUTIONS WHEN STARTING
AND DRIVING
Page 384 of 520
SSD1176
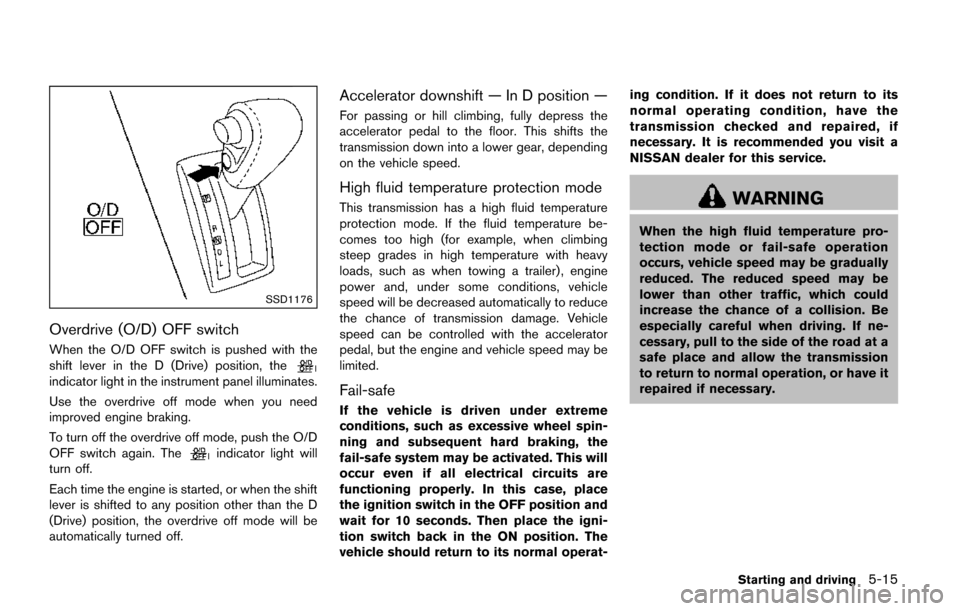
Overdrive (O/D) OFF switch
When the O/D OFF switch is pushed with the
shift lever in the D (Drive) position, the
indicator light in the instrument panel illuminates.
Use the overdrive off mode when you need
improved engine braking.
To turn off the overdrive off mode, push the O/D
OFF switch again. The
indicator light will
turn off.
Each time the engine is started, or when the shift
lever is shifted to any position other than the D
(Drive) position, the overdrive off mode will be
automatically turned off.
Accelerator downshift — In D position —
For passing or hill climbing, fully depress the
accelerator pedal to the floor. This shifts the
transmission down into a lower gear, depending
on the vehicle speed.
High fluid temperature protection mode
This transmission has a high fluid temperature
protection mode. If the fluid temperature be-
comes too high (for example, when climbing
steep grades in high temperature with heavy
loads, such as when towing a trailer) , engine
power and, under some conditions, vehicle
speed will be decreased automatically to reduce
the chance of transmission damage. Vehicle
speed can be controlled with the accelerator
pedal, but the engine and vehicle speed may be
limited.
Fail-safe
If the vehicle is driven under extreme
conditions, such as excessive wheel spin-
ning and subsequent hard braking, the
fail-safe system may be activated. This will
occur even if all electrical circuits are
functioning properly. In this case, place
the ignition switch in the OFF position and
wait for 10 seconds. Then place the igni-
tion switch back in the ON position. The
vehicle should return to its normal operat- ing condition. If it does not return to its
normal operating condition, have the
transmission checked and repaired, if
necessary. It is recommended you visit a
NISSAN dealer for this service.
WARNING
When the high fluid temperature pro-
tection mode or fail-safe operation
occurs, vehicle speed may be gradually
reduced. The reduced speed may be
lower than other traffic, which could
increase the chance of a collision. Be
especially careful when driving. If ne-
cessary, pull to the side of the road at a
safe place and allow the transmission
to return to normal operation, or have it
repaired if necessary.
Starting and driving5-15
Page 389 of 520
5-20Starting and driving
BSW SYSTEM LIMITATIONS
WARNING
Listed below are the system limitations
for the BSW system. Failure to operate
the vehicle in accordance with these
system limitations could result in ser-
ious injury or death.
.The BSW system cannot detect all
vehicles under all conditions.
. The radar sensors may not be able
to detect and activate BSW when
certain objects are present such as:
— Pedestrians, bicycles, animals.
— Vehicles such as motorcycles,
low height vehicles, or high
ground clearance vehicles.
— Oncoming vehicles.
— Vehicles remaining in the detec- tion zone when you accelerate
from a stop.
— A vehicle merging into an adja- cent lane at a speed approxi-
mately the same as your vehicle. — A vehicle approaching rapidly
from behind.
— A vehicle which your vehicle overtakes rapidly.
— A vehicle that passes through the detection zone quickly.
— When overtaking several vehi- cles in a row, the vehicles after
the first vehicle may not be
detected if they are traveling
close together.
. The radar sensor’s detection zone is
designed based on a standard lane
width. When driving in a wider lane,
the radar sensors may not detect
vehicles in an adjacent lane. When
driving in a narrow lane, the radar
sensors may detect vehicles driving
two lanes away.
. The radar sensors are designed to
ignore most stationary objects,
however objects such as guardrails,
walls, foliage and parked vehicles
may occasionally be detected. This
is a normal operating condition.
. The following conditions may re-
duce the ability of the radar to
detect other vehicles: — Severe weather
— Road spray
— Ice/frost/snow build-up on the
vehicle
— Dirt build-up on the vehicle
. Do not attach stickers (including
transparent material) , install acces-
sories or apply additional paint near
the radar sensors. These conditions
may reduce the ability of the radar
to detect other vehicles.
. Do not use the BSW system when
towing a trailer because the system
may not function properly.
. Excessive noise (for example, audio
system volume, open vehicle win-
dow) will interfere with the chime
sound, and it may not be heard.
Page 396 of 520
To reset at a faster cruising speed,use one
of the following methods:
. Depress the accelerator pedal. When the
vehicle attains the desired speed, push and
release the COAST/SET switch.
. Push and hold the ACCELERATE/RESUME
switch. When the vehicle attains the desired
speed, release the switch.
. Push, then quickly release the ACCELER-
ATE/RESUME switch. Each time you do
this, the set speed will increase by about 1
MPH (1.6 km/h) .
To reset at a slower cruising speed, use one
of the following methods:
. Lightly tap the brake pedal. When the
vehicle attains the desired speed, push the
COAST/SET switch and release it.
. Push and hold the COAST/SET switch.
Release the switch when the vehicle slows
down to the desired speed.
. Push, then quickly release the COAST/SET
switch. Each time you do this, the set speed
will decrease by about 1 MPH (1.6 km/h) .
To resume the preset speed, push and
release the ACCELERATE/RESUME switch.
The vehicle will resume the last set cruising
speed when the vehicle speed is over 25 MPH
(40 km/h) .
CAUTION
During the first 1,200 miles (2,000 km) ,
follow these recommendations to ob-
tain maximum engine performance and
ensure the future reliability and econo-
my of your new vehicle. Failure to
follow these recommendations may
result in shortened engine life and
reduced engine performance.
. Avoid driving for long periods at constant
speed, either fast or slow. Do not run the
engine over 4,000 rpm.
. Do not accelerate at full throttle in any gear.
. Avoid quick starts.
. Avoid hard braking as much as possible.
. Do not tow a trailer for the first 500 miles
(800 km) . Your engine, axle or other parts
could be damaged. Follow these easy-to-use Fuel Efficient Driving
Tips to help you achieve the most fuel economy
from your vehicle.
1. Use smooth accelerator and brake pedal
application.
.Avoid rapid starts and stops..Use smooth, gentle accelerator andbrake application whenever possible.
.Maintain constant speed while commut-
ing and coast whenever possible.
2. Maintain constant speed.
.Look ahead to try and anticipate and minimize stops.
.Synchronizing your speed with traffic
lights allows you to reduce your number
of stops.
.Maintaining a steady speed can minimize red light stops and improve fuel effi-
ciency.
3. Use air conditioning (A/C) at higher vehicle speeds.
.Below 40 MPH (64 km/h) , it is moreefficient to open windows to cool the
vehicle due to reduced engine load.
.Above 40 MPH (64 km/h) , it is moreefficient to use A/C to cool the vehicle
due to increased aerodynamic drag.
Starting and driving5-27
BREAK-IN SCHEDULE FUEL EFFICIENT DRIVING TIPS
Page 467 of 520
8-38Do-it-yourself
Care of wheels
See “Cleaning exterior” (P.7-2) for details about
care of the wheels.
Spare tire
Since the spare tire is not equipped with the
TPMS, when a spare tire is mounted (TEMPOR-
ARY USE ONLY or conventional) , the TPMS will
not function.
Observe the following precautions if the TEM-
PORARY USE ONLY spare tire must be used,
otherwise your vehicle could be damaged or
involved in an accident.
WARNING
.The TEMPORARY USE ONLY spare
tire should be used for emergency
use. It should be replaced with the
standard tire at the first opportunity
to avoid possible tire or differential
damage.
. Drive carefully while the TEMPOR-
ARY USE ONLY spare tire is in-
stalled. Avoid sharp turns and
abrupt braking while driving.
. Periodically check spare tire infla-
tion pressure. Always keep the
pressure of the TEMPORARY USE ONLY spare tire at 60 psi (420 kPa,
4.2 bar) . Always keep the pressure
of the full size spare tire (if so
equipped) at the recommended
pressure for standard tires, as in-
dicated on the Tire and Loading
Information label.
. With the TEMPORARY USE ONLY
spare tire installed do not drive your
vehicle at speeds faster than 50
MPH (80 km/h) .
. When driving on roads covered with
snow or ice, the TEMPORARY USE
ONLY spare tire should be used on
the rear wheels and original tire
used on the front wheels (drive
wheels) . Use tire chains only on
the front (original) tires.
. Tire tread of the TEMPORARY USE
ONLY spare tire will wear at a faster
rate than the standard tire. Replace
the spare tire as soon as the tread
wear indicators appear.
. Do not use the spare tire on other
vehicles.
. Do not use more than one spare tire
at the same time. .
Do not tow a trailer while the
TEMPORARY USE ONLY spare tire
is installed.
CAUTION
.Do not use tire chains on a TEM-
PORARY USE ONLY spare tire. Tire
chains will not fit properly and may
cause damage to the vehicle.
. Because the TEMPORARY USE
ONLY spare tire is smaller than the
original tire, ground clearance is
reduced. To avoid damage to the
vehicle, do not drive over obstacles.
Also do not drive the vehicle
through an automatic car wash
since it may get caught.
Page 473 of 520
9-6Maintenance and schedules
CHASSIS AND BODY MAINTENANCE
Brake lines and cables:
Visually inspect for proper installation. Check for
chafing, cracks, deterioration, and signs of
leaking. Replace any deteriorated or damaged
parts immediately.
Brake pads and rotors:
Check for wear, deterioration and fluid leaks.
Replace any deteriorated or damaged parts
immediately.
Exhaust system:
Visually inspect the exhaust pipes, muffler and
hangers for leaks, cracks, deterioration, and
damage. Tighten connections or replace parts
as necessary.
In-cabin microfilter:
Replace at specified intervals. When driving for
prolonged periods in dusty conditions, replace
the filter more frequently.
Steering gear and linkage, axle and sus-
pension parts, drive shaft boots:
Check for damage, looseness, and leakage of oil
or grease. Under severe driving conditions,
inspect more frequently.Tire rotation:
Tires should be rotated every 5,000 miles
(8,000 km) according to the instructions under
“Explanation of general maintenance items”
(P.9-2) . When rotating tires, check for damage
and uneven wear. Replace if necessary.
Transmission fluid/oil:
Visually inspect for signs of leakage at specified
intervals.
If towing a trailer, using a camper or car-top
carrier, or driving on rough or muddy roads:
.
Replace the CVT fluid every 60,000 (96,000
km) miles or request the dealer to inspect
the fluid deterioration data using a CON-
SULT. If the deterioration data is more than
210000, replace the CVT fluid. To help ensure smooth, safe and economical
driving, NISSAN provides two maintenance
schedules that may be used, depending upon
the conditions in which you usually drive. These
schedules contain both distance and time
intervals, up to 120,000 miles (192,000 km)/
144 months. For most people, the odometer
reading will indicate when service is needed.
However, if you drive very little, your vehicle
should be serviced at the regular time intervals
shown in the schedule.
After 120,000 miles (192,000 km)/144
months, continue maintenance at the
same mileage/time intervals.
ADDITIONAL MAINTENANCE ITEMS
FOR SEVERE OPERATING CONDI-
TIONS
Additional maintenance items for severe
operating conditions;
should be performed
on vehicles that are driven under especially
demanding conditions. Additional maintenance
items should be performed if you primarily
operate your vehicle under the following condi-
tions:
. Repeated short trips of less than 5 miles (8
km) .
. Repeated short trips of less than 10 miles
(16 km) with outside temperatures remain-
ing below freezing.
MAINTENANCE SCHEDULES