2017 NISSAN QUEST heating
[x] Cancel search: heatingPage 236 of 520
SAA3055
Rear
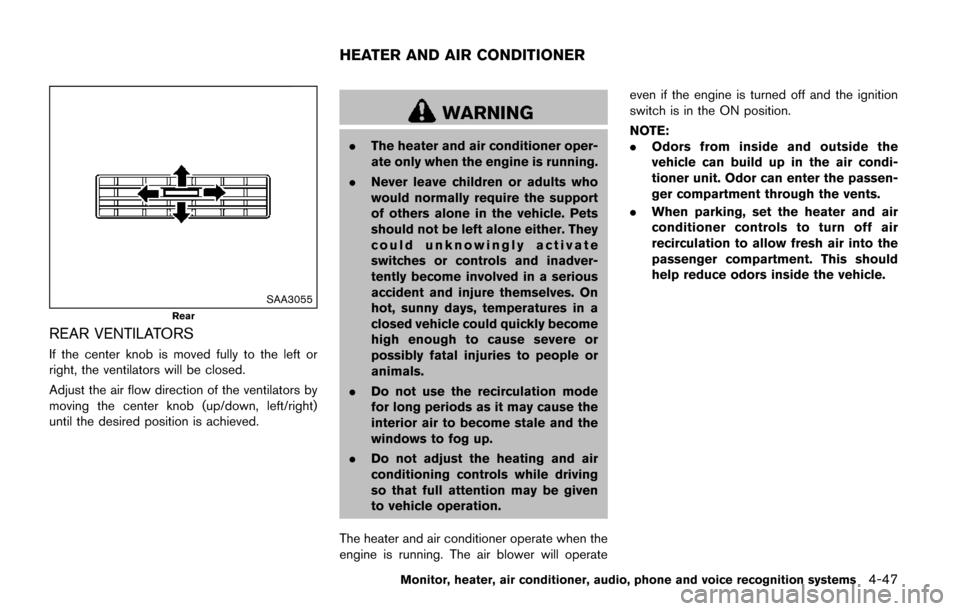
REAR VENTILATORS
If the center knob is moved fully to the left or
right, the ventilators will be closed.
Adjust the air flow direction of the ventilators by
moving the center knob (up/down, left/right)
until the desired position is achieved.
WARNING
.The heater and air conditioner oper-
ate only when the engine is running.
. Never leave children or adults who
would normally require the support
of others alone in the vehicle. Pets
should not be left alone either. They
could unknowingly activate
switches or controls and inadver-
tently become involved in a serious
accident and injure themselves. On
hot, sunny days, temperatures in a
closed vehicle could quickly become
high enough to cause severe or
possibly fatal injuries to people or
animals.
. Do not use the recirculation mode
for long periods as it may cause the
interior air to become stale and the
windows to fog up.
. Do not adjust the heating and air
conditioning controls while driving
so that full attention may be given
to vehicle operation.
The heater and air conditioner operate when the
engine is running. The air blower will operate even if the engine is turned off and the ignition
switch is in the ON position.
NOTE:
.
Odors from inside and outside the
vehicle can build up in the air condi-
tioner unit. Odor can enter the passen-
ger compartment through the vents.
. When parking, set the heater and air
conditioner controls to turn off air
recirculation to allow fresh air into the
passenger compartment. This should
help reduce odors inside the vehicle.
Monitor, heater, air conditioner, audio, phone and voice recognition systems4-47
HEATER AND AIR CONDITIONER
Page 239 of 520
4-50Monitor, heater, air conditioner, audio, phone and voice recognition systems
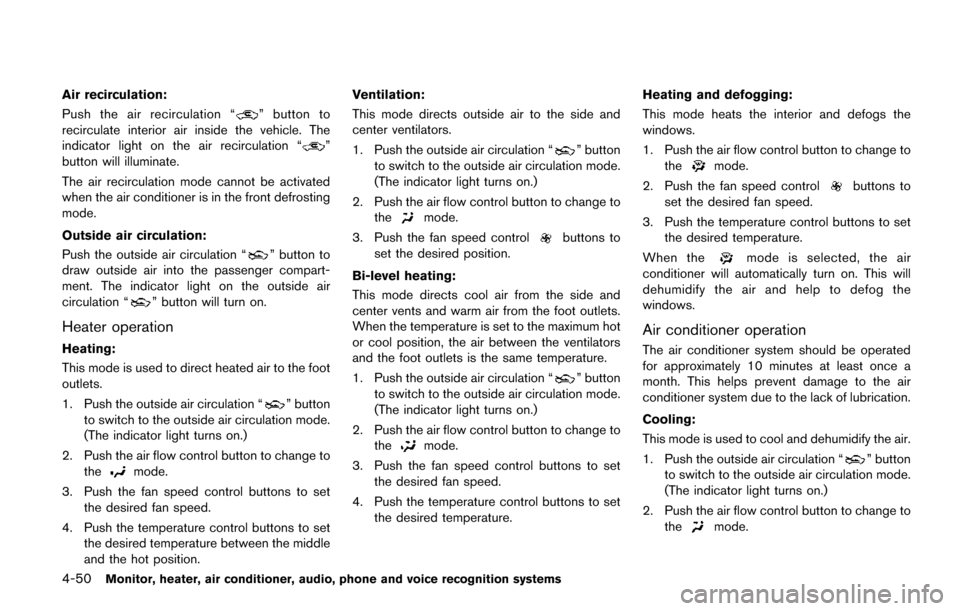
Air recirculation:
Push the air recirculation “
” button to
recirculate interior air inside the vehicle. The
indicator light on the air recirculation “
”
button will illuminate.
The air recirculation mode cannot be activated
when the air conditioner is in the front defrosting
mode.
Outside air circulation:
Push the outside air circulation “
” button to
draw outside air into the passenger compart-
ment. The indicator light on the outside air
circulation “
” button will turn on.
Heater operation
Heating:
This mode is used to direct heated air to the foot
outlets.
1. Push the outside air circulation “
” button
to switch to the outside air circulation mode.
(The indicator light turns on.)
2. Push the air flow control button to change to the
mode.
3. Push the fan speed control buttons to set the desired fan speed.
4. Push the temperature control buttons to set the desired temperature between the middle
and the hot position. Ventilation:
This mode directs outside air to the side and
center ventilators.
1. Push the outside air circulation “
” button
to switch to the outside air circulation mode.
(The indicator light turns on.)
2. Push the air flow control button to change to the
mode.
3. Push the fan speed control
buttons to
set the desired position.
Bi-level heating:
This mode directs cool air from the side and
center vents and warm air from the foot outlets.
When the temperature is set to the maximum hot
or cool position, the air between the ventilators
and the foot outlets is the same temperature.
1. Push the outside air circulation “
” button
to switch to the outside air circulation mode.
(The indicator light turns on.)
2. Push the air flow control button to change to the
mode.
3. Push the fan speed control buttons to set the desired fan speed.
4. Push the temperature control buttons to set the desired temperature. Heating and defogging:
This mode heats the interior and defogs the
windows.
1. Push the air flow control button to change to
the
mode.
2. Push the fan speed control
buttons to
set the desired fan speed.
3. Push the temperature control buttons to set the desired temperature.
When the
mode is selected, the air
conditioner will automatically turn on. This will
dehumidify the air and help to defog the
windows.
Air conditioner operation
The air conditioner system should be operated
for approximately 10 minutes at least once a
month. This helps prevent damage to the air
conditioner system due to the lack of lubrication.
Cooling:
This mode is used to cool and dehumidify the air.
1. Push the outside air circulation “
” button
to switch to the outside air circulation mode.
(The indicator light turns on.)
2. Push the air flow control button to change to the
mode.
Page 240 of 520
3. Push the fan speed control buttons to setthe desired fan speed.
4. Push the A/C button on. (The A/C indicator light will illuminate.)
5. Push the temperature control buttons to set the desired temperature between the middle
and the cool position.
. For quick cooling when the outside tem-
perature is high, push the air recirculation
button to switch to the air recirculation
mode. (The indicator light turns on.) Be sure
to turn off the air recirculation mode for
normal cooling.
. A visible mist may be seen coming from the
ventilators in hot, humid conditions as the air
is cooled rapidly. This does not indicate a
malfunction.
Dehumidified heating:
This mode is used to heat and dehumidify the
air.
1. Push the outside air circulation “
” button
to switch to the outside air circulation mode.
(The indicator light turns on.)
2. Push the air flow control button to change to the
position.
3. Push the fan speed control buttons to the desired fan speed. 4. Push the A/C button on. (The A/C indicator
light will illuminate.)
5. Push the temperature control buttons to set the desired temperature between the middle
and the hot position.
Dehumidified or defrosting/defogging:
This mode is used to defog the windows and
dehumidify the air.
1. Push the front defroster button
on. (The
indicator light turns on.)
2. Push the fan speed control buttons to set the desired fan speed.
3. Push the temperature control buttons to set the desired temperature.
When the
mode is selected, the air
conditioner will automatically turn on. This will
dehumidify the air and help to defog the
windows.
To remove frost from the outside surface of the
windshield quickly, set the temperature to the
maximum hot position and the fan speed to
maximum position.
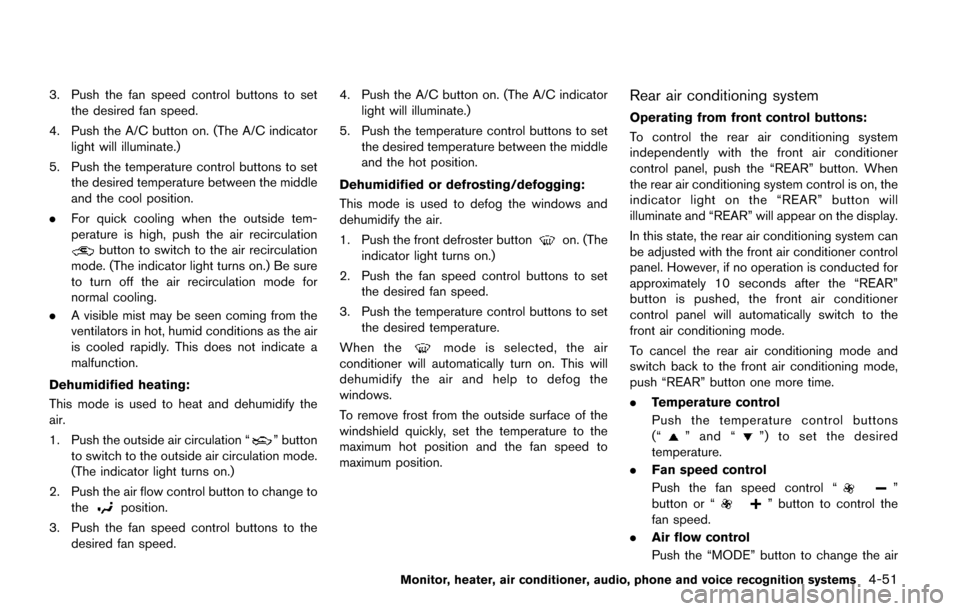
Rear air conditioning system
Operating from front control buttons:
To control the rear air conditioning system
independently with the front air conditioner
control panel, push the “REAR” button. When
the rear air conditioning system control is on, the
indicator light on the “REAR” button will
illuminate and “REAR” will appear on the display.
In this state, the rear air conditioning system can
be adjusted with the front air conditioner control
panel. However, if no operation is conducted for
approximately 10 seconds after the “REAR”
button is pushed, the front air conditioner
control panel will automatically switch to the
front air conditioning mode.
To cancel the rear air conditioning mode and
switch back to the front air conditioning mode,
push “REAR” button one more time.
. Temperature control
Push the temperature control buttons
(“
” and “”) to set the desired
temperature.
. Fan speed control
Push the fan speed control “
”
button or “” button to control the
fan speed.
. Air flow control
Push the “MODE” button to change the air
Monitor, heater, air conditioner, audio, phone and voice recognition systems4-51
Page 241 of 520
4-52Monitor, heater, air conditioner, audio, phone and voice recognition systems
flow mode.
: The air outlet is fixed at foot level.
: The air outlet is fixed at both the head andfoot level.
: The air outlet is fixed at the head level.
NOTE:
Pushing the “A/C” button when the rear air
conditioning system is turned on and
“REAR” does not appear on the display
will turn off the rear air conditioning
system (except when the air flow is set to
the
position) .
. Rear Heating (A/C off)
1. Push the “REAR” button to display “REAR” on the front display when the rear air
conditioning system is on.
2. Switch the air flow mode to
by pressing
the “MODE” button.
3. If the A/C indicator light illuminates, push the “A/C” button. (The A/C indicator light will
turn off.)
4. Push the temperature control buttons (“
” and “”) to set the desired
temperature between the middle and the
hot position.
. To dehumidify the air, push the “A/C” button
before turning on the heater. .
Air does not blow out from the vents on the
ceiling when the system is used for heating.
Turning the system off:
To turn off the rear air conditioner, push the
“ON·OFF” button when “REAR” is on the
display.
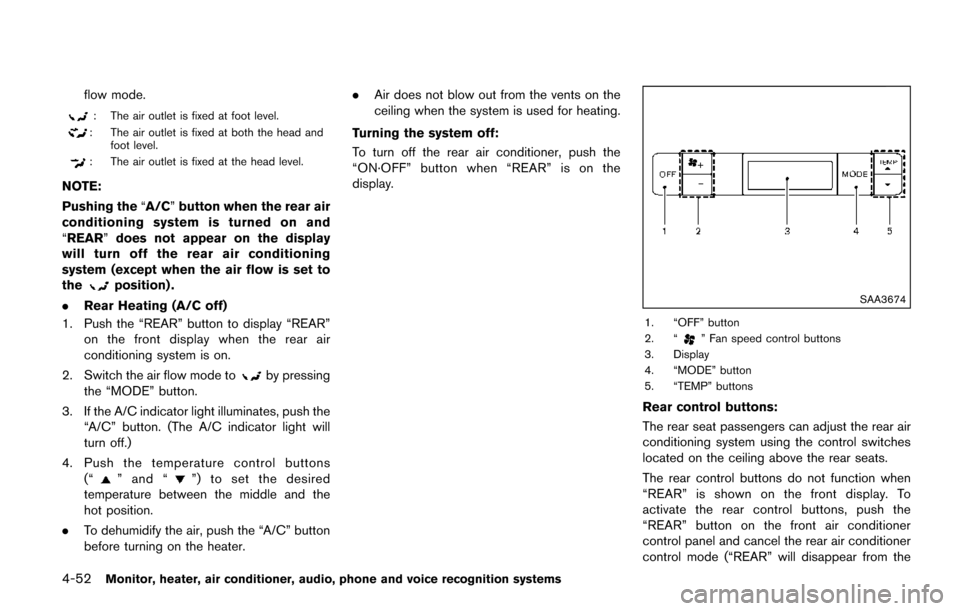
SAA3674
1. “OFF” button
2. “” Fan speed control buttons
3. Display
4. “MODE” button
5. “TEMP” buttons
Rear control buttons:
The rear seat passengers can adjust the rear air
conditioning system using the control switches
located on the ceiling above the rear seats.
The rear control buttons do not function when
“REAR” is shown on the front display. To
activate the rear control buttons, push the
“REAR” button on the front air conditioner
control panel and cancel the rear air conditioner
control mode (“REAR” will disappear from the
Page 243 of 520
4-54Monitor, heater, air conditioner, audio, phone and voice recognition systems
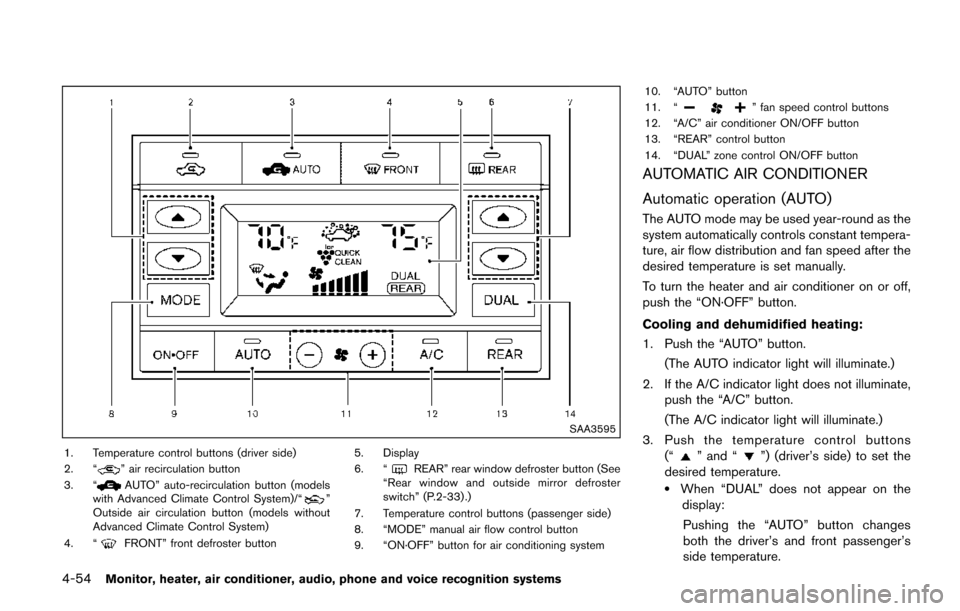
SAA3595
1. Temperature control buttons (driver side)
2. “” air recirculation button
3. “AUTO” auto-recirculation button (models
with Advanced Climate Control System)/“”
Outside air circulation button (models without
Advanced Climate Control System)
4. “
FRONT” front defroster button 5. Display
6. “
REAR” rear window defroster button (See
“Rear window and outside mirror defroster
switch” (P.2-33) .)
7. Temperature control buttons (passenger side)
8. “MODE” manual air flow control button
9. “ON·OFF” button for air conditioning system 10. “AUTO” button
11. “
” fan speed control buttons
12. “A/C” air conditioner ON/OFF button
13. “REAR” control button
14. “DUAL” zone control ON/OFF button
AUTOMATIC AIR CONDITIONER
Automatic operation (AUTO)
The AUTO mode may be used year-round as the
system automatically controls constant tempera-
ture, air flow distribution and fan speed after the
desired temperature is set manually.
To turn the heater and air conditioner on or off,
push the “ON·OFF” button.
Cooling and dehumidified heating:
1. Push the “AUTO” button.
(The AUTO indicator light will illuminate.)
2. If the A/C indicator light does not illuminate, push the “A/C” button.
(The A/C indicator light will illuminate.)
3. Push the temperature control buttons (“
” and “”) (driver’s side) to set the
desired temperature.
.When “DUAL” does not appear on the display:
Pushing the “AUTO” button changes
both the driver’s and front passenger’s
side temperature.
Page 244 of 520
— Pushing the “DUAL” button allows theuser to independently change the front
passenger’s side temperature with the
passenger side temperature control but-
tons (“
” and “”) . (“DUAL” will
appear on the display.)
To cancel the separate temperature
setting, push the “DUAL” button (“DUAL”
will disappear from the display) and the
driver’s side temperature setting will be
applied to both the driver’s and front
passenger’s sides.
4. Models with Advanced Climate Control System:
.Push the “AUTO” auto-recirculation
button. The indicator light on the “
AUTO” auto-recirculation button will illu-
minate. In this mode, the sensor detects
odors and gas to automatically switch
between the air recirculation mode and
the outside air circulation mode. (See
“Advanced climate control system” (P.4-
57) for details.)
Models without Advanced Climate Control
System:
.Push and hold the air recirculation “”
button or outside air circulation “”
button (the one with the indicator light
on) for more than 2 seconds to set the
automatic control between the air recir- culation and outside air circulation
modes. (The “
” and “” indicator
lights will blink twice.)
The following conditions need to be met for the
automatic air intake control mode to function
properly.
. The air flow control is not in the front
defroster mode (the indicator light on the
front defroster “
FRONT” button is
turned off).
. The outside temperature is approximately
328F(0 8C) or above.
A visible mist may be seen coming from the
ventilators in hot, humid conditions as the air is
cooled rapidly. This does not indicate a mal-
function.
Heating (A/C off):
1. Push the “AUTO” button.
(The AUTO indicator light will illuminate.)
2. If the A/C indicator light illuminates, push the “A/C” button.
(The A/C indicator light will turn off.)
3. Push the temperature control buttons (“
” and “”) (driver’s side) to set the
desired temperature.
When the DUAL mode is turned off (“DUAL”
does not appear on the display):
.Pushing the “AUTO” button changes both the driver’s and front passenger’s
side temperature.
.Pushing the “DUAL” button allows the user to independently change the front
passenger’s side temperature with the
passenger side temperature control but-
tons (“
”or“”) . (“DUAL” will
appear on the display.)
To cancel the separate temperature
setting, push the “DUAL” button (“DUAL”
will disappear from the display) and the
driver’s side temperature setting will be
applied to both the driver’s and front
passenger’s sides.
4. Models with Advanced Climate Control System:
.Push the “AUTO” auto-recirculation
button. The indicator light on the “
AUTO” auto-recirculation button will illu-
minate. In this mode, the sensor detects
odors and gas to automatically switch
between the air recirculation mode and
the outside air circulation mode. (See
“Advanced climate control system” (P.4-
57) for details.)
Models without Advanced Climate Control
System:
.Push and hold the air recirculation “”
button or outside air circulation “”
Monitor, heater, air conditioner, audio, phone and voice recognition systems4-55
Page 248 of 520
Manual operation:
To operate the rear air conditioning system using
the front air conditioner control panel, push
“REAR” button (the indicator light on the
“REAR” button will illuminate and “
” will
appear on the display) .
. Temperature control
Push the temperature control buttons
(“
” and “”) (driver’s side) to set the
desired temperature.
. Fan speed control
Push the fan speed control “
”
button or “” button to manually
control the fan speed.
. Air flow control
Push the “MODE” button to change the air
flow mode.
: The air outlet is fixed at foot level.
: The air outlet is fixed at both the head and
foot level.
: The air outlet is fixed at the head level.
NOTE:
Pushing the “A/C” button when the rear air
conditioning system is turned on and “
”
does not appear on the display will turn off
the rear air conditioning system (except
when the air flow is set to the
position) . Rear Heating (A/C off):
1. Push the “REAR” button to display “
”on
the front display when the rear air condition-
ing system is on.
2. Switch the air flow mode to
by pressing
the “MODE” button.
3. Push the “AUTO” button. (The AUTO indicator light will illuminate.)
4. If the A/C indicator light illuminates, push the “A/C” button. (The A/C indicator light will
turn off.)
5. Push the temperature control buttons (“
” and “”) (driver’s side) to set the
desired temperature.
. Do not set the temperature lower than the
outside air temperature. Doing so may cause
the temperature to not be controlled prop-
erly.
. To dehumidify the air, push the “A/C” button
before turning on the heater.
. Air does not blow out from the vents on the
ceiling when the system is used for heating.
Turning the system off:
To turn off the rear air conditioner, push the
“ON·OFF” button when “
” is on the display.
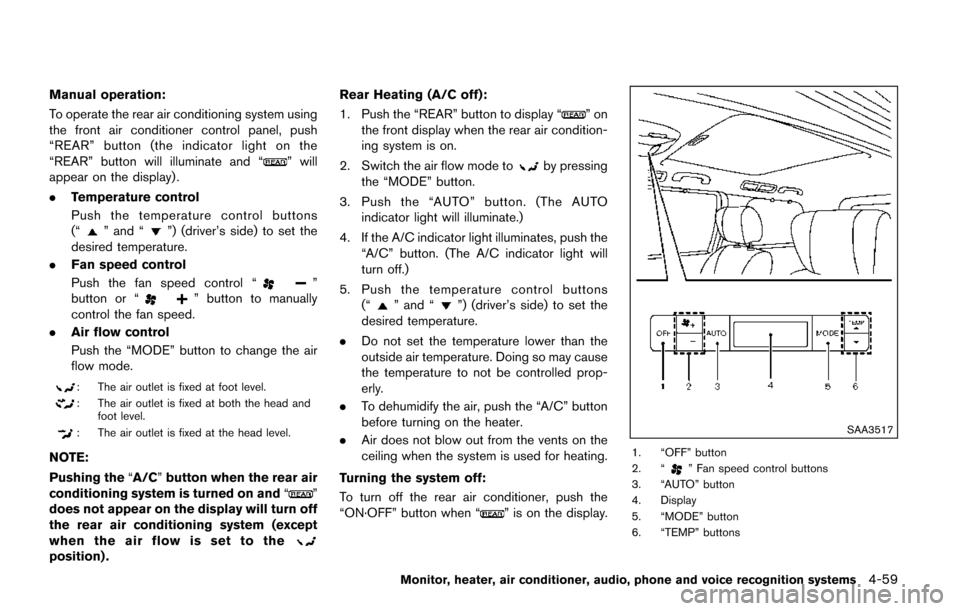
SAA3517
1. “OFF” button
2. “” Fan speed control buttons
3. “AUTO” button
4. Display
5. “MODE” button
6. “TEMP” buttons
Monitor, heater, air conditioner, audio, phone and voice recognition systems4-59
Page 399 of 520
5-30Starting and driving
WARNING
.If the engine is not running or is
turned off while driving, the power
assist for the steering will not work.
Steering will be harder to operate.
. When the hydraulic pump electric
power steering warning light illumi-
nates with the engine running, the
power assist for the steering will
cease operation. You will still have
control of the vehicle, but the steer-
ing will be much harder to operate.
The hydraulic pump electric power steering is
designed to provide power assistance while
driving to operate the steering wheel with light
force.
When the steering wheel is operated repeatedly
or continuously while parking or driving at a very
low speed, the power assist for the steering
wheel will be reduced. This is to prevent
overheating of the hydraulic pump electric
power steering and protect it from getting
damaged. While the power assist is reduced,
steering wheel operation will become heavy.
When the temperature of the power steering
system goes down, the power assist level will return to normal. Avoid repeating such steering
wheel operations that could cause the hydraulic
pump electric power steering to overheat.
You may hear a noise from the front of the
vehicle when the steering wheel is operated.
This is not a malfunction.
If the hydraulic pump electric power steering
warning light illuminates while the engine is
running, it may indicate the hydraulic pump
electric power steering is not functioning prop-
erly and may need servicing. It is recommended
you have the hydraulic pump electric power
steering checked by a NISSAN dealer.
When the hydraulic pump electric power steer-
ing warning light illuminates with the engine
running, the power assist for the steering will
cease operation but you will still have control of
the vehicle. At this time, greater steering efforts
are required to operate the steering wheel,
especially in sharp turns and at low speeds.
BRAKING PRECAUTIONS
The brake system has two separate hydraulic
circuits. If one circuit malfunctions, you will still
have braking at two wheels.
Vacuum assisted brakes
The brake booster aids braking by using engine
vacuum. If the engine stops, you can stop the
vehicle by depressing the brake pedal. However,
greater foot pressure on the brake pedal will be
required to stop the vehicle and the stopping
distance will be longer.
Using the brakes
Avoid resting your foot on the brake pedal while
driving. This will cause overheating of the
brakes, wearing out the brake and pads faster
and reduce gas mileage.
To help reduce brake wear and to prevent the
brakes from overheating, reduce speed and
downshift to a lower gear before going down a
slope or long grade. Overheated brakes may
reduce braking performance and could result in
loss of vehicle control.
WARNING
.
While driving on a slippery surface,
be careful when braking, accelerat-
HYDRAULIC PUMP ELECTRIC
POWER STEERING BRAKE SYSTEM