2017 NISSAN QUEST radio
[x] Cancel search: radioPage 258 of 520
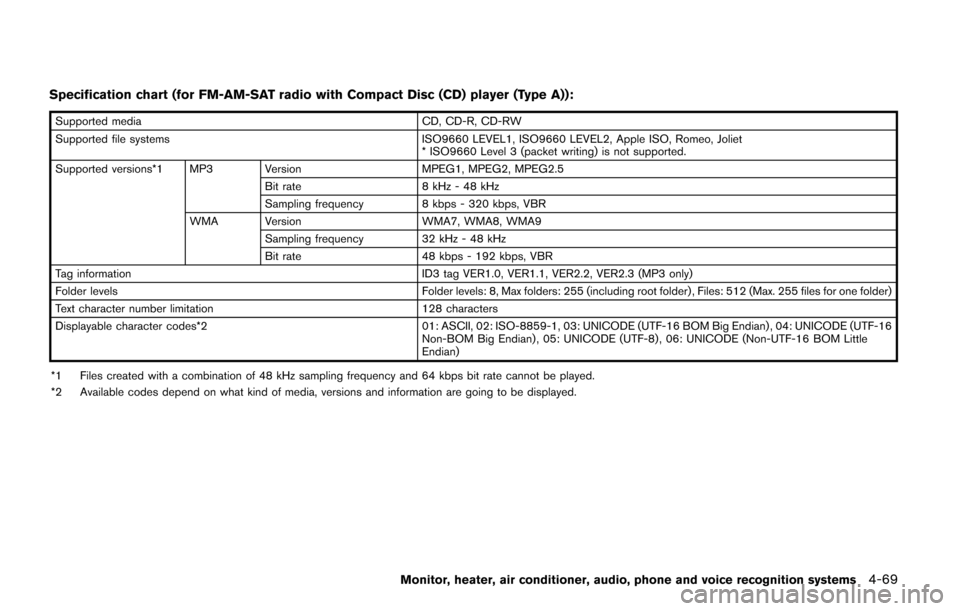
Specification chart (for FM-AM-SAT radio with Compact Disc (CD) player (Type A)):
Supported mediaCD, CD-R, CD-RW
Supported file systems ISO9660 LEVEL1, ISO9660 LEVEL2, Apple ISO, Romeo, Joliet
* ISO9660 Level 3 (packet writing) is not supported.
Supported versions*1 MP3 Version MPEG1, MPEG2, MPEG2.5
Bit rate 8 kHz - 48 kHz
Sampling frequency 8 kbps - 320 kbps, VBR
WMA Version WMA7, WMA8, WMA9
Sampling frequency 32 kHz - 48 kHz
Bit rate 48 kbps - 192 kbps, VBR
Tag information ID3 tag VER1.0, VER1.1, VER2.2, VER2.3 (MP3 only)
Folder levels Folder levels: 8, Max folders: 255 (including root folder) , Files: 512 (Max. 255 files for one folder)
Text character number limitation 128 characters
Displayable character codes*2 01: ASCII, 02: ISO-8859-1, 03: UNICODE (UTF-16 BOM Big Endian) , 04: UNICODE (UTF-16
Non-BOM Big Endian) , 05: UNICODE (UTF-8) , 06: UNICODE (Non-UTF-16 BOM Little
Endian)
*1 Files created with a combination of 48 kHz sampling frequency and 64 kbps bit rate cannot be played.
*2 Available codes depend on what kind of media, versions and information are going to be displayed.
Monitor, heater, air conditioner, audio, phone and voice recognition systems4-69
Page 259 of 520
4-70Monitor, heater, air conditioner, audio, phone and voice recognition systems
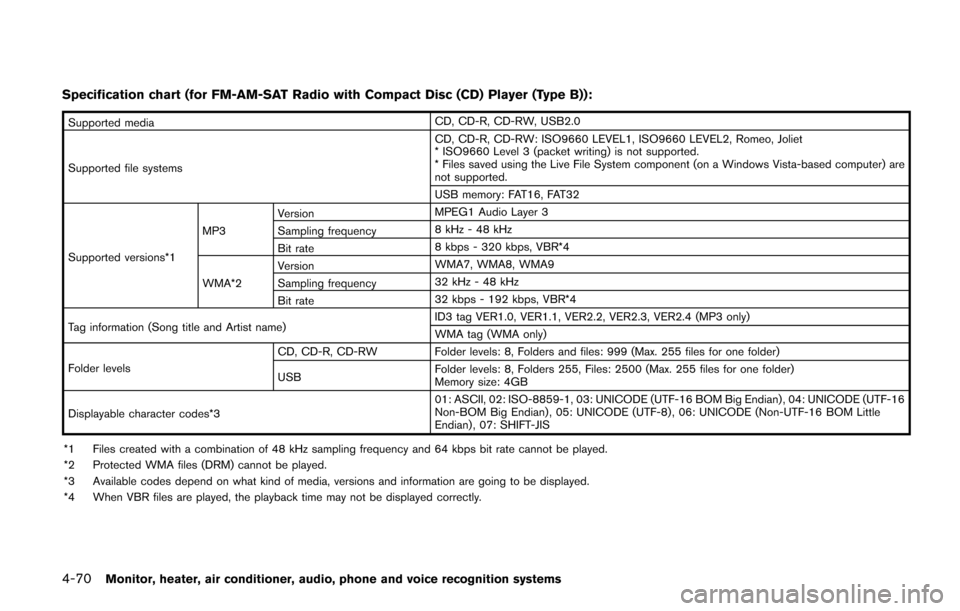
Specification chart (for FM-AM-SAT Radio with Compact Disc (CD) Player (Type B)):
Supported mediaCD, CD-R, CD-RW, USB2.0
Supported file systems CD, CD-R, CD-RW: ISO9660 LEVEL1, ISO9660 LEVEL2, Romeo, Joliet
* ISO9660 Level 3 (packet writing) is not supported.
* Files saved using the Live File System component (on a Windows Vista-based computer) are
not supported.
USB memory: FAT16, FAT32
Supported versions*1 MP3
Version
MPEG1 Audio Layer 3
Sampling frequency 8 kHz - 48 kHz
Bit rate 8 kbps - 320 kbps, VBR*4
WMA*2 Version
WMA7, WMA8, WMA9
Sampling frequency 32 kHz - 48 kHz
Bit rate 32 kbps - 192 kbps, VBR*4
Tag information (Song title and Artist name) ID3 tag VER1.0, VER1.1, VER2.2, VER2.3, VER2.4 (MP3 only)
WMA tag (WMA only)
Folder levels CD, CD-R, CD-RW Folder levels: 8, Folders and files: 999 (Max. 255 files for one folder)
USB
Folder levels: 8, Folders 255, Files: 2500 (Max. 255 files for one folder)
Memory size: 4GB
Displayable character codes*3 01: ASCII, 02: ISO-8859-1, 03: UNICODE (UTF-16 BOM Big Endian) , 04: UNICODE (UTF-16
Non-BOM Big Endian) , 05: UNICODE (UTF-8) , 06: UNICODE (Non-UTF-16 BOM Little
Endian) , 07: SHIFT-JIS
*1 Files created with a combination of 48 kHz sampling frequency and 64 kbps bit rate cannot be played.
*2 Protected WMA files (DRM) cannot be played.
*3 Available codes depend on what kind of media, versions and information are going to be displayed.
*4 When VBR files are played, the playback time may not be displayed correctly.
Page 263 of 520
4-74Monitor, heater, air conditioner, audio, phone and voice recognition systems
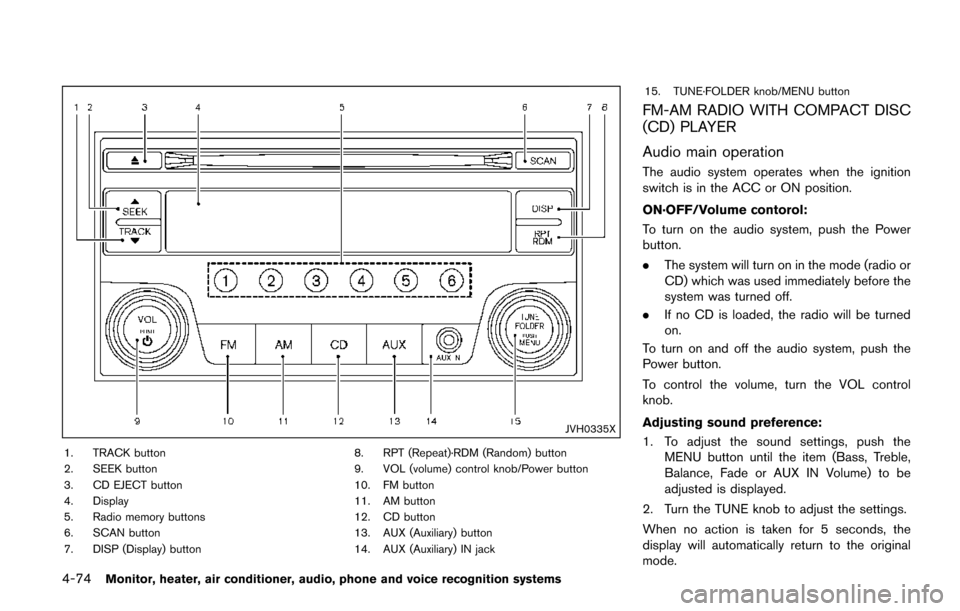
JVH0335X
1. TRACK button
2. SEEK button
3. CD EJECT button
4. Display
5. Radio memory buttons
6. SCAN button
7. DISP (Display) button8. RPT (Repeat)·RDM (Random) button
9. VOL (volume) control knob/Power button
10. FM button
11. AM button
12. CD button
13. AUX (Auxiliary) button
14. AUX (Auxiliary) IN jack15. TUNE·FOLDER knob/MENU button
FM-AM RADIO WITH COMPACT DISC
(CD) PLAYER
Audio main operation
The audio system operates when the ignition
switch is in the ACC or ON position.
ON·OFF/Volume contorol:
To turn on the audio system, push the Power
button.
.
The system will turn on in the mode (radio or
CD) which was used immediately before the
system was turned off.
. If no CD is loaded, the radio will be turned
on.
To turn on and off the audio system, push the
Power button.
To control the volume, turn the VOL control
knob.
Adjusting sound preference:
1. To adjust the sound settings, push the MENU button until the item (Bass, Treble,
Balance, Fade or AUX IN Volume) to be
adjusted is displayed.
2. Turn the TUNE knob to adjust the settings.
When no action is taken for 5 seconds, the
display will automatically return to the original
mode.
Page 264 of 520
Clock setting:
Turning the clock ON/OFF:
1. Push the MENU button until “Clock: ON” or“Clock: OFF” is displayed.
2. Turn the TUNE·FOLDER knob to toggle between “Clock: ON” and “Clock: OFF”.
Adjusting the clock:
1. Turn on the clock.
2. Push the MENU button until “Adjust Clock” is displayed, and then select the “Yes”.
3. Push the MENU button. Turn the TUNE knob to adjust the hour.
4. Push the MENU button. Turn the TUNE knob to adjust the minutes.
5. Push the MENU button to exit the clock mode.
When no action is taken for 5 seconds, the
display will automatically return to the original
mode.
AUX button:
The AUX IN jack is located on the audio unit.
The AUX IN audio input jack accepts any
standard analog audio input such as from a
portable cassette tape player, CD player, digital
audio player or laptop computer.
Push the AUX button to play a compatible device when it is plugged into the AUX IN jack.
NISSAN strongly recommends using a stereo
mini plug cable when connecting your music
device to the audio system. Music may not play
properly when a monaural cable is used.
FM-AM radio operation
/radio (FM/AM) band select:
When the FM/AM button is pushed while the
audio system is off, the audio system will turn on
and the radio will turn on.
When the FM/AM button is pushed while
another audio source is playing, the other audio
source will turn off and the radio will turn on.
To change the radio bands (FM1, FM2, or AM) ,
push the FM/AM buttons.
TUNE (Tuning):
When adjusting the broadcasting station fre-
quency manually, turn the TUNE·FOLDER knob
until the preferred frequency is achieved.
/SEEK tuning:
To adjust the broadcasting station frequency
automatically, push and release the SEEK or
TRACK button. When the system detects a
broadcasting station, it will stop at the station.
Detected stations are skipped while SEEK or TRACK button is pushed and held.
SCAN tuning:
When the SCAN button is pushed, the system
will seek and stop at the detected broadcasting
station for 5 seconds, and then it will start to
seek for the next broadcasting station.
Push the SCAN button in this 5-second period
to stop seeking.
*1to*6Radio memory operations:
The audio system can store up to 12 FM station
frequencies (for FM1 and FM2) and 6 AM
station frequencies.
During radio reception, pushing the radio
memory button for less than 1.5 seconds will
play the stored radio station.
To store the station frequency manually:
1. Tune to the desired broadcasting station frequency using the SEEK /TRACK buttons.
2. Push and hold one of the radio memory buttons
*1-*6until a beep sounds.
3. The frequency of the selected channel will appear on the display when the memory is
stored properly.
4. Perform steps 1 - 3 for all other memory buttons.
Monitor, heater, air conditioner, audio, phone and voice recognition systems4-75
Page 265 of 520
4-76Monitor, heater, air conditioner, audio, phone and voice recognition systems
Compact Disc (CD) player operation
Place the ignition switch in the ACC or ON
position, and insert the CD into the slot with the
label side facing up. The CD will be guided
automatically into the slot and start playing. After
loading the disc, the number of tracks on the
disc will appear on the display.
If the radio is already operating, it will auto-
matically turn off and the CD will play.
If the system has been turned off while the CD
was playing, pushing the Power button will start
the CD.
CD PLAY:
When the CD button is pushed while a CD is
loaded, the CD will start playing.
CD DISPLAY information:
When the DISP is pushed while a CD with title
information is playing, the information text on the
display will change as follows:
CD:
Track time ?Album Title ?Artist Name ?
Song Title ?Track time
CD with MP3/WMA:
Track time ?Folder Title ?Album Title ?Artist
Name ?Song Title ?Track time
/Next/Previous Track and Fast
Forward/Rewind:
Fast forward/Rewind:
Push and hold the FF or REW button for more
than 1.5 seconds to fast forward or rewind
through the track. Release the button to play the
CD at normal speed.
Track up/down:
To play the next track, push the FF button for
less than 1.5 seconds while a CD is playing.
To play the previous track, push the REW button
for less than 1.5 seconds within 2 seconds after
the current track started playing. To return to the
beginning of the current track, push the REW
button for less than 1.5 seconds after 2 seconds
from when the current track started playing.
Folder Selector Knob (CD with MP3/
WMA):
To skip to the next folder, turn the
TUNE·FOLDER knob.
To skip to the next or previous track within the
folder, push SEEK/TRACK button
REPEAT (RPT) , RANDOM (RDM):
When the RPT/RDM button is pushed while a
CD is playing, the play mode will change as
follows: CD:
DISC REPEAT
?TRACK REPEAT ?DISC
RANDOM ?DISC REPEAT
CD with MP3/WMA:
DISC REPEAT ?FOLDER REPEAT ?TRACK
REPEAT ?DISC RANDOM ?FOLDER
RANDOM ?DISC REPEAT
SCAN tuning:
When the SCAN button is pushed while a CD is
being played, the first 10 seconds of all the
tracks will be played.
When the SCAN button is pushed again, the
CD will return to the regular play mode.
CD EJECT button:
When the CD EJECT button is pushed with the
CD loaded, the CD will be ejected.
When this button is pushed while the CD is
being played, the CD will come out and the
system will turn off.
If the CD comes out and is not removed, it
will be pulled back into the slot to protect
it.
Page 266 of 520
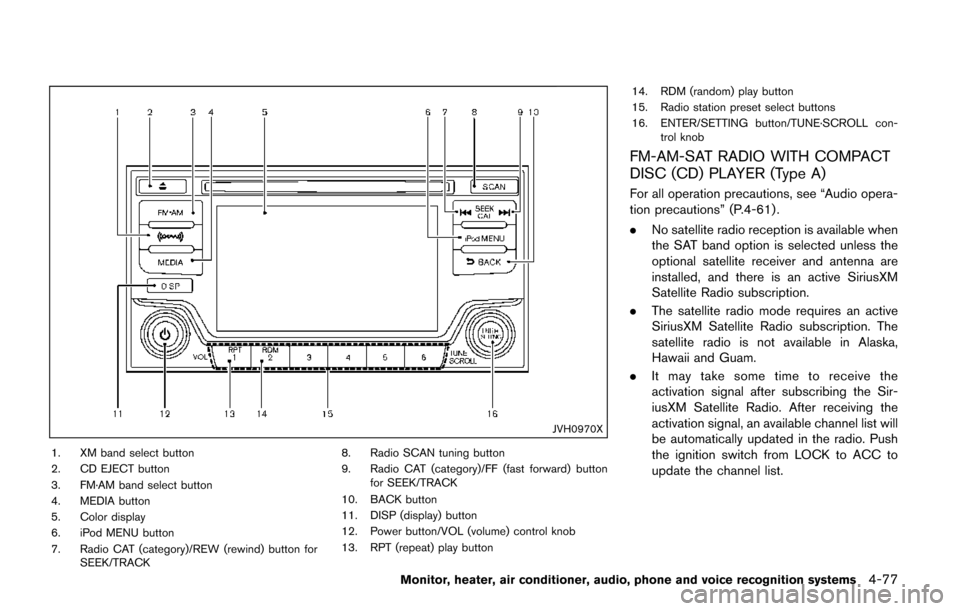
JVH0970X
1. XM band select button
2. CD EJECT button
3. FM·AM band select button
4. MEDIA button
5. Color display
6. iPod MENU button
7. Radio CAT (category)/REW (rewind) button forSEEK/TRACK 8. Radio SCAN tuning button
9. Radio CAT (category)/FF (fast forward) button
for SEEK/TRACK
10. BACK button
11. DISP (display) button
12. Power button/VOL (volume) control knob
13. RPT (repeat) play button 14. RDM (random) play button
15. Radio station preset select buttons
16. ENTER/SETTING button/TUNE·SCROLL con-
trol knob
FM-AM-SAT RADIO WITH COMPACT
DISC (CD) PLAYER (Type A)
For all operation precautions, see “Audio opera-
tion precautions” (P.4-61) .
.No satellite radio reception is available when
the SAT band option is selected unless the
optional satellite receiver and antenna are
installed, and there is an active SiriusXM
Satellite Radio subscription.
. The satellite radio mode requires an active
SiriusXM Satellite Radio subscription. The
satellite radio is not available in Alaska,
Hawaii and Guam.
. It may take some time to receive the
activation signal after subscribing the Sir-
iusXM Satellite Radio. After receiving the
activation signal, an available channel list will
be automatically updated in the radio. Push
the ignition switch from LOCK to ACC to
update the channel list.
Monitor, heater, air conditioner, audio, phone and voice recognition systems4-77
Page 267 of 520
4-78Monitor, heater, air conditioner, audio, phone and voice recognition systems
Audio main operation
The audio system operates when the ignition
switch is placed in the ON or ACC position.
Head unit:
The auto loudness circuit enhances the low and
high frequency ranges automatically in both
radio reception and CD playback.
Power button / VOL (volume) control
knob:
Push the Power button/VOL (volume) control
knob to turn on and off the audio system.
Turn the Power button/VOL (volume) control
knob to adjust the volume.
Audio settings:
The settings screen will appear when pushing
the ENTER/SETTING button.
The following items are available in the settings
screen.
. Bluetooth
It is possible to set the Bluetooth
�Šsettings.
For details of the Bluetooth�Šsettings, see
“Bluetooth�Šaudio player operation” (P.4-
84) .
. Bass, Treble, Balance and Fade
Controls the sound of the audio system.
Balance adjusts the sound between the left
and right speakers. Fade adjusts the sound between the front and rear speakers.
Select the “Bass”, “Treble”, “Balance” or
“Fade” using the TUNE·SCROLL control
knob and then push the ENTER/SETTING
button. Turn the TUNE·SCROLL control
knob to adjust the Bass, Treble, balance
and Fade of the screen to the preferred
level.
. Brightness and Contrast
Adjust the brightness and contrast of the
screen.
Select the “Brightness” or “Contrast” using
the TUNE·SCROLL control knob and then
push the ENTER/SETTING button. Turn the
TUNE·SCROLL control knob to adjust the
brightness and contrast of the screen to the
preferred level.
. Clock Adjust
Adjust the clock according to the following
procedure.
1) Select “Clock Adjust” using the TU-
NE·SCROLL control knob and then
push the ENTER/SETTING button.
2) Adjust the hour with the TUNE·SCROLL control knob and then push the ENTER/
SETTING button.
3) Adjust the minute with the TUNE·SC- ROLL control knob and then push the
ENTER/SETTING button. 24 hour clock is not available.
. On-Screen Clock
When this item is turned on, a clock is
always displayed in the upper right corner of
the screen.
Select the “On-Screen Clock” using the
TUNE·SCROLL control knob and then push
the ENTER/SETTING button. You can tog-
gle between ON and OFF using the
TUNE·SCROLL control knob.
. RDS Display (if so equipped)
RDS (radio data system) information can be
shown on the display. Select “RDS Display”
using the TUNE·SCROLL control knob and
then push the ENTER/SETTING button. You
can toggle between ON and OFF using the
TUNE·SCROLL control knob.
. Speed Sensitive Vol.
To change the Speed Sensitive Volume
(Speed Sensitive Vol.) level from off (0) to
5, turn the TUNE·SCROLL control knob.
. AUX Vol.
Controls the volume level of incoming sound
when an auxiliary device is connected to the
system. Choose a setting between +1 and
+3 or choose 0 to disable the feature
entirely.
Page 268 of 520
.Language Select
The language settings can be changed.
Select “Language Select” using the TU-
NE·SCROLL control knob and then push the
ENTER/SETTING button. Use the TU-
NE·SCROLL control knob knob to select
the preferred language.
DISP button:
Display of the screen can be canceled by
pushing the DISP button. You can still listen to
music that is being played back even while the
screen display is turned off. If you want to
display the screen again, either push the DISP
button once more or push the FM·AM, CD,
MEDIA or iPod MENU button.
MEDIA button:
Pushing the MEDIA button will switch the audio
source as follows:
CD ?USB/iPod
�Š?Bluetooth ?AUX ?CD
FM-AM-SAT radio operation
radio (FM·AM) band select:
Pushing the FM·AM button will change the band
as follows:
AM ?FM1 ?FM2 ?AM
radio (SAT) band select:
Pushing the XM band select button will change
the band as follows:
XM1 ?XM2 ?XM3 ?XM1
When the XM band select button is pushed
while the ignition switch is in the ACC or ON
position, the radio will come on at the channel
last played.
The last channel played will also come on when
the power button is pushed to ON.
The satellite radio is not available in Alaska,
Hawaii and Guam.
If another audio source is playing when the radio
band select button is turned to ON, the audio
source will automatically be turned off and the
last radio channel played will come on.
When the stereo broadcast signal is weak, the
radio will automatically change from stereo to
monaural reception. TUNE (Tuning):
.
For AM and FM radio
Turn the radio TUNE·SCROLL control knob
for manual tuning.
. For SiriusXM Satellite Radio
Turn the radio TUNE·SCROLL control knob
to seek channels from all of the categories
when any category is not selected.
SEEK tuning/CAT (category):
. For AM and FM radio
Push the SEEK button
orto tune
from low to high or high to low frequencies
and to stop at the next broadcasting station.
. For SiriusXM Satellite Radio
Push the SEEK button
orto tune to
the first channel of the next or previous
category.
SCAN tuning:
Push the SCAN tuning button to tune from low
to high frequencies and stop at each broad-
casting station for 5 seconds. Pushing the
button again during this 5 seconds period will
stop SCAN tuning and the radio will remain
tuned to that station.
If the SCAN tuning button is not pushed within 5
seconds, SCAN tuning moves to the next
Monitor, heater, air conditioner, audio, phone and voice recognition systems4-79