2017 NISSAN QUEST radio
[x] Cancel search: radioPage 269 of 520
4-80Monitor, heater, air conditioner, audio, phone and voice recognition systems
station.
toStation memory operations:
12 stations can be set for the FM band (6 each
for FM1 and FM2) and 6 stations can be set for
the AM band.
1. Choose the radio band using the FM·AM button.
2. Tune to the desired station using the SEEK·TRACK, SCAN button or the TU-
NE·SCROLL control knob.
3. Push and hold the desired station preset button
tountill beep sounds.
4. The station indicator will then come on and the sound will resume. Memorizing is now
complete.
5. Other buttons can be set in the same manner.
If the battery cable is disconnected, or if the fuse
opens, the station memory will be erased. In that
case, reset the desired stations.
CD player operation
Place the ignition switch in the ON or ACC
position. Insert the Compact Disc (CD) into the
slot with the label side facing up. The CD will be
guided automatically into the slot and start
playing.
After loading the CD, the number of tracks on
the CD and the play time will appear on the
display.
If the radio is already operating, it will auto-
matically turn off and the CD will play.
If the system has been turned off while the CD
was playing, pushing the Power/VOL dial will
start the CD.
PLAY:
With a CD loaded, press the Media button until
the CD mode is displayed on the screen.
SEEK/CAT:
When the
orbutton is pushed for more
than 1.5 seconds while the CD is being played,
the CD will play while fast forwarding or
rewinding. When the button is released, the
CD will return to normal play speed.
When the
orbutton is pushed for less
than 1.5 seconds while the CD is being played,
the next track or the beginning of the current track on the CD will be played.
REPEAT (RPT):
When the RPT button is pushed while the CD is
played, the play pattern can be changed as
follows:
(CD)
(Normal) �œ1 Track Repeat
(CD with compressed audio files)
(Normal) ?1 Folder Repeat ?1 Track Repeat
? (Normal)
RANDOM (RDM):
When the RDM button is pushed while a CD is
being played, the play pattern can be changed
as follows:
(CD)
(Normal) �œ1 Disc Random
(CD with compressed audio files)
(Normal) ?1 Disc Random ?1 Folder
Random ?(Normal)
CD eject:
When the CD eject button is pushed with the
CD loaded, the CD will be ejected.
When this button is pushed while the CD is
being played, the CD will be ejected.
Page 276 of 520
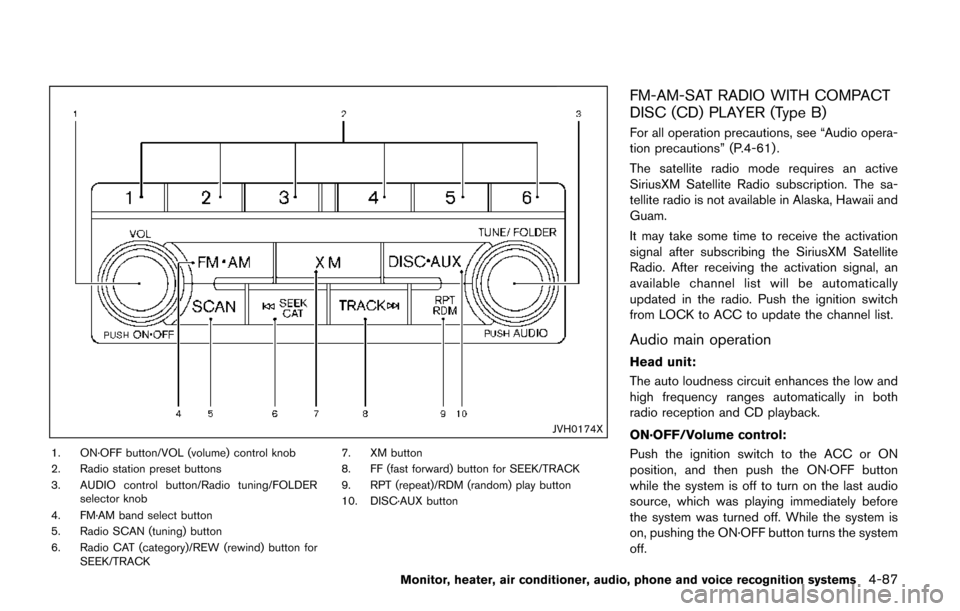
JVH0174X
1. ON·OFF button/VOL (volume) control knob
2. Radio station preset buttons
3. AUDIO control button/Radio tuning/FOLDERselector knob
4. FM·AM band select button
5. Radio SCAN (tuning) button
6. Radio CAT (category)/REW (rewind) button for SEEK/TRACK 7. XM button
8. FF (fast forward) button for SEEK/TRACK
9. RPT (repeat)/RDM (random) play button
10. DISC·AUX button
FM-AM-SAT RADIO WITH COMPACT
DISC (CD) PLAYER (Type B)
For all operation precautions, see “Audio opera-
tion precautions” (P.4-61) .
The satellite radio mode requires an active
SiriusXM Satellite Radio subscription. The sa-
tellite radio is not available in Alaska, Hawaii and
Guam.
It may take some time to receive the activation
signal after subscribing the SiriusXM Satellite
Radio. After receiving the activation signal, an
available channel list will be automatically
updated in the radio. Push the ignition switch
from LOCK to ACC to update the channel list.
Audio main operation
Head unit:
The auto loudness circuit enhances the low and
high frequency ranges automatically in both
radio reception and CD playback.
ON·OFF/Volume control:
Push the ignition switch to the ACC or ON
position, and then push the ON·OFF button
while the system is off to turn on the last audio
source, which was playing immediately before
the system was turned off. While the system is
on, pushing the ON·OFF button turns the system
off.
Monitor, heater, air conditioner, audio, phone and voice recognition systems4-87
Page 277 of 520
4-88Monitor, heater, air conditioner, audio, phone and voice recognition systems
Turn the VOL control knob to adjust the volume.
Adjusting tone quality and speaker bal-
ance:
To adjust Bass, Treble, Balance and Fade, push
the Audio control knob. When the display shows
the setting you want to change (Bass, Treble,
Balance and Fade) , rotate the Audio control
knob to set the desired setting. For the other
setting methods, see “How to use SETTING
button” (P.4-15).
This vehicle has some sound effect functions as
follows:
.Speed Sensitive Vol.
For more details, see “Vehicle information and
settings (models with center multi-function
control panel)” (P.4-10) .
Switching the display:
Pushing the DISC·AUX button will switch the
displays as follows:
iPod
�Š/USB ?CD/DVD ?Bluetooth�ŠAudio (if
so equipped) ?AUX ?iPod�Š/USB
FM-AM-SAT radio operation
When the radio band select button is pushed
while the ignition switch is in the ACC or ON
position, the radio will come on at the channel
last played.
The last channel played will also come on when
the ON·OFF button is pushed to ON.
If another audio source is playing when the radio
band select button is turned on, the audio
source will automatically be turned off and the
last radio channel played will come on.
When the stereo broadcast signal is weak, the
radio will automatically change from stereo to
monaural reception.
radio (FM/AM) band select:
Pushing the radio band select button will
change the band as follows:
AM ?FM1 ?FM2 ?AM
radio (SAT) band select:
Pushing the radio band select button will
change the band as follows:
XM1 ?XM2 ?XM3 ?XM1
The satellite radio is not available in Alaska,
Hawaii and Guam. TUNE (Tuning):
.
For AM and FM radio
Turn the radio TUNE knob for manual tuning.
. For SiriusXM Satellite Radio
Turn the radio TUNE knob to seek channels
from all of the categories when any category
is not selected.
or/SEEK tuning/CATE-
GORY (CAT):
. For AM and FM radio
Push the SEEK button
orto tune
from low to high or high to low frequencies
and to stop at the next broadcasting station.
. For SiriusXM Satellite Radio
Push the SEEK button
orto tune
to the first channel of the next or previous
category.
During satellite radio reception, the following
notices will be displayed under certain condi-
tions.
. NO SIGNAL (No signal is received while the
SAT tuner is connected.)
. OFF AIR (Broadcasting signed off)
. CHECK ANTENNA (Antenna connection
error)
. LOADING (When the initial setting is
performed)
Page 278 of 520
.UPDATING (When the satellite radio sub-
scription is not active)
SCAN tuning:
Push the SCAN tuning button to tune from low
to high frequencies and stop at each broad-
casting station/channel for 5 seconds. Pushing
the button again during this 5 seconds period
will stop SCAN tuning and the radio will remain
tuned to that station/channel.
If the SCAN tuning button is not pushed within 5
seconds, SCAN tuning moves to the next
station/channel.
*1to*6Station memory operations:
12 stations/channels can be set for the FM band
(6 each for FM1 and FM2) , 18 for SiriusXM
Satellite Radio (6 each for XM1, XM2 and XM3)
and 6 stations can be set for the AM band.
1. Choose the radio band using the radio band select button.
2. Tune to the desired station/channel using the SEEK/TRACK, SCAN button or the
radio TUNE knob.
3. Push and hold the desired station preset button
*1to*6until the radio mutes.
4. The station indicator will then come on and the sound will resume. Memorizing is now
complete. 5. Other buttons can be set in the same
manner.
If the battery cable is disconnected, or if the fuse
opens, the radio memory will be erased. In that
case, reset the desired stations/channels.
List (AM and FM radio) (models with
navigation system):
When the “List” key on the display is selected
while the FM or AM radio is being played, the
preset station list will be displayed.
If 1 of the 6 preset stations listed is touched and
held, the current station will be stored as the
new preset.
Menu (SiriusXM Satellite Radio):
When the “Menu” key on the display is selected
while the SiriusXM Satellite Radio is being
played, the menu list will be displayed.
The following items are available.
. Preset List
Displays the preset channel list. If 1 of the 6
preset stations listed is touched and held,
the current station will be stored as the new
preset.
. Customize Channel List
Selects specific channels to skip while using
the TUNE, SEEK/CATEGORY or Menu-
Categories feature. .
Favorite Artists & Songs
Stores the current artist or song that is being
played. Touch the “Alert” key to be reminded
when the stored artist or song is playing on a
station while listening to SiriusXM Satellite
Radio.
. Categories
Selecting a category will go to the first
channel in that category as defined by
SiriusXM Satellite Radio.
. Direct Tune
Inputs the channel number by using a
keypad.
Text (models without navigation system):
When the “Text” key is selected with the multi-
function controller on the display and then the
ENTER button is pushed while the satellite radio
is being played, the text information listed below
will be displayed on the screen.
. CH Name
. Category
. Name
. Title
. Other
Monitor, heater, air conditioner, audio, phone and voice recognition systems4-89
Page 279 of 520
4-90Monitor, heater, air conditioner, audio, phone and voice recognition systems
SAA3607
Compact Disc (CD) player operation
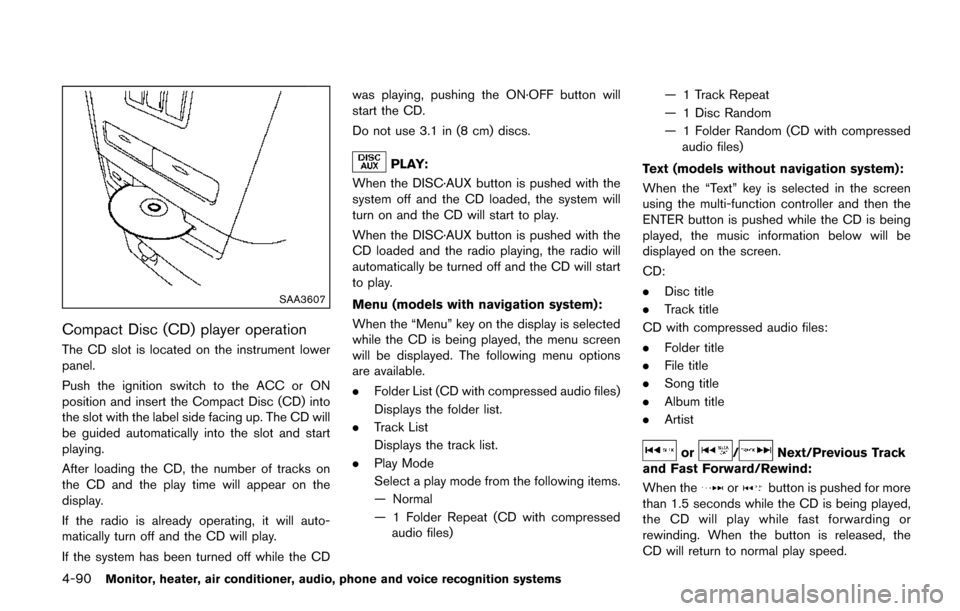
The CD slot is located on the instrument lower
panel.
Push the ignition switch to the ACC or ON
position and insert the Compact Disc (CD) into
the slot with the label side facing up. The CD will
be guided automatically into the slot and start
playing.
After loading the CD, the number of tracks on
the CD and the play time will appear on the
display.
If the radio is already operating, it will auto-
matically turn off and the CD will play.
If the system has been turned off while the CDwas playing, pushing the ON·OFF button will
start the CD.
Do not use 3.1 in (8 cm) discs.
PLAY:
When the DISC·AUX button is pushed with the
system off and the CD loaded, the system will
turn on and the CD will start to play.
When the DISC·AUX button is pushed with the
CD loaded and the radio playing, the radio will
automatically be turned off and the CD will start
to play.
Menu (models with navigation system):
When the “Menu” key on the display is selected
while the CD is being played, the menu screen
will be displayed. The following menu options
are available.
. Folder List (CD with compressed audio files)
Displays the folder list.
. Track List
Displays the track list.
. Play Mode
Select a play mode from the following items.
— Normal
— 1 Folder Repeat (CD with compressed
audio files) — 1 Track Repeat
— 1 Disc Random
— 1 Folder Random (CD with compressed
audio files)
Text (models without navigation system):
When the “Text” key is selected in the screen
using the multi-function controller and then the
ENTER button is pushed while the CD is being
played, the music information below will be
displayed on the screen.
CD:
. Disc title
. Track title
CD with compressed audio files:
. Folder title
. File title
. Song title
. Album title
. Artist
or/Next/Previous Track
and Fast Forward/Rewind:
When the
orbutton is pushed for more
than 1.5 seconds while the CD is being played,
the CD will play while fast forwarding or
rewinding. When the button is released, the
CD will return to normal play speed.
Page 297 of 520
4-108Monitor, heater, air conditioner, audio, phone and voice recognition systems
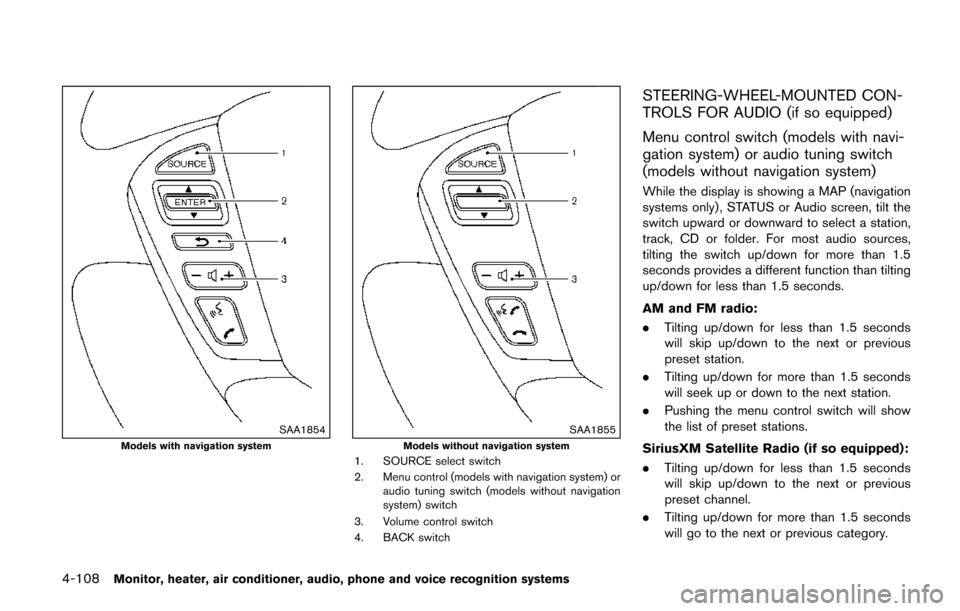
SAA1854Models with navigation systemSAA1855Models without navigation system1. SOURCE select switch
2. Menu control (models with navigation system) oraudio tuning switch (models without navigation
system) switch
3. Volume control switch
4. BACK switch
STEERING-WHEEL-MOUNTED CON-
TROLS FOR AUDIO (if so equipped)
Menu control switch (models with navi-
gation system) or audio tuning switch
(models without navigation system)
While the display is showing a MAP (navigation
systems only) , STATUS or Audio screen, tilt the
switch upward or downward to select a station,
track, CD or folder. For most audio sources,
tilting the switch up/down for more than 1.5
seconds provides a different function than tilting
up/down for less than 1.5 seconds.
AM and FM radio:
. Tilting up/down for less than 1.5 seconds
will skip up/down to the next or previous
preset station.
. Tilting up/down for more than 1.5 seconds
will seek up or down to the next station.
. Pushing the menu control switch will show
the list of preset stations.
SiriusXM Satellite Radio (if so equipped):
. Tilting up/down for less than 1.5 seconds
will skip up/down to the next or previous
preset channel.
. Tilting up/down for more than 1.5 seconds
will go to the next or previous category.
Page 310 of 520
controller and tilt the joystick to the right or left.
Push the BACK button on the remote controller
to apply the settings and return to the previous
display.
To return the adjustment levels to the default
value, select “Execute” next to “Initialization”
using the joystick on the remote controller and
push the ENTER
button. The “Execute” key
is deactivated when the picture mode settings
are already in the default value.
Color System:
To choose the color system, select from
“NTSC”, “PAL”, “PAL-60”, “PAL-M”, “PAL-N” or
“AUTO” using the joystick on the remote
controller and tilt the joystick to the right or left.
3D Y/C filter:
Set to ON/OFF using the joystick on the remote
controller. When turned on, small characters
and an outline of the shapes will be displayed
more clearly than when turned off.
CARE AND MAINTENANCE
Use a lightly dampened, lint free cloth to clean
the surfaces of your Mobile Entertainment
System (DVD player face, screen, remote
controller, etc.) .
CAUTION
. Do not use any solvents or cleaning
solutions when cleaning the video
system.
. Do not use excessive force on the
monitor screen.
. Avoid touching or scratching the
monitor screen as it may become
dirty or damaged.
. Do not attempt to operate the
system in extreme temperature con-
ditions [below �í48F( �í208 C) and
above 1588F (708C)].
. Do not attempt to operate the
system in extreme humidity condi-
tions (less than 10% or more than
75%) . When installing a car phone or a CB radio in
your vehicle, be sure to observe the following
cautions, otherwise the new equipment may
adversely affect the electronic control modules
and electronic control system harness.
WARNING
.
A cellular phone should not be used
for any purpose while driving so full
attention may be given to vehicle
operation. Some jurisdictions prohi-
bit the use of cellular phones while
driving.
. If you must make a call while your
vehicle is in motion, the hands-free
cellular phone operational mode (if
so equipped) is highly recom-
mended. Exercise extreme caution
at all times so full attention may be
given to vehicle operation.
. If you are unable to devote full
attention to vehicle operation while
talking on the phone, pull off the
road to a safe location and stop
your vehicle.
Monitor, heater, air conditioner, audio, phone and voice recognition systems4-121
CAR PHONE OR CB RADIO
Page 311 of 520
4-122Monitor, heater, air conditioner, audio, phone and voice recognition systems
CAUTION
.Keep the antenna as far away as
possible from the electronic control
modules.
. Keep the antenna wire more than 8
in (20 cm) away from the electronic
control system harness. Do not
route the antenna wire next to any
harness.
. Adjust the antenna standing-wave
ratio as recommended by the man-
ufacturer.
. Connect the ground wire from the
CB radio chassis to the body.
. For details, it is recommended you
visit a NISSAN dealer. *Type A is models with navigation system.WARNING
.
Use a phone after stopping your
vehicle in a safe location. If you
have to use a phone while driving,
exercise extreme caution at all
times so full attention may be given
to vehicle operation.
. If you find yourself unable to devote
full attention to vehicle operation
while talking on the phone, pull off
the road to a safe location and stop
your vehicle before doing so.
CAUTION
To avoid draining the vehicle battery,
use a phone after starting the engine.
Your vehicle is equipped with Bluetooth
�Š
Hands-Free Phone System. If you are an owner
of a compatible Bluetooth�Šenabled cellular
phone, you can set up the wireless connection
between your cellular phone and the in-vehicle
phone module. With Bluetooth
�Šwireless tech-
nology, you can make or receive a telephone call with your cellular phone in your pocket.
Once a cellular phone is connected to the in-
vehicle phone module, no phone connecting
procedure is required anymore. Your phone is
automatically connected with the in-vehicle
phone module when the ignition switch is
pushed to the ON position with the registered
cellular phone turned on and carried in the
vehicle.
You can register up to 5 different Bluetooth
�Š
cellular phones in the in-vehicle phone module.
However, you can talk on only one cellular phone
at a time.
The NISSAN Voice Recognition system sup-
ports the phone commands, so dialing a phone
number using your voice is possible. For more
details, see “NISSAN Voice Recognition system
(models with navigation system)” (P.4-154).
Before using the Bluetooth
�ŠHands-Free Phone
System, refer to the following notes.
. Wireless LAN (Wi-Fi) and the Bluetooth
�Š
functions share the same frequency band
(2.4 GHz) . Using the Bluetooth�Šand the
wireless LAN functions at the same time may
slow down or disconnect the communica-
tion and cause undesired noise. It is
recommended that you turn off the wireless
LAN (Wi-Fi) when using the Bluetooth
�Š
functions.
Bluetooth�ŠHANDS-FREE PHONE
SYSTEM (Type A) (if so equipped)