2017 NISSAN QUEST brake light
[x] Cancel search: brake lightPage 115 of 520
2-28Instruments and controls
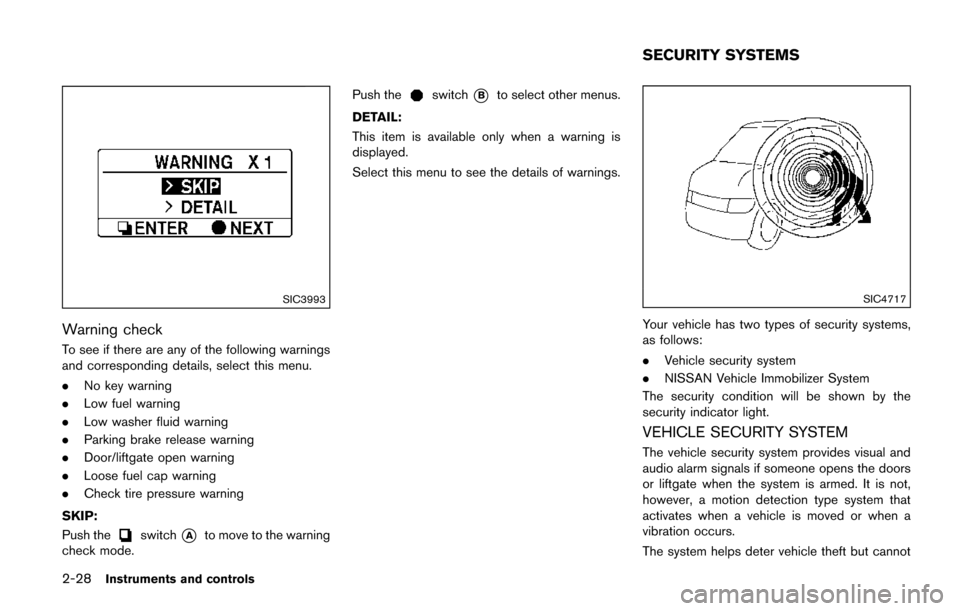
SIC3993
Warning check
To see if there are any of the following warnings
and corresponding details, select this menu.
.No key warning
. Low fuel warning
. Low washer fluid warning
. Parking brake release warning
. Door/liftgate open warning
. Loose fuel cap warning
. Check tire pressure warning
SKIP:
Push the
switch*Ato move to the warning
check mode. Push the
switch*Bto select other menus.
DETAIL:
This item is available only when a warning is
displayed.
Select this menu to see the details of warnings.
SIC4717
Your vehicle has two types of security systems,
as follows:
. Vehicle security system
. NISSAN Vehicle Immobilizer System
The security condition will be shown by the
security indicator light.
VEHICLE SECURITY SYSTEM
The vehicle security system provides visual and
audio alarm signals if someone opens the doors
or liftgate when the system is armed. It is not,
however, a motion detection type system that
activates when a vehicle is moved or when a
vibration occurs.
The system helps deter vehicle theft but cannot
SECURITY SYSTEMS
Page 124 of 520
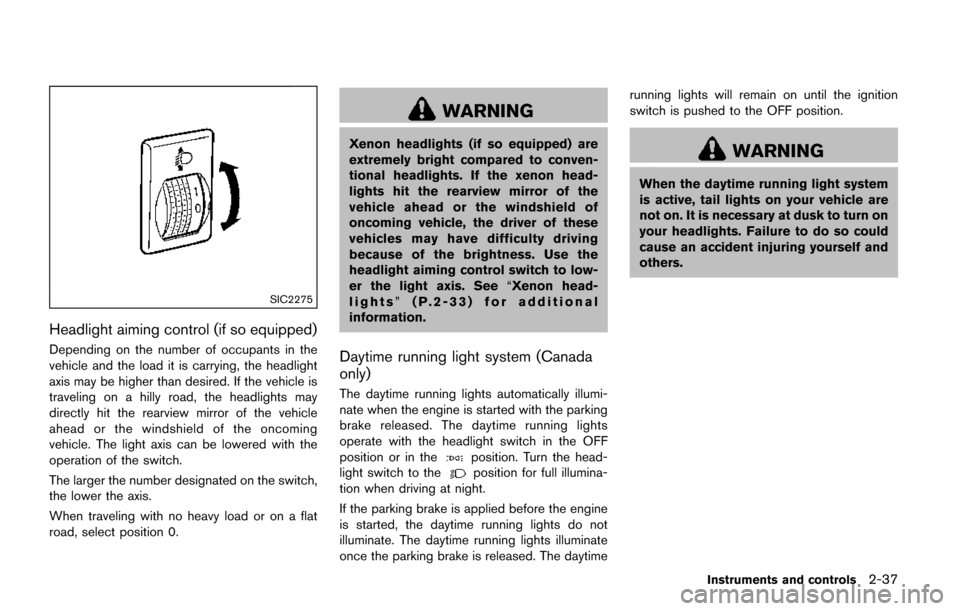
SIC2275
Headlight aiming control (if so equipped)
Depending on the number of occupants in the
vehicle and the load it is carrying, the headlight
axis may be higher than desired. If the vehicle is
traveling on a hilly road, the headlights may
directly hit the rearview mirror of the vehicle
ahead or the windshield of the oncoming
vehicle. The light axis can be lowered with the
operation of the switch.
The larger the number designated on the switch,
the lower the axis.
When traveling with no heavy load or on a flat
road, select position 0.
WARNING
Xenon headlights (if so equipped) are
extremely bright compared to conven-
tional headlights. If the xenon head-
lights hit the rearview mirror of the
vehicle ahead or the windshield of
oncoming vehicle, the driver of these
vehicles may have difficulty driving
because of the brightness. Use the
headlight aiming control switch to low-
er the light axis. See“Xenon head-
lights” (P.2-33) for additional
information.
Daytime running light system (Canada
only)
The daytime running lights automatically illumi-
nate when the engine is started with the parking
brake released. The daytime running lights
operate with the headlight switch in the OFF
position or in the
position. Turn the head-
light switch to theposition for full illumina-
tion when driving at night.
If the parking brake is applied before the engine
is started, the daytime running lights do not
illuminate. The daytime running lights illuminate
once the parking brake is released. The daytime running lights will remain on until the ignition
switch is pushed to the OFF position.
WARNING
When the daytime running light system
is active, tail lights on your vehicle are
not on. It is necessary at dusk to turn on
your headlights. Failure to do so could
cause an accident injuring yourself and
others.
Instruments and controls2-37
Page 376 of 520
wear your seat belt as outlined in the “Seat
belts” (P.1-15) of this manual, and also instruct
your passengers to do so.
Seat belts help reduce the risk of injury in
collisions and rollovers.In a rollover crash, an
unbelted or improperly belted person is
significantly more likely to be injured or
killed than a person properly wearing a
seat belt.
OFF-ROAD RECOVERY
If the right side or left side wheels leave the road
surface, maintain control of the vehicle by
following the procedure below. Please note that
this procedure is only a general guide. The
vehicle must be driven as appropriate based on
the conditions of the vehicle, road and traffic.
1. Remain calm and do not overreact.
2. Do not apply the brakes.
3. Maintain a firm grip on the steering wheel
with both hands and try to hold a straight
course.
4. When appropriate, slowly release the accel- erator pedal to gradually slow the vehicle.
5. If there is nothing in the way, steer the vehicle to follow the road while the vehicle
speed is reduced. Do not attempt to drive
the vehicle back onto the road surface until
vehicle speed is reduced. 6. When it is safe to do so, gradually turn the
steering wheel until both tires return to the
road surface. When all tires are on the road
surface, steer the vehicle to stay in the
appropriate driving lane.
.If you decide that it is not safe to returnthe vehicle to the road surface based on
vehicle, road or traffic conditions, gradu-
ally slow the vehicle to a stop in a safe
place off the road.
RAPID AIR PRESSURE LOSS
Rapid air pressure loss or a “blow-out” can
occur if the tire is punctured or is damaged due
to hitting a curb or pothole. Rapid air pressure
loss can also be caused by driving on under-
inflated tires.
Rapid air pressure loss can affect the handling
and stability of the vehicle, especially at highway
speeds.
Help prevent rapid air pressure loss by main-
taining the correct air pressure and visually
inspect the tires for wear and damage. See
“Wheels and tires” (P.8-27).
If a tire rapidly loses air pressure or “blows-out”
while driving maintain control of the vehicle by
following the procedure below. Please note that
this procedure is only a general guide. The
vehicle must be driven as appropriate based on
the conditions of the vehicle, road and traffic.
WARNING
The following actions can increase the
chance of losing control of the vehicle if
there is a sudden loss of tire air
pressure. Losing control of the vehicle
may cause a collision and result in
personal injury.
. The vehicle generally moves or pulls
in the direction of the flat tire.
. Do not rapidly apply the brakes.
. Do not rapidly release the accelera-
tor pedal.
. Do not rapidly turn the steering
wheel.
1. Remain calm and do not overreact.
2. Maintain a firm grip on the steering wheel with both hands and try to hold a straight
course.
3. When appropriate, slowly release the accel- erator pedal to gradually slow the vehicle.
4. Gradually steer the vehicle to a safe location off the road and away from traffic if possible.
5. Lightly apply the brake pedal to gradually stop the vehicle.
Starting and driving5-7
Page 380 of 520
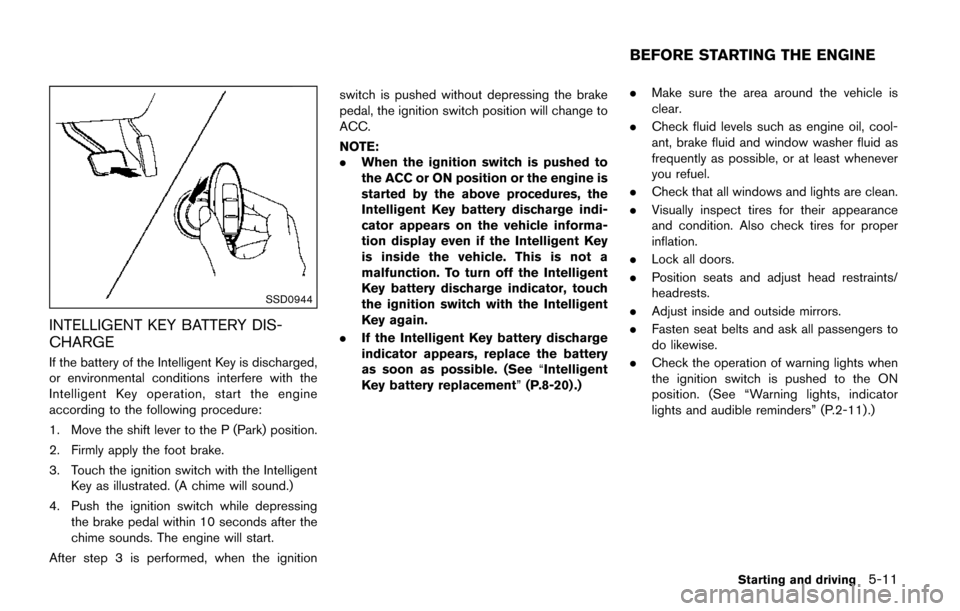
SSD0944
INTELLIGENT KEY BATTERY DIS-
CHARGE
If the battery of the Intelligent Key is discharged,
or environmental conditions interfere with the
Intelligent Key operation, start the engine
according to the following procedure:
1. Move the shift lever to the P (Park) position.
2. Firmly apply the foot brake.
3. Touch the ignition switch with the IntelligentKey as illustrated. (A chime will sound.)
4. Push the ignition switch while depressing the brake pedal within 10 seconds after the
chime sounds. The engine will start.
After step 3 is performed, when the ignition switch is pushed without depressing the brake
pedal, the ignition switch position will change to
ACC.
NOTE:
.
When the ignition switch is pushed to
the ACC or ON position or the engine is
started by the above procedures, the
Intelligent Key battery discharge indi-
cator appears on the vehicle informa-
tion display even if the Intelligent Key
is inside the vehicle. This is not a
malfunction. To turn off the Intelligent
Key battery discharge indicator, touch
the ignition switch with the Intelligent
Key again.
. If the Intelligent Key battery discharge
indicator appears, replace the battery
as soon as possible. (See “Intelligent
Key battery replacement” (P.8-20) .).
Make sure the area around the vehicle is
clear.
. Check fluid levels such as engine oil, cool-
ant, brake fluid and window washer fluid as
frequently as possible, or at least whenever
you refuel.
. Check that all windows and lights are clean.
. Visually inspect tires for their appearance
and condition. Also check tires for proper
inflation.
. Lock all doors.
. Position seats and adjust head restraints/
headrests.
. Adjust inside and outside mirrors.
. Fasten seat belts and ask all passengers to
do likewise.
. Check the operation of warning lights when
the ignition switch is pushed to the ON
position. (See “Warning lights, indicator
lights and audible reminders” (P.2-11) .)
Starting and driving5-11
BEFORE STARTING THE ENGINE
Page 385 of 520
5-16Starting and driving
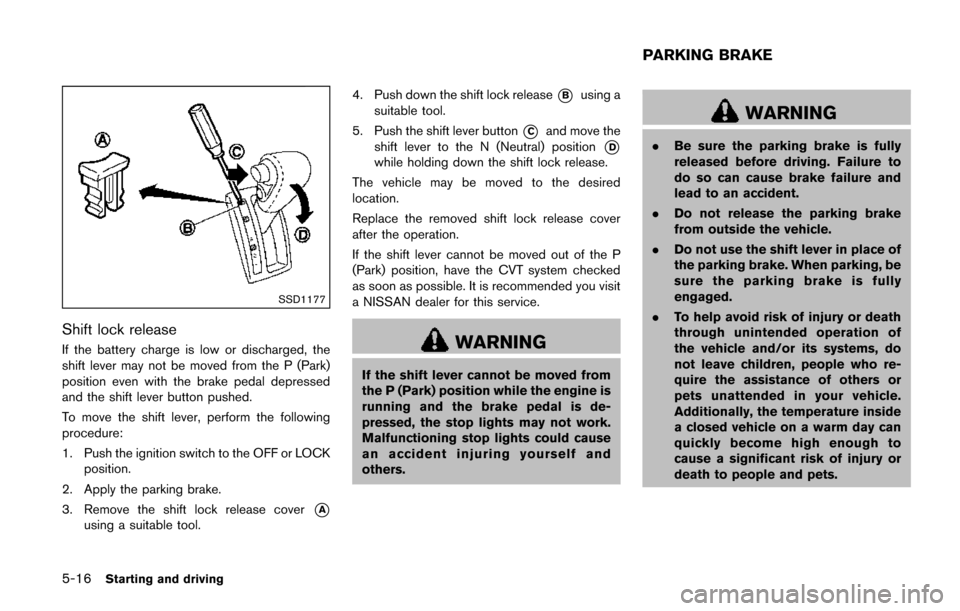
SSD1177
Shift lock release
If the battery charge is low or discharged, the
shift lever may not be moved from the P (Park)
position even with the brake pedal depressed
and the shift lever button pushed.
To move the shift lever, perform the following
procedure:
1. Push the ignition switch to the OFF or LOCKposition.
2. Apply the parking brake.
3. Remove the shift lock release cover
*A
using a suitable tool. 4. Push down the shift lock release
*Busing a
suitable tool.
5. Push the shift lever button
*Cand move the
shift lever to the N (Neutral) position
*D
while holding down the shift lock release.
The vehicle may be moved to the desired
location.
Replace the removed shift lock release cover
after the operation.
If the shift lever cannot be moved out of the P
(Park) position, have the CVT system checked
as soon as possible. It is recommended you visit
a NISSAN dealer for this service.
WARNING
If the shift lever cannot be moved from
the P (Park) position while the engine is
running and the brake pedal is de-
pressed, the stop lights may not work.
Malfunctioning stop lights could cause
an accident injuring yourself and
others.
WARNING
. Be sure the parking brake is fully
released before driving. Failure to
do so can cause brake failure and
lead to an accident.
. Do not release the parking brake
from outside the vehicle.
. Do not use the shift lever in place of
the parking brake. When parking, be
sure the parking brake is fully
engaged.
. To help avoid risk of injury or death
through unintended operation of
the vehicle and/or its systems, do
not leave children, people who re-
quire the assistance of others or
pets unattended in your vehicle.
Additionally, the temperature inside
a closed vehicle on a warm day can
quickly become high enough to
cause a significant risk of injury or
death to people and pets.
PARKING BRAKE
Page 386 of 520
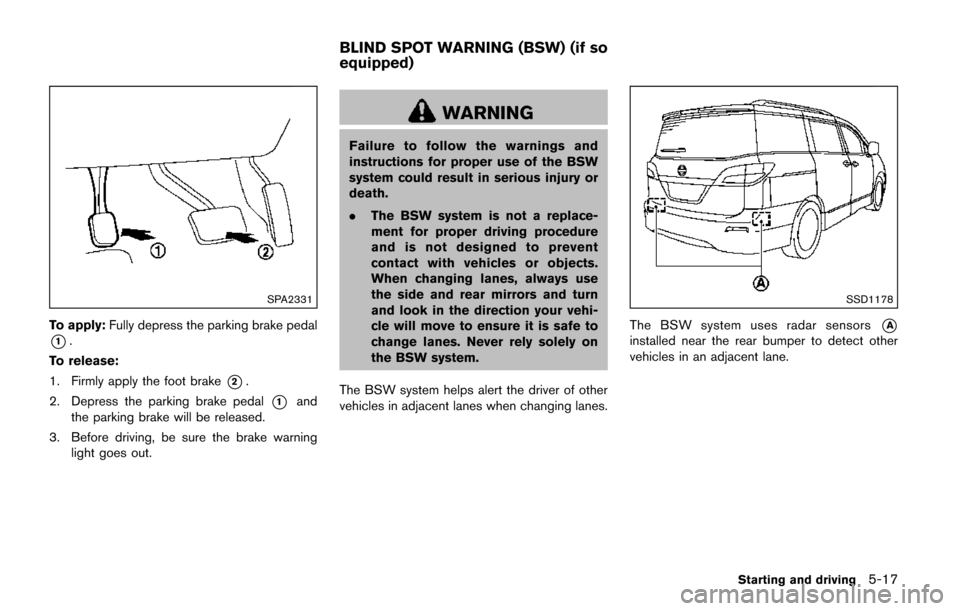
SPA2331
To apply:Fully depress the parking brake pedal
*1.
To release:
1. Firmly apply the foot brake
*2.
2. Depress the parking brake pedal
*1and
the parking brake will be released.
3. Before driving, be sure the brake warning light goes out.
WARNING
Failure to follow the warnings and
instructions for proper use of the BSW
system could result in serious injury or
death.
.The BSW system is not a replace-
ment for proper driving procedure
and is not designed to prevent
contact with vehicles or objects.
When changing lanes, always use
the side and rear mirrors and turn
and look in the direction your vehi-
cle will move to ensure it is safe to
change lanes. Never rely solely on
the BSW system.
The BSW system helps alert the driver of other
vehicles in adjacent lanes when changing lanes.
SSD1178
The BSW system uses radar sensors*A
installed near the rear bumper to detect other
vehicles in an adjacent lane.
Starting and driving5-17
BLIND SPOT WARNING (BSW) (if so
equipped)
Page 395 of 520
5-26Starting and driving
.on winding or hilly roads
. on slippery roads (rain, snow, ice,
etc.)
. in very windy areas
Doing so could cause a loss of vehicle
control and result in an accident.
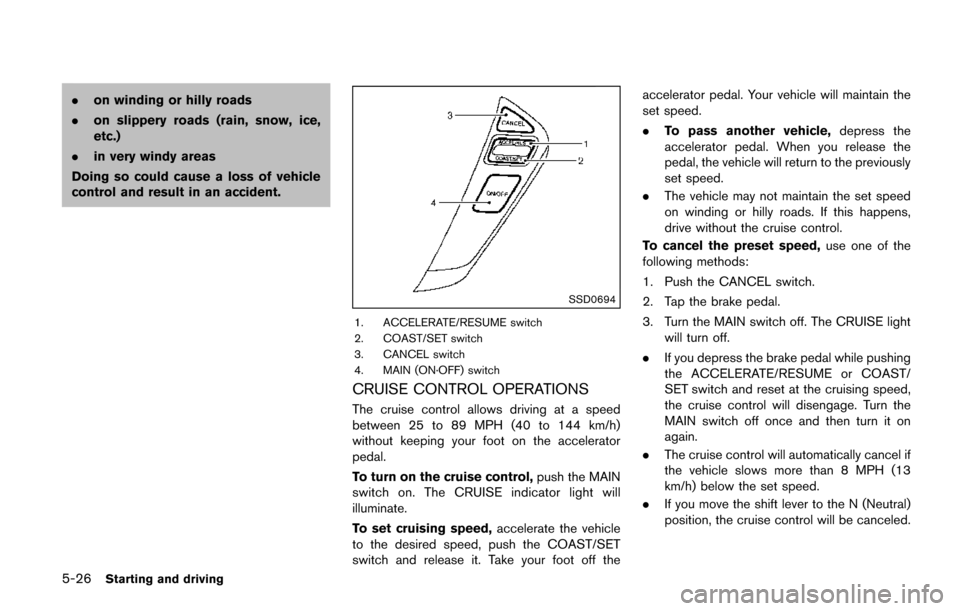
SSD0694
1. ACCELERATE/RESUME switch
2. COAST/SET switch
3. CANCEL switch
4. MAIN (ON·OFF) switch
CRUISE CONTROL OPERATIONS
The cruise control allows driving at a speed
between 25 to 89 MPH (40 to 144 km/h)
without keeping your foot on the accelerator
pedal.
To turn on the cruise control, push the MAIN
switch on. The CRUISE indicator light will
illuminate.
To set cruising speed, accelerate the vehicle
to the desired speed, push the COAST/SET
switch and release it. Take your foot off the accelerator pedal. Your vehicle will maintain the
set speed.
.
To pass another vehicle, depress the
accelerator pedal. When you release the
pedal, the vehicle will return to the previously
set speed.
. The vehicle may not maintain the set speed
on winding or hilly roads. If this happens,
drive without the cruise control.
To cancel the preset speed, use one of the
following methods:
1. Push the CANCEL switch.
2. Tap the brake pedal.
3. Turn the MAIN switch off. The CRUISE light will turn off.
. If you depress the brake pedal while pushing
the ACCELERATE/RESUME or COAST/
SET switch and reset at the cruising speed,
the cruise control will disengage. Turn the
MAIN switch off once and then turn it on
again.
. The cruise control will automatically cancel if
the vehicle slows more than 8 MPH (13
km/h) below the set speed.
. If you move the shift lever to the N (Neutral)
position, the cruise control will be canceled.
Page 396 of 520
To reset at a faster cruising speed,use one
of the following methods:
. Depress the accelerator pedal. When the
vehicle attains the desired speed, push and
release the COAST/SET switch.
. Push and hold the ACCELERATE/RESUME
switch. When the vehicle attains the desired
speed, release the switch.
. Push, then quickly release the ACCELER-
ATE/RESUME switch. Each time you do
this, the set speed will increase by about 1
MPH (1.6 km/h) .
To reset at a slower cruising speed, use one
of the following methods:
. Lightly tap the brake pedal. When the
vehicle attains the desired speed, push the
COAST/SET switch and release it.
. Push and hold the COAST/SET switch.
Release the switch when the vehicle slows
down to the desired speed.
. Push, then quickly release the COAST/SET
switch. Each time you do this, the set speed
will decrease by about 1 MPH (1.6 km/h) .
To resume the preset speed, push and
release the ACCELERATE/RESUME switch.
The vehicle will resume the last set cruising
speed when the vehicle speed is over 25 MPH
(40 km/h) .
CAUTION
During the first 1,200 miles (2,000 km) ,
follow these recommendations to ob-
tain maximum engine performance and
ensure the future reliability and econo-
my of your new vehicle. Failure to
follow these recommendations may
result in shortened engine life and
reduced engine performance.
. Avoid driving for long periods at constant
speed, either fast or slow. Do not run the
engine over 4,000 rpm.
. Do not accelerate at full throttle in any gear.
. Avoid quick starts.
. Avoid hard braking as much as possible.
. Do not tow a trailer for the first 500 miles
(800 km) . Your engine, axle or other parts
could be damaged. Follow these easy-to-use Fuel Efficient Driving
Tips to help you achieve the most fuel economy
from your vehicle.
1. Use smooth accelerator and brake pedal
application.
.Avoid rapid starts and stops..Use smooth, gentle accelerator andbrake application whenever possible.
.Maintain constant speed while commut-
ing and coast whenever possible.
2. Maintain constant speed.
.Look ahead to try and anticipate and minimize stops.
.Synchronizing your speed with traffic
lights allows you to reduce your number
of stops.
.Maintaining a steady speed can minimize red light stops and improve fuel effi-
ciency.
3. Use air conditioning (A/C) at higher vehicle speeds.
.Below 40 MPH (64 km/h) , it is moreefficient to open windows to cool the
vehicle due to reduced engine load.
.Above 40 MPH (64 km/h) , it is moreefficient to use A/C to cool the vehicle
due to increased aerodynamic drag.
Starting and driving5-27
BREAK-IN SCHEDULE FUEL EFFICIENT DRIVING TIPS