2017 NISSAN PATHFINDER steering
[x] Cancel search: steeringPage 2 of 40
11
2
12
2122
20
23
23
24
3
4
5
10
16
1
6
7
19
8
17
Behind Steering
Wheel
13
14
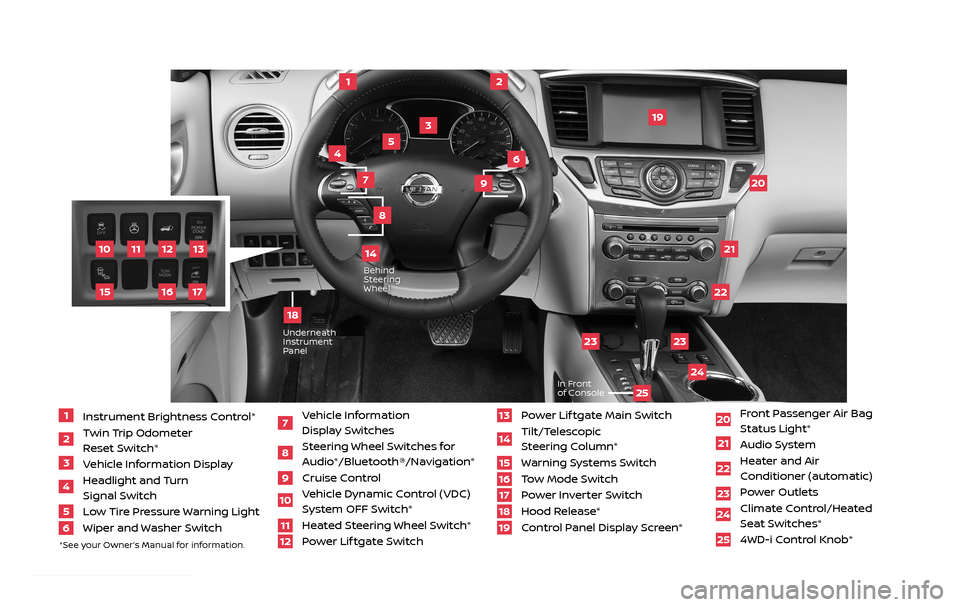
1 Instrument Brightness Control*2 Twin Trip Odometer
Reset Switch*
3 Vehicle Information Display4 Headlight and Turn
Signal Switch
5 Low Tire Pressure Warning Light6 Wiper and Washer Switch
7 Vehicle Information
Display Switches
8 Steering Wheel Switches for Audio*/Bluetooth®/Navigation*
9 Cruise Control
10 Vehicle Dynamic Control (VDC)
System OFF Switch*
11 Heated Steering Wheel Switch*12 Power Lif tgate Switch
13 Power Lif tgate Main Switch14 Tilt/Telescopic
Steering Column*
15 Warning Systems Switch16 Tow Mode Switch17 Power Inverter Switch18 Hood Release*
19 Control Panel Display Screen*
20 Front Passenger Air Bag
Status Light*
21 Audio System22 Heater and Air
Conditioner (automatic)
23 Power Outlets
24 Climate Control/Heated
Seat Switches*
25 4WD-i Control Knob*
*See your Owner’s Manual for information.
UnderneathInstrument
Panel
In Front
of Console
25
15
9
18
2485215_17b_Pathfinder_pQRG_111816b.indd 311/18/16 1:44 PM
Page 3 of 40
NEW SYSTEM FEATURESAround View® Monitor System with Moving Object Detection (if so equipped) ............2
SiriusXM Traffic and SiriusXM Travel Link (if so equipped) ...................................3
NissanConnectSM Services Powered by SiriusXM® (if so equipped) . . . . . . . . . . . . . . . . . . . . . . . . . . 4
Forward Emergency Braking (FEB) (if so equipped) .........................................5
Hill Descent Control (if so equipped) ........................................................6
Blind Spot Warning (BSW) with Rear Cross Traffic Alert (RCTA) (if so equipped).............6
ESSENTIAL INFORMATIONTire Pressure Monitoring System (TPMS) with Easy-Fill Tire Alert ............................7
Loose Fuel Cap and Fuel-filler Door .........................................................8
Towing Your Vehicle........................................................................\
..8
Clock Set/Adjustment .......................................................................\
9
FIRST DRIVE FEATURESNissan Intelligent Key® System .............................................................10
Power Lif tgate (if so equipped) ..............................................................11
Starting/Stopping the Engine ...............................................................12
Front Power Seat Adjustments (if so equipped) ............................................ 13
2ND Row Seats . . . . . . . . . . . . . . . . . . . . . . . . . . . . . . . . . . . .\
. . . . . . . . . . . . . . . . . . . . . . . . . . . . . . . . . . . .\
. . . . . . . . 13
3RD Row Seats ........................................................................\
........14
Automatic Drive Positioner (if so equipped) .................................................14
Outside Mirror Control Switch .............................................................. 15
Headlight Control Switch ....................................................................15
Wiper and Washer Switch ...................................................................16
USB (Universal Serial Bus) Connection Port/iPod® Interface (if so equipped) ...............17
Heater and Air Conditioner (automatic) .....................................................17
Rear Climate Controls........................................................................\
19
AM/FM/SiriusXM® Satellite/HD® Radio with CD/DVD Player (if so equipped)...............20
Cruise Control (if so equipped)...............................................................21
Intelligent Cruise Control (ICC) (if so equipped).............................................22
Power Outlets........................................................................\
.......23
SYSTEM GUIDEVehicle Information Display.................................................................24
Hands-free Text Messaging Assistant ......................................................25
Bluetooth® Hands-free Phone System .....................................................26
• System Operating Tips....................................................................26
Bluetooth® System with Navigation (if so equipped).......................................27
Bluetooth® System without Navigation (if so equipped) ...................................29
Bluetooth® Streaming Audio.................................................................31
Navigation System (if so equipped).........................................................32
Nissan Mobile Entertainment System (MES) (if so equipped) ..............................33
HomeLink® Universal Transceiver (if so equipped)..........................................34
TABLE OF CONTENTS
Please see your Owner ’s Manual for impor tant safety information and system
operation limitations.
• A cellular telephone should not be used for any purpose while driving so full attention may
be given to vehicle operation.
• Always wear your seat belt.
• Supplemental air bags do not replace proper seat belt usage.
• Children 12 and under should always ride in the rear seat properly secured in child restraints
or seat belts according to their age and weight.
• Do not drink and drive.
For more information, refer to the “ Safety — Seats, seat belts and supplemental restraint system
(section 1) ”, the “Monitor, climate, audio, phone and voice recognition systems (section 4) ” and the
“
Star ting and driving (section 5)” of your Owner ’s Manual.
Additional information about your vehicle is also available in your Owner’s Manual, Navigation System Owner’s Manual and at www.NissanUSA.com.
1 Instrument Brightness Control*2 Twin Trip Odometer
Reset Switch*
3 Vehicle Information Display4 Headlight and Turn
Signal Switch
5 Low Tire Pressure Warning Light6 Wiper and Washer Switch
7 Vehicle Information
Display Switches
8 Steering Wheel Switches for Audio*/Bluetooth®/Navigation*
9 Cruise Control10 Vehicle Dynamic Control (VDC)
System OFF Switch*
11 Heated Steering Wheel Switch*12 Power Lif tgate Switch
13 Power Lif tgate Main Switch14 Tilt/Telescopic
Steering Column*
15 Warning Systems Switch16 Tow Mode Switch17 Power Inverter Switch18 Hood Release*19 Control Panel Display Screen*
20 Front Passenger Air Bag
Status Light*
21 Audio System22 Heater and Air
Conditioner (automatic)
23 Power Outlets 24 Climate Control/Heated
Seat Switches*
25 4WD-i Control Knob*
*See your Owner’s Manual for information.
2485215_17b_Pathfinder_pQRG_111816b.indd 411/18/16 1:44 PM
Page 8 of 40
6
BLIND SPOT WARNING (BSW)
WITH REAR CROSS TRAFFIC ALERT (RCTA) (if so equipped)
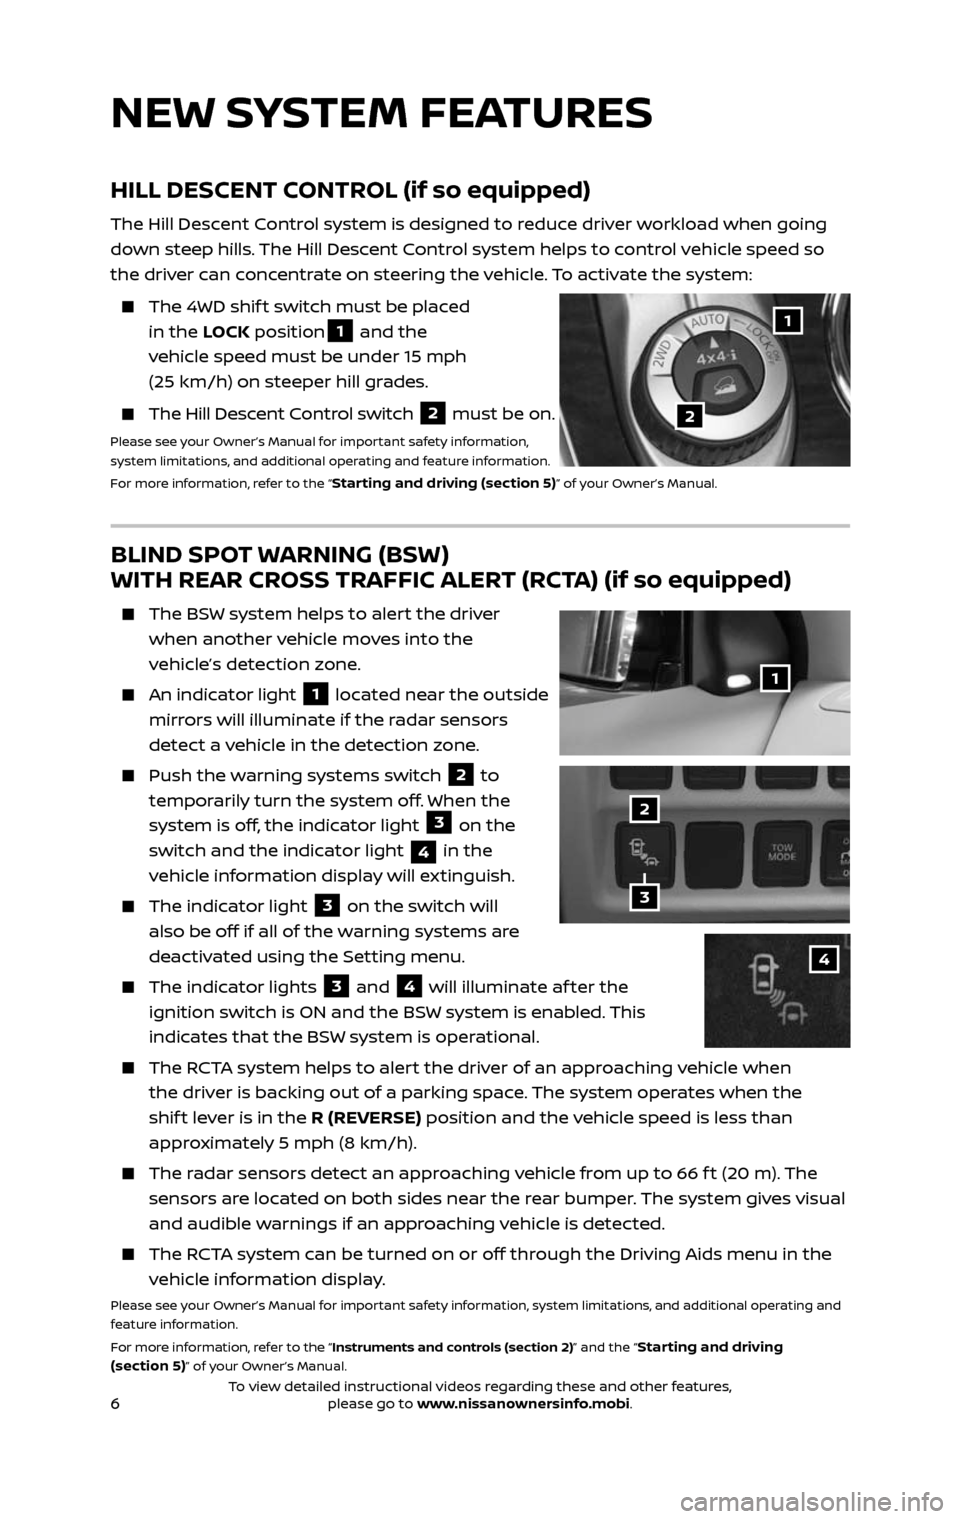
The BSW system helps to alert the driver
when another vehicle moves into the
vehicle’s detection zone.
An indicator light 1 located near the outside
mirrors will illuminate if the radar sensors
detect a vehicle in the detection zone.
Push the w arning systems switch 2 to
temporarily turn the system off. When the
system is off, the indicator light
3 on the
switch and the indicator light
4 in the
vehicle information display will extinguish.
The indic ator light 3 on the switch will
also be off if all of the warning systems are
deactivated using the Setting menu.
The indic ator lights 3 and 4 will illuminate af ter the
ignition switch is ON and the BSW system is enabled. This
indicates that the BSW system is operational.
The RCTA system helps to alert the driver of an approaching vehicle when
the driver is backing out of a parking space. The system operates when the
shif t lever is in the R (REVERSE) position and the vehicle speed is less than
approximately 5 mph (8 km/h).
The radar sensors detect an approaching vehicle from up to 66 f t (20 m). The
sensors are located on both sides near the rear bumper. The system gives visual
and audible warnings if an approaching vehicle is detected.
The RCTA system can be turned on or off through the Driving Aids menu in the
vehicle information display.
Please see your Owner’s Manual for important safety information, system limitations, and additional operating and
feature information.
For more information, refer to the “Instruments and controls (section 2)” and the “
Starting and driving
(section 5)” of your Owner’s Manual.
HILL DESCENT CONTROL (if so equipped)
The Hill Descent Control system is designed to reduce driver workload when going
down steep hills. The Hill Descent Control system helps to control vehicle speed so
the driver can concentrate on steering the vehicle. To activate the system:
The 4WD shif t switch must be placed
in the LOCK position1 and the
vehicle speed must be under 15 mph
(25 km/h) on steeper hill grades.
The Hill Descent Control switch 2 must be on.
Please see your Owner’s Manual for important safety information,
system limitations, and additional operating and feature information.
For more information, refer to the “
Starting and driving (section 5)” of your Owner’s Manual.
NEW SYSTEM FEATURES
1
3
2
4
2
1
2485215_17b_Pathfinder_pQRG_111816b.indd 611/18/16 1:44 PM
To view detailed instructional videos regarding these and other features, please go to www.nissanownersinfo.mobi.To view detailed instructional videos regarding these and other features, please go to www.nissanownersinfo.mobi.
Page 10 of 40
8
LOOSE FUEL CAP AND FUEL-FILLER DOOR
LOOSE FUEL CAP
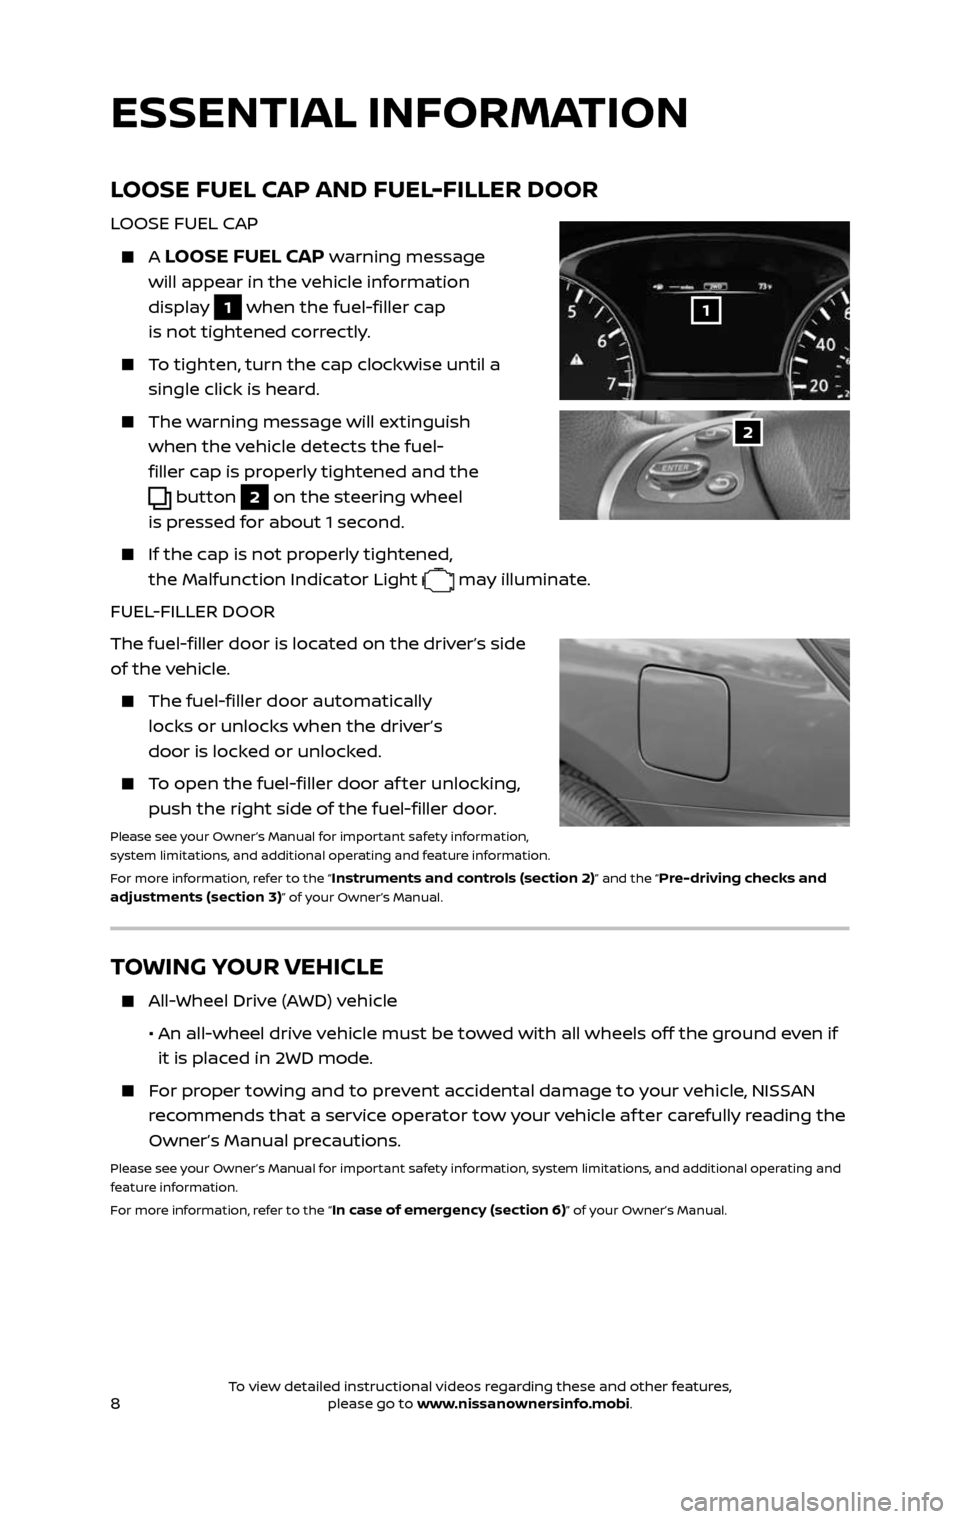
A LOOSE FUEL CAP warning message
will appear in the vehicle information
display
1 when the fuel-filler cap
is not tightened correctly.
To tighten, turn the cap clockwise until a
single click is heard.
The warning message will extinguish
when the vehicle detects the fuel-
filler cap is properly tightened and the
button 2 on the steering wheel
is pressed for about 1 second.
If the cap is not properly tightened,
the Malfunction Indicator Light
may illuminate.
FUEL-FILLER DOOR
The fuel-filler door is located on the driver’s side
of the vehicle.
The fuel-filler door automatically
locks or unlocks when the driver’s
door is locked or unlocked.
To open the fuel-filler door af ter unlocking,
push the right side of the fuel-filler door.
Please see your Owner’s Manual for important safety information,
system limitations, and additional operating and feature information.
For more information, refer to the “
Instruments and controls (section 2)” and the “Pre-driving checks and
adjustments (section 3)” of your Owner’s Manual.
2
1
TOWING YOUR VEHICLE
All-Wheel Drive (AWD) vehicle
• An al l-wheel drive vehicle must be towed with all wheels off the ground even if
it is placed in 2WD mode.
For proper towing and to prevent accidental damage to your vehicle, NISSAN
recommends that a service operator tow your vehicle af ter carefully reading the
Owner’s Manual precautions.
Please see your Owner’s Manual for important safety information, system limitations, and additional operating and
feature information.
For more information, refer to the “
In case of emergency (section 6)” of your Owner’s Manual.
ESSENTIAL INFORMATION
2485215_17b_Pathfinder_pQRG_111816b.indd 811/18/16 1:44 PM
To view detailed instructional videos regarding these and other features, please go to www.nissanownersinfo.mobi.To view detailed instructional videos regarding these and other features, please go to www.nissanownersinfo.mobi.
Page 16 of 40
14
FIRST DRIVE FEATURES
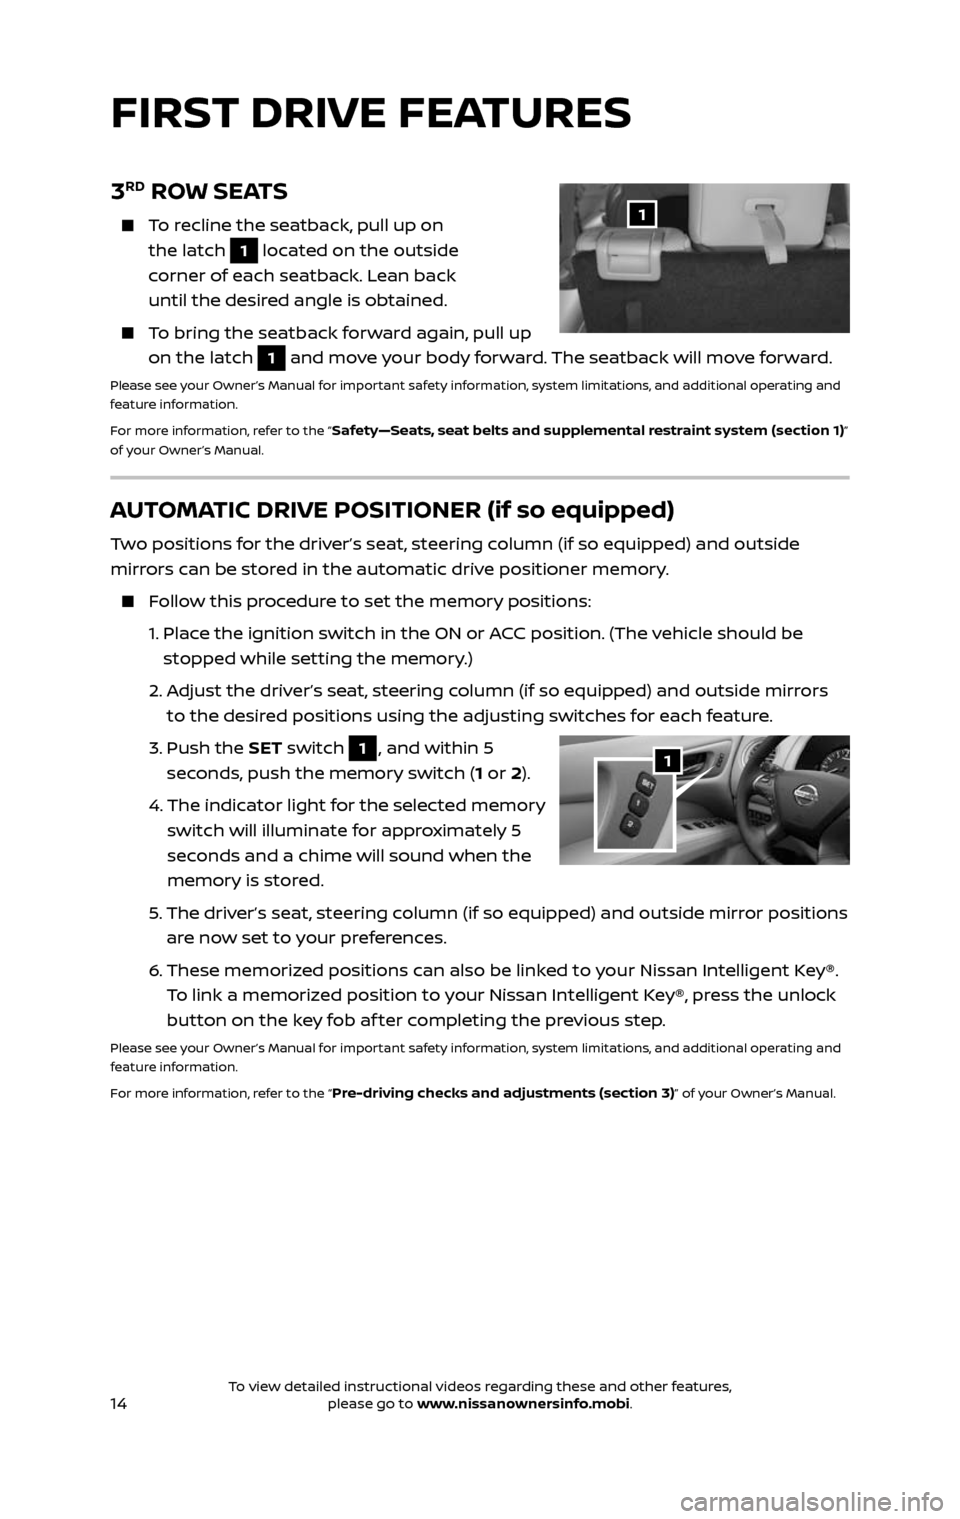
AUTOMATIC DRIVE POSITIONER (if so equipped)
Two positions for the driver’s seat, steering column (if so equipped) and outside
mirrors can be stored in the automatic drive positioner memory.
Follow this procedure to set the memory positions:
1. Place the ignition switch in the ON or ACC position. (The vehicle should be
stopped while setting the memory.)
2. Adjust the driver’s seat, steering column (if so equipped) and outside mirrors
to the desired positions using the adjusting switches for each feature.
3. Push the SET switch 1, and within 5
seconds, push the memory switch (1 or 2).
4. The indic ator light for the selected memory
switch will illuminate for approximately 5
seconds and a chime will sound when the
memory is stored.
5. The driver’s seat, steering column (if so equipped) and outside mirror positions
are now set to your preferences.
6. These memoriz ed positions can also be linked to your Nissan Intelligent Key®.
To link a memorized position to your Nissan Intelligent Key®, press the unlock
button on the key fob af ter completing the previous step.
Please see your Owner’s Manual for important safety information, system limitations, and additional operating and
feature information.
For more information, refer to the “
Pre-driving checks and adjustments (section 3)” of your Owner’s Manual.
1
3RD ROW SEATS
To recline the seatback, pull up on
the latch 1 located on the outside
corner of each seatback. Lean back
until the desired angle is obtained.
To bring the seatback forward again, pull up
on the latch 1 and move your body forward. The seatback will move forward.
Please see your Owner’s Manual for important safety information, system limitations, and additional operating and
feature information.
For more information, refer to the “
Safety—Seats, seat belts and supplemental restraint system (section 1)”
of your Owner’s Manual.
1
2485215_17b_Pathfinder_pQRG_111816b.indd 1411/18/16 1:44 PM
To view detailed instructional videos regarding these and other features, please go to www.nissanownersinfo.mobi.To view detailed instructional videos regarding these and other features, please go to www.nissanownersinfo.mobi.
Page 23 of 40
21
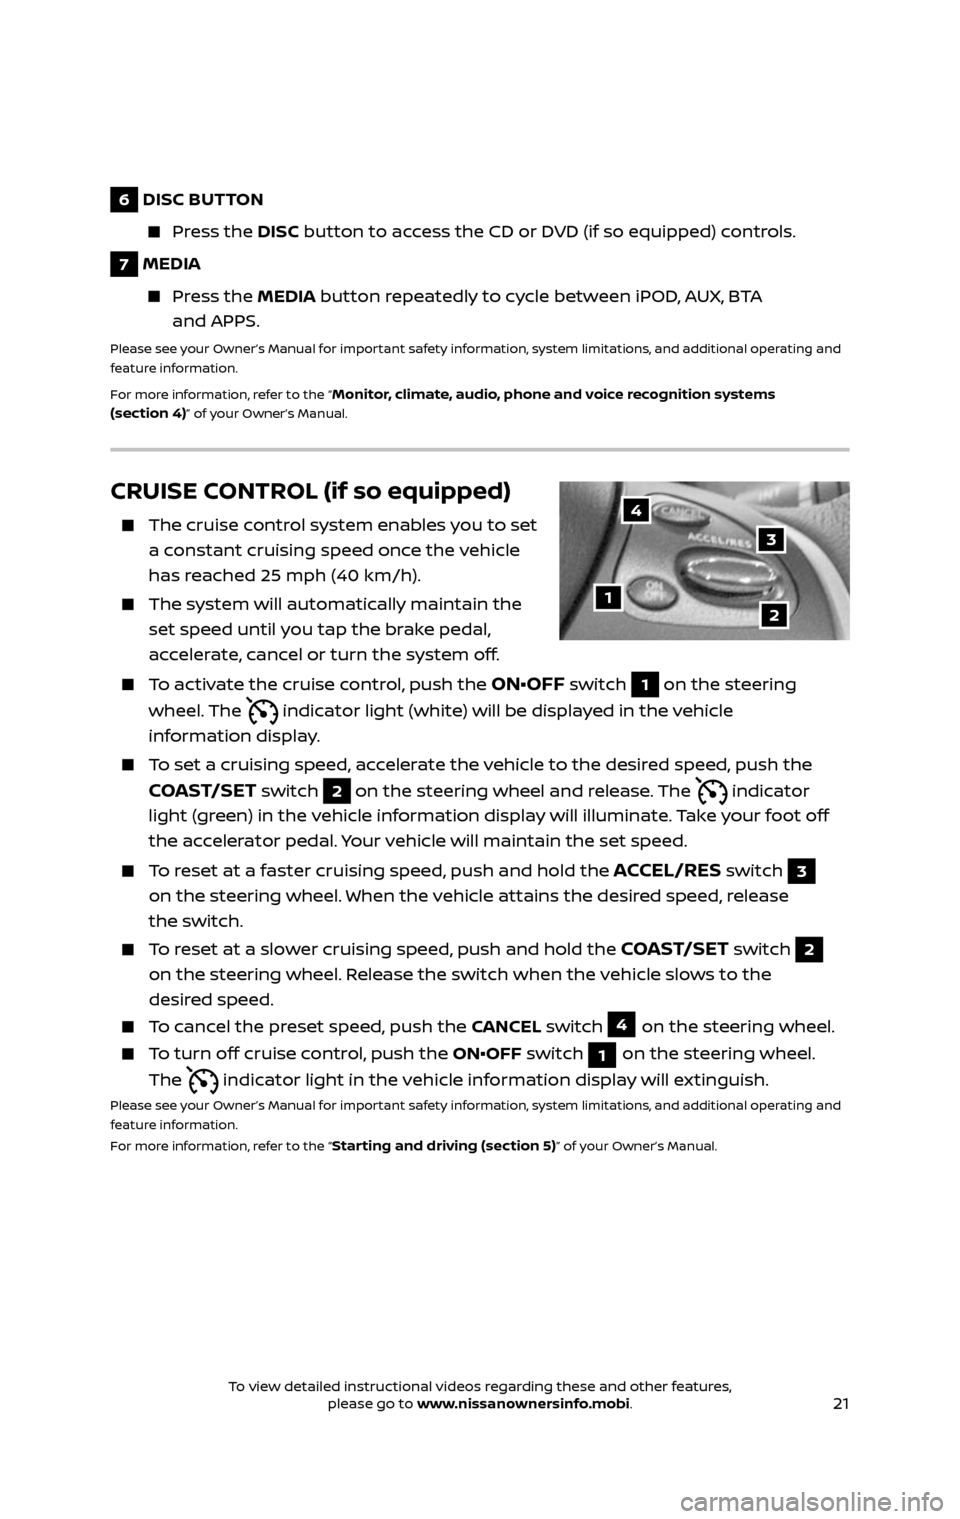
CRUISE CONTROL (if so equipped)
The cruise control system enables you to set
a constant cruising speed once the vehicle
has reached 25 mph (40 km/h).
The system wil l automatically maintain the
set speed until you tap the brake pedal,
accelerate, cancel or turn the system off.
To activate the cruise control, push the ON•OFF switch 1 on the steering
wheel. The
indicator light (white) will be displayed in the vehicle
information display.
To set a cruising speed, accelerate the vehicle to the desired speed, push the
COAST/SET switch 2 on the steering wheel and release. The indicator
light (green) in the vehicle information display will illuminate. Take your foot off
the accelerator pedal. Your vehicle will maintain the set speed.
To reset at a faster cruising speed, push and hold the ACCEL/RES switch 3
on the steering wheel. When the vehicle attains the desired speed, release
the switch.
To reset at a slower cruising speed, push and hold the COAST/SET switch 2
on the steering wheel. Release the switch when the vehicle slows to the
desired speed.
To cancel the preset speed, push the CANCEL switch 4 on the steering wheel.
To turn off cruise control, push the ON•OFF switch 1 on the steering wheel.
The
indicator light in the vehicle information display will extinguish.
Please see your Owner’s Manual for important safety information, system limitations, and additional operating and
feature information.
For more information, refer to the “
Starting and driving (section 5)” of your Owner’s Manual.
12
3
4
6 DISC BUTTON
Press the DISC button to access the CD or DVD (if so equipped) controls.
7 MEDIA
Press the MEDIA button repeatedly to cycle between iPOD, AUX, BTA
and APPS.
Please see your Owner’s Manual for important safety information, system limitations, and additional operating and
feature information.
For more information, refer to the “
Monitor, climate, audio, phone and voice recognition systems
(section 4)” of your Owner’s Manual.
2485215_17b_Pathfinder_pQRG_111816b.indd 2111/18/16 1:45 PM
To view detailed instructional videos regarding these and other features, please go to www.nissanownersinfo.mobi.To view detailed instructional videos regarding these and other features, please go to www.nissanownersinfo.mobi.
Page 24 of 40
22
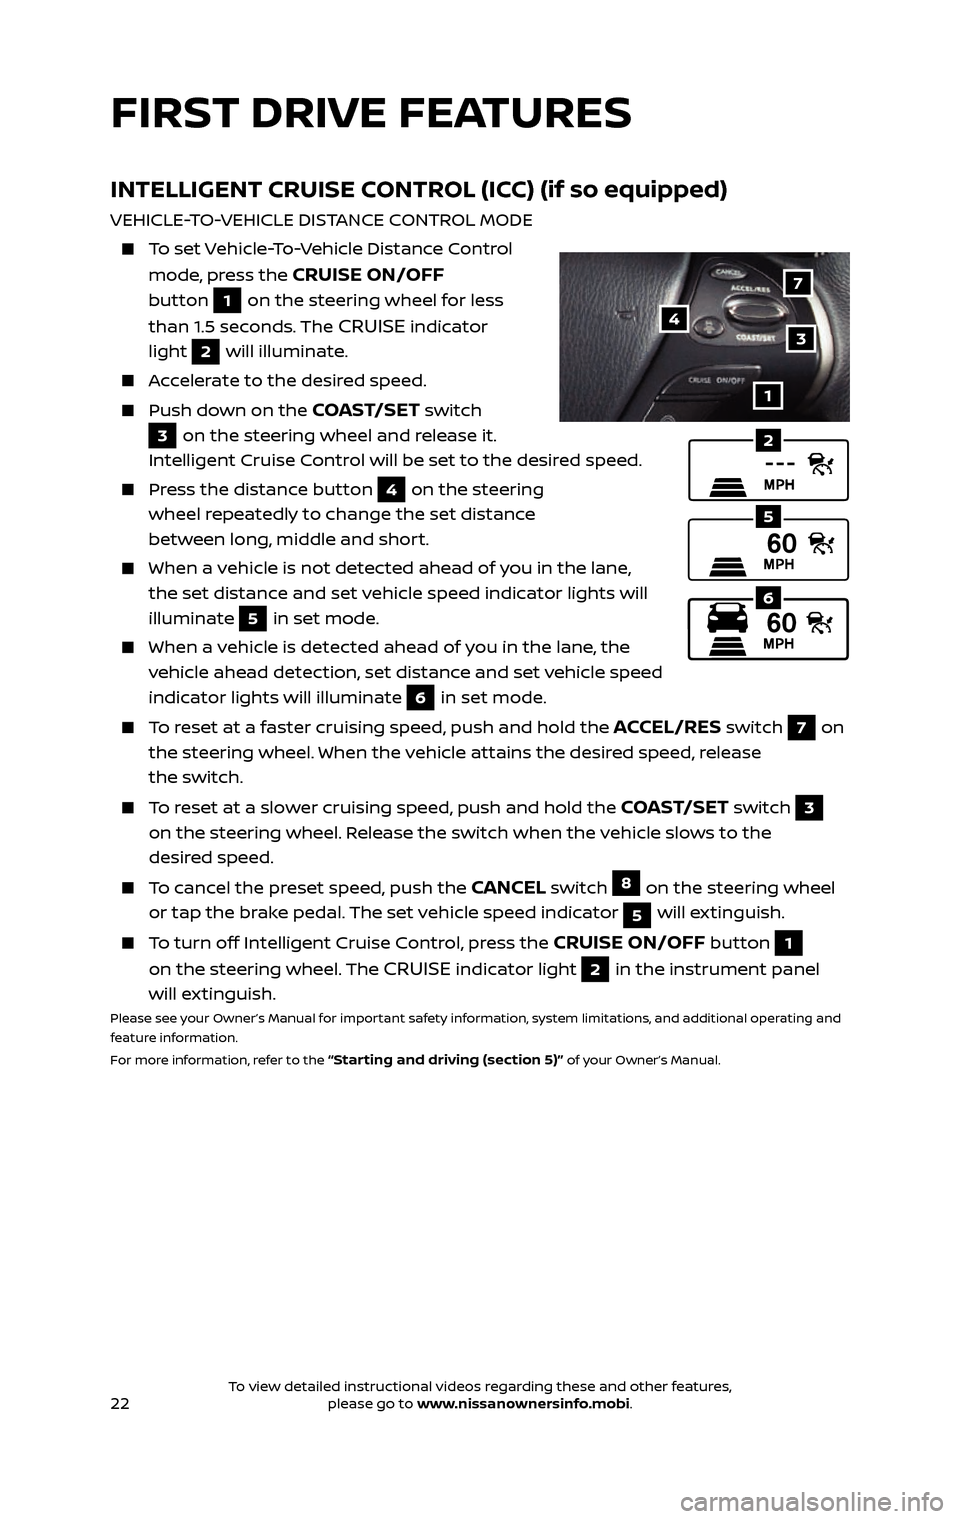
INTELLIGENT CRUISE CONTROL (ICC) (if so equipped)
VEHICLE-TO-VEHICLE DISTANCE CONTROL MODE
To set Vehicle-To-Vehicle Distance Control
mode, press the CRUISE ON/OFF
button
1 on the steering wheel for less
than 1.5 seconds. The
CRUISE indicator
light
2 will illuminate.
Accelerate to the desired speed.
Push down on the COAST/SET switch
3 on the steering wheel and release it.
Intelligent Cruise Control will be set to the desired speed.
Press the distance button 4 on the steering
wheel repeatedly to change the set distance
between long, middle and short.
When a v ehicle is not detected ahead of you in the lane,
the set distance and set vehicle speed indicator lights will
illuminate
5 in set mode.
When a vehicle is detected ahead of you in the lane, the
vehicle ahead detection, set distance and set vehicle speed
indicator lights will illuminate
6 in set mode.
To reset at a faster cruising speed, push and hold the ACCEL/RES switch 7 on
the steering wheel. When the vehicle attains the desired speed, release
the switch.
To reset at a slower cruising speed, push and hold the COAST/SET switch 3 on the steering wheel. Release the switch when the vehicle slows to the
desired speed.
To cancel the preset speed, push the CANCEL switch 8 on the steering wheel
or tap the brake pedal. The set vehicle speed indicator
5 will extinguish.
To turn off Intelligent Cruise Control, press the CRUISE ON/OFF button 1 on the steering wheel. The CRUISE indicator light 2 in the instrument panel
will extinguish.
Please see your Owner’s Manual for important safety information, system limitations, and additional operating and
feature information.
For more information, refer to the
“Starting and driving (section 5)” of your Owner’s Manual.
2
6
1
7
34
5
FIRST DRIVE FEATURES
2485215_17b_Pathfinder_pQRG_111816b.indd 2211/18/16 1:45 PM
To view detailed instructional videos regarding these and other features, please go to www.nissanownersinfo.mobi.To view detailed instructional videos regarding these and other features, please go to www.nissanownersinfo.mobi.
Page 26 of 40
24
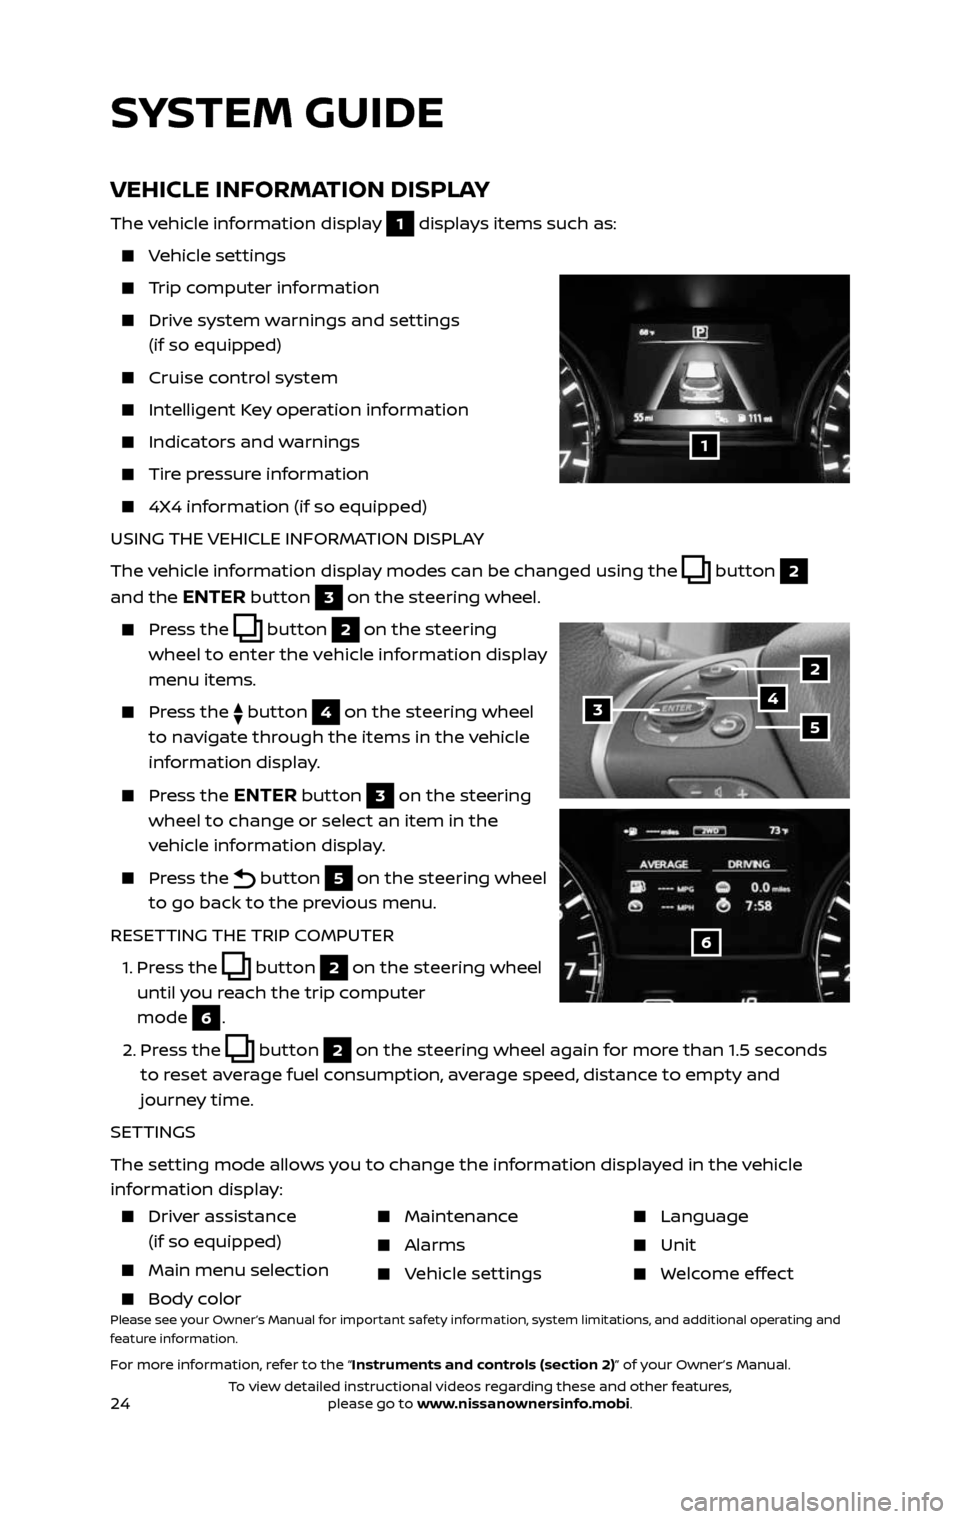
VEHICLE INFORMATION DISPLAY
The vehicle information display 1 displays items such as:
Vehicle settings
Trip computer information
Drive system warnings and settings
(if so equipped)
Cruise control system
Intelligent Key operation information
Indicators and warnings
Tire pressure information
4X4 information (if so equipped)
USING THE VEHICLE INFORMATION DISPLAY
The vehicle information display modes can be changed using the
button 2
and the
ENTER button 3 on the steering wheel.
Press the button 2 on the steering
wheel to enter the vehicle information display
menu items.
Press the button 4 on the steering wheel
to navigate through the items in the vehicle
information display.
Press the ENTER button 3 on the steering
wheel to change or select an item in the
vehicle information display.
Press the button 5 on the steering wheel
to go back to the previous menu.
RESETTING THE TRIP COMPUTER
1. Press the button 2 on the steering wheel
until you reach the trip computer
mode
6.
2. Press the button 2 on the steering wheel again for more than 1.5 seconds
to reset average fuel consumption, average speed, distance to empty and
journey time.
SETTINGS
The setting mode allows you to change the information displayed in the vehicle
information display:
1
2
435
6
Driver assistance
(if so equipped)
Main menu selec tion
Body color
Maintenance
Alarms
Vehicle settings
Language
Unit
Welcome effect
Please see your Owner’s Manual for important safety information, system limitations, and additional operating and
feature information.
For more information, refer to the “Instruments and controls (section 2)” of your Owner’s Manual.
SYSTEM GUIDE
2485215_17b_Pathfinder_pQRG_111816b.indd 2411/18/16 1:45 PM
To view detailed instructional videos regarding these and other features, please go to www.nissanownersinfo.mobi.To view detailed instructional videos regarding these and other features, please go to www.nissanownersinfo.mobi.