2017 NISSAN PATHFINDER instrument panel
[x] Cancel search: instrument panelPage 2 of 40
11
2
12
2122
20
23
23
24
3
4
5
10
16
1
6
7
19
8
17
Behind Steering
Wheel
13
14
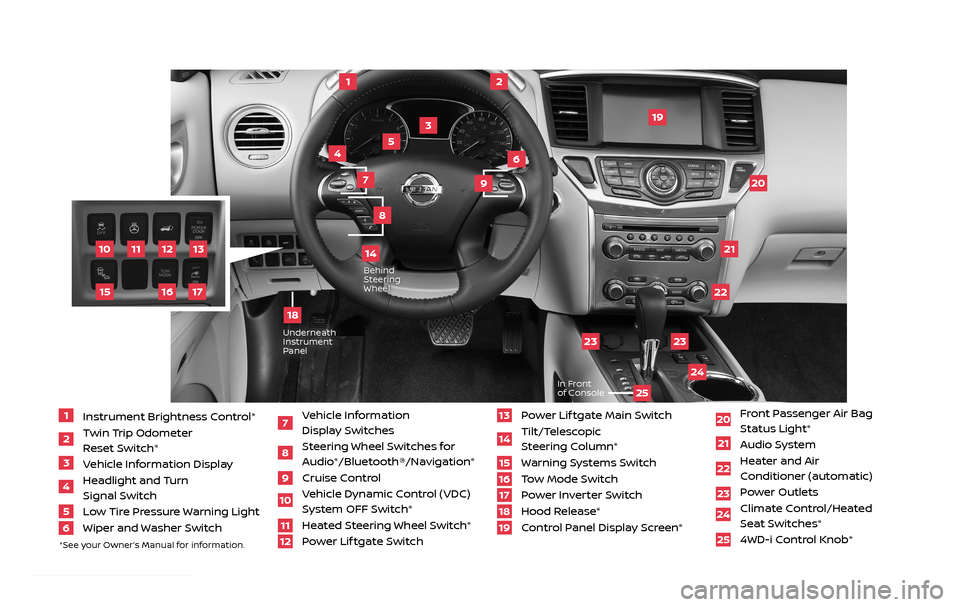
1 Instrument Brightness Control*2 Twin Trip Odometer
Reset Switch*
3 Vehicle Information Display4 Headlight and Turn
Signal Switch
5 Low Tire Pressure Warning Light6 Wiper and Washer Switch
7 Vehicle Information
Display Switches
8 Steering Wheel Switches for Audio*/Bluetooth®/Navigation*
9 Cruise Control
10 Vehicle Dynamic Control (VDC)
System OFF Switch*
11 Heated Steering Wheel Switch*12 Power Lif tgate Switch
13 Power Lif tgate Main Switch14 Tilt/Telescopic
Steering Column*
15 Warning Systems Switch16 Tow Mode Switch17 Power Inverter Switch18 Hood Release*
19 Control Panel Display Screen*
20 Front Passenger Air Bag
Status Light*
21 Audio System22 Heater and Air
Conditioner (automatic)
23 Power Outlets
24 Climate Control/Heated
Seat Switches*
25 4WD-i Control Knob*
*See your Owner’s Manual for information.
UnderneathInstrument
Panel
In Front
of Console
25
15
9
18
2485215_17b_Pathfinder_pQRG_111816b.indd 311/18/16 1:44 PM
Page 3 of 40
NEW SYSTEM FEATURESAround View® Monitor System with Moving Object Detection (if so equipped) ............2
SiriusXM Traffic and SiriusXM Travel Link (if so equipped) ...................................3
NissanConnectSM Services Powered by SiriusXM® (if so equipped) . . . . . . . . . . . . . . . . . . . . . . . . . . 4
Forward Emergency Braking (FEB) (if so equipped) .........................................5
Hill Descent Control (if so equipped) ........................................................6
Blind Spot Warning (BSW) with Rear Cross Traffic Alert (RCTA) (if so equipped).............6
ESSENTIAL INFORMATIONTire Pressure Monitoring System (TPMS) with Easy-Fill Tire Alert ............................7
Loose Fuel Cap and Fuel-filler Door .........................................................8
Towing Your Vehicle........................................................................\
..8
Clock Set/Adjustment .......................................................................\
9
FIRST DRIVE FEATURESNissan Intelligent Key® System .............................................................10
Power Lif tgate (if so equipped) ..............................................................11
Starting/Stopping the Engine ...............................................................12
Front Power Seat Adjustments (if so equipped) ............................................ 13
2ND Row Seats . . . . . . . . . . . . . . . . . . . . . . . . . . . . . . . . . . . .\
. . . . . . . . . . . . . . . . . . . . . . . . . . . . . . . . . . . .\
. . . . . . . . 13
3RD Row Seats ........................................................................\
........14
Automatic Drive Positioner (if so equipped) .................................................14
Outside Mirror Control Switch .............................................................. 15
Headlight Control Switch ....................................................................15
Wiper and Washer Switch ...................................................................16
USB (Universal Serial Bus) Connection Port/iPod® Interface (if so equipped) ...............17
Heater and Air Conditioner (automatic) .....................................................17
Rear Climate Controls........................................................................\
19
AM/FM/SiriusXM® Satellite/HD® Radio with CD/DVD Player (if so equipped)...............20
Cruise Control (if so equipped)...............................................................21
Intelligent Cruise Control (ICC) (if so equipped).............................................22
Power Outlets........................................................................\
.......23
SYSTEM GUIDEVehicle Information Display.................................................................24
Hands-free Text Messaging Assistant ......................................................25
Bluetooth® Hands-free Phone System .....................................................26
• System Operating Tips....................................................................26
Bluetooth® System with Navigation (if so equipped).......................................27
Bluetooth® System without Navigation (if so equipped) ...................................29
Bluetooth® Streaming Audio.................................................................31
Navigation System (if so equipped).........................................................32
Nissan Mobile Entertainment System (MES) (if so equipped) ..............................33
HomeLink® Universal Transceiver (if so equipped)..........................................34
TABLE OF CONTENTS
Please see your Owner ’s Manual for impor tant safety information and system
operation limitations.
• A cellular telephone should not be used for any purpose while driving so full attention may
be given to vehicle operation.
• Always wear your seat belt.
• Supplemental air bags do not replace proper seat belt usage.
• Children 12 and under should always ride in the rear seat properly secured in child restraints
or seat belts according to their age and weight.
• Do not drink and drive.
For more information, refer to the “ Safety — Seats, seat belts and supplemental restraint system
(section 1) ”, the “Monitor, climate, audio, phone and voice recognition systems (section 4) ” and the
“
Star ting and driving (section 5)” of your Owner ’s Manual.
Additional information about your vehicle is also available in your Owner’s Manual, Navigation System Owner’s Manual and at www.NissanUSA.com.
1 Instrument Brightness Control*2 Twin Trip Odometer
Reset Switch*
3 Vehicle Information Display4 Headlight and Turn
Signal Switch
5 Low Tire Pressure Warning Light6 Wiper and Washer Switch
7 Vehicle Information
Display Switches
8 Steering Wheel Switches for Audio*/Bluetooth®/Navigation*
9 Cruise Control10 Vehicle Dynamic Control (VDC)
System OFF Switch*
11 Heated Steering Wheel Switch*12 Power Lif tgate Switch
13 Power Lif tgate Main Switch14 Tilt/Telescopic
Steering Column*
15 Warning Systems Switch16 Tow Mode Switch17 Power Inverter Switch18 Hood Release*19 Control Panel Display Screen*
20 Front Passenger Air Bag
Status Light*
21 Audio System22 Heater and Air
Conditioner (automatic)
23 Power Outlets 24 Climate Control/Heated
Seat Switches*
25 4WD-i Control Knob*
*See your Owner’s Manual for information.
2485215_17b_Pathfinder_pQRG_111816b.indd 411/18/16 1:44 PM
Page 13 of 40
11
LIFTGATE RELEASE (if so equipped)
To open the lif tgate, press the button 5 for longer than 1 second.
To close the lif tgate (if so equipped), press the button 5 again for longer
than 1 second.
PANIC ALARM
The Intel ligent Key can also be used to activate the panic alarm by pressing and
holding the button 6 for more than 1 second. Once activated, the panic
alarm and headlights will stay on for a period of time.
INTELLIGENT KEY BATTERY DISCHARGE
If the bat tery of the Intelligent Key is discharged or environmental
conditions interfere with the Intelligent Key operation, start the engine
according to the following procedure:
1. Move the shif t lever to the
P (PARK) position.
2. Firmly apply the foot brake.
3. Touch the ignition switch with the
Intelligent Key, and a chime will sound.
4. Within 10 sec onds af ter the chime sounds,
press the ignition switch START/STOP
button while depressing the brake pedal and the engine will start.
*State laws may apply; review local laws before using.
Please see your Owner’s Manual for important safety information, system limitations, and additional operating and
feature information.
For more information, refer to the “
Pre-driving checks and adjustments (section 3)”, the “Starting and
driving (section 5)” and the “Do-it-yourself (section 8)” of your Owner’s Manual.
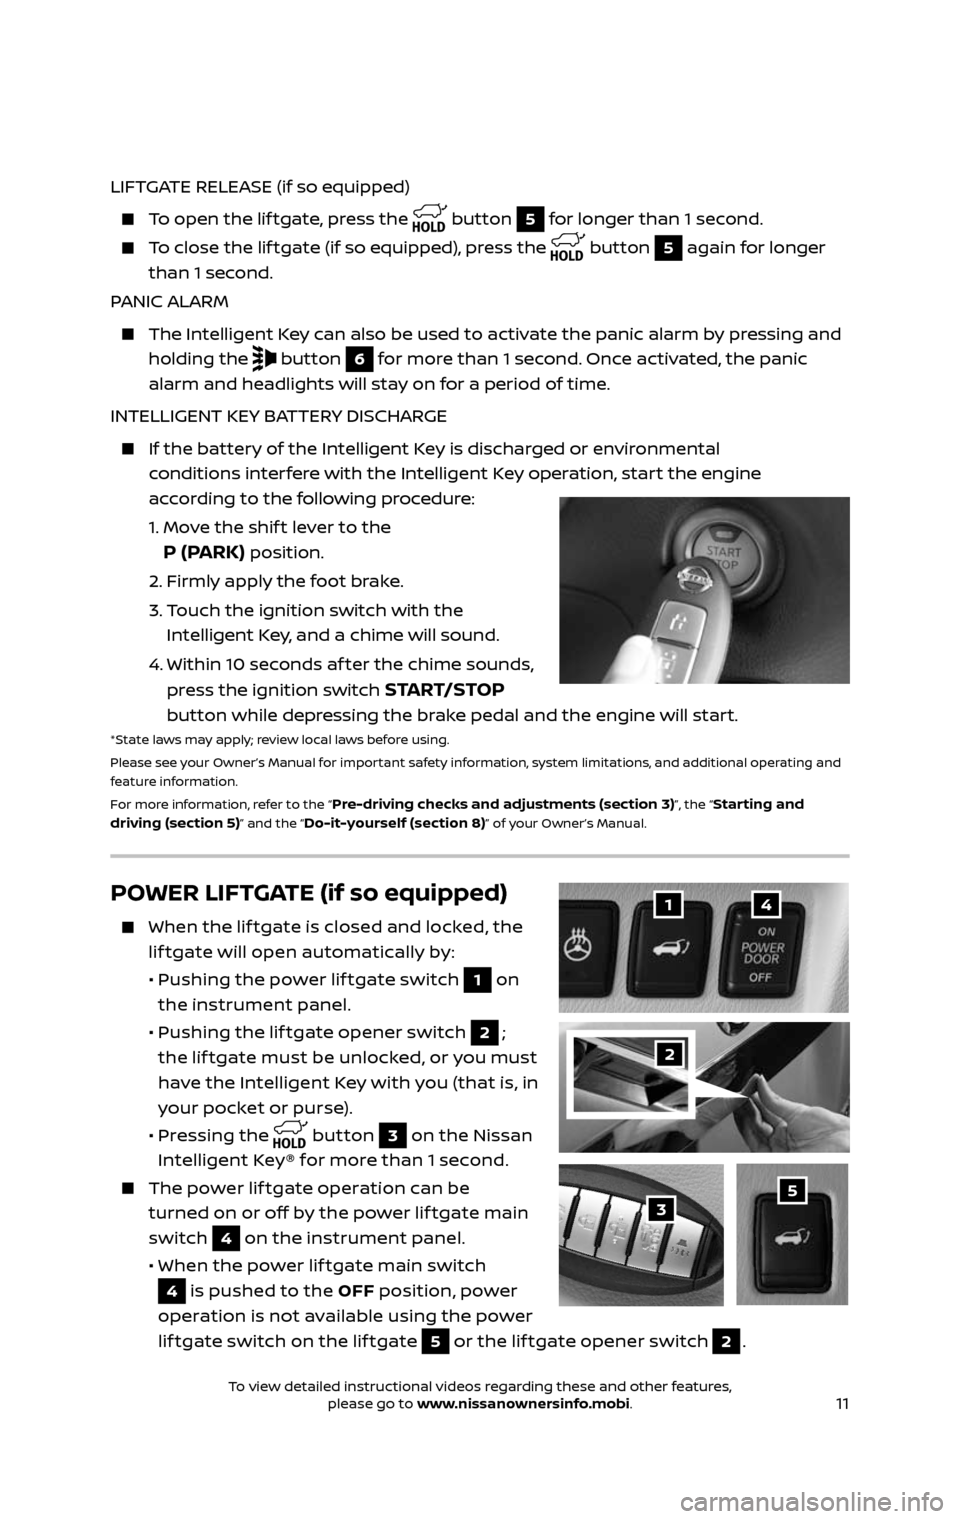
POWER LIFTGATE (if so equipped)
When the lif tgate is closed and locked, the
lif tgate will open automatically by:
• Pushing the power lif tgate switch 1 on
the instrument panel.
• Pushing the lif tgate opener switch 2;
the lif tgate must be unlocked, or you must
have the Intelligent Key with you (that is, in
your pocket or purse).
• Pressing the button 3 on the Nissan
Intelligent Key® for more than 1 second.
The power lif tgate operation can be
turned on or off by the power lif tgate main
switch
4 on the instrument panel.
• When the power lif tgate main switch
4 is pushed to the OFF position, power
operation is not available using the power
lif tgate switch on the lif tgate
5 or the lif tgate opener switch 2 .
14
53
2
2485215_17b_Pathfinder_pQRG_111816b.indd 1111/18/16 1:44 PM
To view detailed instructional videos regarding these and other features, please go to www.nissanownersinfo.mobi.To view detailed instructional videos regarding these and other features, please go to www.nissanownersinfo.mobi.
Page 17 of 40
15
OUTSIDE MIRROR CONTROL SWITCH
To select the right or lef t side mirror, move the
control switch 1 right or lef t.
Adjust each mirror to the desired position
using the switch 2.
REVERSE TILT-DOWN FEATURE (if so equipped)
The reverse tilt-down feature will turn both outside mirror surfaces downward
to provide better rear visibility close to the vehicle.
1. Apply the brake.
2. Place the ignition switch in the ON position.
3. Move the shif t lever to the R (REVERSE) position.
4. The outside mirr or surfaces will move downward. (The mirror control
switch
1 must be out of the center [neutral] position.)
The outside mirr or surfaces will return to their original positions when one of
the following conditions has occurred:
1. The shift lever is moved to any position other than R (REVERSE).
2. The outside mirr or control switch 1 is set to the center (neutral) position.
3. The ignition switch is plac ed in the OFF position.
Please see your Owner’s Manual for important safety information, system limitations, and additional operating and
feature information.
For more information, refer to the “
Pre-driving checks and adjustments (section 3)” of your Owner’s Manual.
12
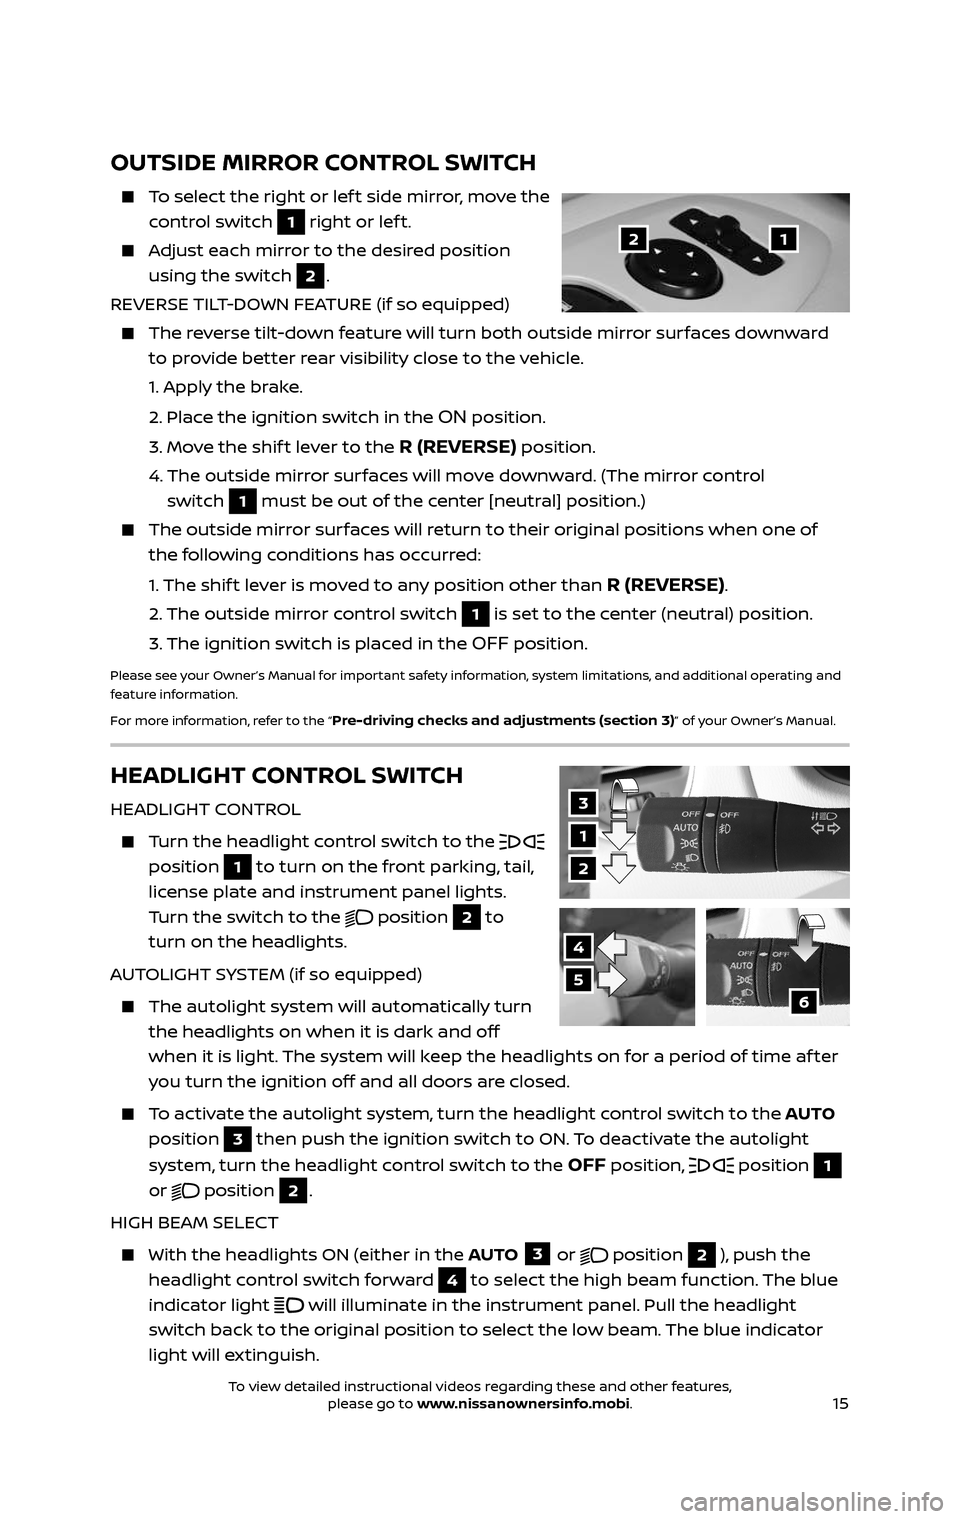
HEADLIGHT CONTROL SWITCH
HEADLIGHT CONTROL
Turn the headlight control switch to the
position 1 to turn on the front parking, tail,
license plate and instrument panel lights.
Turn the switch to the
position 2 to
turn on the headlights.
AUTOLIGHT SYSTEM (if so equipped)
The autolight system wil l automatically turn
the headlights on when it is dark and off
when it is light. The system will keep the headlights on for a period of time af ter
you turn the ignition off and all doors are closed.
To activate the autolight system, turn the headlight control switch to the AUTO
position
3 then push the ignition switch to ON. To deactivate the autolight
system, turn the headlight control switch to the
OFF position, position 1
or
position 2.
HIGH BEAM SELECT
With the he adlights ON (either in the AUTO 3 or position 2 ), push the
headlight control switch forward
4 to select the high beam function. The blue
indicator light
will illuminate in the instrument panel. Pull the headlight
switch back to the original position to select the low beam. The blue indicator
light will extinguish.
3
1
2
4
56
2485215_17b_Pathfinder_pQRG_111816b.indd 1511/18/16 1:45 PM
To view detailed instructional videos regarding these and other features, please go to www.nissanownersinfo.mobi.To view detailed instructional videos regarding these and other features, please go to www.nissanownersinfo.mobi.
Page 21 of 40
19
REAR CLIMATE CONTROLS
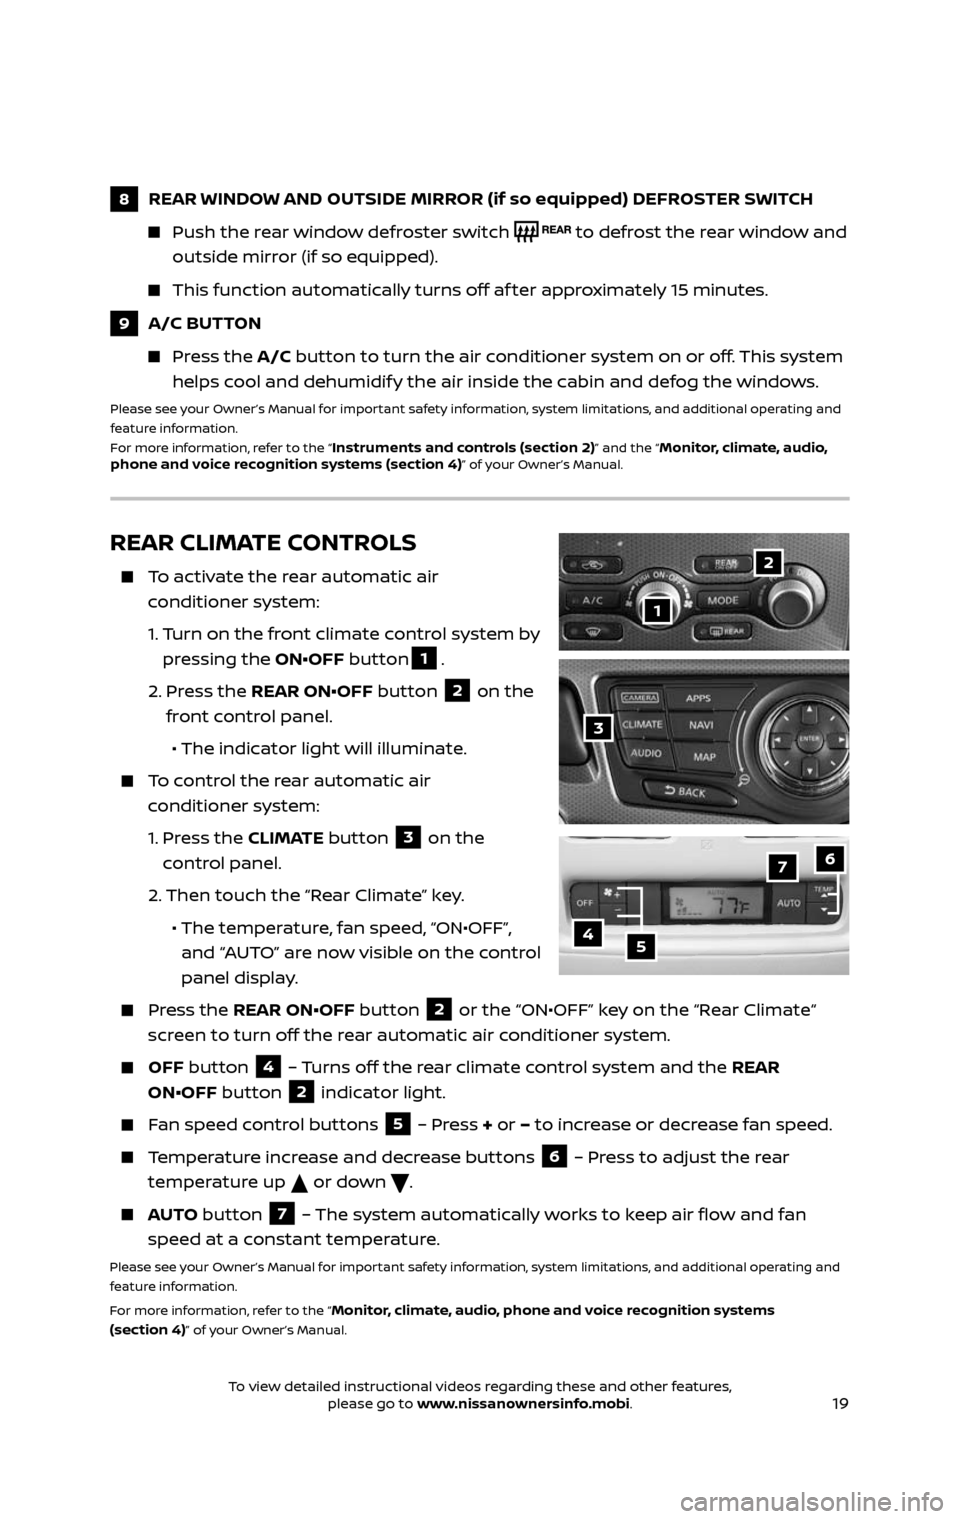
To activate the rear automatic air
conditioner system:
1. Turn on the front climate control system by
pressing the ON•OFF button1.
2. Press the REAR ON•OFF button 2 on the
front control panel.
• The indicator light will illuminate.
To control the rear automatic air
conditioner system:
1. Press the CLIMATE button 3 on the
control panel.
2. Then touch the “Rear Climate” key.
• The temper ature, fan speed, “ON•OFF”,
and “AUTO” are now visible on the control
panel display.
Press the REAR ON•OFF button 2 or the “ON•OFF” key on the “Rear Climate“
screen to turn off the rear automatic air conditioner system.
OFF button 4 – Turns off the rear climate control system and the REAR
ON•OFF button
2 indicator light.
Fan speed control buttons 5 – Press + or – to increase or decrease fan speed.
Temperature increase and decrease buttons 6 – Press to adjust the rear
temperature up
or down .
AUTO button 7 – The system automatically works to keep air flow and fan
speed at a constant temperature.
Please see your Owner’s Manual for important safety information, system limitations, and additional operating and
feature information.
For more information, refer to the “
Monitor, climate, audio, phone and voice recognition systems
(section 4)” of your Owner’s Manual.
2
4
7
5
6
1
3
8 REAR WINDOW AND OUTSIDE MIRROR (if so equipped) DEFROSTER SWITCH
Push the r ear window defroster switch to defrost the rear window and
outside mirror (if so equipped).
This function automatically turns off af ter approximately 15 minutes.
9 A/C BUTTON
Press the A/C button to turn the air conditioner system on or off. This system
helps cool and dehumidify the air inside the cabin and defog the windows.
Please see your Owner’s Manual for important safety information, system limitations, and additional operating and
feature information.
For more information, refer to the “
Instruments and controls (section 2)” and the “Monitor, climate, audio,
phone and voice recognition systems (section 4)” of your Owner’s Manual.
2485215_17b_Pathfinder_pQRG_111816b.indd 1911/18/16 1:45 PM
To view detailed instructional videos regarding these and other features, please go to www.nissanownersinfo.mobi.To view detailed instructional videos regarding these and other features, please go to www.nissanownersinfo.mobi.
Page 24 of 40
22
INTELLIGENT CRUISE CONTROL (ICC) (if so equipped)
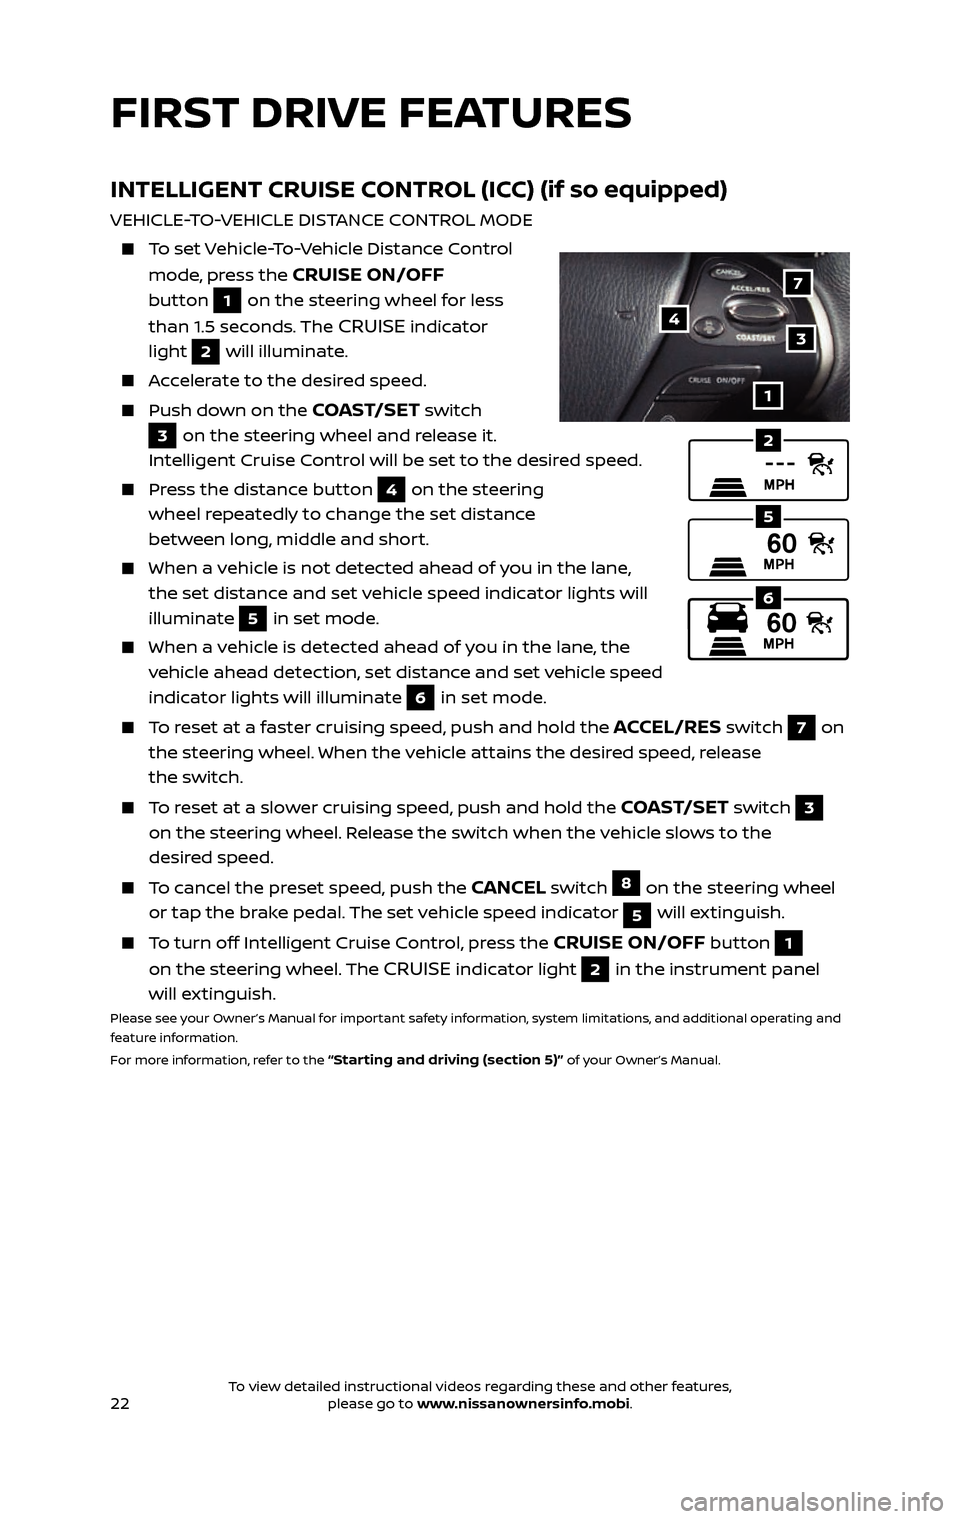
VEHICLE-TO-VEHICLE DISTANCE CONTROL MODE
To set Vehicle-To-Vehicle Distance Control
mode, press the CRUISE ON/OFF
button
1 on the steering wheel for less
than 1.5 seconds. The
CRUISE indicator
light
2 will illuminate.
Accelerate to the desired speed.
Push down on the COAST/SET switch
3 on the steering wheel and release it.
Intelligent Cruise Control will be set to the desired speed.
Press the distance button 4 on the steering
wheel repeatedly to change the set distance
between long, middle and short.
When a v ehicle is not detected ahead of you in the lane,
the set distance and set vehicle speed indicator lights will
illuminate
5 in set mode.
When a vehicle is detected ahead of you in the lane, the
vehicle ahead detection, set distance and set vehicle speed
indicator lights will illuminate
6 in set mode.
To reset at a faster cruising speed, push and hold the ACCEL/RES switch 7 on
the steering wheel. When the vehicle attains the desired speed, release
the switch.
To reset at a slower cruising speed, push and hold the COAST/SET switch 3 on the steering wheel. Release the switch when the vehicle slows to the
desired speed.
To cancel the preset speed, push the CANCEL switch 8 on the steering wheel
or tap the brake pedal. The set vehicle speed indicator
5 will extinguish.
To turn off Intelligent Cruise Control, press the CRUISE ON/OFF button 1 on the steering wheel. The CRUISE indicator light 2 in the instrument panel
will extinguish.
Please see your Owner’s Manual for important safety information, system limitations, and additional operating and
feature information.
For more information, refer to the
“Starting and driving (section 5)” of your Owner’s Manual.
2
6
1
7
34
5
FIRST DRIVE FEATURES
2485215_17b_Pathfinder_pQRG_111816b.indd 2211/18/16 1:45 PM
To view detailed instructional videos regarding these and other features, please go to www.nissanownersinfo.mobi.To view detailed instructional videos regarding these and other features, please go to www.nissanownersinfo.mobi.
Page 25 of 40
23
POWER OUTLETS
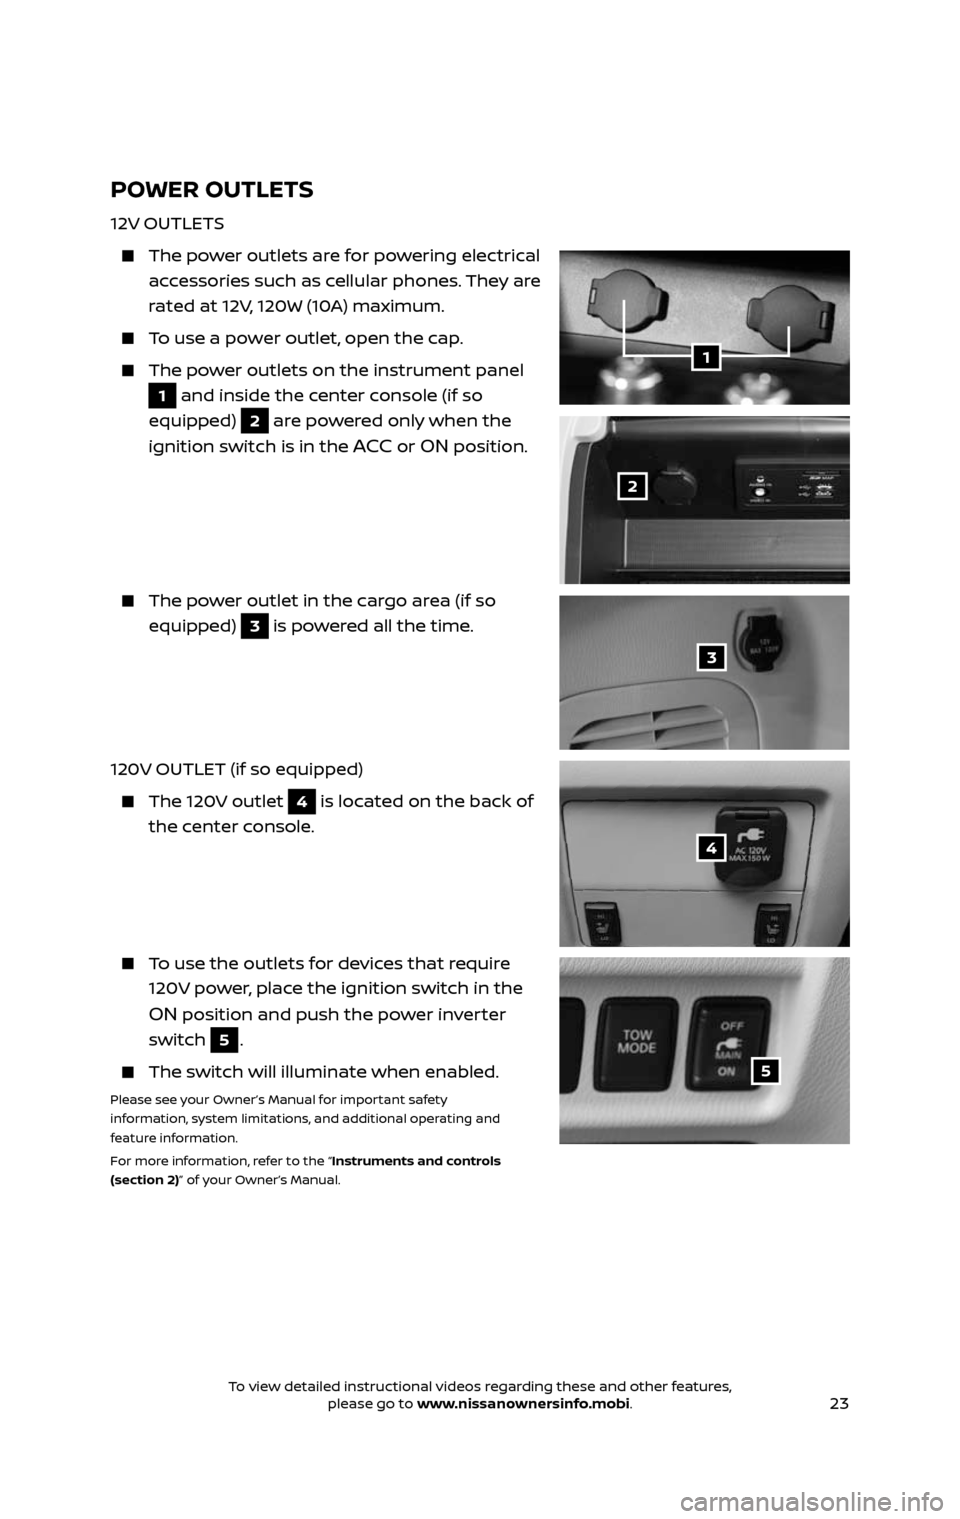
12V OUTLETS
The power outlets are for powering electrical
accessories such as cellular phones. They are
rated at 12V, 120W (10A) maximum.
To use a power outlet, open the cap.
The power outlets on the instrument panel
1 and inside the center console (if so
equipped)
2 are powered only when the
ignition switch is in the
ACC or ON position.
The power outlet in the cargo area (if so
equipped) 3 is powered all the time.
120V OUTLET (if so equipped)
The 120V outlet 4 is located on the back of
the center console.
To use the outlets for devices that require
120V power, place the ignition switch in the
ON position and push the power inverter
switch
5.
The switch wil l illuminate when enabled.
Please see your Owner’s Manual for important safety
information, system limitations, and additional operating and
feature information.
For more information, refer to the “Instruments and controls
(section 2)” of your Owner’s Manual.
1
2
3
4
5
2485215_17b_Pathfinder_pQRG_111816b.indd 2311/18/16 1:45 PM
To view detailed instructional videos regarding these and other features, please go to www.nissanownersinfo.mobi.To view detailed instructional videos regarding these and other features, please go to www.nissanownersinfo.mobi.