Page 198 of 555
SYSTEM OPERATION
The automatic drive positioner system will not
work or will stop operating under the following
conditions:● When the vehicle speed is above 0 mph
(0 km/h) or 4 mph (7km/h) for some limited
functions such as linking a key fob to the
meter when the power source is turned on
from off or during the Exit function.
● When any of the memory switches are
pushed while the automatic drive positioner
is operating.
● When the adjusting switch for the driver’s
seat and steering column is turned on while
the automatic drive positioner is operating.
● When the seat has already been moved to
the memorized position.
● When no seat position is stored in the
memory switch.
● When the shift lever is moved from P (Park)
to any other position.
Pre-driving checks and adjustments3-39
Page 200 of 555

4 Monitor, climate, audio, phone and voice
recognition systems
Safety Precautions.................................4-4
Starting System ...................................4-4
Start-up warning (models with navigation
system) .......................................4-4
Center Multi-Function Control Panel .................4-5
Control panel ..................................4-6
Multi-function controller .........................4-7
Steering wheel switch ...........................4-8
Touch panel operation ..........................4-9
Operating menu screens .......................4-11
Scrolling list or message .......................4-11
Selecting item ................................. 4-11
Adjusting settings ............................. 4-12
Character (letters and numbers) input
screen ....................................... 4-12
System status screen .......................... 4-13
Information and Settings .......................... 4-14
Information screen ............................. 4-14
Settings screen ............................... 4-16
RearView Monitor (if so equipped) ..................4-21
RearView Monitor system operation .............4-22
How to read the displayed lines .................4-22
Difference between predicted and actual
distances ..................................... 4-23How to park with predicted course lines
..........4-24
Adjusting the screen ........................... 4-26
How to turn on and off predicted course
lines ......................................... 4-26
RearView Monitor system limitations .............4-26
System maintenance ........................... 4-27
Around View® Monitor (if so equipped) .............4-28
Around View® Monitor system operation .........4-29
Difference between predicted and actual
distances ..................................... 4-32
How to park with predicted course lines ..........4-34
How to switch the display ......................4-35
Adjusting the screen ........................... 4-36
Around View® Monitor system limitations ........4-36
System maintenance ........................... 4-38
Camera Aiding Sonar (parking sensor)
(if so equipped) .................................. 4-39
Sonar System
Operation ....................... 4-40
Turning ON and OFF the sonar function ..........4-40
Sonar System Limitations .......................4-41
System Maintenance ........................... 4-41
Moving Object Detection (MOD) (if so equipped) ....4-42
MOD system operation ......................... 4-43
Turning MOD on and off ........................ 4-44
Page 207 of 555

�4Center dialTurn to highlight an item on the screen or
adjust a setting.
STEERING WHEEL SWITCH
�1ENTER button
Tilt to highlight an item on the screen or
adjust a setting. Push to select the high-
lighted item.
�2button
Push this switch to go back to the previous
screen or cancel the selection if it is not
completed. NOTE:
You are unable to operate the display of
NissanConnect
SMusing the buttons on the
steering wheel switch whenever the meter
shows the setting display.
�3+- button
Use to adjust the volume. These buttons
have the same function as that of the VOL
button on the audio system.
For additional information, refer to “Steering
wheel switch for audio control” in this sec-
tion.
�4SOURCE button
Use to switch the audio mode (source) .
For additional information, refer to “Steering
wheel switch for audio control” in this sec-
tion.
�5(TALK) button
Push to start a voice recognition session.
During a voice recognition session, pushing
this button cancels the voice guidance and
you can speak a voice command immedi-
ately.
Push and hold this button to end a voice
recognition session.
JNB0462X
4-8Monitor, climate, audio, phone and voice recognition systems
Page 222 of 555

Vehicle width guide lines�5
Indicate the vehicle width when backing up.
Predicted course lines
�6
Indicate the predicted course when backing up.
The predicted course lines will be displayed on
the monitor when the shift lever is in the R (Re-
verse) position and the steering wheel is turned.
The predicted course lines will move depending
on how much the steering wheel is turned and
will not be displayed while the steering wheel is in
the straight-ahead position.
The vehicle width guide lines and the width of the
predicted course lines are wider than the actual
width and course.
DIFFERENCE BETWEEN
PREDICTED AND ACTUAL
DISTANCES
The displayed guidelines and their locations on
the ground are for approximate reference only.
Objects on uphill or downhill surfaces or project-
ing objects will be actually located at distances
different from those displayed in the monitor rela-
tive to the guidelines (refer to illustrations) . When
in doubt, turn around and view the objects as you
are backing up, or park and exit the vehicle to
view the positioning of objects behind the ve-
hicle.
Backing up on a steep uphill
When backing up the vehicle up a hill, the dis-
tance guide lines and the vehicle width guide
lines are shown closer than the actual distance.
Note that any object on the hill is further than it
appears on the monitor.
Backing up on a steep downhill
When backing up the vehicle down a hill, the
distance guide lines and the vehicle width guide
lines are shown farther than the actual distance.
Note that any object on the hill is closer than it
appears on the monitor.
LHA3763LHA3764
Monitor, climate, audio, phone and voice recognition systems4-23
Page 223 of 555

Backing up near a projecting object
The predicted course lines�Ado not touch the
object in the display. However, the vehicle may hit
the object if it projects over the actual backing up
course.
Backing up behind a projecting object
The position�Cis shown farther than the position
�Bin the display. However, the position�Cis
actually at the same distance as the position
�A.
The vehicle may hit the object when backing up to the position
�Aif the object projects over the
actual backing up course.
HOW TO PARK WITH PREDICTED
COURSE LINES
WARNING
● If the tires are replaced with different
sized tires, the predicted course lines
may be displayed incorrectly.
● On a snow-covered or slippery road,
there may be a difference between the
predicted course line and the actual
course line.
● If the battery is disconnected or be-
comes discharged, the predicted course
lines may be displayed incorrectly. If
this occurs, please perform the follow-
ing procedures:
– Turn the steering wheel from lock to lock while the engine is running.
– Drive the vehicle on a straight road for more than 5 minutes.
● When the steering wheel is turned with
the ignition switch in the ACC position,
the predicted course lines may be dis-
played incorrectly.
LHA1201LHA4387
4-24Monitor, climate, audio, phone and voice recognition systems
Page 224 of 555
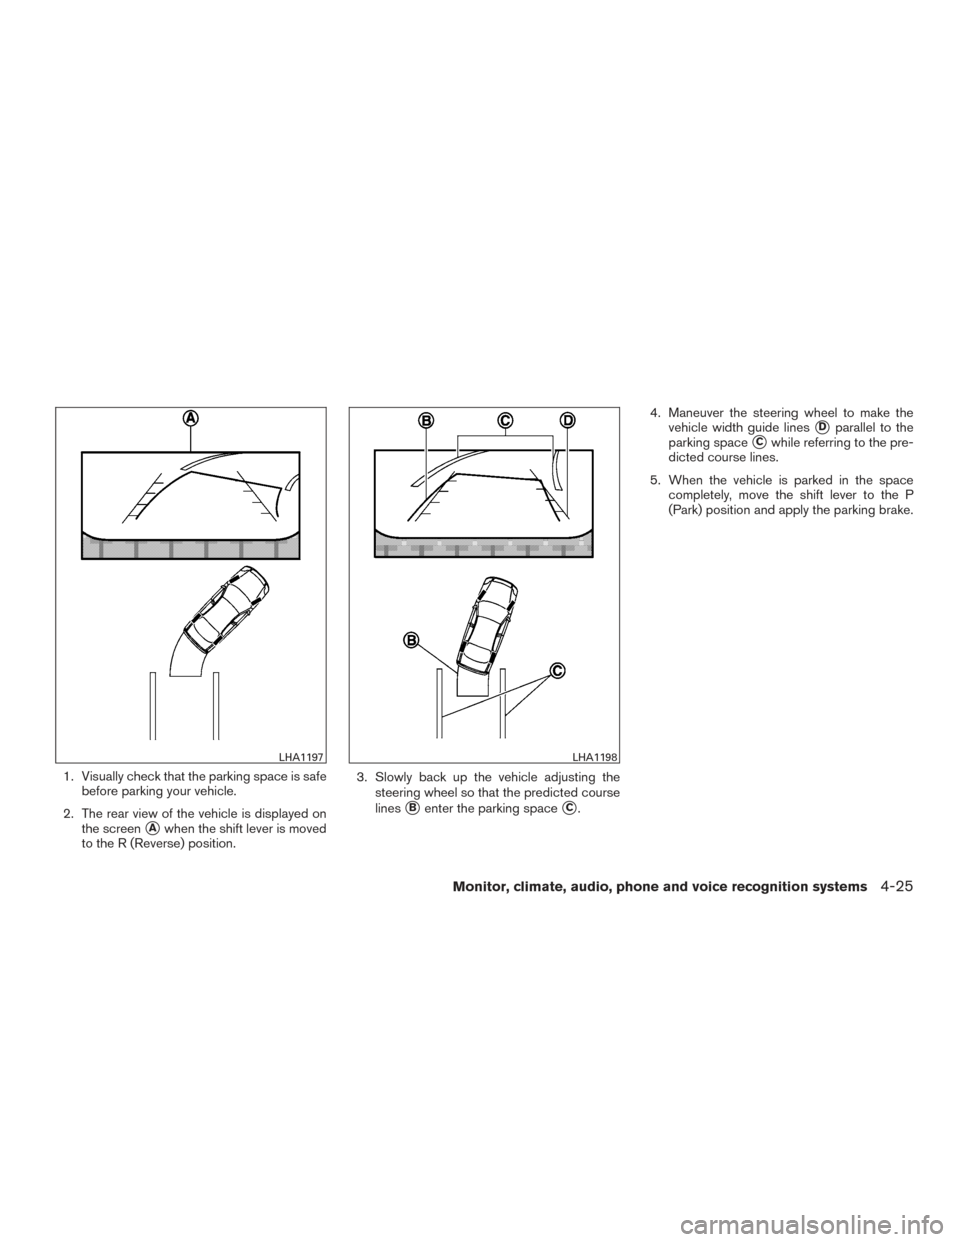
1. Visually check that the parking space is safebefore parking your vehicle.
2. The rear view of the vehicle is displayed on the screen
�Awhen the shift lever is moved
to the R (Reverse) position. 3. Slowly back up the vehicle adjusting the
steering wheel so that the predicted course
lines
�Benter the parking space�C. 4. Maneuver the steering wheel to make the
vehicle width guide lines
�Dparallel to the
parking space
�Cwhile referring to the pre-
dicted course lines.
5. When the vehicle is parked in the space completely, move the shift lever to the P
(Park) position and apply the parking brake.
LHA1197LHA1198
Monitor, climate, audio, phone and voice recognition systems4-25
Page 230 of 555

Vehicle width guide lines�5:
Indicate the approximate vehicle width when
backing up.
Predicted course lines
�6:
Indicate the predicted course when operating the
vehicle. The predicted course lines will be dis-
played on the monitor when the steering wheel is
turned. The predicted course lines will move de-
pending on how much the steering wheel is
turned and will not be displayed while the steer-
ing wheel is in the straight-ahead position. The front view will not be displayed when the
vehicle speed is above 6 mph (10 km/h).
NOTE:
When the monitor displays the front view
and the steering wheel turns about 90 de-
grees or less from the straight-ahead posi-
tion, both the right and left predicted
course lines
�6are displayed. When the
steering wheel turns about 90 degrees or
more, a line is displayed only on the oppo-
site side of the turn.
Bird’s-eye view
The bird’s-eye view shows the overhead view of
the vehicle, which helps confirm the vehicle po-
sition and the predicted course to a parking
space.
The vehicle icon
�1shows the position of the
vehicle. Note that the apparent distance between
objects viewed in the bird’s-eye view may differ
somewhat from the actual distance to the vehicle.
The areas that the cameras cannot cover
�2are
indicated in black.
Rear view
SAA1896LHA3730
Monitor, climate, audio, phone and voice recognition systems4-31
Page 233 of 555

Backing up behind a projecting object
The position�Cis shown farther than the position
�Bin the display. However, the position�Cis
actually at the same distance as the position
�A.
The vehicle may hit the object when backing up to the position
�Aif the object projects over the
actual backing up course.
HOW TO PARK WITH PREDICTED
COURSE LINES
WARNING
● If the tires are replaced with different
sized tires, the predicted course lines
may be displayed incorrectly.
● On a snow-covered or slippery road,
there may be a difference between the
predicted course line and the actual
course line.
● If the battery is disconnected or be-
comes discharged, the predicted course
lines may be displayed incorrectly. If
this occurs, please perform the follow-
ing procedures:
– Turn the steering wheel from lock to lock while the engine is running.
– Drive the vehicle on a straight road for more than 5 minutes.
● When the steering wheel is turned with
the ignition switch in the ACC position,
the predicted course lines may be dis-
played incorrectly. 1. Visually check that the parking space is safe
before parking your vehicle.
2. The rear view of the vehicle is displayed on the screen
�Awhen the shift lever is moved
to the R (Reverse) position.
LHA4387LHA1197
4-34Monitor, climate, audio, phone and voice recognition systems
 or 4 mph (7km/h) for some")