2017 NISSAN PATHFINDER Steering
[x] Cancel search: SteeringPage 92 of 555
17. Cruise control main/set switches(if so equipped) (P. 5-38)
Intelligent Cruise Control (ICC)
switches (if so equipped) (P. 5-40)
18. Tilt and telescopic steering wheel con-
trol (P. 3-31)
19. Control panel and vehicle information
display switches (P. 2-19)
Bluetooth® Hands-Free Phone System
(P. 4-113)
20. Hood release (P. 3-20)
21. Vehicle Dynamic Control (VDC) OFF
switch (P. 2-44)
Tow mode switch (P. 2-46)
Power liftgate main switch
(if so equipped) (P. 3-21)
Warning systems switch
(if so equipped) (P. 2-46)
Heated steering wheel switch
(if so equipped) (P. 2-44)
Power inverter switch (if so equipped)
(P. 2-47)
*: Refer to the separate Navigation System Own-
er’s Manual (if so equipped) .
Refer to the page number indicated in pa-
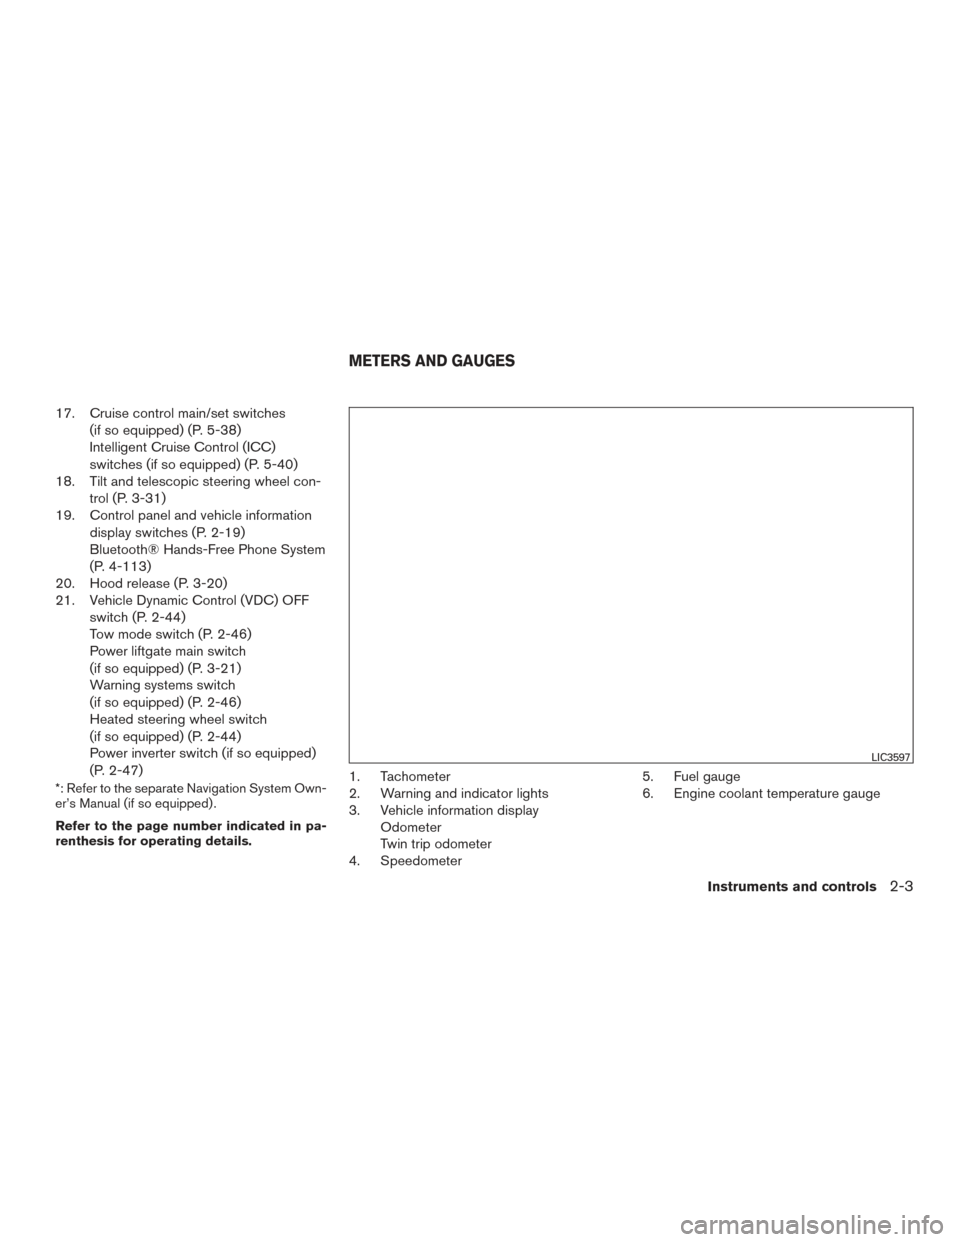
renthesis for operating details.1. Tachometer
2. Warning and indicator lights
3. Vehicle information displayOdometer
Twin trip odometer
4. Speedometer 5. Fuel gauge
6. Engine coolant temperature gauge
LIC3597
METERS AND GAUGES
Instruments and controls2-3
Page 99 of 555
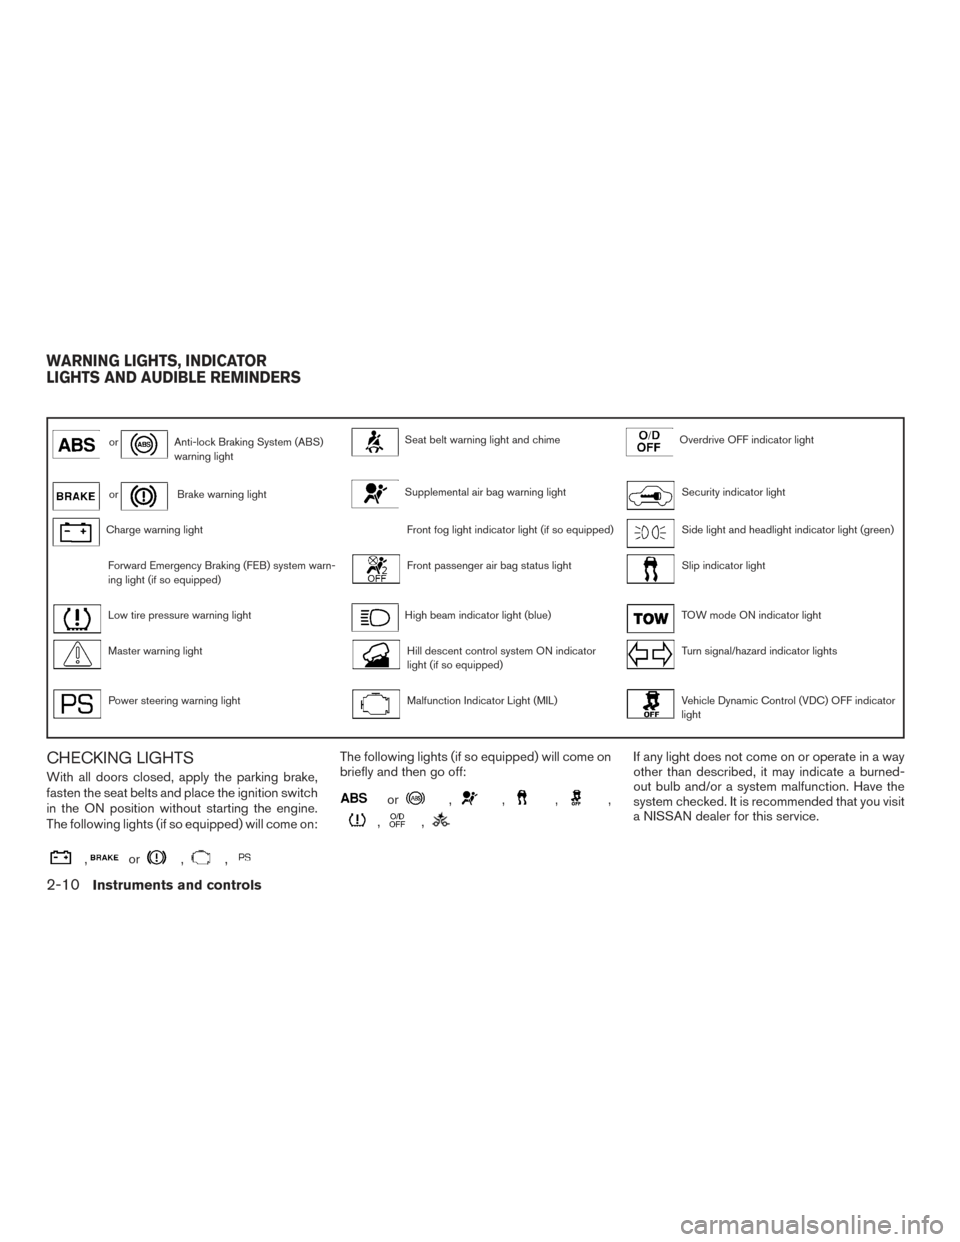
orAnti-lock Braking System (ABS)
warning lightSeat belt warning light and chimeOverdrive OFF indicator light
orBrake warning lightSupplemental air bag warning lightSecurity indicator light
Charge warning lightFront fog light indicator light (if so equipped)Side light and headlight indicator light (green)
Forward Emergency Braking (FEB) system warn-
ing light (if so equipped)Front passenger air bag status lightSlip indicator light
Low tire pressure warning lightHigh beam indicator light (blue)TOW mode ON indicator light
Master warning lightHill descent control system ON indicator
light (if so equipped)Turn signal/hazard indicator lights
Power steering warning lightMalfunction Indicator Light (MIL)Vehicle Dynamic Control (VDC) OFF indicator
light
CHECKING LIGHTS
With all doors closed, apply the parking brake,
fasten the seat belts and place the ignition switch
in the ON position without starting the engine.
The following lights (if so equipped) will come on:
,or,,
The following lights (if so equipped) will come on
briefly and then go off:
or,,,,
,,
If any light does not come on or operate in a way
other than described, it may indicate a burned-
out bulb and/or a system malfunction. Have the
system checked. It is recommended that you visit
a NISSAN dealer for this service.
WARNING LIGHTS, INDICATOR
LIGHTS AND AUDIBLE REMINDERS
2-10Instruments and controls
Page 102 of 555
For additional information, refer to “Tire Pressure
Monitoring System (TPMS)” in the “Starting and
driving” section and “Tire pressure” in the “Do-it-
yourself” section of this manual.
WARNING
●Radio waves could adversely affect
electric medical equipment. Those who
use a pacemaker should contact the
electric medical equipment manufac-
turer for the possible influences before
use.
● If the light does not illuminate with the
ignition switch placed in the ON posi-
tion, have the vehicle checked as soon
as possible. It is recommended that you
visit a NISSAN dealer for this service. ●
If the light illuminates while driving,
avoid sudden steering maneuvers or
abrupt braking, reduce vehicle speed,
pull off the road to a safe location and
stop the vehicle as soon as possible.
Driving with under-inflated tires may
permanently damage the tires and in-
crease the likelihood of tire failure. Se-
rious vehicle damage could occur and
may lead to an accident and could result
in serious personal injury or death.
Check the tire pressure for all four tires.
Adjust the tire pressure to the recom-
mended COLD tire pressure shown on
the Tire and Loading Information label
located in the driver’s door opening to
turn the low tire pressure warning light
off. If the light still illuminates while
driving after adjusting the tire pressure,
a tire may be flat or the TPMS may be
malfunctioning. If you have a flat tire,
replace it with a spare tire as soon as
possible. If no tire is flat and all tires are
properly inflated, have the vehicle
checked. It is recommended that you
visit a NISSAN dealer for this service. ●
Since the spare tire is not equipped with
the TPMS, when a spare tire is mounted
or a wheel is replaced, the TPMS will
not function and the low tire pressure
warning light will flash for approxi-
mately 1 minute. The light will remain
on after 1 minute. Have your tires re-
placed and/or TPMS system reset as
soon as possible. It is recommended
that you visit a NISSAN dealer for these
services.
● Replacing tires with those not originally
specified by NISSAN could affect the
proper operation of the TPMS.
CAUTION
●The TPMS is not a substitute for the
regular tire pressure check. Be sure to
check the tire pressure regularly.
● If the vehicle is being driven at speeds
of less than 16 mph (25 km/h), the
TPMS may not operate correctly.
● Be sure to install the specified size of
tires to the four wheels correctly.
Instruments and controls2-13
Page 103 of 555
Master warning light
When the ignition is in the ON position, the
master warning light illuminates if any of the fol-
lowing are displayed on the vehicle information
display.● No key warning
● Low fuel warning
● Low windshield-washer fluid warning
● Parking brake release
● Door open warning
● Check tire pressure warning
For additional information, refer to “Vehicle infor-
mation display” in this section.
Power steering warning light
WARNING
● If the engine is not running or is turned
off while driving, the power assist for
the steering will not work. Steering will
be harder to operate. ●
When the power steering warning light
illuminates with the engine running,
there will be no power assist for the
steering. You will still have control of
the vehicle, but the steering will be
harder to operate. Have the power
steering system checked. It is recom-
mended that you visit a NISSAN dealer
for this service.
When the ignition switch is placed in the ON
position, the power steering warning light illumi-
nates. After starting the engine, the power steer-
ing warning light turns off. This indicates the
power steering is operational.
If the power steering warning light illuminates
while the engine is running, it may indicate the
power steering is not functioning properly and
may need servicing. Have the power steering
checked. It is recommended that you visit a
NISSAN dealer for this service.
When the power steering warning light illumi-
nates with the engine running, there will be no
power assist for the steering, but you will still
have control of the vehicle. At this time, greater
steering effort is required to operate the steering
wheel, especially in sharp turns and at low
speeds. For additional information, refer to “Power steer-
ing” in the “Starting and driving” section of this
manual.
Seat belt warning light and
chime
The light and chime remind you to fasten your
seat belts. The light illuminates whenever the
ignition switch is placed in the ON or START
position and remains illuminated until the driver’s
seat belt is fastened. At the same time, the chime
sounds for about 6 seconds unless the driver’s
seat belt is securely fastened.
The seat belt warning light may also illuminate if
the front passenger’s seat belt is not fastened
when the front passenger’s seat is occupied . For
7 seconds after the ignition switch is placed in
the ON position, the system does not activate the
warning light for the front passenger.
For additional information, refer to “Seat belts” in
the “Safety—Seats, seat belts and supplemental
restraint system” section of this manual.
Supplemental air bag warninglight
When the ignition switch is placed in the ON or
START position, the supplemental air bag warn-
ing light illuminates for about 7 seconds and then
turns off. This means the system is operational.
2-14Instruments and controls
Page 108 of 555
HOW TO USE THE VEHICLE
INFORMATION DISPLAY
The vehicle information display can be navigated
using the
,, ENTER , andbuttons located on the steering wheel.1.
— select/enter the vehicle information
display menu items or to change from one
display screen to the next (i.e. trip, settings,
fuel economy)
2.
— navigate through the items in the
vehicle information display
ENTER — change or select an item in the
vehicle information display 3.
— go back to the previous menu
The ENTER and
buttons also control audio
and control panel functions. For additional infor-
mation, refer to “Steering wheel switch for audio
control” in the “Monitor, climate, audio, phone
and voice recognition systems” section of this
manual.
STARTUP DISPLAY
When the vehicle in placed in the ON or ACC
position the screens that display in the vehicle
information include:
● Active system status (if so equipped)
● Trip computer
● Tire pressure information
● 4WD (if so equipped)
● Fuel economy
● Distance to empty
● Warnings
Warnings will only display if there are any pres-
ent. For additional information on warnings and
indicators refer to “Vehicle information display
warnings and indicators” in this section.
To control what items display in the vehicle infor-
mation display, refer to “Main menu selection” in
this section.
RESETTING THE TRIP COMPUTER
1. Press thebutton until you reach the
trip computer mode.
2. Press the
button again for more than
1.5 seconds to reset average fuel consump-
tion, average speed, distance to empty, and
journey time.
SETTINGS
The setting mode allows you to change the infor-
mation displayed in the vehicle information dis-
play:
● Driver Assistance (if so equipped)
● Vehicle Settings
● Main Menu Selection
● Body Color
● Maintenance
● Alarms
● Language
● Units
● Welcome Effect
● Factory Reset
LIC2245
Instruments and controls2-19
Page 110 of 555
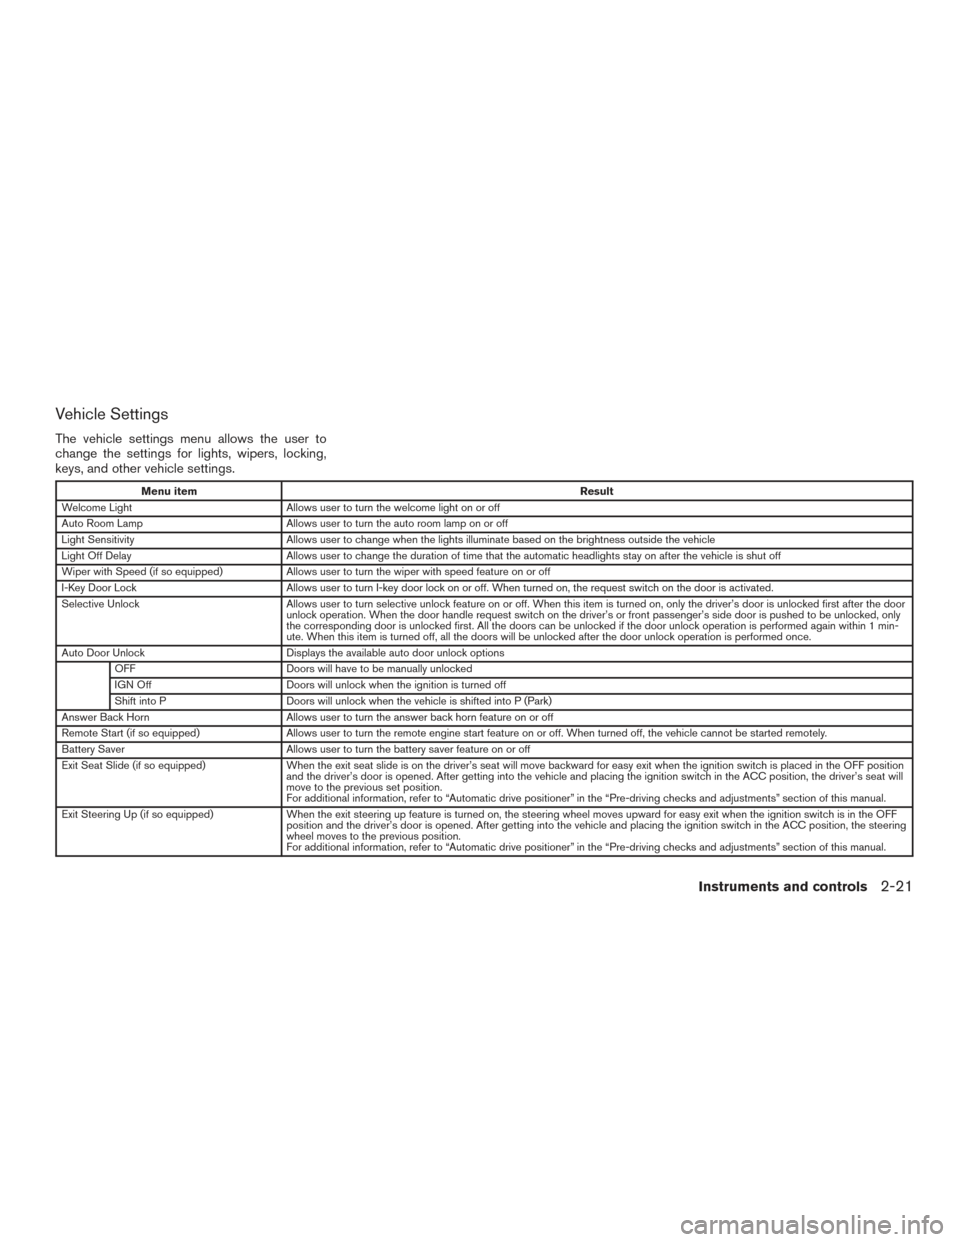
Vehicle Settings
The vehicle settings menu allows the user to
change the settings for lights, wipers, locking,
keys, and other vehicle settings.
Menu itemResult
Welcome Light Allows user to turn the welcome light on or off
Auto Room Lamp Allows user to turn the auto room lamp on or off
Light Sensitivity Allows user to change when the lights illuminate based on the brightness outside the vehicle
Light Off Delay Allows user to change the duration of time that the automatic headlights stay on after the vehicle is shut off
Wiper with Speed (if so equipped) Allows user to turn the wiper with speed feature on or off
I-Key Door Lock Allows user to turn I-key door lock on or off. When turned on, the request switch on the door is activated.
Selective Unlock Allows user to turn selective unlock feature on or off. When this item is turned on, only the driver’s door is unlocked first after the door
unlock operation. When the door handle request switch on the driver’s or front passenger’s side door is pushed to be unlocked, only
the corresponding door is unlocked first. All the doors can be unlocked if the door unlock operation is performed again within 1 min-
ute. When this item is turned off, all the doors will be unlocked after the door unlock operation is performed once.
Auto Door Unlock Displays the available auto door unlock options
OFF Doors will have to be manually unlocked
IGN Off Doors will unlock when the ignition is turned off
Shift into P Doors will unlock when the vehicle is shifted into P (Park)
Answer Back Horn Allows user to turn the answer back horn feature on or off
Remote Start (if so equipped) Allows user to turn the remote engine start feature on or off. When turned off, the vehicle cannot be started remotely.
Battery Saver Allows user to turn the battery saver feature on or off
Exit Seat Slide (if so equipped) When the exit seat slide is on the driver’s seat will move backward for easy exit when the ignition switch is placed in the OFF position
and the driver’s door is opened. After getting into the vehicle and placing the ignition switch in the ACC position, the driver’s seat will
move to the previous set position.
For additional information, refer to “Automatic drive positioner” in the “Pre-driving checks and adjustments” section of this manual.
Exit Steering Up (if so equipped) When the exit steering up feature is turned on, the steering wheel moves upward for easy exit when the ignition switch is in the OFF
position and the driver’s door is opened. After getting into the vehicle and placing the ignition switch in the ACC position, the steering
wheel moves to the previous position.
For additional information, refer to “Automatic drive positioner” in the “Pre-driving checks and adjustments” section of this manual.
Instruments and controls2-21
Page 129 of 555
FOG LIGHT SWITCH (if so equipped)
To turn the fog lights on, rotate the headlight
switch to the
position, then rotate the fog
light switch to the
position.
To turn the fog lights on with the headlight switch
in the AUTO position, the headlights must be on,
then rotate the fog light switch to the
po-
sition.
To turn the fog lights off, rotate the fog light
switch to the OFF position.
The headlights must be on and the low beams
selected for the fog lights to operate. The fog
lights automatically turn off when the high beam
headlights are selected. To sound the horn, push the center pad area of
the steering wheel.
WARNING
Do not use or allow occupants to use the
climate controlled seats if you or the oc-
cupants can not monitor seat tempera-
tures or have an inability to feel pain in
those body parts in contact with the seat.
Use of the climate controlled seats by
such people could result in serious injury.
CAUTION
●
The battery could run down if the cli-
mate control seat is operated while the
engine is not running.
LIC3256LIC2227SIC4334
HORN CLIMATE CONTROLLED SEAT
SWITCHES (if so equipped)
2-40Instruments and controls
Page 133 of 555
The heated steering wheel system is designed to
operate only when the surface temperature of the
steering wheel is below 68°F (20°C) .
Push the heated steering wheel switch to warm
the steering wheel after the engine starts. The
indicator light will come on.
If the surface temperature of the steering wheel is
below 68°F (20°C) , the system will heat the
steering wheel and cycle off and on to maintain a
temperature above 68°F (20°C) . The indicator
light will remain on as long as the system is on.
Push the switch again to turn the heated steering
wheel system off manually. The indicator light will
go off.NOTE:
If the surface temperature of the steering
wheel is above 68°F (20°C) when the switch
is turned on, the system will not heat the
steering wheel. This is not a malfunction.
The vehicle should be driven with the VDC sys-
tem on for most driving conditions.
If the vehicle is stuck in mud or snow, the VDC
system reduces the engine output to reduce
wheel spin. The engine speed will be reduced
even if the accelerator is depressed to the floor. If
maximum engine power is needed to free a stuck
vehicle, turn the VDC system off.
To turn off the VDC system, push the VDC OFF
switch. The
indicator will come on.
Push the VDC OFF switch again or restart the engine
to turn on the system. For additional information, refer
to “Vehicle Dynamic Control (VDC) system” in the
“Starting and driving” section of this manual.
LIC2221LIC3344
HEATED STEERING WHEEL SWITCH
(if so equipped) VEHICLE DYNAMIC CONTROL (VDC)
OFF SWITCH
2-44Instruments and controls