2017 NISSAN MAXIMA turn signal
[x] Cancel search: turn signalPage 36 of 243
3. Audio system
AUDIO OPERATION PRECAU-
TIONS
CAUTION
.Operate the audio system only when
the vehicle engine or the hybrid
system is running. Operating the
audio system for extended periods
of time with the engine or the hybrid
system turned off can discharge the
vehicle battery.
. Do not allow the system to get wet.
Excessive moisture such as spilled
liquids may cause the system to
malfunction.
RADIO
Place the ignition switch in the ACC or ON
position before turning on the radio. If you listen
to the radio with the engine or the hybrid system
not running, the ignition switch should be placed
in the ACC position.
Radio reception is affected by station signal
strength, distance from radio transmitter, build-
ings, bridges, mountains and other external
influences. Intermittent changes in reception
quality normally are caused by these external influences.
Using a cellular phone in or near the vehicle
may influence radio reception quality.
Radio reception
Your radio system is equipped with state-of-the-
art electronic circuits to enhance radio reception.
These circuits are designed to extend reception
range, and to enhance the quality of that
reception.
However there are some general characteristics
of both FM and AM radio signals that can affect
radio reception quality in a moving vehicle, even
when the finest equipment is used. These
characteristics are completely normal in a given
reception area, and do not indicate any malfunc-
tion in your radio system.
Reception conditions will constantly change
because of vehicle movement. Buildings, terrain,
signal distance and interference from other
vehicles can work against ideal reception.
Described below are some of the factors that
can affect your radio reception.
Some cellular phones or other devices may
cause interference or a buzzing noise to come
from the audio system speakers. Storing the
device in a different location may reduce or
eliminate the noise.
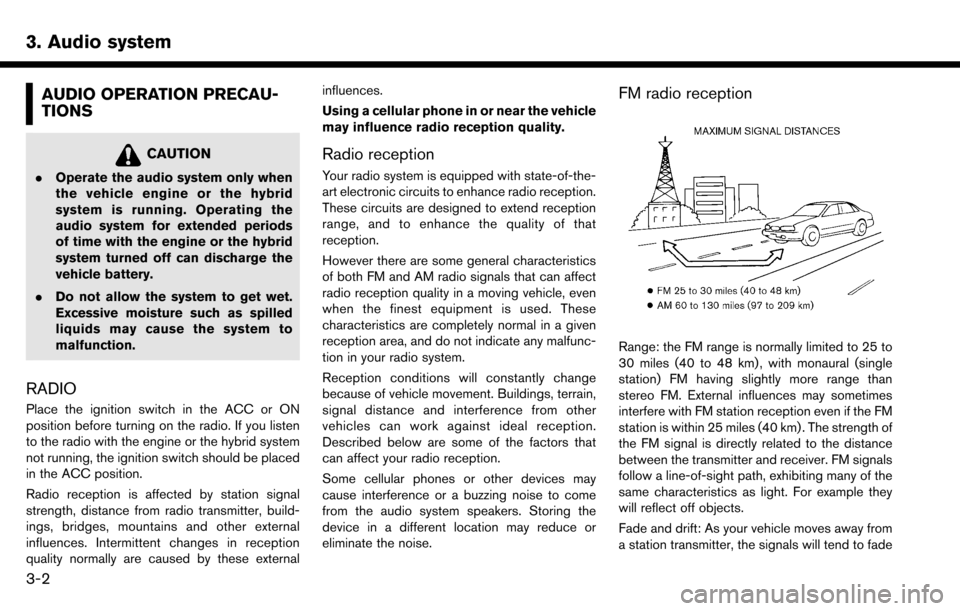
FM radio reception
Range: the FM range is normally limited to 25 to
30 miles (40 to 48 km) , with monaural (single
station) FM having slightly more range than
stereo FM. External influences may sometimes
interfere with FM station reception even if the FM
station is within 25 miles (40 km) . The strength of
the FM signal is directly related to the distance
between the transmitter and receiver. FM signals
follow a line-of-sight path, exhibiting many of the
same characteristics as light. For example they
will reflect off objects.
Fade and drift: As your vehicle moves away from
a station transmitter, the signals will tend to fade
3-2
Page 48 of 243
![NISSAN MAXIMA 2017 A36 / 8.G Nissan Connect Navigation Manual 3. Audio system
The radio screen can be viewed and operated on
the touch screen display.
*1[AM Menu]/[FM Menu]/[SXM Menu] (for
U.S. and Canada):
[AM Menu]/[FM Menu] (for Mexico):
Touch to display the NISSAN MAXIMA 2017 A36 / 8.G Nissan Connect Navigation Manual 3. Audio system
The radio screen can be viewed and operated on
the touch screen display.
*1[AM Menu]/[FM Menu]/[SXM Menu] (for
U.S. and Canada):
[AM Menu]/[FM Menu] (for Mexico):
Touch to display the](/manual-img/5/539/w960_539-47.png)
3. Audio system
The radio screen can be viewed and operated on
the touch screen display.
*1[AM Menu]/[FM Menu]/[SXM Menu] (for
U.S. and Canada):
[AM Menu]/[FM Menu] (for Mexico):
Touch to display the radio menu screen.
“Radio Menu” (page 3-16)
*2[Source]:
Touch to display the audio source screen to
select the other audio source.
“Selecting audio source” (page 3-12)
*3Preset number:
A preset number is displayed if the current
frequency is stored as a preset station or
channel (if so equipped) .
*4Audio source indicator:
Indicates the currently selected audio
source.
*5Reception information display:
Reception information currently available
such as frequency, station, or channel (if
so equipped) name, etc. are displayed.
*6Turn direction indicator:
When a route to the destination is set,
turning direction and the distance to the
next turn is displayed.
*7TAG indicator (for U.S.):
TAG indicator is displayed if the iTunes
Tagging information exists in the HD broad-
cast receiving.
“Radio Menu” (page 3-16)
*8Preset list:
To listen to a preset station, touch the
corresponding key in the preset list. Touch [
< ] or [ > ] to scroll the preset list. Touch and
hold one of the keys in the preset list to store
the station or channel (if so equipped)
currently tuned to.
“Presetting” (page 3-15)
*9Mode indicator (for U.S.):
On AM and FM screens, HD Radio icon will
appear when HD mode setting is turned on.
“Radio Menu” (page 3-16)
“Live” will appear when in ballgame mode
during reception of the HD broadcast.
INFO:
. An icon indicating the signal strength ap-
pears on the SXM screen.
. HD Radio (for U.S.) reception needs to be
activated to receive HD Radio broadcasts.
This enables you to receive radio broadcasts
digitally (where available) , providing a better quality sound with clear reception. When this
feature is not activated or HD Radio broad-
casts are not available, you will receive
analog radio (AM/FM) broadcasts.
“Radio Menu” (page 3-16)
Radio operation (for U.S. and Canada)
Radio activation and band selection:
To listen to the radio, turn on the audio system
and select a preferred radio band on the audio
source menu screen.
“Selecting audio source” (page 3-12)
INFO:
When the stereo broadcast signal is weak, the
radio will automatically change from stereo to
monaural reception.
Tuning:
To tune to stations/channels manually, turn
station is selected.
Seek tuning:
Tilt and hold <
>/<>on the steering
wheel to seek up/down to the next receivable
broadcast station or channel.
3-14
Page 49 of 243
![NISSAN MAXIMA 2017 A36 / 8.G Nissan Connect Navigation Manual Scan tuning:
To scan tune the stations/channels, touch [FM
Menu], [AM Menu] or [SXM Menu] on the radio
screen and then touch [SCAN]. The stations/
channels will be tuned from low to high
frequencies a NISSAN MAXIMA 2017 A36 / 8.G Nissan Connect Navigation Manual Scan tuning:
To scan tune the stations/channels, touch [FM
Menu], [AM Menu] or [SXM Menu] on the radio
screen and then touch [SCAN]. The stations/
channels will be tuned from low to high
frequencies a](/manual-img/5/539/w960_539-48.png)
Scan tuning:
To scan tune the stations/channels, touch [FM
Menu], [AM Menu] or [SXM Menu] on the radio
screen and then touch [SCAN]. The stations/
channels will be tuned from low to high
frequencies and stop at each broadcasting
station/channel for several seconds. Touching
[SCAN] again during this period of several
seconds will stop scan tuning and the radio will
remain tuned to that station/channel.
Pushing and holding<
>/<>will also
scan tune the stations/channels.
Presetting:
Up to 6 for AM, 12 for FM and 18 for SXM
stations/channels can be registered in the preset
list.
1. Select a radio band (AM, FM or SXM) .
2. Tune to the station/channel you wish to store in the preset list.
3. Touch and hold one of the preset numbers in the preset list.
4. The information such as frequency (AM/FM) , channel number (SXM) , etc. will be dis-
played on the preset list. To select and listen to the preset stations/
channels, tilt
<
>/<> on the steering
wheel briefly or touch a preferred station/channel
on the preset list on the radio screen.
Radio operation (for Mexico)
Radio activation and band selection:
To listen to the radio, turn on the audio system
and select a preferred radio band on the audio
source menu screen.
“Selecting audio source” (page 3-12)
INFO:
When the stereo broadcast signal is weak, the
radio will automatically change from stereo to
monaural reception.
Tuning:
To tune to stations manually, push
<
> /<> until the preferred station is
selected.
Seek tuning:
Tilt and hold <
>/<>on the steering
wheel to seek up/down to the next receivable
broadcast station. Scan tuning:
To scan tune the stations, touch [FM Menu] or
[AM Menu] on the radio screen and then touch
[SCAN]. The stations will be tuned from low to
high frequencies and stop at each broadcasting
station for several seconds. Touching [SCAN]
again during this period of several seconds will
stop scan tuning and the radio will remain tuned
to that station.
Pushing and holding
<
>/<>will also
scan tune the stations.
Presetting:
Up to 6 for AM or 12 for FM stations can be
registered in the preset list.
1. Select a radio band (AM or FM) .
2. Tune to the station you wish to store in the preset list.
3. Touch and hold one of the preset numbers in the preset list.
4. Information such as frequency (AM/FM) , etc. will be displayed on the preset list.
To select and listen to the preset stations, tilt
<
>/<> on the steering wheel briefly or
touch a preferred station on the preset list on the
radio screen.
3. Audio system
3-15
Page 67 of 243
![NISSAN MAXIMA 2017 A36 / 8.G Nissan Connect Navigation Manual AUDIO SETTINGS
Audio settings can be adjusted or audio related functions can be turned on/off with the following procedure.
1. Touch [Settings] on the Launch Bar.
2. Touch [Sound].
Setting itemsAction NISSAN MAXIMA 2017 A36 / 8.G Nissan Connect Navigation Manual AUDIO SETTINGS
Audio settings can be adjusted or audio related functions can be turned on/off with the following procedure.
1. Touch [Settings] on the Launch Bar.
2. Touch [Sound].
Setting itemsAction](/manual-img/5/539/w960_539-66.png)
AUDIO SETTINGS
Audio settings can be adjusted or audio related functions can be turned on/off with the following procedure.
1. Touch [Settings] on the Launch Bar.
2. Touch [Sound].
Setting itemsAction
[Bass]
Adjust the speaker tone quality and sound balance by touching [+]/[-], [L]/[R] or [R]/[F].
[Treble]
[Balance]
[Fade]
[Speed Sensitive Volume]
Automatically adjusts the volume depending on the vehicle speed. Touch [+]/[-] to change the sensitivity
level.
[BOSE
�ŠCenterpoint]
(if so equipped) When this item is turned on, surround sound playback is generated from a traditional stereo recording.
Turn on the item to activate BOSE�ŠCenterpoint and to change its effect level with [Surround Volume].
[Surround Volume]
(if so equipped) Touch [+]/[-] to adjust the Surround Volume level if BOSE�ŠCenterpoint [ON].
[Driver’s Audio Stage]
(if so equipped) When this item is turned on, a better sound will be provided to the driver’s position. The driver can enjoy a
more crisp and clear sound that is specialized for the driver’s seat position. The prominency of the effect of
this feature depends on the type of music that is played. For some music, it may be difficult to recognize
the effect of the feature.
INFO:
The setting items [BOSE
�ŠCenterpoint] and [Surround Volume] will be disabled when an analog radio signal is received.
3. Audio system
3-33
Page 94 of 243
5. Information
Response Specialist provides various assis-
tance depending on the situation.
“Emergency support” (page 5-16)
. Automatic Collision Notification (ACN):
The TCU (Telematics Control Unit) gener-
ates a signal automatically to the Nissan-
Connect
SMServices Response Center in the
case of an accident severe enough to trigger
one of the vehicle’s air bags. Upon the signal,
a Response Specialist receives the vehicle
location and customer information and no-
tifies the proper authorities in accordance
with established policies and procedures.
. Curfew Alert:
Customers can set time interval for accep-
table and unacceptable operation of the
vehicle via NissanConnect
SMPortal Website
and NissanConnectSMServices Companion
App. If the time restrictions are violated, the
customer will be automatically notified (e-
mail, text message, or phone call) .
. Remote Door Lock/Unlock:
The Remote Door Lock/Unlock feature
allows the customer to access the vehicle
remotely from the NissanConnect
SMSer-
vices website or Companion App to send
lock or unlock commands to the vehicle.
“Connecting to Interactive Voice
Menu” (page 5-13)
. Remote Sound Horn and Flash Lights:
Customers can activate the vehicle’s head-
lights and horn via the NissanConnect
SM
Services website or Companion App.
. Remote Engine Start:
If the vehicle is equipped with both TCU
(Telematics Control Unit) and Remote Start,
customers can remotely start the vehicle via
the NissanConnect
SMServices website or
Companion App.
. Alarm Notification:
Customers will be notified if the vehicle alarm
system is activated based on their notifica-
tion preferences (e-mail, text, phone call) .
. Boundary Alert:
Customers can set an area for the vehicle to
stay in or out of via the NissanConnect
SM
Services website or Companion App. Cus-
tomers will be notified when vehicle is out-of-
bounds based on their notification prefer-
ences (e-mail, text, phone call).
. Maintenance Alert/Reminder:
The center sends maintenance and other
relevant info. to registered e-mail address
(PC/Mobile) based on the vehicle informa- tion (e.g. driving mileage and etc.) sent at the
center access timing. Details of vehicle
information are separately examined.
. Send to Car:
Customers can access turn-by-turn naviga-
tion provided by Google maps and sent
directly to the NissanConnect
SMvehicle.
. Journey Planner:
Customers can create a multiple way-point
route via Journey Planner on the NissanCon-
nect
SMServices website and send the de-
tails directly to their vehicle.
. Destination Download:
Customers can search for different locations
via the NissanConnect
SMServices website
and send them directly to their vehicle.
. Connected Search:
Customers can access Internet search en-
gines directly from the vehicle to find exact
destinations to navigate to.
. Assisted Search:
Customers can use Assisted Search to get
further destination assistance via operator
service or live Response Specialist for more
detailed information.
“Searching by using Voice Menu but-
ton on map” (page 6-25)
5-10
Page 169 of 243
*Areas with numerous tall trees
*In a canyon
INFO:
The GPS antenna is located on the instrument
panel inside the vehicle. Do not place any
objects, especially cellular phones or transcei-
vers, on the instrument panel. Because the
strength of the GPS signal is approximately one
billionth of that of TV waves, phones and
transceivers will affect or may totally disrupt the
signal.
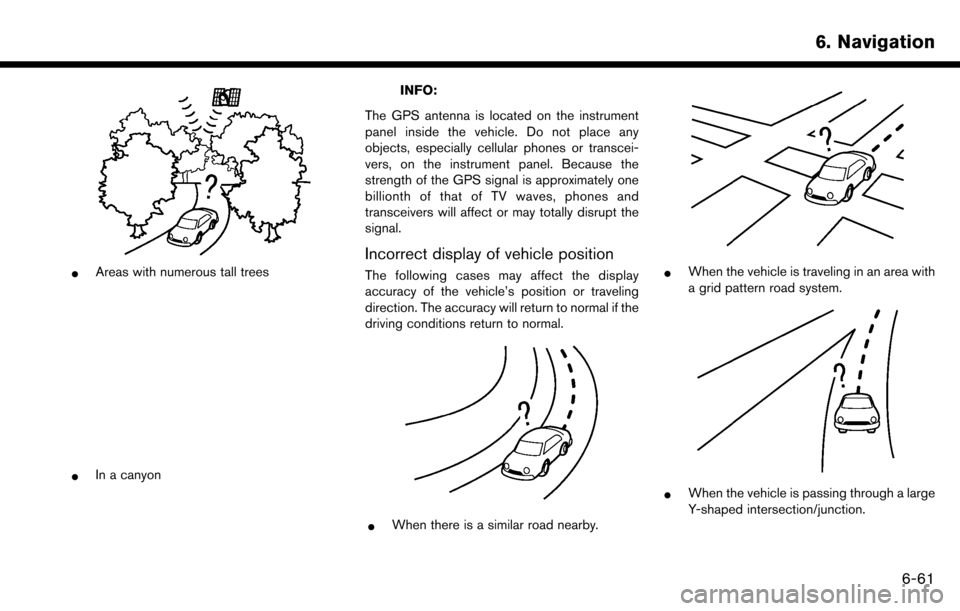
Incorrect display of vehicle position
The following cases may affect the display
accuracy of the vehicle’s position or traveling
direction. The accuracy will return to normal if the
driving conditions return to normal.
*When there is a similar road nearby.
*When the vehicle is traveling in an area with
a grid pattern road system.
*When the vehicle is passing through a large
Y-shaped intersection/junction.
6. Navigation
6-61
Page 222 of 243
8. Troubleshooting guide
SymptomPossible cause Possible solution
Each volume level (ring tone, incoming voice or
outgoing voice) is different. Each volume level is not adjusted properly. Adjust each volume level properly.
The antenna display is different between the
navigation screen and a cellular phone screen.
Making or receiving a call is unavailable even
though the antenna display shows that it is
possible to do so. The antenna display varies depending on the model
of cellular phone.
This does not indicate a malfunction. The antenna display
and remaining battery level shown on the navigation screen
may be different from those shown on the cellular phone
screen. Use them as a reference.
A voice cannot be heard clearly when using a
cellular phone behind tall buildings. Some structures such as tall buildings, etc. may
cause irregular reflection of radio waves or comple-
tely shut out radio waves that are used for cellular
phones. Move to a place without tall buildings.
Noise is heard when using a cellular phone
under/near areas of elevated railroads, high
voltage electric power cables, traffic signals,
neon billboards, etc. Electromagnetic waves that are generated from radio
devices may adversely affect the cellular phone.
This is not a malfunction.
Noise is heard in the sound from the audio
system while using a cellular phone. Radio waves that are generated from a cellular phone
may adversely affect the sound from the audio
system. This is not a malfunction.
Sound skips or stutters. The cellular phone may have turned on the wireless
LAN (Wi-Fi). Turn off the wireless LAN (Wi-Fi).
Phonebook cannot be downloaded. An error occurred during the phone pairing process. Please delete the Bluetooth
�Špairing information from both
the mobile phone and vehicle system before registering it
again.
Phone does not support phonebook download
function. Visit www.nissanusa.com/bluetooth/ to check
compatibility.
8-16
Page 226 of 243
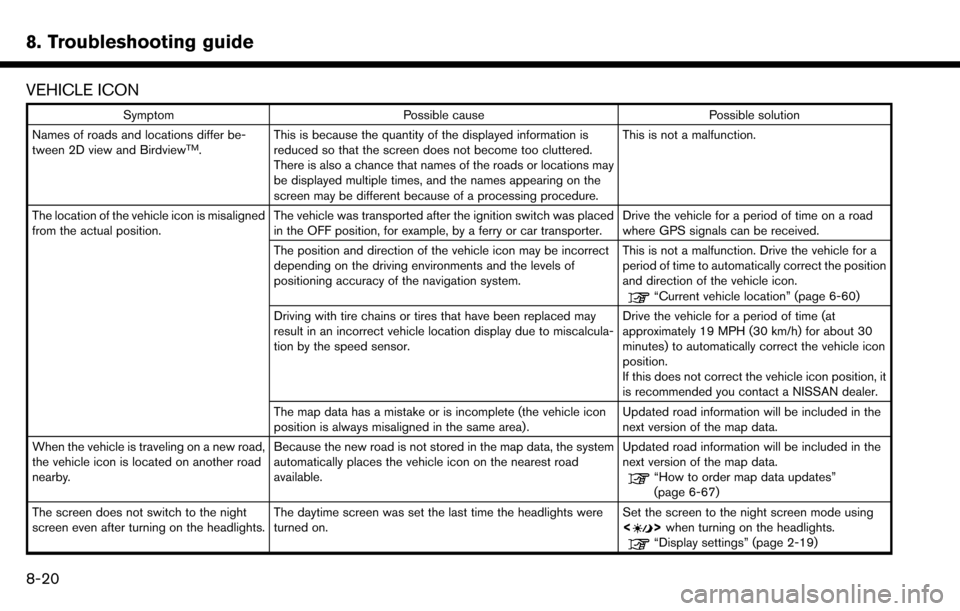
8. Troubleshooting guide
VEHICLE ICON
SymptomPossible cause Possible solution
Names of roads and locations differ be-
tween 2D view and Birdview
TM. This is because the quantity of the displayed information is
reduced so that the screen does not become too cluttered.
There is also a chance that names of the roads or locations may
be displayed multiple times, and the names appearing on the
screen may be different because of a processing procedure. This is not a malfunction.
The location of the vehicle icon is misaligned
from the actual position. The vehicle was transported after the ignition switch was placed
in the OFF position, for example, by a ferry or car transporter. Drive the vehicle for a period of time on a road
where GPS signals can be received.
The position and direction of the vehicle icon may be incorrect
depending on the driving environments and the levels of
positioning accuracy of the navigation system. This is not a malfunction. Drive the vehicle for a
period of time to automatically correct the position
and direction of the vehicle icon.
“Current vehicle location” (page 6-60)
Driving with tire chains or tires that have been replaced may
result in an incorrect vehicle location display due to miscalcula-
tion by the speed sensor. Drive the vehicle for a period of time (at
approximately 19 MPH (30 km/h) for about 30
minutes) to automatically correct the vehicle icon
position.
If this does not correct the vehicle icon position, it
is recommended you contact a NISSAN dealer.
The map data has a mistake or is incomplete (the vehicle icon
position is always misaligned in the same area). Updated road information will be included in the
next version of the map data.
When the vehicle is traveling on a new road,
the vehicle icon is located on another road
nearby. Because the new road is not stored in the map data, the system
automatically places the vehicle icon on the nearest road
available. Updated road information will be included in the
next version of the map data.
“How to order map data updates”
(page 6-67)
The screen does not switch to the night
screen even after turning on the headlights. The daytime screen was set the last time the headlights were
turned on. Set the screen to the night screen mode using
<
>
when turning on the headlights.“Display settings” (page 2-19)
8-20