2017 NISSAN LEAF CD player
[x] Cancel search: CD playerPage 284 of 424
If the CD comes out and is not removed, it
will be pulled back into the slot to protect it.
AUX IN jack
The AUX IN jack is located under the control
panel. The AUX IN audio jack accepts any stan-
dard analog audio input such as from a portable
cassette tape/CD player, MP3 player or laptop
computer.
MEDIA
With a CD loaded, press the MEDIA button until
the CD mode is displayed on the screen. Press-
ing the MEDIA button repeatedly will maneuver
through CD, USB, Bluetooth® Audio and AUX
modes.
For additional information, refer to “NissanCon-
nect
SMMobile Apps” in this section regarding
“My Apps” key.
CD/MP3 display mode
While listening to an MP3/WMA CD, certain text
may be displayed on the screen if the CD has
been encoded with the text information. Depend-
ing on how the MP3/WMA CD is encoded, infor-
mation such as artist, song and folder will be
displayed. The track number and total number of tracks in
the current folder or on the current disc are
displayed on the screen as well.
TUNE/SCROLL knob (MP#/WMA CD only)
If a MP3/WMA CD with multiple folders is play-
ing, turn the TUNE/SCROLL knob to change
folders. Turn the knob to the left to skip back a
folder. Turn the knob to the right to skip ahead a
folder.
Additional features
For additional information about the iPod® player
available with this system, refer to “iPod® player
operation (models without Navigation System)”
in this section.
For additional information about the USB (Uni-
versal Serial Bus) Connection Port available with
this system, refer to “USB (Universal Serial Bus)
Connection Port Operation (models without
Navigation System)” in this section.
For additional information about the Bluetooth®
audio interface available with this system, refer to
“Bluetooth® streaming audio (models without
Navigation System)” in this section.
USB (UNIVERSAL SERIAL BUS)
CONNECTION PORT (MODELS
WITHOUT NAVIGATION SYSTEM)
Connecting a device to the USB
(Universal Serial Bus) connection port
WARNING
Do not connect, disconnect or operate
the USB device while driving. Doing so
can be a distraction. If distracted you
could lose control of your vehicle and
cause an accident or serious injury.
Display screen, heater, air conditioner, audio and phone systems4-55
Page 286 of 424
BACK button
When the
BACK button is pressed, it
returns to the previous display.
IPOD® PLAYER OPERATION
(MODELS WITHOUT NAVIGATION
SYSTEM)
Connecting iPod®
WARNING
Do not connect, disconnect or operate
the USB device while driving. Doing so
can be a distraction. If distracted you could lose control of your vehicle and
cause an accident or serious injury.
CAUTION
• Do not force the USB device into the USB port. Inserting the USB device
tilted or up-side-down into the port
may damage the port. Make sure that
the USB device is connected correctly
into the USB port.
• Do not grab the USB port cover (if so equipped) when pulling the USB de-
vice out of the port. This could damage
the port and the cover.
• Do not leave the USB cable in a place where it can be pulled unintentionally.
Pulling the cable my damage the port.
For additional information, refer to your device
manufacturer’s owner information regarding the
proper use and care of the device.
To connect an iPod® to the vehicle so that the
iPod® can be controlled with the audio system
controls and display screen, use the USB con-
nection port located in the center console. Con-
nect the iPod®-specific end of the cable to the
iPod® and the USB end of the cable to the USB
connection port on the vehicle. If your iPod® supports charging via a USB connection, its bat-
tery will be charged while connected to the ve-
hicle with the power switch in the ACC or ON
position.
While connected to the vehicle, the iPod® can
only be operated by the vehicle audio controls.
To disconnect the iPod® from the vehicle, re-
move the USB end of the cable from the USB
connection port on the vehicle, then remove the
cable from the iPod®.
·iPod® is a trademark of Apple Inc, registered in
the U.S. and other countries.
Compatibility
The following models are available:
• Third generation iPhone® (Firmware version
IOS 2.1–4.2.1)
• Fourth generation iPhone® (Firmware version IOS 4.0–6.1.3)
• Fifth generation iPhone® (firmware version IOS6/6.0)
• Fifth generation iPod® (Firmware version iOS 6.0.0–6.1.4)
• First generation iPod Classic® (Firmware ver- sion 1.1.1 or 2.0.1)
Display screen, heater, air conditioner, audio and phone systems4-57
Page 288 of 424
• Artists
• Albums
• Songs
• Podcasts
• Genres
• Composers
• Audiobooks
• Shuffle Songs
For additional information, refer to the iPod®
Owner’s Manual.
SEEK/CAT buttons
When the
orbutton is pressed for
more than 1.5 seconds while the iPod® is play-
ing, the iPod® will play while fast forwarding or
rewinding. When the button is released , the
iPod® will return to the normal play speed.
When the
orbutton is pressed for
less than 1.5 seconds while the iPod® is playing,
the next track or the beginning of the current track
on the iPod® will be played.
REPEAT (RPT)
When the RPT play button is pressed while a
track is being played, the play pattern can be
changed as follows: Repeat Off→1 Track Repeat→All Repeat→Re-
peat Off
RANDOM (RDM)
When the RDM play button is pressed while a
track is being played, the play pattern can be
changed as follows:
Shuffle Off→Track Shuffle→Album Shuffle-
→Shuffle Off
BACK button
When the
BACK button is pressed, it
returns to the previous display.
BLUETOOTH® STREAMING AUDIO
(MODELS WITHOUT NAVIGATION
SYSTEM)
If you have a compatible Bluetooth® audio de-
vice that is capable of playing audio files, the
device can be connected to the vehicle’s audio
system so that the audio files on the device play
through the vehicle’s speakers. For additional
information, refer to “FM-AM-SAT radio with
compact disc (CD) player” in this section.
NOTE:
For additional information regarding
Bluetooth® Streaming Audio, refer to
the Cellular Phone Owner’s Manual.
Connecting Bluetooth® audio
To connect your Bluetooth® audio device to the
vehicle, follow the procedure below:
1. Press the ENTER/SETTING button.
2. Select “Bluetooth”.
3. Select “Add Phone”. This same screen can be accessed to remove, replace or select a dif-
ferent Bluetooth® device.
4. The system acknowledges the command and asks you to initiate connecting from the phone
handset. The connecting procedure of the
cellular phone varies according to each cellu-
lar phone model. For additional information,
refer to the cellular phone’s Owner’s Manual.
You can also visit
www.NissanUSA.com/bluetooth for instruc-
tions on connecting NISSAN-recommended
cellular phones.
Audio main operation:
To switch to the Bluetooth® audio mode, press
the MEDIA button repeatedly until the
Display screen, heater, air conditioner, audio and phone systems4-59
Page 289 of 424
Bluetooth® audio mode is displayed on the
screen. Use the vehicle audio controls or the
Bluetooth® device’s controls to play, pause, skip
or reverse tracks.
AUX DEVICE PLAYER OPERATION
The AUX input jack is located in the center con-
sole. The AUX input jack accepts any standard
analog audio input such as from a portable cas-
sette tape/CD player, MP3 player or laptop com-
puter.
NISSAN strongly recommends using a stereo
mini plug when connecting your music device to
the audio system. Music may not play properly
when monaural cable is used.
To switch the AUX mode, press the MEDIA but-
ton until the AUX mode is selected, while the
power switch is in the “ON” or “ACC” position.
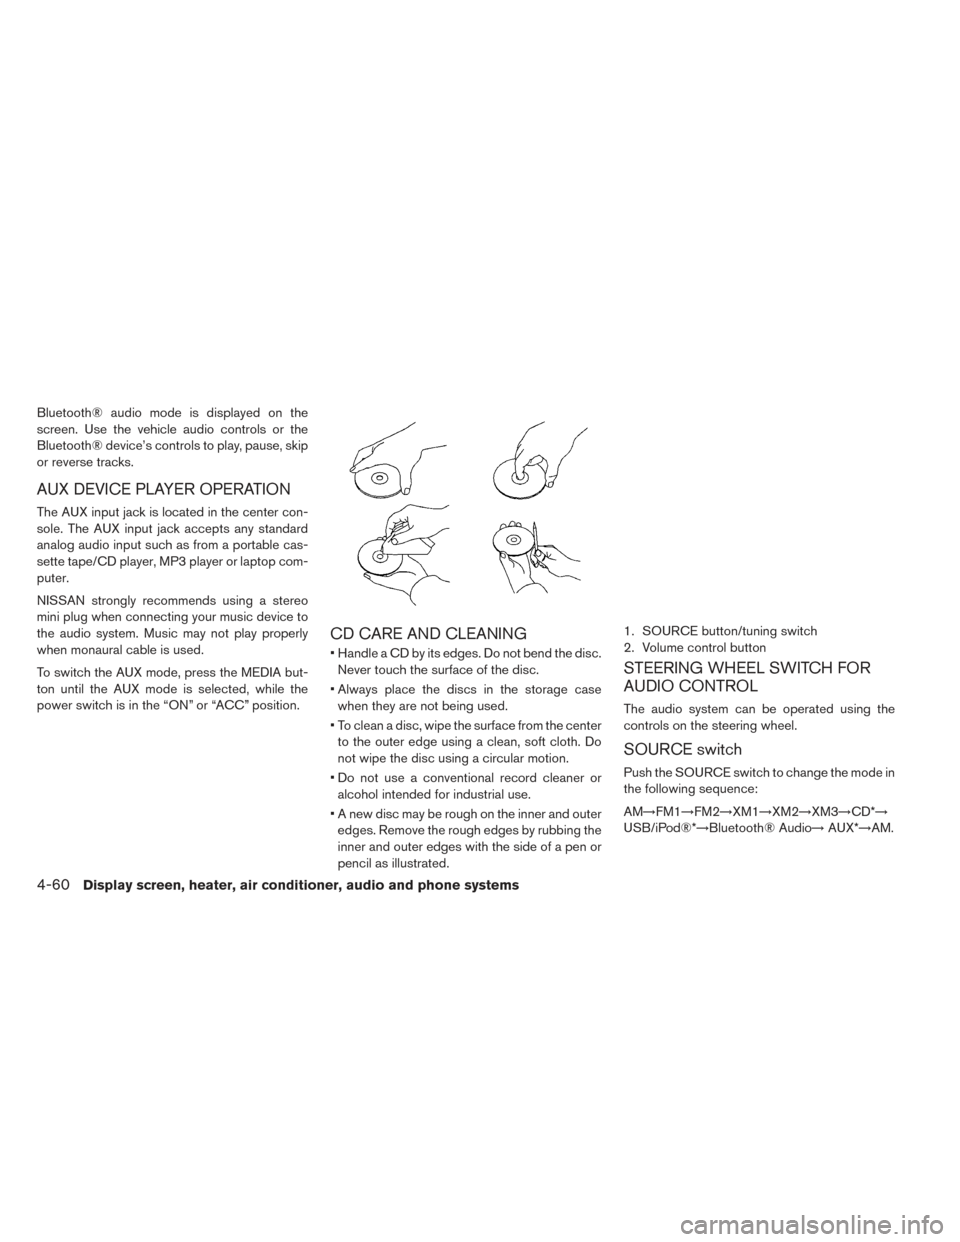
CD CARE AND CLEANING
• Handle a CD by its edges. Do not bend the disc.Never touch the surface of the disc.
• Always place the discs in the storage case when they are not being used.
• To clean a disc, wipe the surface from the center to the outer edge using a clean, soft cloth. Do
not wipe the disc using a circular motion.
• Do not use a conventional record cleaner or alcohol intended for industrial use.
• A new disc may be rough on the inner and outer edges. Remove the rough edges by rubbing the
inner and outer edges with the side of a pen or
pencil as illustrated.
STEERING WHEEL SWITCH FOR
AUDIO CONTROL
The audio system can be operated using the
controls on the steering wheel.
SOURCE switch
Push the SOURCE switch to change the mode in
the following sequence:
AM→FM1→FM2→XM1→XM2→XM3→CD*→
USB/iPod®*→Bluetooth® Audio→ AUX*→AM.
1. SOURCE button/tuning switch
2. Volume control button
4-60Display screen, heater, air conditioner, audio and phone systems
Page 361 of 424
smoothly and that the locks (if so equipped) hold
securely in all latched positions.
Seat belts:Check that all parts of the seat belt
system (for example, buckles, anchors, adjusters
and retractors) operate properly and smoothly,
and are installed securely. Check the belt web-
bing for cuts, fraying, wear or damage.
Steering wheel: Check for changes in the
steering conditions, such as excessive free play,
hard steering or strange noises.
Warning lights and chimes: Make sure that all
warning lights and chimes are operating properly.
Windshield defroster: Check that the air emits
from the defroster outlets properly and in suffi-
cient quantity when operating the heater or air
conditioner.
Windshield wiper and washer*: Check that
the wipers and washers operate properly and
that the wipers do not streak.
Under hood and vehicle
The maintenance items listed here should be
checked periodically.
12-volt battery (for serviceable battery)*:
Check the fluid level in each cell. It should be
between the MAX and MIN lines. Vehicles oper- ated in high temperatures or under severe condi-
tions require frequent checks of the 12–volt bat-
tery fluid level.
NOTE:
Care should be taken to avoid situations
that can lead to potential battery discharge
and potential no-start conditions such as:
1.
Installation or extended use of elec-
tronic accessories that consume battery
power when the engine is not running
(Phone chargers, GPS, DVD players,
etc.)
2. Vehicle is not driven regularly and/or
only driven short distances.
In these cases, the battery may need to be
charged to maintain battery health.
Brake fluid level*: Make sure that the brake
fluid level is between the “MAX” and “MIN” lines
on the reservoir.
Coolant level*: Check the coolant level when
the motor compartment is cold.
Fluid leaks: Check under the vehicle for water
or other fluid leaks after the vehicle has been
parked for a while. Water dripping from the air
conditioner after use is normal. If you should notice any leaks, check for cause and have it
corrected immediately.
Radiator and hoses:
Check the front of the
radiator and clean off any dirt, insects, leaves,
etc., that may have accumulated. Make sure that
the hoses have no cracks, deformation, rot or
loose connections.
Underbody: The underbody is frequently ex-
posed to corrosive substances such as those
used on icy roads or to control dust. It is very
important to remove these substances, other-
wise rust will form on the floor pan and frame. At
the end of winter, the underbody should be thor-
oughly flushed with plain water, being careful to
clean those areas where mud and dirt may accu-
mulate. For additional information, refer to
“Cleaning exterior” in the “Appearance and care”
section of this manual.
Windshield-washer fluid*: Check that there is
an adequate amount of fluid in the reservoir.
8-4Maintenance and do-it yourself
Page 369 of 424

• Keep the 12-volt battery surface clean and dry.Clean the 12-volt battery with a solution of
baking soda and water.
• Make certain the terminal connections are clean and securely tightened.
NOTE:
Care should be taken to avoid situations
that can lead to potential battery discharge
and potential no-start conditions such as:
1. Installation or extended use of elec-
tronic accessories that consume battery
power when the motor is not running
(Phone chargers, GPS, DVD players,
etc.)
2. Vehicle is not driven regularly and/or
only driven short distances.
In these cases, the battery may need to be
charged to maintain battery health
WARNING
• Do not expose the 12-volt battery to flames or electrical sparks. Hydrogen
gas generated by the 12-volt battery is
explosive. Do not allow 12-volt battery
fluid to contact your skin, eyes, fabrics
or painted surfaces. After touching a
12-volt battery or 12-volt battery cap,
do not touch or rub your eyes. Thor-
oughly wash your hands. If the acid
contacts your eyes, skin or clothing,
immediately flush with water for at
least 15 minutes and seek medical at-
tention.
• Do not operate the vehicle if the fluid in the 12-volt battery is low. Low 12-
volt battery fluid can cause a higher
load on the 12-volt battery which can
generate heat, reduce battery life, and
in some cases lead to an explosion.
• When working on or near a 12-volt battery, always wear suitable eye pro-
tection and remove all jewelry.
• 12-volt battery posts, terminals and re- lated accessories contain lead and
lead compounds. Wash hands after
handling.
• Keep the 12-volt battery out of the reach of children. 1. Remove the vent caps with a screwdriver as
shown. Use a cloth to protect the battery
case.
12-VOLT BATTERY
8-12Maintenance and do-it yourself
Page 417 of 424
Charging methods...............CH-21
Chargingrelatedindicatorlight........CH-27
Charging related remote function ......CH-26
Charging status indicator light ........CH-27
Chargingtimer.................CH-21
Charging troubleshooting guide .......CH-32
Checking .....................2-13
Checkingbulbs................2-13
Checkingcoolantlevel.............8-9
Child restraints ..................1-18
Boosterseats.................1-35
Precautions on child restraints .......1-19
Top tether strap ................1-23
Childsafety....................1-16
Child safety rear door lock ............3-6
Circuit breaker, Fusible link ...........8-18
Cleaning exterior and interior ........7-2,7-4
Climatecontrol..................4-41 Climate control service ............4-41
Climate control system refrigerant and
lubricant recommendations .........4-41
Climate control system .............4-22
Climate control operation ..........4-22
Climate Ctrl. Timer ............4-29,4-36
Clock.......................2-11
Clock setting (models without Navigation
System) ......................4-51
Cold weather driving ...............5-26
Consolebox...................2-55 Coolant
.......................8-9
Changingcoolant ...............8-9
Checking coolant level .............8-9
Recommended fluids/lubricants and
capacities ....................9-2
Cooling system ..................8-8
Corrosion protection ...............7-7
Cruisecontrol..................5-16
Cupholders...................2-52
D
Defroster switch, Rear window and outside
mirror defroster switch ..............2-42
Dimensionsandweights.............9-5
Display, vehicle information ...........2-23
Doors ........................3-4
Driving ......................5-26
Cold weather driving .............5-26
Driving vehicle ................5-11
Precautions when starting and driving ....5-2
Driving range ....................2-8
Driving vehicle ..................5-11
E
ECO .......................2-48
ECO switch ..................2-48
ECOindicator..................2-10
Efficient use of your vehicle ..........EV-23Emergencycharge ..............CH-11
Emergency EV (Electric Vehicle)
shutoff ...................5-10,6-3
Emergency shutoff system
...........EV-9
Emission control information label ........9-7
EV Characteristics ...............EV-9
Event Data Recorder (EDR) ...........9-17
EVSE (Electric Vehicle Supply
Equipment) ...................CH-11
EV system ....................EV-2
EV unique information .............EV-25
F
Flashers (Refer to hazard warning flasher
switch).......................6-2
Flat tire .......................6-3
Flattowing....................9-13
Floormatcleaning.................7-5
Fluid ........................8-10
Brake fluid ...................8-10
coolant.....................8-8
Recommended fluids/lubricants and
capacities ....................9-2
Reduction gear fluid .............8-10
Windshield-washer fluid ...........8-11
FM/AM/SAT Radio with Compact Disc (CD)
Player .......................4-50
F.M.V.S.S./C.M.V.S.S. certification label .....9-7
Foglightswitch .................2-46
10-2Index
Page 418 of 424
Front manual seat adjustment..........1-3
Front passenger air bag and status light ....1-46
Front seat, Front seat adjustment ........1-3
Fuses.......................8-17
Fusiblelinks ...................8-18
G
Garage door open, HomeLink® Universal . . .2-60 Transceiver ..................2-60
Gauge.......................2-8 Driving range ..................2-8
ECOindicator ................2-10
Li-ion battery available charge gauge .....2-9
Li-ion battery capacity level gauge .....2-10
Li-ion battery temperature gauge .......2-7
Odometer ....................2-6
Power meter ..................2-7
Speedometer ..................2-6
Generalmaintenance...............8-2
Glovebox.....................2-54
H
Hazard warning flasher switch ..........6-2
Headlights ....................8-22
Bulb replacement ...............8-22
Headlightswitch...............2-43
Heatedseatswitch ...............2-48
Heated steering wheel switch .........2-46Highvoltageprecautions............EV-7
HillStart .....................5-25
Hill Start Assist
..................5-25
HomeLink® universal transceiver ........2-60
Hood release ...................3-17
Horn .......................2-47
How to normal charge .............CH-9
How to quick charge .............CH-15
How to trickle charge (if so equipped) ....CH-11
I
If the Li-ion battery becomes completely
discharged....................6-12
Immediate charge ...............CH-25
Immobilizer system ................2-38
Indicatorlights..................2-20
Indicators for operation .............2-24
Inside rearview mirror ..............3-23
Instrument brightness control ..........2-42
Intelligent Key system ..............3-13
Remote keyless operation ..........3-13
Interior light replacement ............8-24
Interior lights ...................2-59
iPod® player operation (models without
Navigation System) ...............4-57
ISOFIX child restraint ..............1-21
J
Jump starting...................6-10
K
Keyless entry...................3-13
With Intelligent Key system (Refer to Intelligent
Key system) ..................3-13
Keys ........................3-2 For Intelligent Key system ...........3-6
L
Labels.......................1-55
Airbagwarninglabels............1-55
Air conditioner specification label .......9-8
Emission control information label ......9-7
F.M.V.S.S./C.M.V.S.S. certification label . . .9-7
Motor serial number ..............9-7
Tire and Loading Information Label .....8-28
Tire and Loading information label ......9-8
Vehicle identification number (VIN) ......9-6
LATCH system ..................1-21
License plate, Installing front license plate . . .9-8
Light .......................1-55 Airbagwarninglight.............1-55
Bulb replacement ...............8-22
Ceiling light ..................2-59
Fog light switch ................2-46
Index10-3