Page 10 of 424
1. Charge port lid—Charging lid switch (P. 3-19)
—Front camera (if so equipped) (P. 4-11)
2. Hood (P. 3-17) 3. Headlight and turn signal lights
— Switch operation (P. 2-43)
— Bulb replacement (P. 8-22)
— Daytime running light system
(if so equipped) (P. 2-45) 4. Wiper and washer switch
— Switch operation (P. 2-39)
— Blade replacement (P. 8-13)
— Windshield-washer fluid (P. 8-11)
5. Outside mirrors —Switch operation (P. 3-23)
— Side camera (if so equipped) (P. 4-11)
6. Power windows (P. 2-56)
7. Child safety rear door lock (P. 3-4)
8. Doors — Keys (P. 3-2)
— Door locks (P. 3-4)
— NISSAN Intelligent Key® system (P. 3-6)
— Security system (P. 2-36)
9. Tires — Wheels and tires (P. 8-26, 9-5)
— Flat tire (P. 6-3)
— Tire Pressure Monitoring System (TPMS)
(P. 2-17, 5-2)
10. Fog lights (if so equipped) — Switch operation (P. 2-46)
— Bulb replacement (P. 8-22)
11. License plate installation (P. 9-8)
EXTERIOR FRONT
Illustrated table of contents0-3
Page 12 of 424
1. Room light (P. 2-59)
2. Sun visors (P. 3-22)
3. Map lights— Switch operation (P. 2-59)
— Bluetooth® Hands-Free Phone System
(without Navigation) microphone (P. 4-62) — Bluetooth® Hands-Free Phone System
(with Navigation) microphone (Refer to LEAF
Navigation System Owner’s Manual)
4. Sunglasses holder (P. 2-52)
5. Mirror — Inside rearview mirror (P. 3-23)
— HomeLink® (if so equipped) (P. 2-60) 6. Front heated seat switch (P. 2-48)
7. Front cup holders (P. 2-52)
8. Door armrest
— Power window switch (P. 2-57)
— Power door lock switch (P. 3-4)
— Outside mirror remote control switch
(P. 3-23)
9. Console box (P. 2-52)
10. Emergency tire puncture repair kit (P. 6-3)
11. Cargo area — Tonneau cover (if so equipped) (P. 2-52)
— EVSE (Electric Vehicle Supply Equipment)
(P. CH-27)
PASSENGER COMPARTMENT
Illustrated table of contents0-5
Page 140 of 424

2 Instruments and controls
Cockpit............................ .2-3
Instrument panel ....................... .2-4
Meters and gauges ..................... .2-5
Speedometer and odometer ...............2-6
Li-ion battery temperature gauge ............2-7
Power meter ....................... .2-7
Driving range ....................... .2-8
Li-ion battery available charge gauge .........2-9
Li-ion battery capacity level gauge ..........2-10
Outside air temperature ................2-10
ECO indicator ..................... .2-10
Clock .......................... .2-11
Warning lights, indicator lights and audible
reminders .......................... .2-12
Checking lights .................... .2-13
Warning lights ..................... .2-13
Indicator lights ..................... .2-20
Audible reminders ................... .2-22
Vehicle information display .................2-23
Indicators for operation ................ .2-24
Trip computer ..................... .2-28
Warning information displays .............2-33
Indicators for maintenance ...............2-35
Indicator for timer ................... .2-36Security systems
..................... .2-36
Vehicle security system ................ .2-37
NISSAN Vehicle Immobilizer System .........2-38
Wiper and washer switch .................2-39
Washer operation ................... .2-40
Rear wiper operation ................. .2-41
Rear window and outside mirror (if so equipped)
defroster switch ...................... .2-42
Instrument brightness control ...............2-42
Headlight and turn signal switch .............2-43
Headlight switch .................... .2-43
Turn signal switch ................... .2-45
Fog
light switch (if so equipped) .............2-46
Heated steering wheel switch (if so equipped) .....2-46
Horn ............................. .2-47
ECO switch ........................ .2-48
Heated seat switch .................... .2-48
Vehicle Dynamic Control (VDC) OFF switch ......2-49
Charge port lid switch .................. .2-50
Charge connector lock switch ...............2-50
Charge timer OFF switch .................2-51
Power outlet ........................ .2-51
Storage ........................... .2-52
Cup holders ...................... .2-52
Storage trays ...................... .2-52
Page 181 of 424

To defrost the rear window glass and outside
mirrors, place the power switch in the ON posi-
tion and push the switch
�1on. The indicator
light will illuminate. Push the switch again to turn
the defroster off.
It will automatically turn off in approximately
15 minutes.
CAUTION
When cleaning the inner side of the rear
window, be careful not to scratch or dam-
age the rear window defroster.
The instrument brightness control switch can be
operated when the power switch is in the ON
position. When the switch is operated, the ve-
hicle information display switches to the bright-
ness adjustment mode.
Push the switch
�1to display the setting menu of
the brightness control on the vehicle information
display.
Push the
�1switch to move the bar to the + side.
If the bar reaches the maximum brightness, a
chime will sound. If the switch
�1is pushed again
when the brightness is at the maximum setting,
the instrument lights turn off.
Type A (if so equipped)
Type B (if so equipped)
REAR WINDOW AND OUTSIDE
MIRROR (IF SO EQUIPPED)
DEFROSTER SWITCH INSTRUMENT BRIGHTNESS
CONTROL
2-42Instruments and controls
Page 204 of 424

3 Pre-driving checks and adjustments
Keys...............................3-2
NISSAN Intelligent Key® ................3-2
NISSAN Vehicle Immobilizer System keys .......3-3
Doors ............................. .3-4
Locking with mechanical key (driver’s side only) . . .3-4
Locking with inside lock knob ..............3-5
Locking with power door lock switch ..........3-5
Automatic door locks .................. .3-6
Child safety rear door lock ................3-6
NISSAN Intelligent Key® system ..............3-6
NISSAN Intelligent Key® operating range of the
door lock/unlock function ................3-8
Door locks/unlocks precaution .............3-9
NISSAN Intelligent Key® operation ..........3-9
12-volt battery saver system ..............3-11
Warning signals .................... .3-11
Troubleshooting guide ................ .3-12
How to use remote keyless entry function ......3-13Hood
............................ .3-17
Rear hatch ......................... .3-18
Secondary rear hatch release .............3-19
Charge port lid ....................... .3-19
Opening charge port lid ................3-19
Charge port cap .................... .3-20
Steering wheel ....................... .3-21
Tilt operation ...................... .3-21
Sun visors ......................... .3-22
Vanity mirror ...................... .3-22
Card holder (Driver’s side only) ............3-23
Mirrors ........................... .3-23
Inside rearview mirror ................. .3-23
Manual anti-glare rearview mirror
(if so equipped) .................... .3-23
Automatic anti-glare type (if so equipped) ......3-24
Outside mirrors .................... .3-25
Page 225 of 424
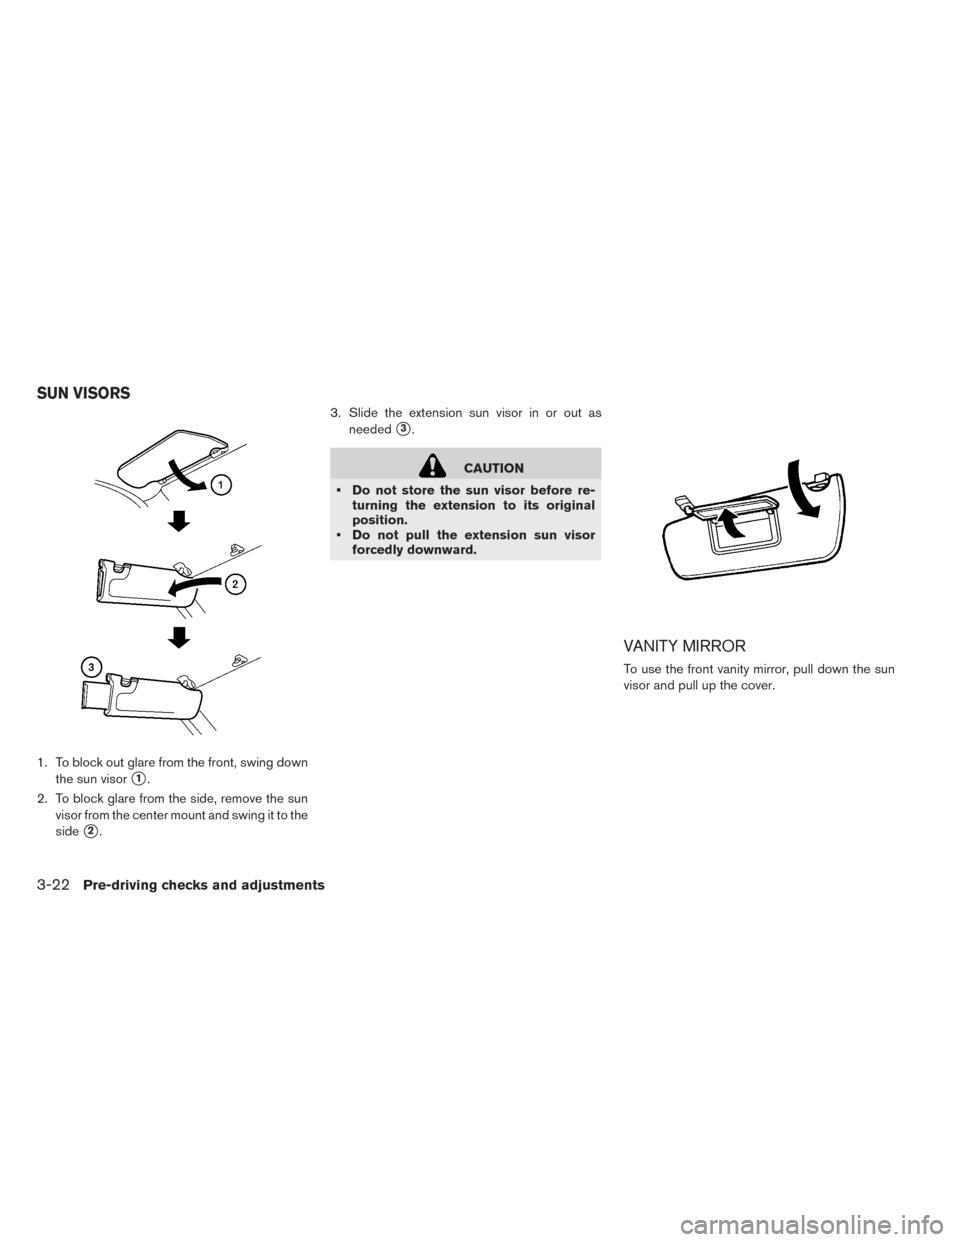
1. To block out glare from the front, swing downthe sun visor
�1.
2. To block glare from the side, remove the sun visor from the center mount and swing it to the
side
�2. 3. Slide the extension sun visor in or out as
needed
�3.
CAUTION
• Do not store the sun visor before re- turning the extension to its original
position.
• Do not pull the extension sun visor forcedly downward.
VANITY MIRROR
To use the front vanity mirror, pull down the sun
visor and pull up the cover.
SUN VISORS
3-22Pre-driving checks and adjustments
Page 226 of 424
CARD HOLDER (DRIVER’S SIDE
ONLY)
To access the card holder, slide card in the card
holder. Do not view information while operating
the vehicle.
INSIDE REARVIEW MIRROR
Adjust the angle of the inside rearview mirror to
the preferred position.
MANUAL ANTI-GLARE REARVIEW
MIRROR (IF SO EQUIPPED)
The night position�1reduces glare from the
headlights of vehicles behind you at night.
Use the day position
�2when driving in daylight
hours.
WARNING
Use the night position only when neces-
sary, because it reduces rearview clarity.
MIRRORS
Pre-driving checks and adjustments3-23
Page 227 of 424

The inside mirror is designed so that it automati-
cally changes reflection based on the intensity of
the headlights of the vehicle behind.
When the system i")
AUTOMATIC ANTI-GLARE TYPE (IF
SO EQUIPPED)
The inside mirror is designed so that it automati-
cally changes reflection based on the intensity of
the headlights of the vehicle behind.
When the system is turned on, the indicator light
�Awill illuminate and excessive glare from the
headlights of the vehicle behind you will be re-
duced.
Type A (if so equipped): The anti-glare system
automatically turns on when the power switch is
moved to the ON position.
Do not hang any objects on the mirror or
apply glass cleaner to it. Doing so will re-
duce the sensitivity of the sensor
�B, result-
ing in improper operation.
Type B (if so equipped): Push the “�” switch
�C
to make the inside rearview mirror operate nor-
mally. The indicator light will turn off. Push the “I”
switch
�Dto turn the system on.
Do not allow any object to cover the sen-
sors
�Eor apply glass cleaner on them.
Doing so will reduce the sensitivity of the
sensor, resulting in improper operation.
WARNING
Use the night position only when neces-
sary, because it reduces rear view clarity.
Type A (if so equipped)
Type B (if so equipped)
3-24Pre-driving checks and adjustments

—Front camera (if so equipped) (P. 4-11)
2. Hood (P. 3-17) 3. Headlight and turn signal lights
— Switch operation (P. 2-43)
— Bulb replacement")

2. Sun visors (P. 3-22)
3. Map lights— Switch operation (P. 2-59)
— Bluetooth® Hands-Free Phone System
(without Navigation) microphone (P. 4-62) — Bluetooth® Hands-Free")

To access the card holder, slide card in the card
holder. Do not view information while operating
the vehicle.
INSIDE REARVIEW MIRROR
Adjust the angle of the inside")