2017 NISSAN LEAF key
[x] Cancel search: keyPage 38 of 268
![NISSAN LEAF 2017 1.G Navigation Manual 2. Touch [Comfort & Convenience].
Available settings items
Available setting items may vary depending on
models and specifications.
Setting itemAction
[Auto Interior Illumination] When this item is tu NISSAN LEAF 2017 1.G Navigation Manual 2. Touch [Comfort & Convenience].
Available settings items
Available setting items may vary depending on
models and specifications.
Setting itemAction
[Auto Interior Illumination] When this item is tu](/manual-img/5/531/w960_531-37.png)
2. Touch [Comfort & Convenience].
Available settings items
Available setting items may vary depending on
models and specifications.
Setting itemAction
[Auto Interior Illumination] When this item is turned on, the interior lights will illuminate if any door is unlocked.
[Speed Sensing Wiper Interval] When this item is turned to ON, the wiper interval is adjusted automatically according to the vehicle speed.
[Light Sensitivity] Adjust the sensitivity of the automatic headlight by touching [+] or [-].
[Light Off Delay] Select the duration of the automatic headlight off timer from 0, 30, 45, 60, 90, 120, 150 and 180 second
periods.
[Selective Door Unlock] When this item is turned on, only the driver’s door is unlocked first after the door unlock operation. When
the door handle request switch on the driver’s or front passenger’s side door is pushed to be unlocked,
only the corresponding door is unlocked first. All the doors can be unlocked if the door unlock operation is
performed again within 60 seconds. When this item is turned to OFF, all the doors will be unlocked after
the door unlock operation is performed once.
[Intelligent Key Lock/Unlock] When this item is turned to ON, door lock/unlock function by pushing the door handle request switch will
be activated.
[Return All Settings to Default] Touch this item and touch [Yes] if you want to return all settings to the default.
1-18
1. Getting started
Page 53 of 268

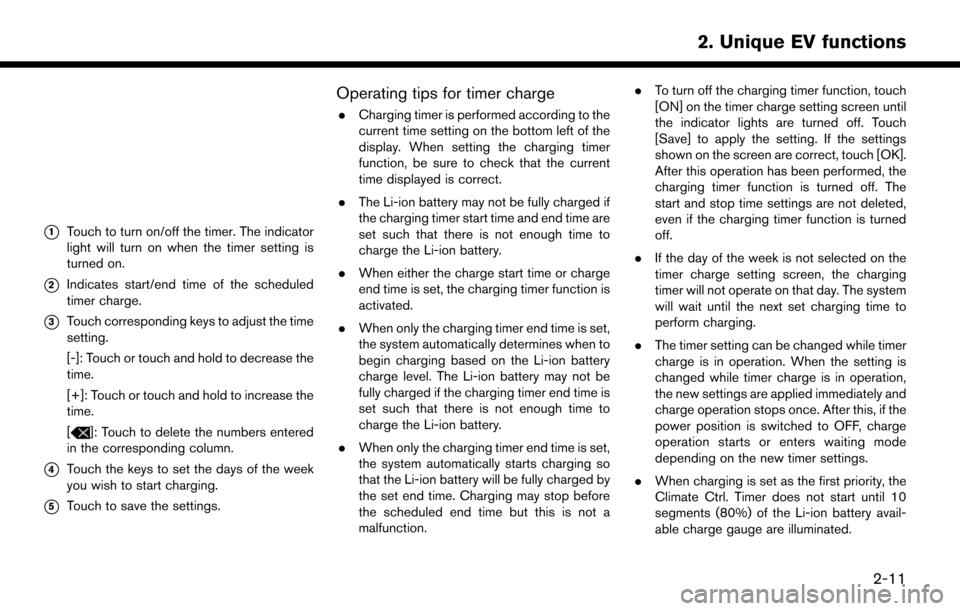
*1Touch to turn on/off the timer. The indicator
light will turn on when the timer setting is
turned on.
*2Indicates start/end time of the scheduled
timer charge.
*3Touch corresponding keys to adjust the time
setting.
[-]: Touch or touch and hold to decrease the
time.
[+]: Touch or touch and hold to increase the
time.
[
]: Touch to delete the numbers entered
in the corresponding column.
*4Touch the keys to set the days of the week
you wish to start charging.
*5Touch to save the settings.
Operating tips for timer charge
. Charging timer is performed according to the
current time setting on the bottom left of the
display. When setting the charging timer
function, be sure to check that the current
time displayed is correct.
. The Li-ion battery may not be fully charged if
the charging timer start time and end time are
set such that there is not enough time to
charge the Li-ion battery.
. When either the charge start time or charge
end time is set, the charging timer function is
activated.
. When only the charging timer end time is set,
the system automatically determines when to
begin charging based on the Li-ion battery
charge level. The Li-ion battery may not be
fully charged if the charging timer end time is
set such that there is not enough time to
charge the Li-ion battery.
. When only the charging timer end time is set,
the system automatically starts charging so
that the Li-ion battery will be fully charged by
the set end time. Charging may stop before
the scheduled end time but this is not a
malfunction. .
To turn off the charging timer function, touch
[ON] on the timer charge setting screen until
the indicator lights are turned off. Touch
[Save] to apply the setting. If the settings
shown on the screen are correct, touch [OK].
After this operation has been performed, the
charging timer function is turned off. The
start and stop time settings are not deleted,
even if the charging timer function is turned
off.
. If the day of the week is not selected on the
timer charge setting screen, the charging
timer will not operate on that day. The system
will wait until the next set charging time to
perform charging.
. The timer setting can be changed while timer
charge is in operation. When the setting is
changed while timer charge is in operation,
the new settings are applied immediately and
charge operation stops once. After this, if the
power position is switched to OFF, charge
operation starts or enters waiting mode
depending on the new timer settings.
. When charging is set as the first priority, the
Climate Ctrl. Timer does not start until 10
segments (80%) of the Li-ion battery avail-
able charge gauge are illuminated.
2-11
2. Unique EV functions
Page 55 of 268
![NISSAN LEAF 2017 1.G Navigation Manual 4. After entering the information, touch [Save].A confirmation screen is displayed.
5. Touch [OK] to confirm the setting, push the power switch to the OFF position, and then
connect the charge connect NISSAN LEAF 2017 1.G Navigation Manual 4. After entering the information, touch [Save].A confirmation screen is displayed.
5. Touch [OK] to confirm the setting, push the power switch to the OFF position, and then
connect the charge connect](/manual-img/5/531/w960_531-54.png)
4. After entering the information, touch [Save].A confirmation screen is displayed.
5. Touch [OK] to confirm the setting, push the power switch to the OFF position, and then
connect the charge connector to the vehicle.
Climate Ctrl. Timer setting screen
*1Touch to turn on/off the timer. The indicator
light will turn on when the timer setting is
turned on.
*2Shows the set departure time. Climate
Control system will be activated in order
that the vehicle compartment will be cooled/
heated to the set temperature and turn off
itself by the departure time.
*3Touch corresponding keys to adjust the time
setting.
[-]: Touch or touch and hold to decrease the
time. [+]: Touch or touch and hold to increase the
time.
[
]: Touch to delete the numbers entered.
*4Touch the keys to set the days of the week
you wish to activate the Climate Control
system.
*5Touch to save the setting.
Priority setting between timer charge
and Climate Ctrl. Timer
If the timer charge function and the Climate Ctrl.
Timer function are in operation at the same time
due to an overlap of the timer settings, either
function can be set to be preferentially provided
with electric power.
1. Push
<
>and touch [Climate Ctrl. Timer].
2. Touch [Timer With Priority]. Priority setting screen is displayed.
3. Select the preferred setting. Available settings
Setting item Result
[Charging
Timer]
When charging is set as the
first priority, the Climate Ctrl.
Timer does not start until 10
segments (80%) of the Li-ion
battery available charge gauge
are illuminated.
[Clim. Ctrl.
Timer] When the Climate Control is
set as the first priority, the
Climate Control system will
start to operate when the re-
maining Li-ion battery power
displayed in the meter reaches
2 segments (15%) or higher.
Operating tips for using Climate Ctrl.
Timer
.
Temperature setting for the Climate Ctrl. can
be changed from [Timer / Remote - Set
Climate Temp].
. The Climate Ctrl. Timer will only start when
the power switch is in the OFF position.
Always place the power switch in the OFF
position after the Climate Ctrl. Timer is set.
. To turn off the Climate Ctrl. Timer function,
touch [ON] until the indicator light turns off.
The start and stop time settings will not be
2-13
2. Unique EV functions
Page 68 of 268

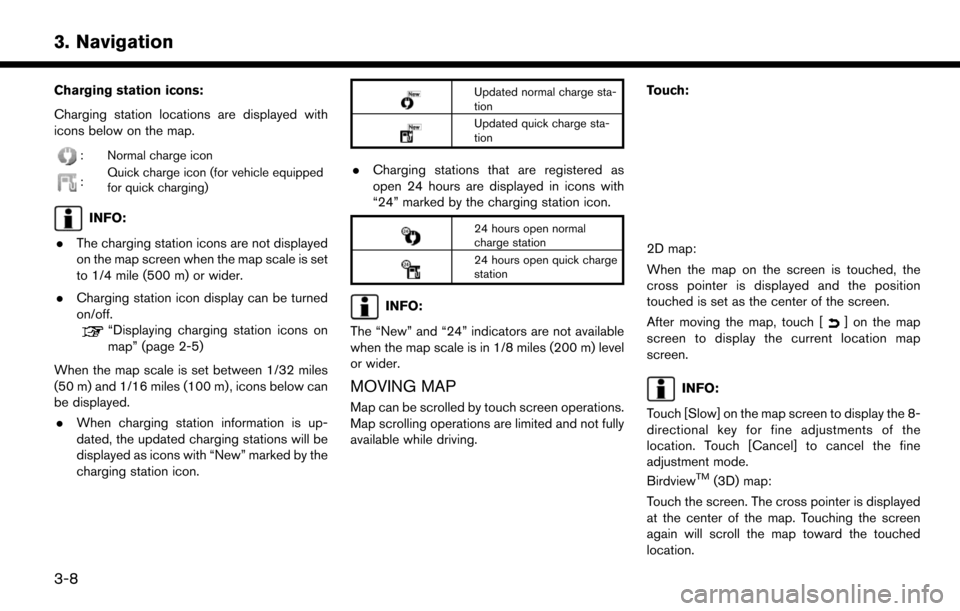
Charging station icons:
Charging station locations are displayed with
icons below on the map.
: Normal charge icon
:Quick charge icon (for vehicle equipped
for quick charging)
INFO:
. The charging station icons are not displayed
on the map screen when the map scale is set
to 1/4 mile (500 m) or wider.
. Charging station icon display can be turned
on/off.
“Displaying charging station icons on
map” (page 2-5)
When the map scale is set between 1/32 miles
(50 m) and 1/16 miles (100 m) , icons below can
be displayed. . When charging station information is up-
dated, the updated charging stations will be
displayed as icons with “New” marked by the
charging station icon.
Updated normal charge sta-
tion
Updated quick charge sta-
tion
.Charging stations that are registered as
open 24 hours are displayed in icons with
“24” marked by the charging station icon.
24 hours open normal
charge station
24 hours open quick charge
station
INFO:
The “New” and “24” indicators are not available
when the map scale is in 1/8 miles (200 m) level
or wider.
MOVING MAP
Map can be scrolled by touch screen operations.
Map scrolling operations are limited and not fully
available while driving. Touch:
2D map:
When the map on the screen is touched, the
cross pointer is displayed and the position
touched is set as the center of the screen.
After moving the map, touch [
] on the map
screen to display the current location map
screen.
INFO:
Touch [Slow] on the map screen to display the 8-
directional key for fine adjustments of the
location. Touch [Cancel] to cancel the fine
adjustment mode.
Birdview
TM(3D) map:
Touch the screen. The cross pointer is displayed
at the center of the map. Touching the screen
again will scroll the map toward the touched
location.
3-8
3. Navigation
Page 74 of 268

SETTING INFORMATION ON MAP
Some information on the map can be displayed
or hidden.
Displaying map icons
Displays map icons of certain points of interest
(such as restaurants and charging stations, etc.)
on the map around the current vehicle location.
1. Touch [Settings] on the Launch Bar.
2. Touch [Navigation].
3. Touch [Map Icons].
4. Touch the preferred icon. The indicator of theselected icon illuminates.
Available setting icons . Restaurant:
.Charging Station:
.Hotel:
.ATM:
.Rest Area:
INFO:
. [Map Icons] can also be accessed from
[
] on the Map screen.
. The map icons are not displayed on the map
screen when the map scale is set to 1/4 mile (500 m) or wider in the 2D and Birdview
TM
map.
. If brand icons are registered in the map data,
the brand will be displayed on the map
instead of the general map icons listed.
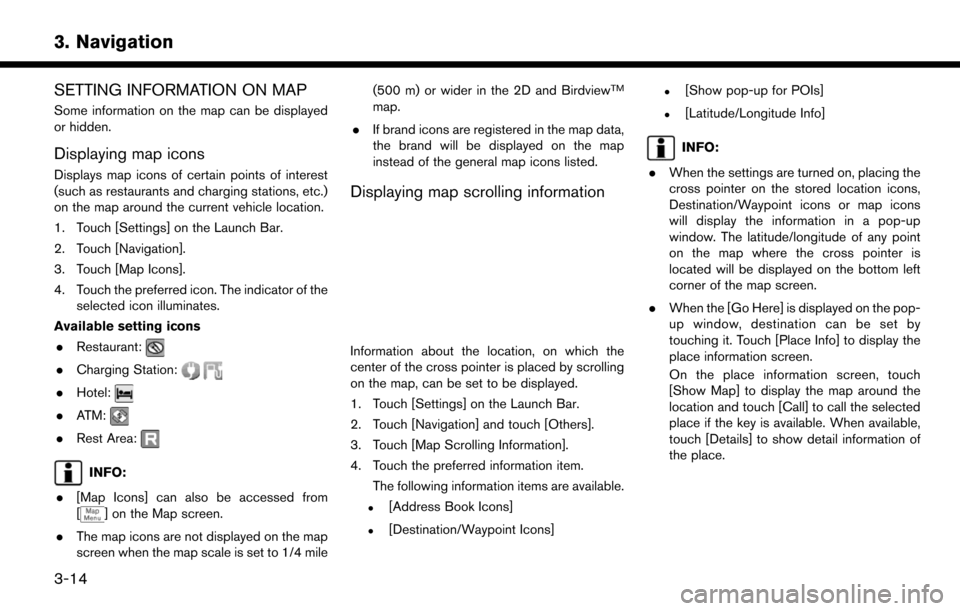
Displaying map scrolling information
Information about the location, on which the
center of the cross pointer is placed by scrolling
on the map, can be set to be displayed.
1. Touch [Settings] on the Launch Bar.
2. Touch [Navigation] and touch [Others].
3. Touch [Map Scrolling Information].
4. Touch the preferred information item.
The following information items are available.
.[Address Book Icons]
.[Destination/Waypoint Icons]
.[Show pop-up for POIs]
.[Latitude/Longitude Info]
INFO:
. When the settings are turned on, placing the
cross pointer on the stored location icons,
Destination/Waypoint icons or map icons
will display the information in a pop-up
window. The latitude/longitude of any point
on the map where the cross pointer is
located will be displayed on the bottom left
corner of the map screen.
. When the [Go Here] is displayed on the pop-
up window, destination can be set by
touching it. Touch [Place Info] to display the
place information screen.
On the place information screen, touch
[Show Map] to display the map around the
location and touch [Call] to call the selected
place if the key is available. When available,
touch [Details] to show detail information of
the place.
3-14
3. Navigation
Page 80 of 268
![NISSAN LEAF 2017 1.G Navigation Manual tion has been set.
.[Near Scroll Position]Displays a list of charging stations near
location where the cross pointer is
located on the map.
.[Near City Center]Displays a list of charging stations when NISSAN LEAF 2017 1.G Navigation Manual tion has been set.
.[Near Scroll Position]Displays a list of charging stations near
location where the cross pointer is
located on the map.
.[Near City Center]Displays a list of charging stations when](/manual-img/5/531/w960_531-79.png)
tion has been set.
.[Near Scroll Position]Displays a list of charging stations near
location where the cross pointer is
located on the map.
.[Near City Center]Displays a list of charging stations when a
city name is entered.
.[Nearby Charging Availability]Displays a list of charging stations and
icons that shows their current availability
by connecting to Nissan Data Center.
“Confirming charging station avail-
ability” (page 2-6)
3. Select preferred searching conditions.
4. Select a charging station from the list.
INFO:
.Touch [Options] to select from the follow- ing options. Available items may vary
depending on certain conditions.
— [Show Along Route]: Shows charging stations located along
the route to destination.
— [Show Quick Charging Stations Only]: Shows charging stations with quick
charger.
— [Open 24-hours]: Shows charging stations that are open
24 hours.
.Touch []or[] on the list to view
charging station information. On the
place information screen, touch [Show
Map] to display the map around the
location and touch [Call] to call the
selected place if the key is available.
When available, touch [Details] to show
detail information of the place.
5. Touch [Yes] to confirm the message dis- played on the screen.
6. Touch [Start] to start the route guidance.
NOTE:
Equipment that is displayed on the char-
ging station information screen is not
necessarily compatible with a LEAF. Be
sure to check whether equipment can be
used with a LEAF beforehand.
INFO:
Charging station search menus can also be
accessed with the following procedure.
1. Push <
>.
2. Touch [Nearby Stations].
Voice command
1. Push <
>located on the steering wheel.
2. After the tone sounds, speak a command.
Use the following voice command to search for a
destination by address:
“Charging Station”
3-20
3. Navigation
Page 86 of 268

Voice command
1. Push <
>located on the steering wheel.
2. After the tone sounds, speak a command.
Use the following voice command to set city
center as a destination:
“City Center”*
*: This voice command operation is available only
when the language setting is in English.
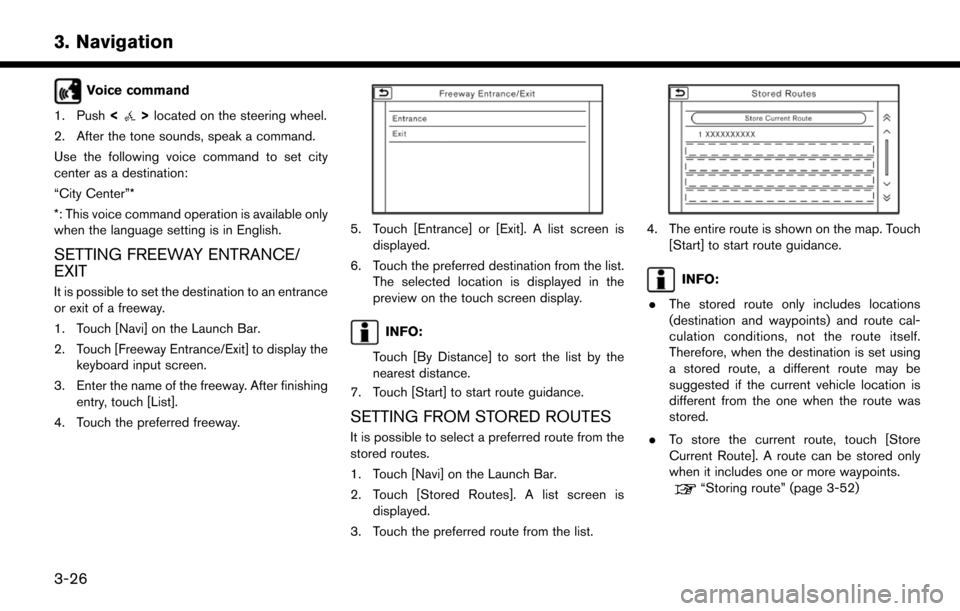
SETTING FREEWAY ENTRANCE/
EXIT
It is possible to set the destination to an entrance
or exit of a freeway.
1. Touch [Navi] on the Launch Bar.
2. Touch [Freeway Entrance/Exit] to display the keyboard input screen.
3. Enter the name of the freeway. After finishing entry, touch [List].
4. Touch the preferred freeway.
5. Touch [Entrance] or [Exit]. A list screen is displayed.
6. Touch the preferred destination from the list. The selected location is displayed in the
preview on the touch screen display.
INFO:
Touch [By Distance] to sort the list by the
nearest distance.
7. Touch [Start] to start route guidance.
SETTING FROM STORED ROUTES
It is possible to select a preferred route from the
stored routes.
1. Touch [Navi] on the Launch Bar.
2. Touch [Stored Routes]. A list screen is displayed.
3. Touch the preferred route from the list.
4. The entire route is shown on the map. Touch [Start] to start route guidance.
INFO:
. The stored route only includes locations
(destination and waypoints) and route cal-
culation conditions, not the route itself.
Therefore, when the destination is set using
a stored route, a different route may be
suggested if the current vehicle location is
different from the one when the route was
stored.
. To store the current route, touch [Store
Current Route]. A route can be stored only
when it includes one or more waypoints.
“Storing route” (page 3-52)
3-26
3. Navigation
Page 99 of 268
![NISSAN LEAF 2017 1.G Navigation Manual SETTING NEW DESTINATION
When the destination is already set, new
destination can be set.
1. Touch [Navi] on the Launch Bar.
2. Touch [New Destination].
3. Touch the preferred destination settingmethod NISSAN LEAF 2017 1.G Navigation Manual SETTING NEW DESTINATION
When the destination is already set, new
destination can be set.
1. Touch [Navi] on the Launch Bar.
2. Touch [New Destination].
3. Touch the preferred destination settingmethod](/manual-img/5/531/w960_531-98.png)
SETTING NEW DESTINATION
When the destination is already set, new
destination can be set.
1. Touch [Navi] on the Launch Bar.
2. Touch [New Destination].
3. Touch the preferred destination settingmethod.
“Setting destination” (page 3-16)
INFO:
You can also set a waypoint with this operation.
CANCELING ROUTE
It is possible to delete a destination and all
waypoints that have already been set.
1. Touch [Navi] on the Launch Bar.
2. Touch [Cancel Route].
3. A confirmation message is displayed. Touch [Yes] to delete the currently set destinations
and waypoints.
INFO:
The deleted destination and waypoints cannot
be reactivated.
CONFIRMING ROUTE
The route information can be confirmed and the
suggested route simulation can be performed.
1. Touch [Navi] on the Launch Bar.
2. Touch [Route Info].
3. Touch the preferred item.
Available items . [Turn List]:
Displays the details of the suggested route
guidance.
. [Simulation]:
Simulate the route guidance. This function
provides a detailed image of the route with
voice guidance.
Touch the following keys for operation.
: Pauses the simulation.
: Resumes the simulation.
: Ends the simulation. .
[Store Route]:
A calculated route can be stored. A maximum
of 5 routes can be stored. The stored routes
can easily be recalled for future use.
. [Map Scroll]:
Displays a map screen where the location of
the destination can be confirmed.
EDITING ROUTE
1. Touch [Navi] on the Launch Bar.
2. Touch [Edit/Add to Route].
3. Edit the following settings and touch [Cal-
culate].
Available settings
*1[Add Destination]:
Touch to add a new destination.
*2Current destination:
Touch to edit or delete the destination.
“Editing/deleting destination or way-
3-39
3. Navigation