2017 NISSAN JUKE lock
[x] Cancel search: lockPage 29 of 416

1-8Safety — Seats, seat belts and supplemental restraint system
SSS0997
ADJUST
For adjustable head restraint/headrest
Adjust the head restraint/headrest so the center
is level with the center of your ears. If your ear
position is still higher than the recommended
alignment, place the head restraint/headrest at
the highest position.
JVR0259X
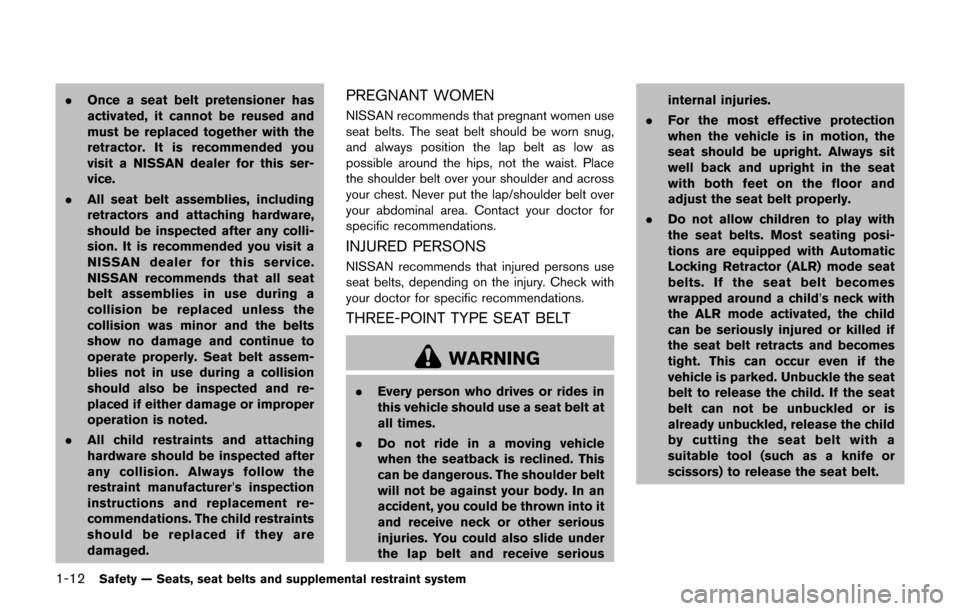
For non-adjustable head restraint/head-
rest
Make sure the head restraint/headrest is posi-
tioned so the lock knob is engaged in the notch
before riding in that designated seating position.
SSS1035
Raise
To raise the head restraint/headrest, pull it up.
Make sure the head restraint/headrest is posi-
tioned so the lock knob is engaged in the notch
before riding in that designated seating position.
Page 30 of 416

SSS1036
Lower
To lower, push and hold the lock knob and push
the head restraint/headrest down.
Make sure the head restraint/headrest is posi-
tioned so the lock knob is engaged in the notch
before riding in that designated seating position.
SSS0508
FRONT-SEAT ACTIVE HEAD RE-
STRAINTS (if so equipped)
The Active Head Restraint moves forward
utilizing the force that the seatback receives
from the occupant in a rear-end collision. The
movement of the head restraint helps support
the occupant’s head by reducing its backward
movement and helping absorb some of the
forces that may lead to whiplash-type injuries.
Active Head Restraints are effective for colli-
sions at low to medium speeds in which it is said
that whiplash injury occurs most.
Active Head Restraints operate only in certain
rear-end collisions. After the collision, the head
restraints return to their original positions.The front head restraints have multiple adjust-
ment notches.
Properly adjust the Active Head Restraints as
described in this section.
Safety — Seats, seat belts and supplemental restraint system1-9
Page 33 of 416

1-12Safety — Seats, seat belts and supplemental restraint system
.Once a seat belt pretensioner has
activated, it cannot be reused and
must be replaced together with the
retractor. It is recommended you
visit a NISSAN dealer for this ser-
vice.
. All seat belt assemblies, including
retractors and attaching hardware,
should be inspected after any colli-
sion. It is recommended you visit a
NISSAN dealer for this service.
NISSAN recommends that all seat
belt assemblies in use during a
collision be replaced unless the
collision was minor and the belts
show no damage and continue to
operate properly. Seat belt assem-
blies not in use during a collision
should also be inspected and re-
placed if either damage or improper
operation is noted.
. All child restraints and attaching
hardware should be inspected after
any collision. Always follow the
restraint manufacturer’s inspection
instructions and replacement re-
commendations. The child restraints
should be replaced if they are
damaged.PREGNANT WOMEN
NISSAN recommends that pregnant women use
seat belts. The seat belt should be worn snug,
and always position the lap belt as low as
possible around the hips, not the waist. Place
the shoulder belt over your shoulder and across
your chest. Never put the lap/shoulder belt over
your abdominal area. Contact your doctor for
specific recommendations.
INJURED PERSONS
NISSAN recommends that injured persons use
seat belts, depending on the injury. Check with
your doctor for specific recommendations.
THREE-POINT TYPE SEAT BELT
WARNING
.Every person who drives or rides in
this vehicle should use a seat belt at
all times.
. Do not ride in a moving vehicle
when the seatback is reclined. This
can be dangerous. The shoulder belt
will not be against your body. In an
accident, you could be thrown into it
and receive neck or other serious
injuries. You could also slide under
the lap belt and receive serious internal injuries.
. For the most effective protection
when the vehicle is in motion, the
seat should be upright. Always sit
well back and upright in the seat
with both feet on the floor and
adjust the seat belt properly.
. Do not allow children to play with
the seat belts. Most seating posi-
tions are equipped with Automatic
Locking Retractor (ALR) mode seat
belts. If the seat belt becomes
wrapped around a child’s neck with
the ALR mode activated, the child
can be seriously injured or killed if
the seat belt retracts and becomes
tight. This can occur even if the
vehicle is parked. Unbuckle the seat
belt to release the child. If the seat
belt can not be unbuckled or is
already unbuckled, release the child
by cutting the seat belt with a
suitable tool (such as a knife or
scissors) to release the seat belt.
Page 34 of 416

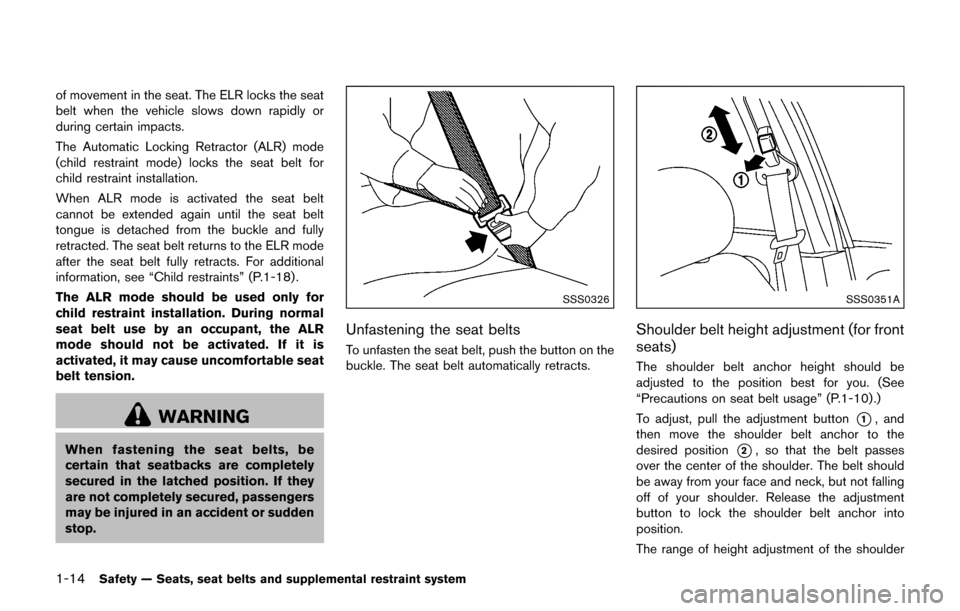
Fastening the seat belts
1. Adjust the seat. (See “Seats” (P.1-2) .)
SSS0292
2. Slowly pull the seat belt out of the retractorand insert the tongue into the buckle until
you hear and feel the latch engage.
.The retractor is designed to lockduring a sudden stop or on impact.
A slow pulling motion permits the
belt to move and allows you some
freedom of movement in the seat.
.If the seat belt cannot be pulled from its fully retracted position, firmly pull
the belt and release it. Then
smoothly pull the belt out of the
retractor.
SSS0290
3. Position the lap belt portion low and snug
on the hips as shown.
4. Pull the shoulder belt portion toward the retractor to take up extra slack. Be sure the
shoulder belt is routed over your shoulder
and across your chest.
The front passenger seat and the rear seating
positions three-point seat belts have two modes
of operation:
. Emergency Locking Retractor (ELR)
. Automatic Locking Retractor (ALR)
The Emergency Locking Retractor (ELR) mode
allows the seat belt to extend and retract to
allow the driver and passengers some freedom
Safety — Seats, seat belts and supplemental restraint system1-13
Page 35 of 416

1-14Safety — Seats, seat belts and supplemental restraint system
of movement in the seat. The ELR locks the seat
belt when the vehicle slows down rapidly or
during certain impacts.
The Automatic Locking Retractor (ALR) mode
(child restraint mode) locks the seat belt for
child restraint installation.
When ALR mode is activated the seat belt
cannot be extended again until the seat belt
tongue is detached from the buckle and fully
retracted. The seat belt returns to the ELR mode
after the seat belt fully retracts. For additional
information, see “Child restraints” (P.1-18) .
The ALR mode should be used only for
child restraint installation. During normal
seat belt use by an occupant, the ALR
mode should not be activated. If it is
activated, it may cause uncomfortable seat
belt tension.
WARNING
When fastening the seat belts, be
certain that seatbacks are completely
secured in the latched position. If they
are not completely secured, passengers
may be injured in an accident or sudden
stop.
SSS0326
Unfastening the seat belts
To unfasten the seat belt, push the button on the
buckle. The seat belt automatically retracts.
SSS0351A
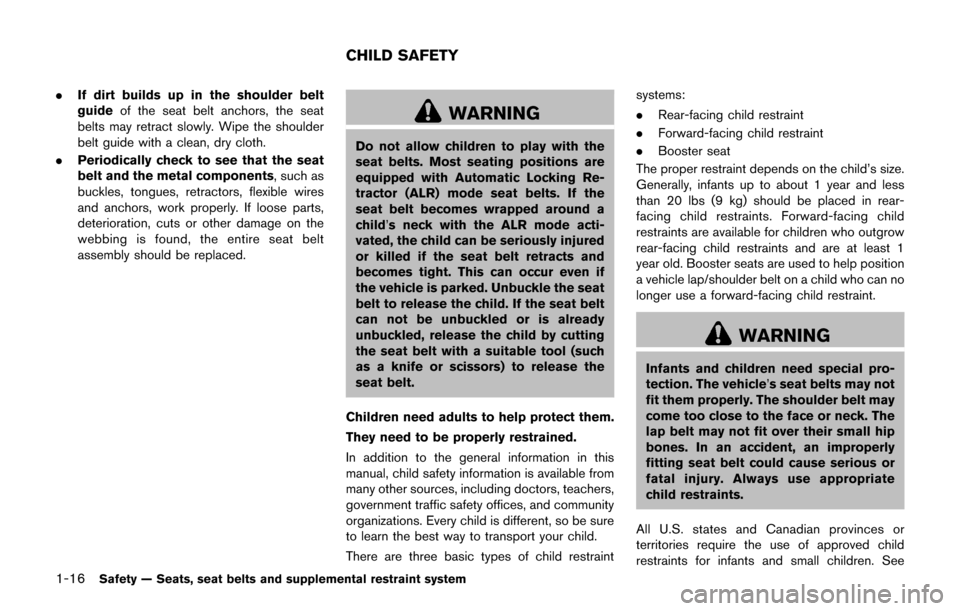
Shoulder belt height adjustment (for front
seats)
The shoulder belt anchor height should be
adjusted to the position best for you. (See
“Precautions on seat belt usage” (P.1-10) .)
To adjust, pull the adjustment button
*1, and
then move the shoulder belt anchor to the
desired position
*2, so that the belt passes
over the center of the shoulder. The belt should
be away from your face and neck, but not falling
off of your shoulder. Release the adjustment
button to lock the shoulder belt anchor into
position.
The range of height adjustment of the shoulder
Page 37 of 416

1-16Safety — Seats, seat belts and supplemental restraint system
.If dirt builds up in the shoulder belt
guide of the seat belt anchors, the seat
belts may retract slowly. Wipe the shoulder
belt guide with a clean, dry cloth.
. Periodically check to see that the seat
belt and the metal components, such as
buckles, tongues, retractors, flexible wires
and anchors, work properly. If loose parts,
deterioration, cuts or other damage on the
webbing is found, the entire seat belt
assembly should be replaced.
WARNING
Do not allow children to play with the
seat belts. Most seating positions are
equipped with Automatic Locking Re-
tractor (ALR) mode seat belts. If the
seat belt becomes wrapped around a
child’s neck with the ALR mode acti-
vated, the child can be seriously injured
or killed if the seat belt retracts and
becomes tight. This can occur even if
the vehicle is parked. Unbuckle the seat
belt to release the child. If the seat belt
can not be unbuckled or is already
unbuckled, release the child by cutting
the seat belt with a suitable tool (such
as a knife or scissors) to release the
seat belt.
Children need adults to help protect them.
They need to be properly restrained.
In addition to the general information in this
manual, child safety information is available from
many other sources, including doctors, teachers,
government traffic safety offices, and community
organizations. Every child is different, so be sure
to learn the best way to transport your child.
There are three basic types of child restraint systems:
.
Rear-facing child restraint
. Forward-facing child restraint
. Booster seat
The proper restraint depends on the child’s size.
Generally, infants up to about 1 year and less
than 20 lbs (9 kg) should be placed in rear-
facing child restraints. Forward-facing child
restraints are available for children who outgrow
rear-facing child restraints and are at least 1
year old. Booster seats are used to help position
a vehicle lap/shoulder belt on a child who can no
longer use a forward-facing child restraint.
WARNING
Infants and children need special pro-
tection. The vehicle’s seat belts may not
fit them properly. The shoulder belt may
come too close to the face or neck. The
lap belt may not fit over their small hip
bones. In an accident, an improperly
fitting seat belt could cause serious or
fatal injury. Always use appropriate
child restraints.
All U.S. states and Canadian provinces or
territories require the use of approved child
restraints for infants and small children. See
CHILD SAFETY
Page 46 of 416

SSS0650
Rear-facing — step 4
4. After attaching the child restraint, test itbefore you place the child in it. Push it from
side to side while holding the child restraint
near the LATCH attachment path. The child
restraint should not move more than 1 inch
(25 mm) , from side to side. Try to tug it
forward and check to see if the LATCH
attachment holds the restraint in place. If the
restraint is not secure, tighten the LATCH
attachment as necessary, or put the restraint
in another seat and test it again. You may
need to try a different child restraint or try
installing by using the vehicle seat belt (if
applicable) . Not all child restraints fit in all
types of vehicles. 5. Check to make sure the child restraint is
properly secured prior to each use. If the
child restraint is loose, repeat steps 1
through 4.
REAR-FACING CHILD RESTRAINT IN-
STALLATION USING THE SEAT BELTS
WARNING
The three-point seat belt with Auto-
matic Locking Retractor (ALR) must be
used when installing a child restraint.
Failure to use the ALR mode will result
in the child restraint not being properly
secured. The restraint could tip over or
be loose and cause injury to a child in a
sudden stop or collision. Also, it can
change the operation of the front
passenger air bag. See “Front passen-
ger air bag and status light” (P.1-46) .
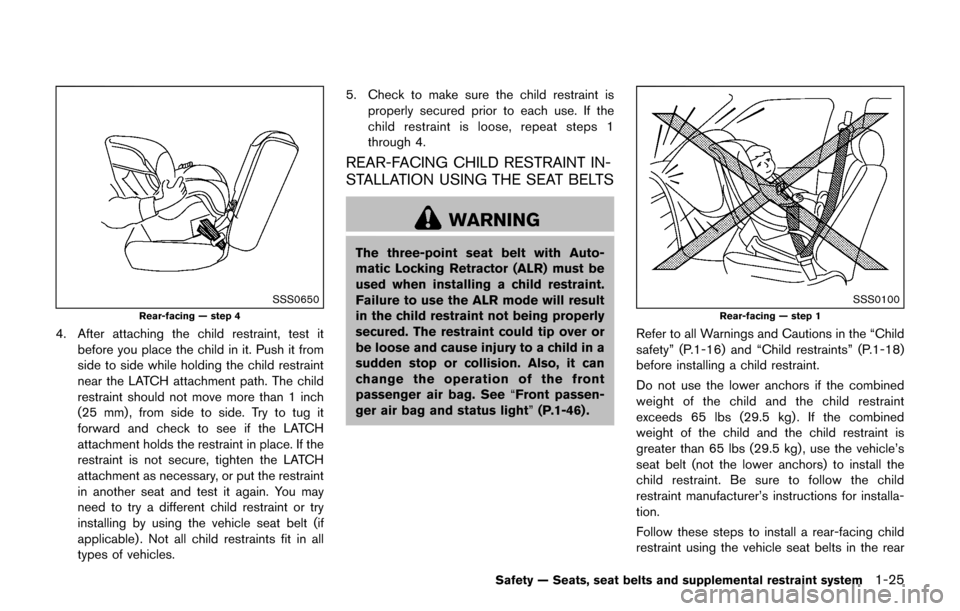
SSS0100
Rear-facing — step 1
Refer to all Warnings and Cautions in the “Child
safety” (P.1-16) and “Child restraints” (P.1-18)
before installing a child restraint.
Do not use the lower anchors if the combined
weight of the child and the child restraint
exceeds 65 lbs (29.5 kg) . If the combined
weight of the child and the child restraint is
greater than 65 lbs (29.5 kg) , use the vehicle’s
seat belt (not the lower anchors) to install the
child restraint. Be sure to follow the child
restraint manufacturer’s instructions for installa-
tion.
Follow these steps to install a rear-facing child
restraint using the vehicle seat belts in the rear
Safety — Seats, seat belts and supplemental restraint system1-25
Page 47 of 416

1-26Safety — Seats, seat belts and supplemental restraint system
seats:
1.Child restraints for infants must be
used in the rear-facing direction and
therefore must not be used in the front
seat. Position the child restraint on the seat.
Always follow the restraint manufacturer’s
instructions.
SSS0654
Rear-facing — step 2
2. Route the seat belt tongue through the child restraint and insert it into the buckle until you
hear and feel the latch engage. Be sure to
follow the child restraint manufacturer’s
instructions for belt routing.
SSS0655
Rear-facing — step 3
3. Pull the shoulder belt until the belt is fullyextended. At this time, the seat belt retractor
is in the Automatic Locking Retractor (ALR)
mode (child restraint mode) . It reverts to the
Emergency Locking Retractor (ELR) mode
when the seat belt is fully retracted.