2017 NISSAN JUKE brake
[x] Cancel search: brakePage 96 of 416
WARNING
.Your brake system may not be
working properly if the warning light
is on. Driving could be dangerous. If
you judge it to be safe, drive care-
fully to the nearest service station
for repairs. Otherwise, have your
vehicle towed because driving it
could be dangerous.
. Pressing the brake pedal with the
engine stopped and/or low brake
fluid level may increase your stop-
ping distance and braking will re-
quire greater pedal effort as well as
pedal travel.
. If the brake fluid level is below the
minimum or MIN mark on the brake
fluid reservoir, do not drive until the
brake system has been checked. It
is recommended you visit a NISSAN
dealer for this service.
Charge warning light
If the light illuminates while the engine is running,
it may indicate the charging system is not
functioning properly. Turn the engine off and
check the alternator belt. If the belt is loose,
broken, missing or if the light remains on, have
your vehicle serviced immediately. It is recom-
mended you visit a NISSAN dealer for this
service.
CAUTION
Do not continue driving if the alternator
belt is loose, broken or missing.
Door open warning light
This light illuminates when any of the doors and/
or liftgate are not closed securely while the
ignition switch is in the ON position.
Electric power steering warning
light
When the ignition switch is in the ON position,
the electric power steering warning light illumi-
nates. After starting the engine, the electric
power steering warning light turns off. This
indicates the electric power steering is opera- tional.
If the electric power steering warning light
illuminates while the engine is running, it may
indicate the electric power steering is not
functioning properly and may need servicing.
Have the electric power steering checked. It is
recommended you visit a NISSAN dealer for this
service.
When the electric power steering warning light
illuminates with the engine running, the power
assist to the steering will cease operation but
you will still have control of the vehicle. At this
time, greater steering efforts are required to
operate the steering wheel, especially in sharp
turns and at low speeds.
See “Electric power steering” (P.5-34).
Engine oil pressure warning light
This light warns of low engine oil pressure. If the
light flickers or illuminates during normal driving,
pull off the road in a safe area, stop the engine
immediately
and call a NISSAN dealer or other
authorized repair shop.
The engine oil pressure warning light is
not designed to indicate a low oil level.
Use the dipstick to check the oil level. (See
“Engine oil” (P.8-5).)
Instruments and controls2-17
Page 100 of 416

Vehicle Dynamic Control (VDC)
warning light
When the ignition switch is in the “ON” position,
the Vehicle Dynamic Control (VDC) warning
light illuminates and then turns off.
The light will blink when the Vehicle Dynamic
Control (VDC) system or the traction control
system is operating, thus alerting the driver that
the vehicle is nearing its traction limits. The road
surface may be slippery.
If the VDC warning light illuminates while the
VDC system is on, this light alerts the driver to
the fact that the VDC system’s fail-safe mode is
operating, for example the VDC system may not
be functioning properly. Have the system
checked. It is recommended you visit a NISSAN
dealer for this service. If a malfunction occurs in
the system, the VDC system function will be
canceled but the vehicle is still driveable. For
additional information, see “Vehicle Dynamic
Control (VDC) system” (P.5-37) of this manual.
INDICATOR LIGHTS
All-Wheel Drive (AWD) indicator
light (AWD model)
When the ignition switch is in the “ON” position,
the All-Wheel Drive (AWD) indicator light
illuminates and then turns off.
When selecting AWD mode while the engine is
running, the AWD indicator light illuminates.
(See “All-Wheel Drive (AWD)” (P.5-29) .)
All-Wheel Drive (AWD-V) indicator
light (AWD model)
When selecting AWD-V mode while the engine
is running, the AWD-V indicator light illuminates.
(See “All-Wheel Drive (AWD)” (P.5-29) .)
Continuously Variable Transmis-
sion (CVT) indicator light (if so equipped)
When the ignition switch is in the “ON” position,
the Continuously Variable Transmission (CVT)
indicator light illuminates and then turns off.
Cruise indicator light
Cruise main switch indicator:
This light illuminates when the cruise control
main switch is pushed. The light turns off when
the main switch is pushed again. When the
cruise indicator light illuminates, the cruise
control system is operational.
Cruise malfunction:
If the cruise indicator light blinks while the
engine is running, it may indicate the cruise
control system is not functioning properly. Have
the system checked. It is recommended you visit
a NISSAN dealer for this service.
See “Cruise control” (P.5-26).
Engine start operation indicator
light
This light appears when the shift lever is in the P
(Park) position (Continuously Variable Transmis-
sion (CVT) models) or N (Neutral) position
(Manual Transmission (MT) models) . This light
means that the engine will start by pushing the
ignition switch with the brake pedal (CVT
models) or clutch pedal (MT models) depressed.
You can start the engine directly in any position.
Instruments and controls2-21
Page 102 of 416
blinking and remain on.
Have the vehicle inspected. It is recom-
mended you visit a NISSAN dealer for this
service. You do not need to have your
vehicle towed to the dealer.
CAUTION
Continued vehicle operation without
having the emission control system
and/or CVT system checked and re-
paired as necessary could lead to poor
driveability, reduced fuel economy, and
possible damage to the emission con-
trol system.
Security indicator light
The light blinks when the ignition switch is in the
ACC, OFF or LOCK position. This function
indicates the security system equipped on the
vehicle is operational.
If the security system is malfunctioning, this light
will remain on while the ignition switch is in the
ON position. For additional information, see
“Security systems” (P.2-33) .
Turn signal/hazard indicator lights
The light flashes when the turn signal switch
lever or hazard switch is turned on.
Vehicle Dynamic Control (VDC) off
indicator light
When the ignition switch is in the “ON” position,
the Vehicle Dynamic Control (VDC) off indicator
light illuminates and then turns off.
The light comes on when the Vehicle Dynamic
Control (VDC) off switch is pushed to OFF. This
indicates that the VDC system and traction
control system are not operating.
AUDIBLE REMINDERS
Key reminder chime
A chime will sound if the driver side door is
opened while the ignition switch is pushed to
the ACC position.
Make sure the ignition switch is pushed to the
OFF position, and take the Intelligent Key with
you when leaving the vehicle.
Light reminder chime
The light reminder chime will sound when the
driver side door is opened with the headlight
switch in the
orposition, and the
ignition switch is in the ACC, OFF or LOCK
position.
Turn the light switch off when you leave the
vehicle.
Brake pad wear warning
The disc brake pads have audible wear warn-
ings. When a brake pad requires replacement, it
will make a high pitched scraping sound when
the vehicle is in motion. This scraping sound will
first occur only when the brake pedal is
depressed. After more wear of the brake pad,
the sound will always be heard even if the brake
pedal is not depressed. Have the brakes
checked as soon as possible if the warning
sound is heard.
Parking brake reminder chime
The parking brake reminder chime will sound if
the vehicle is driven at more than 4 MPH (7
km/h) with the parking brake applied. Stop the
vehicle and release the parking brake.
Instruments and controls2-23
Page 116 of 416
Pulling up the wiper arm:
The windshield wipers must be in the service
position in order to replace the wiper blades.
To move the wiper blades to the service position,
follow this procedure:
.When the ignition switch is in the “ON”
position or within 60 seconds of placing the
ignition switch to the “OFF” position, lift the
lever up
*4two times in less than 0.5
seconds. The windshield wipers will move to
the service position automatically, and the
wiper blades can now be replaced. To
replace the wiper blades, see “Windshield
wiper blades” (P.8-15).
To move the wiper blades back to the original
position:
. Lift the lever up
*4or push the lever down
to operate at any wiper speed.
CAUTION
. This function can be operated even
if the ignition switch is in the “ON”
position. However, to prevent an
accident or damage when pulling
up the wiper arm, be sure to observe
the following precautions. — Make sure the shift lever is in
the P (Park) position (Continu-
ously Variable Transmission
models) .
— Make sure the shift lever is in the N (Neutral) position, with the
parking brake fully applied
(Manual Transmission models) .
— Never allow the passengers to operate the windshield wiper
switch inadvertently.
. Do not operate the windshield wiper
while the wiper arm is pulled up. The
wiper arm may be damaged.
WARNING
In freezing temperatures the washer
solution may freeze on the rear window
glass and obscure your vision. Warm
the rear window with the defroster
before you wash the rear window.
CAUTION
.Do not operate the washer continu-
ously for more than 30 seconds.
. Do not operate the washer if the
reservoir tank is empty.
. Do not fill the window washer
reservoir tank with washer fluid
concentrates at full strength. Some
methyl alcohol based washer fluid
concentrates may permanently stain
the grille if spilled while filling the
window washer reservoir tank.
. Pre-mix washer fluid concentrates
with water to the manufacturer’s
recommended levels before pouring
the fluid into the window washer
reservoir tank. Do not use the
Instruments and controls2-37
REAR WINDOW WIPER AND
WASHER SWITCH
Page 121 of 416
2-42Instruments and controls
Daytime running light system (for NISMO
models and Canada)
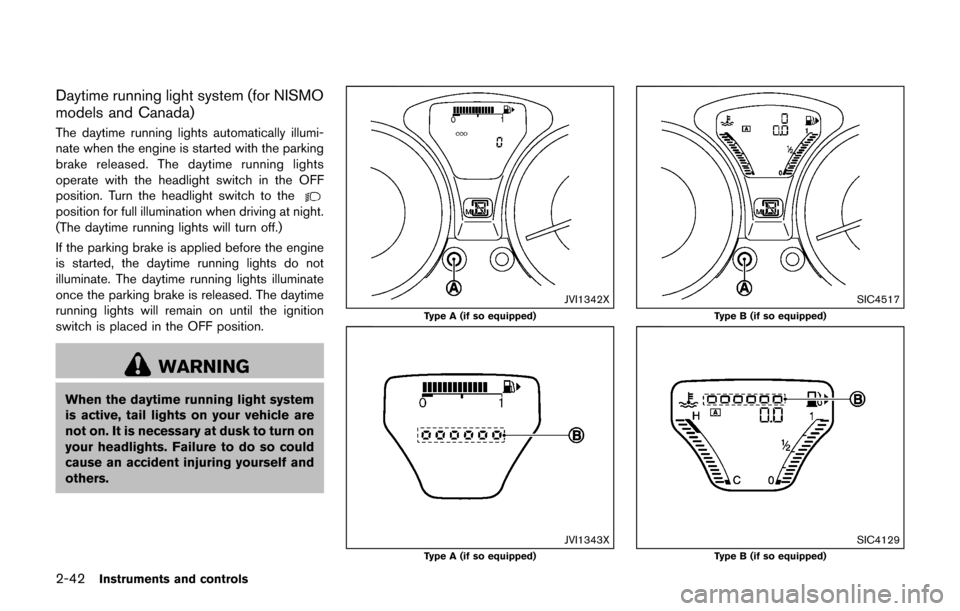
The daytime running lights automatically illumi-
nate when the engine is started with the parking
brake released. The daytime running lights
operate with the headlight switch in the OFF
position. Turn the headlight switch to the
position for full illumination when driving at night.
(The daytime running lights will turn off.)
If the parking brake is applied before the engine
is started, the daytime running lights do not
illuminate. The daytime running lights illuminate
once the parking brake is released. The daytime
running lights will remain on until the ignition
switch is placed in the OFF position.
WARNING
When the daytime running light system
is active, tail lights on your vehicle are
not on. It is necessary at dusk to turn on
your headlights. Failure to do so could
cause an accident injuring yourself and
others.
JVI1342X
Type A (if so equipped)
JVI1343XType A (if so equipped)
SIC4517
Type B (if so equipped)
SIC4129Type B (if so equipped)
Page 170 of 416
SAA3475
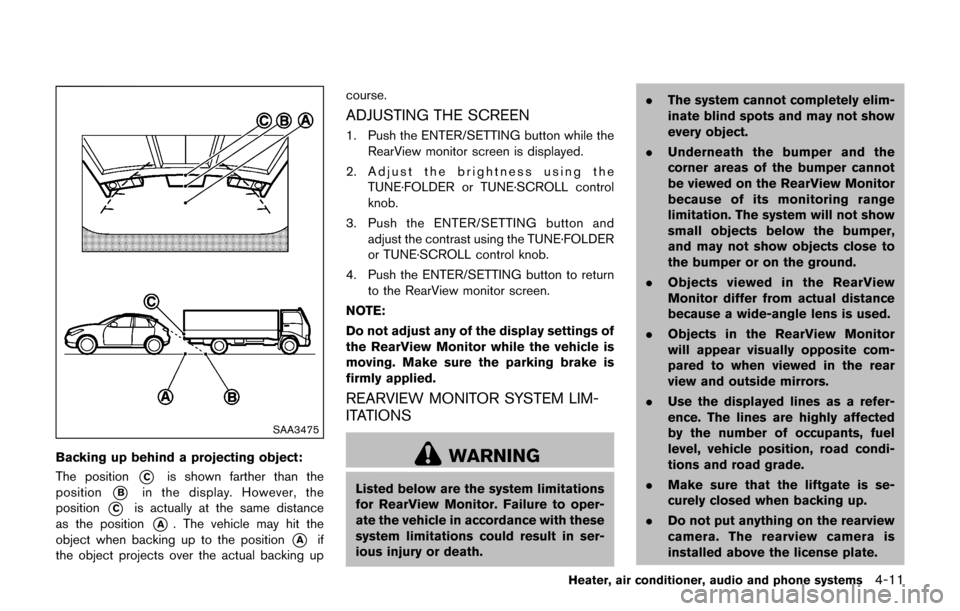
Backing up behind a projecting object:
The position
*Cis shown farther than the
position
*Bin the display. However, the
position
*Cis actually at the same distance
as the position
*A. The vehicle may hit the
object when backing up to the position
*Aif
the object projects over the actual backing up course.
ADJUSTING THE SCREEN
1. Push the ENTER/SETTING button while the
RearView monitor screen is displayed.
2. Adjust the brightness using the TUNE·FOLDER or TUNE·SCROLL control
knob.
3. Push the ENTER/SETTING button and adjust the contrast using the TUNE·FOLDER
or TUNE·SCROLL control knob.
4. Push the ENTER/SETTING button to return to the RearView monitor screen.
NOTE:
Do not adjust any of the display settings of
the RearView Monitor while the vehicle is
moving. Make sure the parking brake is
firmly applied.
REARVIEW MONITOR SYSTEM LIM-
ITATIONS
WARNING
Listed below are the system limitations
for RearView Monitor. Failure to oper-
ate the vehicle in accordance with these
system limitations could result in ser-
ious injury or death. .
The system cannot completely elim-
inate blind spots and may not show
every object.
. Underneath the bumper and the
corner areas of the bumper cannot
be viewed on the RearView Monitor
because of its monitoring range
limitation. The system will not show
small objects below the bumper,
and may not show objects close to
the bumper or on the ground.
. Objects viewed in the RearView
Monitor differ from actual distance
because a wide-angle lens is used.
. Objects in the RearView Monitor
will appear visually opposite com-
pared to when viewed in the rear
view and outside mirrors.
. Use the displayed lines as a refer-
ence. The lines are highly affected
by the number of occupants, fuel
level, vehicle position, road condi-
tions and road grade.
. Make sure that the liftgate is se-
curely closed when backing up.
. Do not put anything on the rearview
camera. The rearview camera is
installed above the license plate.
Heater, air conditioner, audio and phone systems4-11
Page 179 of 416
4-20Heater, air conditioner, audio and phone systems
SAA1898
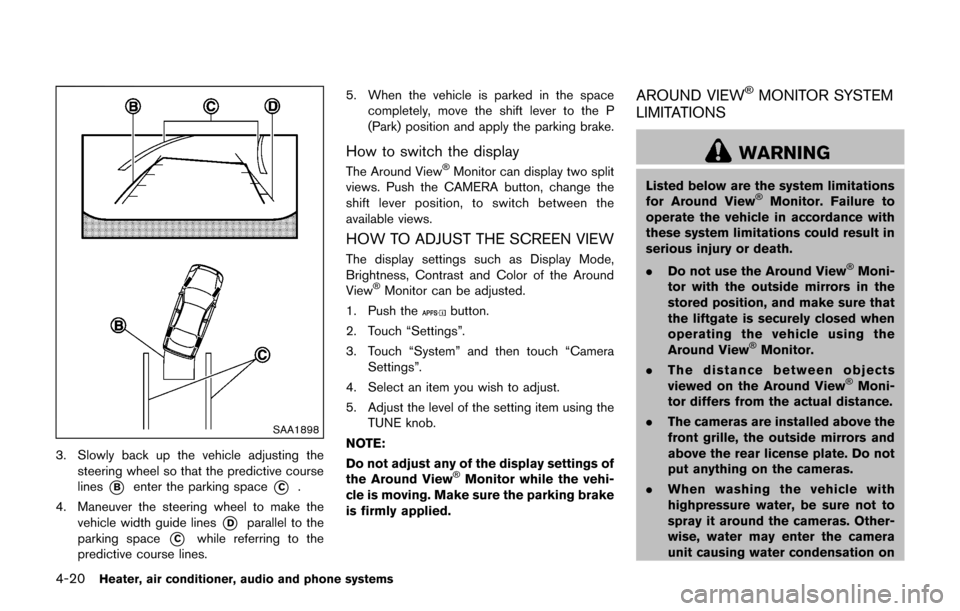
3. Slowly back up the vehicle adjusting thesteering wheel so that the predictive course
lines
*Benter the parking space*C.
4. Maneuver the steering wheel to make the vehicle width guide lines
*Dparallel to the
parking space
*Cwhile referring to the
predictive course lines. 5. When the vehicle is parked in the space
completely, move the shift lever to the P
(Park) position and apply the parking brake.
How to switch the display
The Around View�ŠMonitor can display two split
views. Push the CAMERA button, change the
shift lever position, to switch between the
available views.
HOW TO ADJUST THE SCREEN VIEW
The display settings such as Display Mode,
Brightness, Contrast and Color of the Around
View
�ŠMonitor can be adjusted.
1. Push the
button.
2. Touch “Settings”.
3. Touch “System” and then touch “Camera Settings”.
4. Select an item you wish to adjust.
5. Adjust the level of the setting item using the TUNE knob.
NOTE:
Do not adjust any of the display settings of
the Around View
�ŠMonitor while the vehi-
cle is moving. Make sure the parking brake
is firmly applied.
AROUND VIEW�ŠMONITOR SYSTEM
LIMITATIONS
WARNING
Listed below are the system limitations
for Around View�ŠMonitor. Failure to
operate the vehicle in accordance with
these system limitations could result in
serious injury or death.
. Do not use the Around View
�ŠMoni-
tor with the outside mirrors in the
stored position, and make sure that
the liftgate is securely closed when
operating the vehicle using the
Around View
�ŠMonitor.
. The distance between objects
viewed on the Around View
�ŠMoni-
tor differs from the actual distance.
. The cameras are installed above the
front grille, the outside mirrors and
above the rear license plate. Do not
put anything on the cameras.
. When washing the vehicle with
highpressure water, be sure not to
spray it around the cameras. Other-
wise, water may enter the camera
unit causing water condensation on
Page 262 of 416

5 Starting and driving
Precautions when starting and driving ................................ 5-2Exhaust gas (carbon monoxide) ...................................... 5-2
Three-way catalyst .............................................................. 5-3
Tire Pressure Monitoring System (TPMS) .................... 5-3
Avoiding collision and rollover ......................................... 5-6
Off-road recovery ................................................................ 5-6
Rapid air pressure loss ...................................................... 5-6
Drinking alcohol/drugs and driving ................................. 5-7
Driving safety precautions ................................................. 5-7
Push-button ignition switch .................................................... 5-9
Operating range for engine start function ................. 5-10
Push-button ignition switch operation ........................ 5-10
Push-button ignition switch positions ......................... 5-11
Emergency engine shut off ............................................ 5-11
Intelligent Key battery discharge .................................. 5-12
Before starting the engine ................................................... 5-12
Starting the engine ................................................................ 5-13
Driving the vehicle ................................................................. 5-14 Continuously Variable Transmission (CVT) ................ 5-14
Manual Transmission (MT) ............................................. 5-19
Integrated control system (if so equipped) ..................... 5-21 Drive mode ........................................................................\
. 5-22
Parking brake ........................................................................\
.. 5-25
Cruise control ........................................................................\
. 5-26 Precautions on cruise control ....................................... 5-26 Cruise control operations ............................................ 5-26
Break-in schedule ................................................................. 5-27
Fuel Efficient Driving Tips ................................................... 5-28
Increasing fuel economy ...................................................... 5-29
All-Wheel Drive (AWD) (if so equipped) ........................ 5-29 All-Wheel Drive (AWD) mode
switch operations ........................................................... 5-29
AWD warning light ........................................................ 5-31
Parking/parking on hills ........................................................ 5-33
Electric power steering ........................................................ 5-34
Brake system ........................................................................\
.. 5-35 Braking precautions ...................................................... 5-35
Brake assist ........................................................................\
.... 5-36
Brake assist ..................................................................... 5-36
Anti-lock Braking System (ABS) ............................... 5-36
Vehicle Dynamic Control (VDC) system ......................... 5-37
Cold weather driving ............................................................ 5-39 Freeing a frozen door lock ........................................... 5-39
Anti-freeze ........................................................................\
5-39
Battery ........................................................................\
....... 5-39
Draining of coolant water ............................................. 5-39
Tire equipment ................................................................ 5-39
Special winter equipment ............................................ 5-39
Driving on snow or ice ................................................. 5-39
Engine block heater (if so equipped) ....................... 5-40