2017 NISSAN JUKE lock
[x] Cancel search: lockPage 300 of 416

FREEING A FROZEN DOOR LOCK
To prevent a door lock from freezing, apply
deicer through the key hole. If the lock becomes
frozen, heat the key before inserting it into the
key hole or use the Intelligent Key system.
ANTI-FREEZE
In the winter when it is anticipated that the
outside temperature will drop below 328F(08C) ,
check the anti-freeze to assure proper winter
protection. For additional information, see “En-
gine cooling system” (P.8-4) .
BATTERY
If the battery is not fully charged during
extremely cold weather conditions, the battery
fluid may freeze and damage the battery. To
maintain maximum efficiency, the battery should
be checked regularly. For additional information,
see “Battery” (P.8-10) .
DRAINING OF COOLANT WATER
If the vehicle is to be left outside without anti-
freeze, drain the cooling system, including the
engine block. Refill before operating the vehicle.
For details, see “Engine cooling system” (P.8-4) .
TIRE EQUIPMENT
SUMMER tires have a tread designed to provide
superior performance on dry pavement. How-
ever, the performance of these tires will be
substantially reduced in snowy and icy condi-
tions. If you operate your vehicle on snowy or icy
roads, NISSAN recommends the use of MUD &
SNOW or ALL SEASON tires on all four wheels.
It is recommended you consult a NISSAN dealer
for the tire type, size, speed rating and
availability information.
For additional traction on icy roads, studded
tires may be used. However, some U.S. states
and Canadian provinces prohibit their use.
Check local, state and provincial laws before
installing studded tires.
Skid and traction capabilities of studded
snow tires, on wet or dry surfaces, may be
poorer than that of non-studded snow
tires.
Tire chains may be used. For details, see “Tire
chains” (P.8-37) of this manual.
All-Wheel Drive (AWD) model
If you install snow tires, they must also be the
same size, brand, construction and tread pattern
on all four wheels.
SPECIAL WINTER EQUIPMENT
It is recommended that the following items be
carried in the vehicle during winter:
. A scraper and stiff-bristled brush to remove
ice and snow from the windows and wiper
blades.
. A sturdy, flat board to be placed under the
jack to give it firm support.
. A shovel to dig the vehicle out of snow-
drifts.
. Extra window washer fluid to refill the
reservoir tank.
DRIVING ON SNOW OR ICE
WARNING
.Wet ice (328F, 0 8C and freezing rain) ,
very cold snow or ice can be slick
and very hard to drive on. The
vehicle will have much less traction
or “grip” under these conditions. Try
to avoid driving on wet ice until the
road is salted or sanded.
. Whatever the condition, drive with
caution. Accelerate and slow down
with care. If accelerating or down-
shifting too fast, the drive wheels
will lose even more traction.
Starting and driving5-39
COLD WEATHER DRIVING
Page 301 of 416
5-40Starting and driving
.Allow more stopping distance under
these conditions. Braking should be
started sooner than on dry pave-
ment.
. Allow greater following distances
on slippery roads.
. Watch for slippery spots (glare ice) .
These may appear on an otherwise
clear road in shaded areas. If a
patch of ice is seen ahead, brake
before reaching it. Try not to brake
while on the ice, and avoid any
sudden steering maneuvers.
. Do not use cruise control on slip-
pery roads.
. Snow can trap dangerous exhaust
gases under your vehicle. Keep
snow clear of the exhaust pipe and
from around your vehicle.
ENGINE BLOCK HEATER (if so
equipped)
Engine block heaters are used to assist in cold
temperature starting.
The engine block heater should be used when
the outside temperature is 208F( �í78C) or lower.
To use the engine block heater
1. Turn the engine off.
2. Open the hood and unwrap the engine
block heater cord.
3. Plug the engine block heater cord into a grounded 3-wire, 3-pronged extension cord.
4. Plug the extension cord into a Ground Fault Interrupt (GFI) protected, grounded 110-
volt AC (VAC) outlet.
5. The engine block heater must be plugged in for at least 2 - 4 hours, depending on
outside temperatures, to properly warm the
engine coolant. Use an appropriate timer to
turn the engine block heater on.
6. Before starting the engine, unplug and properly store the cord to keep it away from
moving parts.
WARNING
.Do not use your engine block heater
with an ungrounded electrical sys-
tem or a 2-pronged adapter. You can
be seriously injured by an electrical
shock if you use an ungrounded
connection. .
Disconnect and properly store the
engine block heater cord before
starting the engine. Damage to the
cord could result in an electrical
shock and can cause serious injury.
. Use a heavy-duty 3-wire, 3-pronged
extension cord rated for at least
10A. Plug the extension cord into a
Ground Fault Interrupt (GFI) pro-
tected, grounded 110-VAC outlet.
Failure to use the proper extension
cord or a grounded outlet can result
in a fire or electrical shock and
cause serious personal injury.
Page 305 of 416
6-4In case of emergency
.Do not inject any tire liquid or
aerosol tire sealant into the tires,
as this may cause a malfunction of
the tire pressure sensors.
CHANGING A FLAT TIRE
If you have a flat tire, follow the instructions
below.
Stopping the vehicle
1. Safely move the vehicle off the road and
away from traffic.
2. Turn on the hazard warning flashers.
3. Park on a level surface and apply the parking brake.
4. Continuously Variable Transmission
(CVT) models:
Move the shift lever to the P (Park) position.
Manual Transmission (MT) models:
Move the shift lever to the R (Reverse)
position.
5. Turn off the engine.
6. Raise the hood to warn other traffic, and to signal professional road assistance person-
nel that you need assistance.
7. Have all passengers get out of the vehicle and stand in a safe place, away from traffic and clear of the vehicle.
WARNING
.
Make sure the parking brake is
securely applied and the Manual
Transmission is shifted into R (Re-
verse) , or the Continuously Variable
Transmission into P (Park) .
. Never change tires when the vehicle
is on a slope, ice or slippery areas.
This is hazardous.
. Never change tires if oncoming
traffic is close to your vehicle. Wait
for professional road assistance.
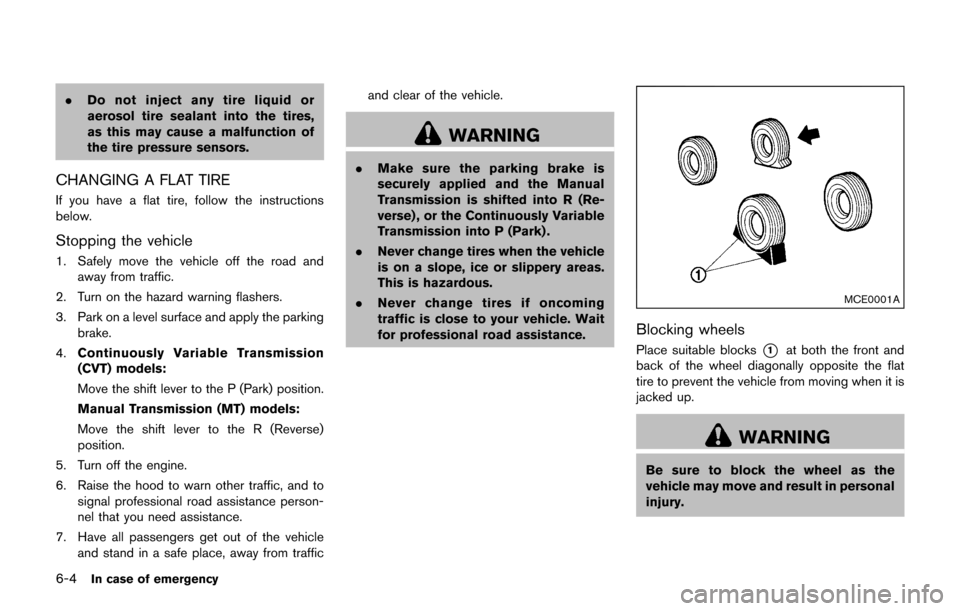
MCE0001A
Blocking wheels
Place suitable blocks*1at both the front and
back of the wheel diagonally opposite the flat
tire to prevent the vehicle from moving when it is
jacked up.
WARNING
Be sure to block the wheel as the
vehicle may move and result in personal
injury.
Page 306 of 416

JVE0354XJacking tools
Getting the spare tire and tools
Open the liftgate. Raise the cargo floor board
*1. Remove jacking tools located behind the
spare tire.
SCE0947
The spare tire is located under the cargo floor
board.
Loosen the clamp
*2and remove the spacer
*1and take out the spare tire.
Jacking up the vehicle and removing the
damaged tire
WARNING
. Never get under the vehicle while it
is supported only by the jack. If it is
necessary to work under the vehicle,
support it with safety stands.
. Use only the jack provided with your
vehicle to lift the vehicle. Do not use
the jack provided with your vehicle
on other vehicles. The jack is de-
signed for lifting only your vehicle
during a tire change.
. Use the correct jack-up points.
Never use any other part of the
vehicle for jack support.
. Never jack up the vehicle more than
necessary.
. Never use blocks on or under the
jack.
. Do not start or run the engine while
vehicle is on the jack, as it may
cause the vehicle to move. This is
especially true for vehicles with
limited slip differentials.
In case of emergency6-5
Page 308 of 416

SCE0504
2. Loosen each wheel nut one or two turns byturning it counterclockwise with the wheel
nut wrench. Do not remove the wheel
nuts until the tire is off the ground.
3. To lift the vehicle, securely hold the jack lever and rod with both hands as shown above.
Carefully raise the vehicle until the tire clears
the ground. Remove the wheel nuts, and
then remove the tire.
SCE0933
Installing the spare tire
The spare tire is designed for emergency
use. (See specific instructions under the
heading “Wheels and tires” (P.8-28) .)
1. Clean any mud or dirt from the surfacebetween the wheel and hub.
2. Carefully put the spare tire on and tighten the wheel nuts finger tight. Check that all the
wheel nuts contact the wheel surface
horizontally.
3. With the wheel nut wrench, tighten wheel nuts alternately and evenly in the sequence
illustrated (
*1,*2,*3,*4,*5) , more
than 2 times, until they are tight.
In case of emergency6-7
Page 327 of 416
8-2Do-it-yourself
When performing any inspection or mainte-
nance work on your vehicle, always take care
to prevent serious accidental injury to yourself or
damage to the vehicle. The following are general
precautions which should be closely observed.
WARNING
.Park the vehicle on a level surface,
apply the parking brake securely
and block the wheels to prevent
the vehicle from moving. Move the
shift lever to the P (Park) position
(CVT model) or the shift lever to the
N (Neutral) position (MT model) .
. Be sure the ignition switch is in the
OFF or LOCK position when per-
forming any parts replacement or
repairs.
. If you must work with the engine
running, keep your hands, clothing,
hair and tools away from moving
fans, belts and any other moving
parts.
. It is advisable to secure or remove
any loose clothing and remove any
jewelry, such as rings, watches, etc.
before working on your vehicle. .
Always wear eye protection when-
ever you work on your vehicle.
. If you must run the engine in an
enclosed space such as a garage, be
sure there is proper ventilation for
exhaust gases to escape.
. Never get under the vehicle while it
is supported only by a jack. If it is
necessary to work under the vehicle,
support it with safety stands.
. Keep smoking materials, flame and
sparks away from fuel tank and the
battery.
. Because the fuel lines are under
high pressure even when the engine
is off, it is recommended you visit a
NISSAN dealer for service of the
fuel filter or fuel lines.
CAUTION
.Do not work under the hood while
the engine is hot. Turn the engine
off and wait until it cools down.
. Avoid direct contact with used en-
gine oil and coolant. Improperly
disposed engine oil, and engine coolant and/or other vehicle fluids
can damage the environment. Al-
ways conform to local regulations
for disposal of vehicle fluid.
. Never leave the engine or the CVT
related component harnesses dis-
connected while the ignition switch
is in the ON position.
. Never connect or disconnect the
battery or any transistorized com-
ponent while the ignition switch is
in the ON position.
. Your vehicle is equipped with an
automatic engine cooling fan. It may
come on at any time without warn-
ing, even if the ignition key is in the
OFF position and the engine is not
running. To avoid injury, always
disconnect the negative battery
cable before working near the fan.
This “8. Do-it-yourself” section gives instruc-
tions regarding only those items which are
relatively easy for an owner to perform.
A genuine NISSAN Service Manual is also
available. (See “Owner’s manual/service manual
order information” (P.10-22) .)
You should be aware that incomplete or
MAINTENANCE PRECAUTIONS
Page 332 of 416
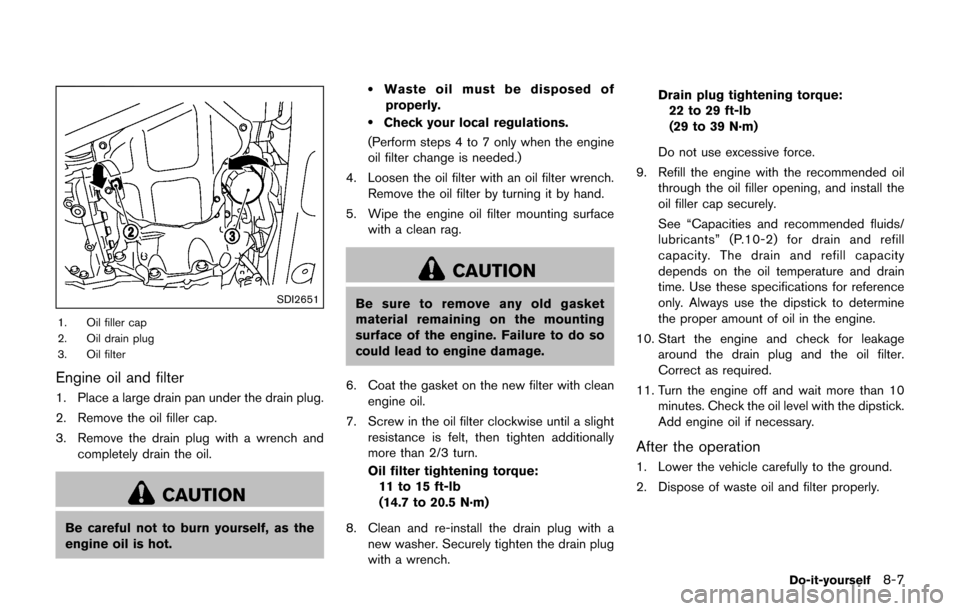
SDI2651
1. Oil filler cap
2. Oil drain plug
3. Oil filter
Engine oil and filter
1. Place a large drain pan under the drain plug.
2. Remove the oil filler cap.
3. Remove the drain plug with a wrench andcompletely drain the oil.
CAUTION
Be careful not to burn yourself, as the
engine oil is hot.
.Waste oil must be disposed of
properly.
.Check your local regulations.
(Perform steps 4 to 7 only when the engine
oil filter change is needed.)
4. Loosen the oil filter with an oil filter wrench. Remove the oil filter by turning it by hand.
5. Wipe the engine oil filter mounting surface with a clean rag.
CAUTION
Be sure to remove any old gasket
material remaining on the mounting
surface of the engine. Failure to do so
could lead to engine damage.
6. Coat the gasket on the new filter with clean engine oil.
7. Screw in the oil filter clockwise until a slight resistance is felt, then tighten additionally
more than 2/3 turn.
Oil filter tightening torque:11 to 15 ft-lb
(14.7 to 20.5 N·m)
8. Clean and re-install the drain plug with a new washer. Securely tighten the drain plug
with a wrench. Drain plug tightening torque:
22 to 29 ft-lb
(29 to 39 N·m)
Do not use excessive force.
9. Refill the engine with the recommended oil through the oil filler opening, and install the
oil filler cap securely.
See “Capacities and recommended fluids/
lubricants” (P.10-2) for drain and refill
capacity. The drain and refill capacity
depends on the oil temperature and drain
time. Use these specifications for reference
only. Always use the dipstick to determine
the proper amount of oil in the engine.
10. Start the engine and check for leakage around the drain plug and the oil filter.
Correct as required.
11. Turn the engine off and wait more than 10 minutes. Check the oil level with the dipstick.
Add engine oil if necessary.
After the operation
1. Lower the vehicle carefully to the ground.
2. Dispose of waste oil and filter properly.
Do-it-yourself8-7
Page 337 of 416
8-12Do-it-yourself
JUMP STARTING
If jump starting is necessary, see “Jump starting”
(P.6-9) . If the engine does not start by jump
starting, the battery may have to be replaced. It
is recommended you visit a NISSAN dealer for
this service.CAUTION
.Do not ground accessories directly
to the battery terminal. Doing so will
bypass the variable voltage control
system and the vehicle battery may
not charge completely.
. Use electrical accessories with the
engine running to avoid discharging
the vehicle battery.
The variable voltage control system measures
the amount of electrical discharge from the
battery and controls voltage generated by the
generator.
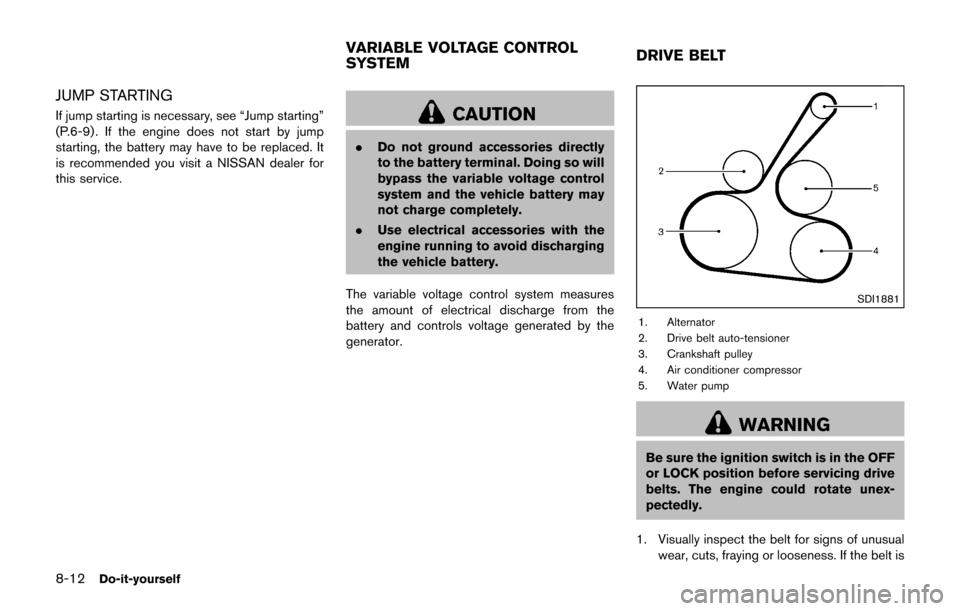
SDI1881
1. Alternator
2. Drive belt auto-tensioner
3. Crankshaft pulley
4. Air conditioner compressor
5. Water pump
WARNING
Be sure the ignition switch is in the OFF
or LOCK position before servicing drive
belts. The engine could rotate unex-
pectedly.
1. Visually inspect the belt for signs of unusual wear, cuts, fraying or looseness. If the belt is
VARIABLE VOLTAGE CONTROL
SYSTEM DRIVE BELT