2017 NISSAN FRONTIER air conditioning
[x] Cancel search: air conditioningPage 217 of 478
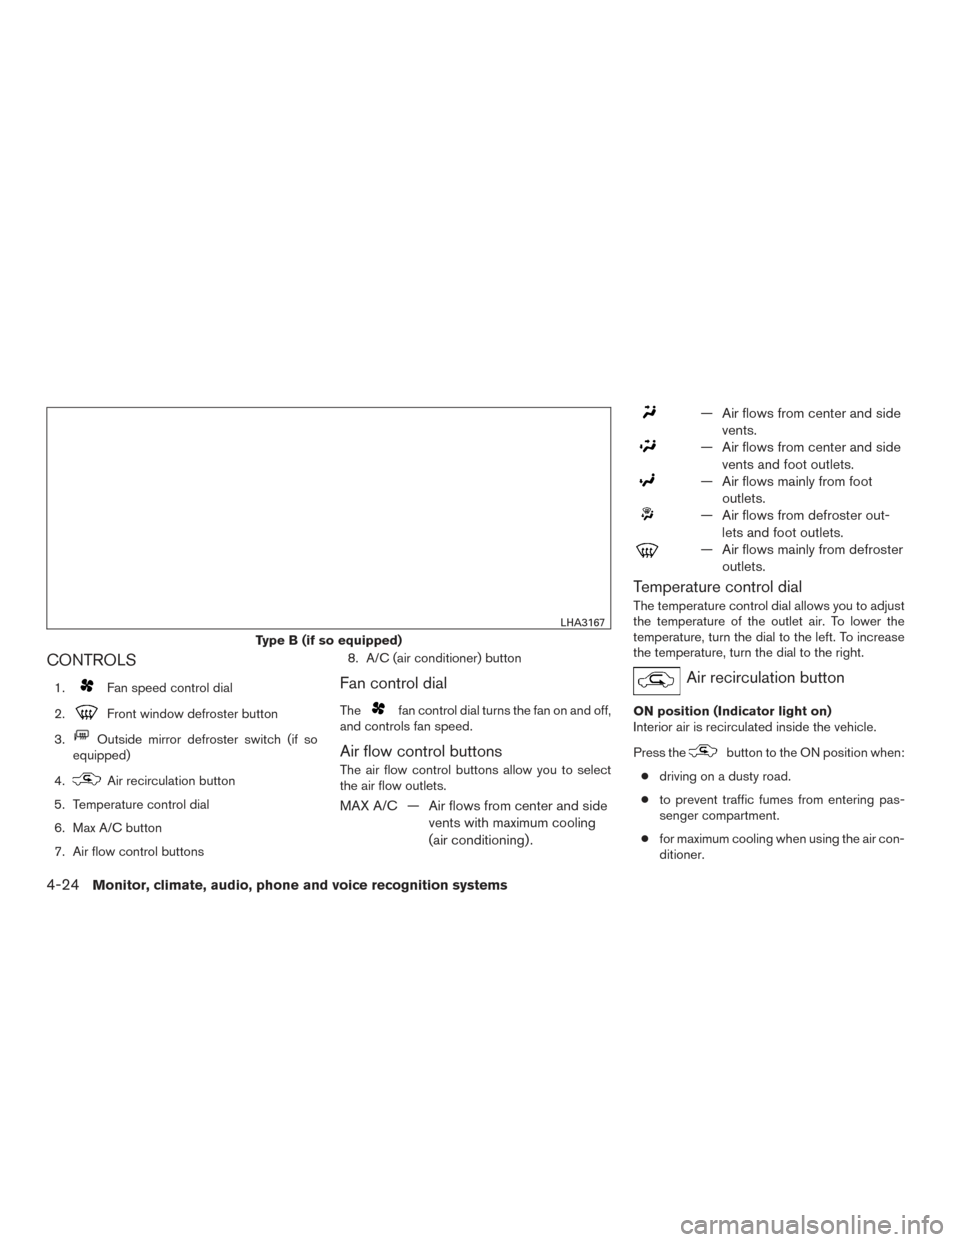
CONTROLS
1.Fan speed control dial
2.
Front window defroster button
3.
Outside mirror defroster switch (if so
equipped)
4.
Air recirculation button
5. Temperature control dial
6. Max A/C button
7. Air flow control buttons 8. A/C (air conditioner) button
Fan control dial
Thefan control dial turns the fan on and off,
and controls fan speed.
Air flow control buttons
The air flow control buttons allow you to select
the air flow outlets.
MAX A/C — Air flows from center and side
vents with maximum cooling
(air conditioning) .
— Air flows from center and sidevents.
— Air flows from center and sidevents and foot outlets.
— Air flows mainly from footoutlets.
— Air flows from defroster out-lets and foot outlets.
— Air flows mainly from defrosteroutlets.
Temperature control dial
The temperature control dial allows you to adjust
the temperature of the outlet air. To lower the
temperature, turn the dial to the left. To increase
the temperature, turn the dial to the right.
Air recirculation button
ON position (Indicator light on)
Interior air is recirculated inside the vehicle.
Press the
button to the ON position when:
● driving on a dusty road.
● to prevent traffic fumes from entering pas-
senger compartment.
● for maximum cooling when using the air con-
ditioner.
Type B (if so equipped)
LHA3167
4-24Monitor, climate, audio, phone and voice recognition systems
Page 219 of 478
Bi-level heating
The bi-level mode directs warmed air to the side
and center vents and to the front and rear floor
outlets.1. Press the
button to the OFF position.
The indicator light on the
button will
go off.
2. Press the
air flow control button.
3. Turn the
fan control dial to the desired
position.
4. Turn the temperature control dial to the de- sired position.
Heating and defogging
This mode heats the interior and defogs the wind-
shield.
1. Press the
air flow control button.
2. Turn the
fan control dial to the desired
position.
3. Turn the temperature control dial to the de- sired position between the middle and the
hot position. ●
When the
position is selected, the air
conditioner automatically turns on if the out-
side temperature is more than 36°F (2°C) . If
the
air flow control button is selected
for more than 1 minute, the air conditioning
system will continue to operate until
the
fan control dial is turned to OFF,
the vehicle is shut off, or the A/C button is
used to turn off the compressor even if the
air flow control dial is turned to a position
other than the
position. This dehu-
midifies the air which helps defog the wind-
shield. The
mode automatically turns
off, allowing outside air to be drawn into the
passenger compartment to further improve
the defogging performance.
Operating tips
Clear snow and ice from the wiper blades
and air inlet in front of the windshield. This
improves heater operation.
AIR CONDITIONER OPERATION
Start the engine, turn thefan control dial to
the desired position, and press the
button
to activate the air conditioner. When the air con-
ditioner is on, cooling and dehumidifying func-
tions are added to the heater operation.
The air conditioner cooling function oper-
ates only when the engine is running.
Cooling
This mode is used to cool and dehumidify the air.
1. Press the
button to the OFF position.
2. Press the
air flow control button.
3. Turn the
fan control dial to the desired
position.
4. Press the
button.
5. Turn the temperature control dial to the de- sired position.
● For quick cooling when the outside tem-
perature is high, press the
button to
the ON position. Be sure to return the
to the OFF position for normal cooling. The
indicator light on the
button will go off.
You may also select MAX A/C for quick
cooling.
Dehumidified heating
This mode is used to heat and dehumidify the air.
1. Press the
air flow control button.
2. Turn the
fan control dial to the desired
position.
3. Press the
button on.
4. Turn the temperature control dial to the de- sired position.
4-26Monitor, climate, audio, phone and voice recognition systems
Page 220 of 478
Dehumidified defogging
This mode is used to defog the windows and
dehumidify the air.1. Press the
air flow control button.
2. Turn the
fan control dial to the desired
position.
● When the or
are selected, the air
conditioner automatically turns on if the out-
side temperature is more than 36° F (2° C) .
This dehumidifies the air which helps defog
the windshield. The
mode automati-
cally turns off, allowing outside air to be
drawn into the passenger compartment to
further improve the defogging performance.
● The air conditioner is always on in the
mode, regardless of whether the indicator
light is on or off.
3. Turn the temperature control dial to the de- sired position.
Operating tips
●Keep the windows closed while the air con-
ditioner is in operation.
● After parking in the sun, drive for 2 or 3 min-
utes with the windows open to vent hot air
from the passenger compartment. Then,
close the windows. This allows the air con-
ditioner to cool the interior more quickly.
● The air conditioning system should be
operated for approximately 10 minutes
at least once a month. This helps pre-
vent damage to the system due to lack
of lubrication.
● A visible mist may be seen coming from the
ventilators in hot, humid conditions as the air
is cooled rapidly. This does not indicate a
malfunction.
● If the engine coolant temperature
gauge indicates engine coolant tem-
perature over the normal range, turn
the air conditioner off. For additional
information, refer to “If your vehicle
overheats” in the “In case of emer-
gency” section of this manual.
AIR FLOW CHARTS
The following charts show the button and dial
positions for MAXIMUM AND QUICK heating,
cooling or defrosting. The air recirculation
(
) button should always be in the OFF
position for heating and defrosting.
Monitor, climate, audio, phone and voice recognition systems4-27
Page 227 of 478
●When parking, set the heater and air condi-
tioner controls to turn off air recirculation to
allow fresh air into the passenger compart-
ment. This should help reduce odors inside
the vehicle.
AUTOMATIC OPERATION
Cooling or heating (auto)
This mode may be normally used all year round as
the system automatically works to keep a con-
stant temperature. Air flow distribution and fan
speed are also controlled automatically.
1. Press the AUTO button on.
2. Turn the temperature dial to the left or right to set the desired temperature. Driver and
passenger temperatures can be set inde-
pendently. Press DUAL to activate dual cli-
mate control functions. Turn the passenger’s
side temperature control dial to the left or
right to set the desired passenger’s tem-
perature.
● Adjust the temperature dial to about 75°F
(24°C) for normal operation.
● The temperature of the passenger compart-
ment will be maintained automatically. Air
flow distribution, fan speed and A/C on/off
are also controlled automatically. ●
A visible mist may be seen coming from the
vents in hot, humid conditions as the air is
cooled rapidly. This does not indicate a mal-
function.
Heating (A/C OFF)
The air conditioner does not activate. When you
need to heat only, use this mode.
1. Press the AUTO button.
2. Turn the temperature control dial to set the desired temperature.
● The temperature of the passenger compart-
ment will be maintained automatically. Air
flow distribution and fan speed are also con-
trolled automatically.
● Do not set the temperature lower than the
outside air temperature. Otherwise, the sys-
tem may not work properly.
● Not recommended if windows fog up.
Dehumidified defrosting or defogging
1. Press thedefroster control switch to
turn the system on. The indicator light in the
button will illuminate.
2. Turn the temperature dial to the left or right to set the desired temperature. ●
To quickly remove ice from the outside of the
windows, turn the manual fan control to the
maximum position.
● As soon as possible after the windshield is
clean, press the AUTO button to return to
the auto mode.
● When the
control is activated, the air
conditioner will automatically be turned on at
outside temperatures above 36°F (2°C) . If in
defrost mode for more than 1 minute, the air
conditioning system will continue to operate
until the fan control is turned OFF, the ve-
hicle is shut off or the A/C button is used to
turn off the compressor even if an air flow
button other than
is selected. This
dehumidifies the air which helps defog the
windshield. The air recirculation mode auto-
matically turns off, allowing outside air to be
drawn into the passenger compartment to
further improve the defogging performance.
MANUAL OPERATION
Fan speed control
Turn thefan speed control dial to manually
control the fan speed.
Press the AUTO button to return to automatic
control of the fan speed.
4-34Monitor, climate, audio, phone and voice recognition systems
Page 320 of 478
Follow these easy-to-use Fuel Efficient Driving
Tips to help you achieve the most fuel economy
from your vehicle.1. Use Smooth Accelerator and Brake
Pedal Application
● Avoid rapid starts and stops.
● Use smooth, gentle accelerator and
brake application whenever possible.
● Maintain constant speed while commut-
ing and coast whenever possible.
2. Maintain Constant Speed
● Look ahead to try and anticipate and mini-
mize stops.
● Synchronizing your speed with traffic
lights allows you to reduce your number
of stops.
● Maintaining a steady speed can minimize
red light stops and improve fuel effi-
ciency.
3. Use Air Conditioning (A/C) at Higher
Vehicle Speeds
● Below 40 mph (64 km/h), it is more effi-
cient to open windows to cool the vehicle
due to reduced engine load. ●
Above 40 mph (64 km/h), it is more effi-
cient to use A/C to cool the vehicle due to
increased aerodynamic drag.
● Recirculating the cool air in the cabin
when the A/C is on reduces cooling load.
4. Drive at Economical Speeds and Dis-
tances
● Observing the speed limit and not ex-
ceeding 60 mph (97 km/h) (where legally
allowed) can improve fuel efficiency due
to reduced aerodynamic drag.
● Maintaining a safe following distance be-
hind other vehicles reduces unnecessary
braking.
● Safely monitoring traffic to anticipate
changes in speed permits reduced brak-
ing and smooth acceleration changes.
● Select a gear range suitable to road con-
ditions.
5. Use Cruise Control
● Using cruise control during highway driv-
ing helps maintain a steady speed.
● Cruise control is particularly effective in
providing fuel savings when driving on flat
terrains. 6.
Plan for the Shortest Route
● Utilize a map or navigation system to de-
termine the best route to save time.
7. Avoid Idling
● Shutting off your engine when safe for
stops exceeding 30–60 seconds saves
fuel and reduces emissions.
8. Buy an Automated Pass for Toll Roads
● Automated passes permit drivers to use
special lanes to maintain cruising speed
through the toll and avoid stopping and
starting.
9. Winter Warm Up
● Limit idling time to minimize impact to fuel
economy.
● Vehicles typically need no more than
30 seconds of idling at start-up to effec-
tively circulate the engine oil before driv-
ing.
● Your vehicle will reach its ideal operating
temperature more quickly while driving
versus idling.
FUEL EFFICIENT DRIVING TIPS
Starting and driving5-23
Page 427 of 478
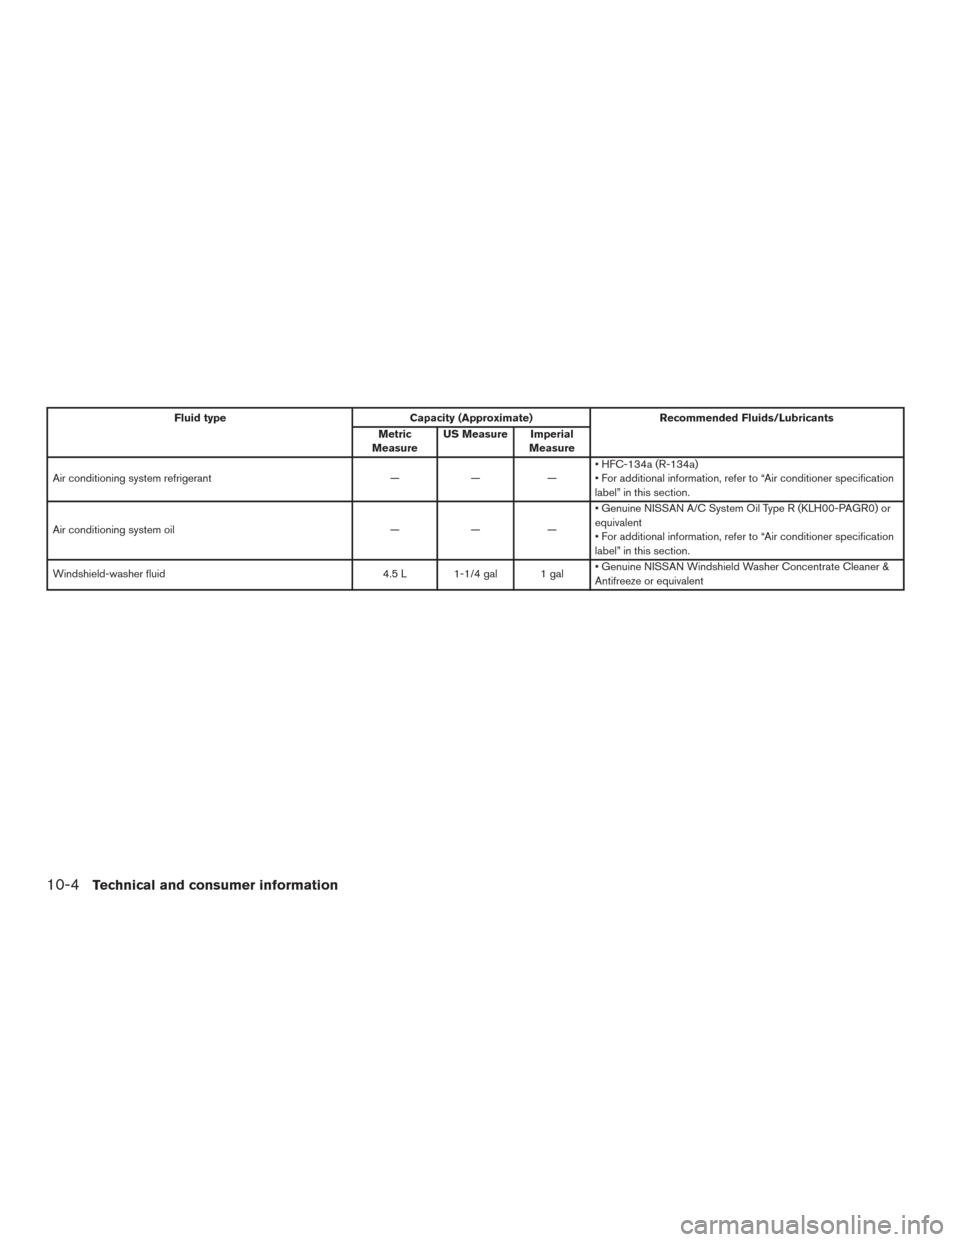
Fluid typeCapacity (Approximate) Recommended Fluids/Lubricants
Metric
Measure US Measure Imperial
Measure
Air conditioning system refrigerant ———• HFC-134a (R-134a)
• For additional information, refer to “Air conditioner specification
label” in this section.
Air conditioning system oil ———• Genuine NISSAN A/C System Oil Type R (KLH00-PAGR0) or
equivalent
• For additional information, refer to “Air conditioner specification
label” in this section.
Windshield-washer fluid 4.5 L 1-1/4 gal 1 gal• Genuine NISSAN Windshield Washer Concentrate Cleaner &
Antifreeze or equivalent
10-4Technical and consumer information
Page 449 of 478
LOCATION FOR CENTER OF
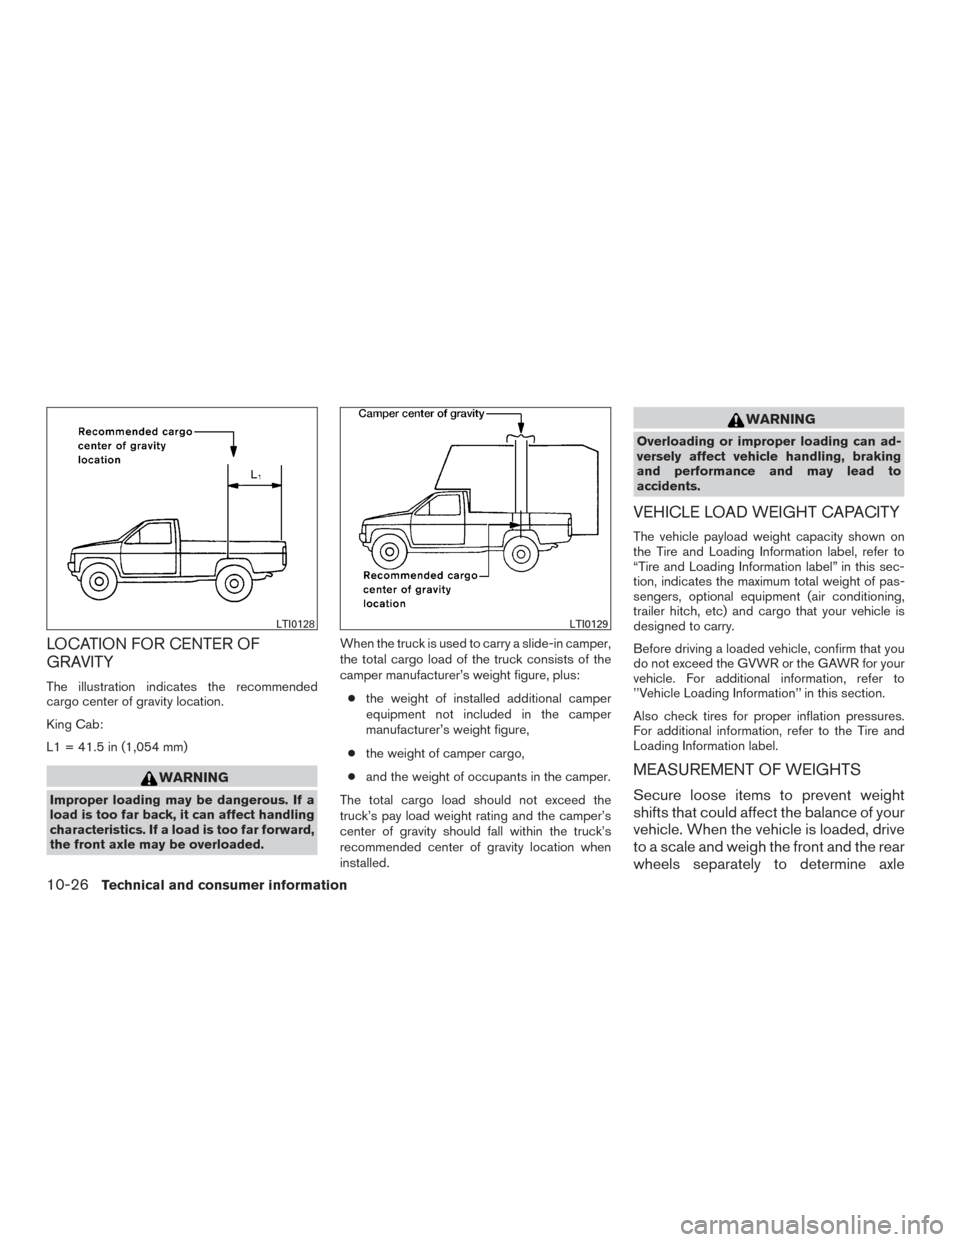
GRAVITY
The illustration indicates the recommended
cargo center of gravity location.
King Cab:
L1 = 41.5 in (1,054 mm)
WARNING
Improper loading may be dangerous. If a
load is too far back, it can affect handling
characteristics. If a load is too far forward,
the front axle may be overloaded.When the truck is used to carry a slide-in camper,
the total cargo load of the truck consists of the
camper manufacturer’s weight figure, plus:
● the weight of installed additional camper
equipment not included in the camper
manufacturer’s weight figure,
● the weight of camper cargo,
● and the weight of occupants in the camper.
The total cargo load should not exceed the
truck’s pay load weight rating and the camper’s
center of gravity should fall within the truck’s
recommended center of gravity location when
installed.
WARNING
Overloading or improper loading can ad-
versely affect vehicle handling, braking
and performance and may lead to
accidents.
VEHICLE LOAD WEIGHT CAPACITY
The vehicle payload weight capacity shown on
the Tire and Loading Information label, refer to
“Tire and Loading Information label” in this sec-
tion, indicates the maximum total weight of pas-
sengers, optional equipment (air conditioning,
trailer hitch, etc) and cargo that your vehicle is
designed to carry.
Before driving a loaded vehicle, confirm that you
do not exceed the GVWR or the GAWR for your
vehicle. For additional information, refer to
’’Vehicle Loading Information’’ in this section.
Also check tires for proper inflation pressures.
For additional information, refer to the Tire and
Loading Information label.
MEASUREMENT OF WEIGHTS
Secure loose items to prevent weight
shifts that could affect the balance of your
vehicle. When the vehicle is loaded, drive
to a scale and weigh the front and the rear
wheels separately to determine axle
LTI0128LTI0129
10-26Technical and consumer information