Page 111 of 478
1. Vents (P. 4-16)
2. Headlight/fog light (if so equipped)/turnsignal switch (P. 2-29)
3. Steering wheel switch for audio control
(if so equipped) (P. 4-72)
Bluetooth® Hands-Free Phone System
(if so equipped) (P. 4-69, 4-89)
4. Driver supplemental air bag (P. 1-71) Horn (P. 2-33)
5. Meters and gauges (P. 2-3) Warning and indicator lights (P. 2-14)
6. Cruise control main/set switches (if so
equipped) (P. 5-21)
7. Wiper and washer switch (P. 2-27)
8. Storage (P. 2-40)
9. Audio system (if so equipped) (P. 4-36)
10. Front passenger supplemental air bag
(P. 1-71)
11. Upper and lower glove box (P. 2-44)
12. Passenger air bag status light (P. 1-80)
13. USB connection port (if so equipped)
(P. 4-36)
AUX input (if so equipped) (P. 4-36)
14. Power outlets (P. 2-39)
LII2484
INSTRUMENT PANEL
2-2Instruments and controls
Page 138 of 478
CAUTION
When cleaning the inner side of the rear
window, be careful not to scratch or dam-
age the rear window defroster.
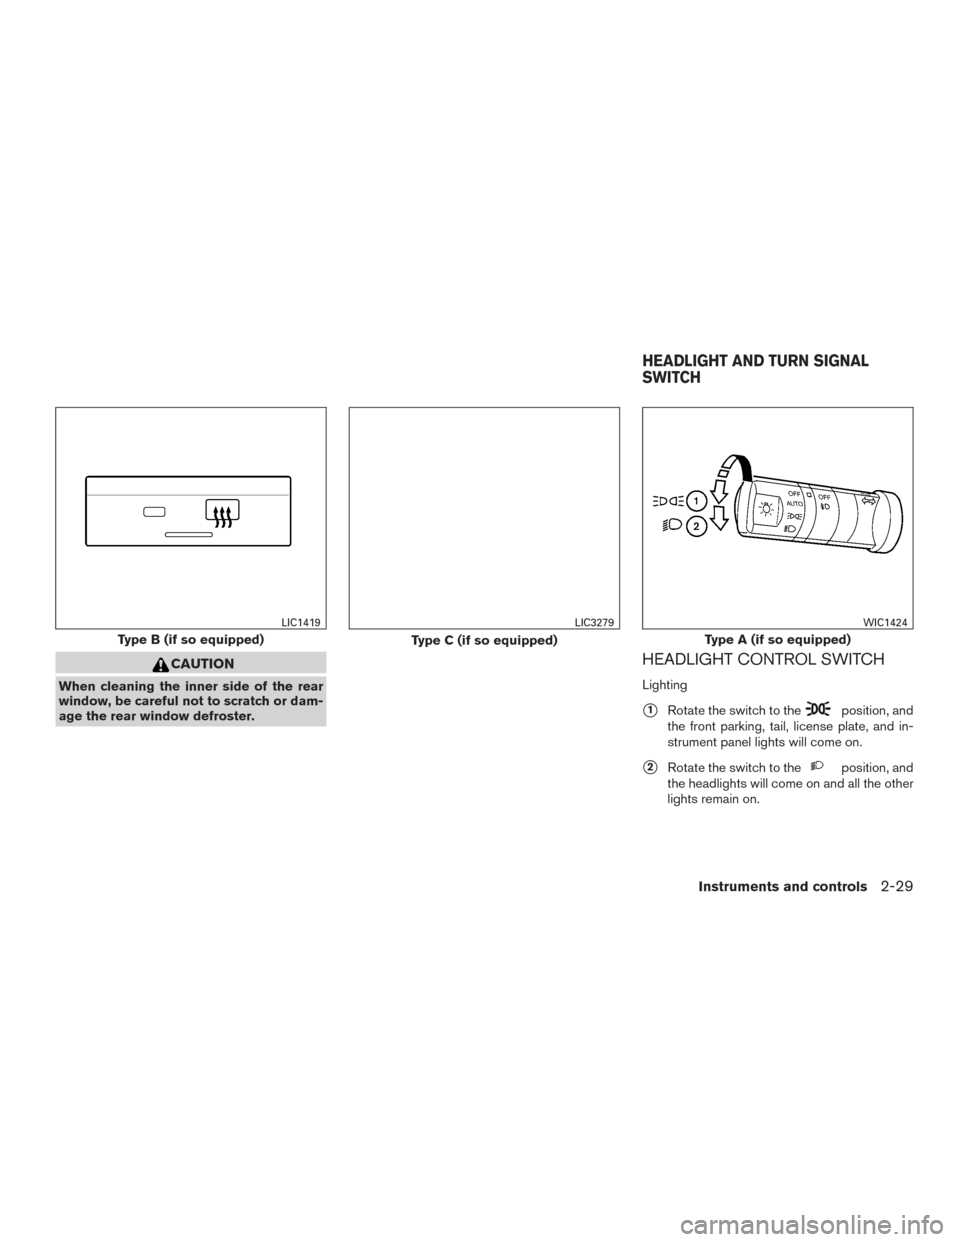
HEADLIGHT CONTROL SWITCH
Lighting
�1Rotate the switch to theposition, and
the front parking, tail, license plate, and in-
strument panel lights will come on.
�2Rotate the switch to theposition, and
the headlights will come on and all the other
lights remain on.
Type B (if so equipped)
LIC1419
Type C (if so equipped)
LIC3279
Type A (if so equipped)
WIC1424
HEADLIGHT AND TURN SIGNAL
SWITCH
Instruments and controls2-29
Page 139 of 478
CAUTION
Use the headlights with the engine run-
ning to avoid discharging the vehicle
battery.
Autolight system (if so equipped)
The autolight system allows the headlights to be
set so they turn on and off automatically. The
autolight system can:● Turn on the headlights, front parking, tail,
license plate and instrument panel lights au-
tomatically when it is dark.
● Turn off all the lights when it is light.
● Keep all the lights on for a period of time after
you turn the key to OFF and all doors are
closed.
Type B (if so equipped)
WIC1452
Type C (if so equipped)
WIC1426LIC0561
2-30Instruments and controls
Page 140 of 478

To turn on the autolight system:1. Turn the headlight switch to the AUTO posi- tion
�1.
2. Turn the ignition switch to ON.
3. The autolight system automatically turns the headlights on and off.
Initially, if the ignition switch is turned OFF and a
door is opened and left open, the headlights
remain ON for a period of time. If another door is
opened while the headlights are on, then the
timer is reset.
To turn the autolight system off, turn the switch to
the OFF,
,orposition. Be sure you do not put anything on top of
the autolight sensor
�1located in the top
side of the instrument panel. The autolight
sensor controls the autolight; if it is cov-
ered, the autolight sensor reacts as if it is
dark out and the headlights will illuminate.
If this occurs while parked with the engine
off and the switch in the ON position, your
vehicle’s battery could become discharged.Headlight beam select
�1To select the high beam function, push the
lever forward. The high beam lights come on
and the
light illuminates.
�2Pull the lever back to select the low beam.
�3Pulling and releasing the lever flashes the
headlight high beams on and off.
Battery saver system
If the ignition switch is placed in the OFF position
while the headlight switch is in the
orposition, the headlights will turn off after
a period of time.
LIC0835LIC0562
Instruments and controls2-31
Page 141 of 478

After the headlights automatically turn off with the
headlight switch in the
orposition,
the headlights will illuminate again if the headlight
switch is moved to the OFF position and then
turned to the
orposition.
CAUTION
Even though the battery saver feature au-
tomatically turns off the headlights after a
period of time, you should turn the head-
light switch to the OFF position when the
engine is not running to avoid discharging
the vehicle battery.
DAYTIME RUNNING LIGHT SYSTEM
(Canada only)
The daytime running lights automatically illumi-
nate when the engine is started with the parking
brake released. The daytime running lights oper-
ate with the headlight switch in the OFF position
or in the
position. Turn the headlight switch
to the
position for full illumination when
driving at night.
If the parking brake is applied before the engine is
started, the daytime running lights do not illumi-
nate. The daytime running lights illuminate when
the parking brake is released. The daytime run-
ning lights will remain on until the ignition switch
is placed in the OFF position.
WARNING
When the daytime running light system is
active, tail lights on your vehicle are not
on. It is necessary at dusk to turn on your
headlights. Failure to do so could cause
an accident injuring yourself and others.
INSTRUMENT BRIGHTNESS
CONTROL
The instrument brightness control operates when
the headlight control switch is in the AUTO (if so
equipped) ,
orposition.
Turn the control
�Ato adjust the brightness of the
instrument panel lights when driving at night.
WIC0917
2-32Instruments and controls
Page 159 of 478
1. Window lock button
2. Power door lock switch
3. Front passenger side window switch
4. Right rear passenger window switch(Crew Cab models only)
5. Left rear passenger window switch
(Crew Cab models only)
6. Driver’s side automatic switch
Driver’s side power window switch
The driver’s side control panel is equipped with
switches to open or close the front and rear
passenger windows.
To open a window, push the switch and hold it
down. To close a window, pull the switch and
hold it up. To stop the opening or closing function
at any time, simply release the switch.
Front passenger’s power window
switch
The passenger’s window switch operates only
the corresponding passenger’s window. To open
the window, push the switch and hold it down
�1.
To close the window, pull the switch up
�2.
LIC1329WIC0260
2-50Instruments and controls
Page 179 of 478

The hazard warning lights will flash once and the
horn will sound once to confirm that the horn
beep feature has been reactivated.
Deactivating the horn beep feature does not si-
lence the horn if the alarm is triggered.1. Pull the hood lock release handle
�1located
below the driver’s side instrument panel. The
hood will spring up slightly.
2. Push the lever
�2at the front of the hood to
the side as illustrated with your fingertips
and raise the hood.
3. Insert the support rod into the slot on the underside of the hood
�3.
When closing the hood, return the hood rod to its
original position. Lower the hood approximately
12 in (30 cm) above the latch and release it. This
allows proper engagement of the hood latch.
WARNING
● Make sure the hood is completely
closed and latched before driving. Fail-
ure to do so could cause the hood to fly
open and result in an accident.
● If you see steam or smoke coming from
the engine compartment, to avoid injury
do not open the hood.
LPD0302
HOOD
3-10Pre-driving checks and adjustments
Page 228 of 478

Air recirculation
Press the air recirculation buttonto recir-
culate interior air inside the vehicle. Press the
AUTO button to return to automatic mode.
The air recirculation cannot be activated when
the air conditioner is in the
front defogging
mode.
Fresh air intake (if so equipped)
Press thefresh air intake button to draw
outside air into the passenger compartment.
The
indicator light on the button will come
on.
Air flow control
Press the air flow control buttons to manually
control air flow and select the air outlet:
— Air flows from center and side
vents.
— Air flows from center and sidevents and foot outlets.
— Air flows mainly from foot outlets.
— Air flows from defroster and footoutlets.
— Air flows from defroster outlets.
To turn system off
Press the OFF button.
Rear window or outside mirror
defroster switch (if so equipped)
For additional information, refer to “Rear window
or outside mirror defroster switch” in the “Instru-
ments and controls” section of this manual.
OPERATING TIPS
●When the engine coolant temperature and
outside air temperature are low, the air flow
from the foot outlets may not operate for a
maximum of 150 seconds. However, this is
not a malfunction. After the coolant tempera-
ture warms up, air flow from the foot outlets
will operate normally. The sunload sensor
�1, located on the top center
of the instrument panel, helps the system main-
tain a constant temperature. Do not put anything
on or around this sensor.
LIC0515
Monitor, climate, audio, phone and voice recognition systems4-35

2. Headlight/fog light (if so equipped)/turnsignal switch (P. 2-29)
3. Steering wheel switch for audio control
(if so equipped) (P. 4-72)
Bluetooth® Hands-Free Phone System
(if so")

The autolight system allows the headlights to be
set so they turn on an")

5. Left rear passenger window switch
(Crew Cab models")