2017 NISSAN ARMADA buttons
[x] Cancel search: buttonsPage 18 of 36

16
FIRST DRIVE FEATURES
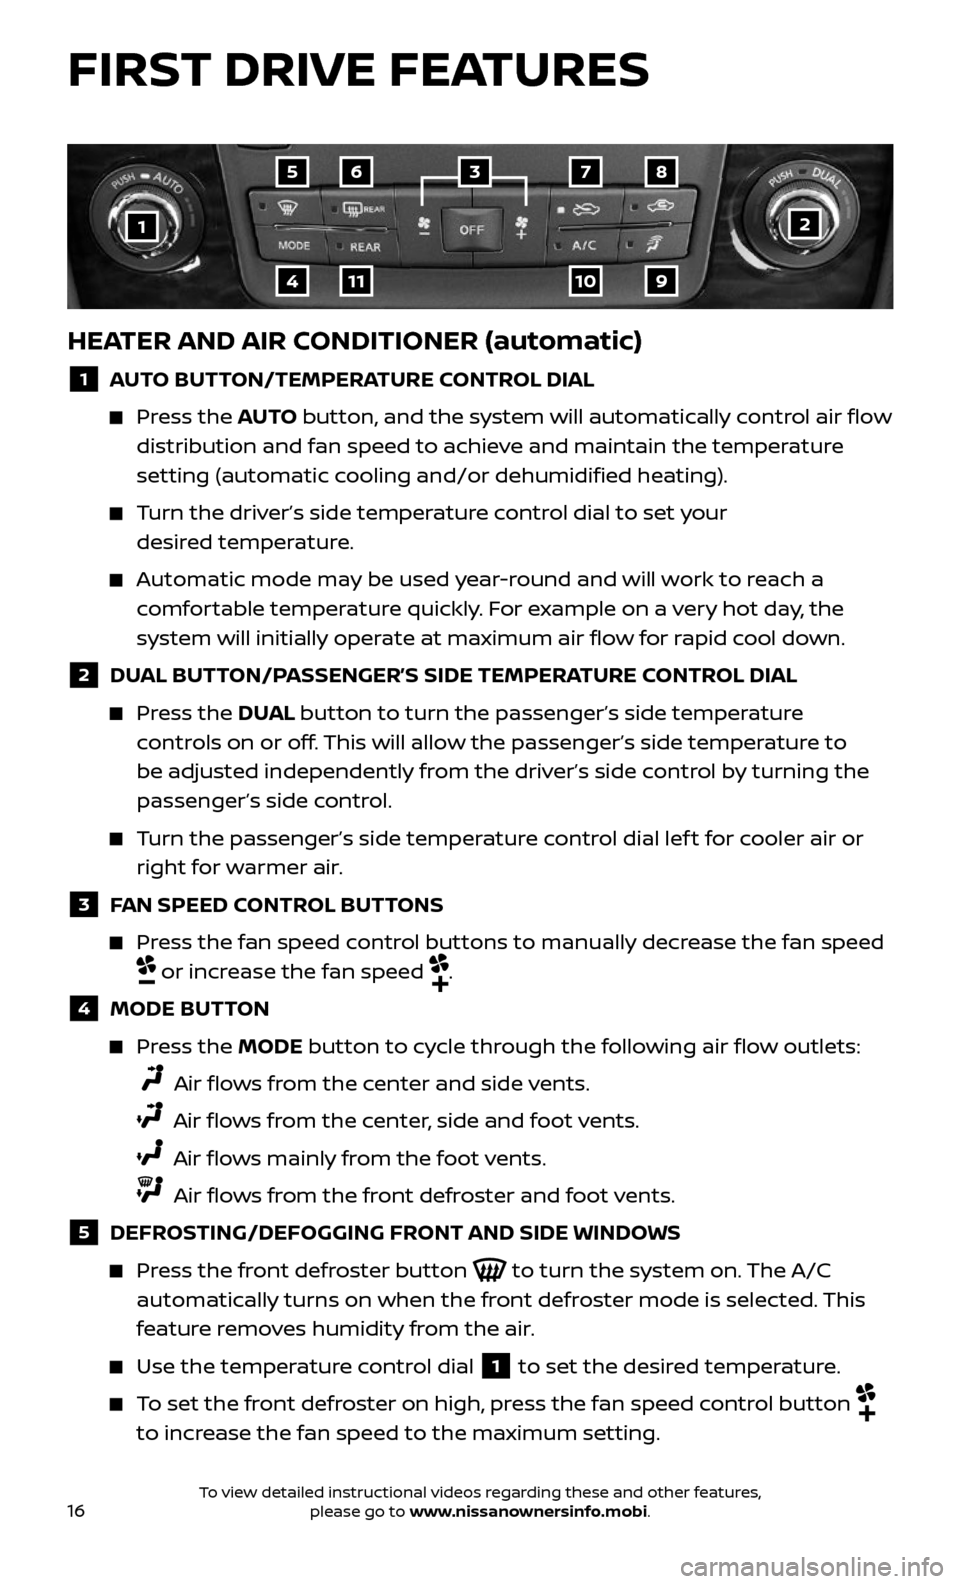
HEATER AND AIR CONDITIONER (automatic)
1 AUTO BUTTON/TEMPERATURE CONTROL DIAL
Press the AUTO button, and the system will automatically control air flow
distribution and fan speed to achieve and maintain the temperature
setting (automatic cooling and/or dehumidified heating).
Turn the driver’s side temperature control dial to set your
desired temperature.
Automatic mode may be used year-round and will work to reach a
comfortable temperature quickly. For example on a very hot day, the
system will initially operate at maximum air flow for rapid cool down.
2 DUAL BUTTON/PASSENGER’S SIDE TEMPERATURE CONTROL DIAL
Press the DUAL button to turn the passenger’s side temperature
controls on or off. This will allow the passenger’s side temperature to
be adjusted independently from the driver’s side control by turning the
passenger’s side control.
Turn the passenger’s side temperature control dial lef t for cooler air or
right for warmer air.
3 FAN SPEED CONTROL BUTTONS
Press the fan speed control buttons to manually decrease the fan speed
or increase the fan speed .
4 MODE BUTTON
Press the MODE button to cycle through the following air flow outlets:
Air flows from the center and side vents.
Air flows from the center, side and foot vents.
Air flows mainly from the foot vents.
Air flows from the front defroster and foot vents.
5 DEFROSTING/DEFOGGING FRONT AND SIDE WINDOWS
Press the front defroster button to turn the system on. The A/C
automatically turns on when the front defroster mode is selected. This
feature removes humidity from the air.
Use the temper ature control dial 1 to set the desired temperature.
To set the front defroster on high, press the fan speed control button
to increase the fan speed to the maximum setting.
1
9
8765
4
3
2
1011
To view detailed instructional videos regarding these and other features, please go to www.nissanownersinfo.mobi.
Page 20 of 36

18
FIRST DRIVE FEATURES
REAR HEATER AND AIR CONDITIONER
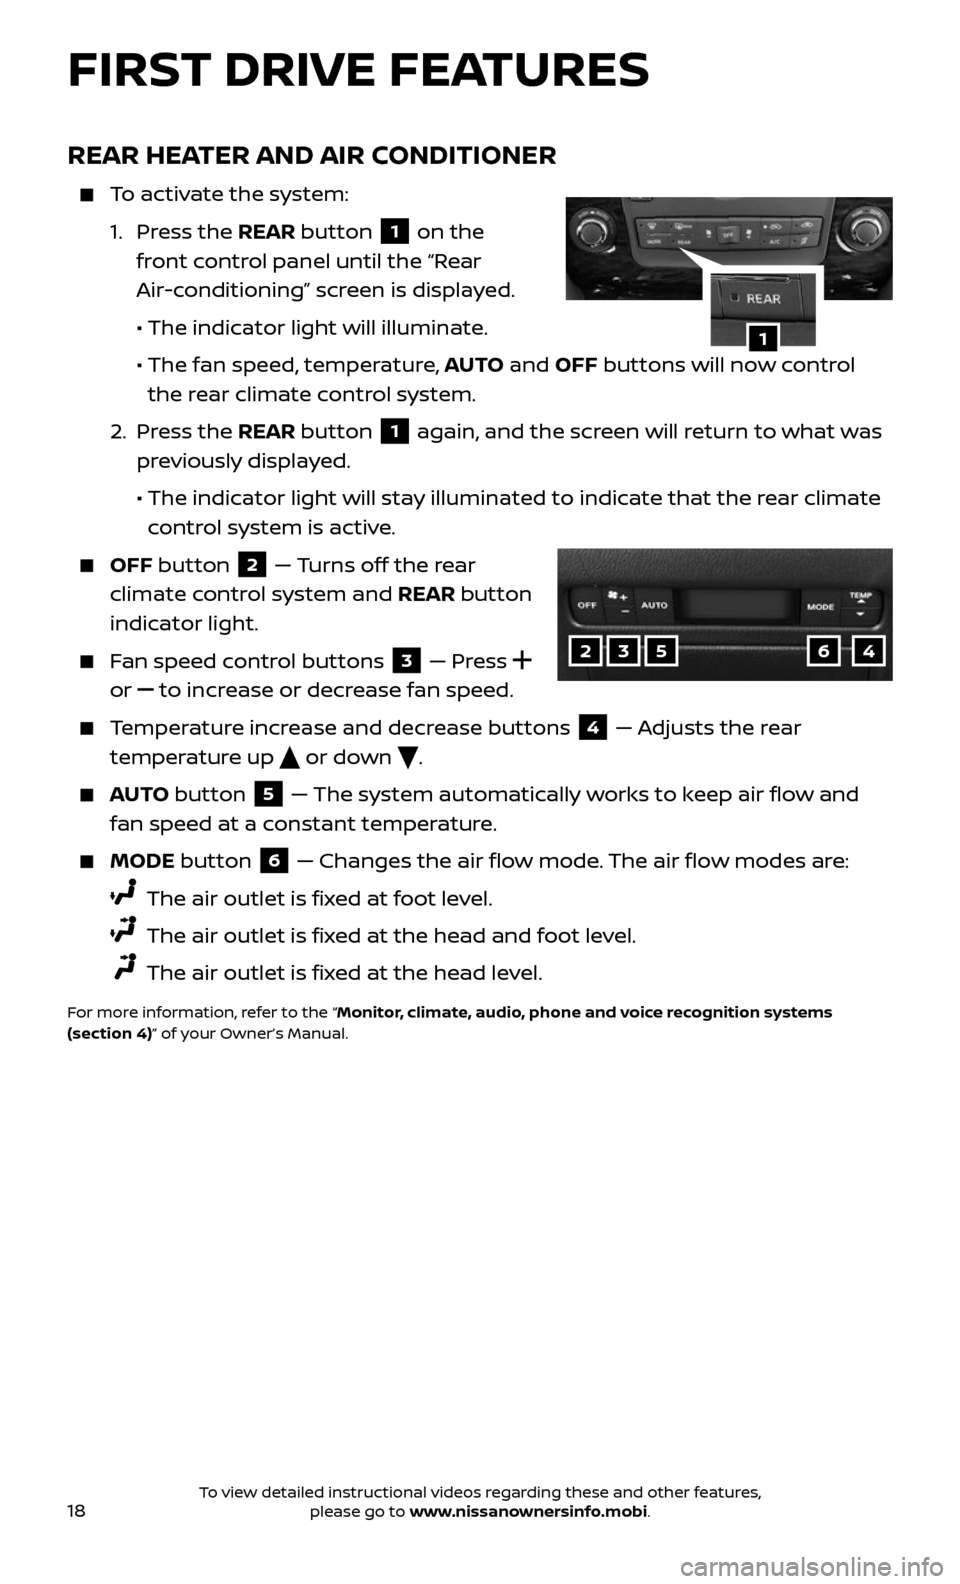
To activate the system:
1. Press the REAR button 1 on the
front control panel until the “Rear
Air-conditioning” screen is displayed.
• The indicator light will illuminate.
• The fan speed , temperature, AUTO and OFF buttons will now control
the rear climate control system.
2. Press the REAR button 1 again, and the screen will return to what was
previously displayed.
• The indic ator light will stay illuminated to indicate that the rear climate
control system is active.
OFF button 2 — Turns off the rear
climate control system and REAR button
indicator light.
Fan speed control buttons 3 — Press
or
to increase or decrease fan speed.
Temperature increase and decrease buttons 4 — Adjusts the rear
temperature up
or down .
AUTO button 5 — The system automatically works to keep air flow and
fan speed at a constant temperature.
MODE button 6 — Changes the air flow mode. The air flow modes are:
The air outlet is fixed at foot level.
The air outlet is fixed at the head and foot level.
The air outlet is fixed at the head level.
For more information, refer to the “Monitor, climate, audio, phone and voice recognition systems
(section 4)” of your Owner’s Manual.
1
23564
To view detailed instructional videos regarding these and other features, please go to www.nissanownersinfo.mobi.
Page 21 of 36

19
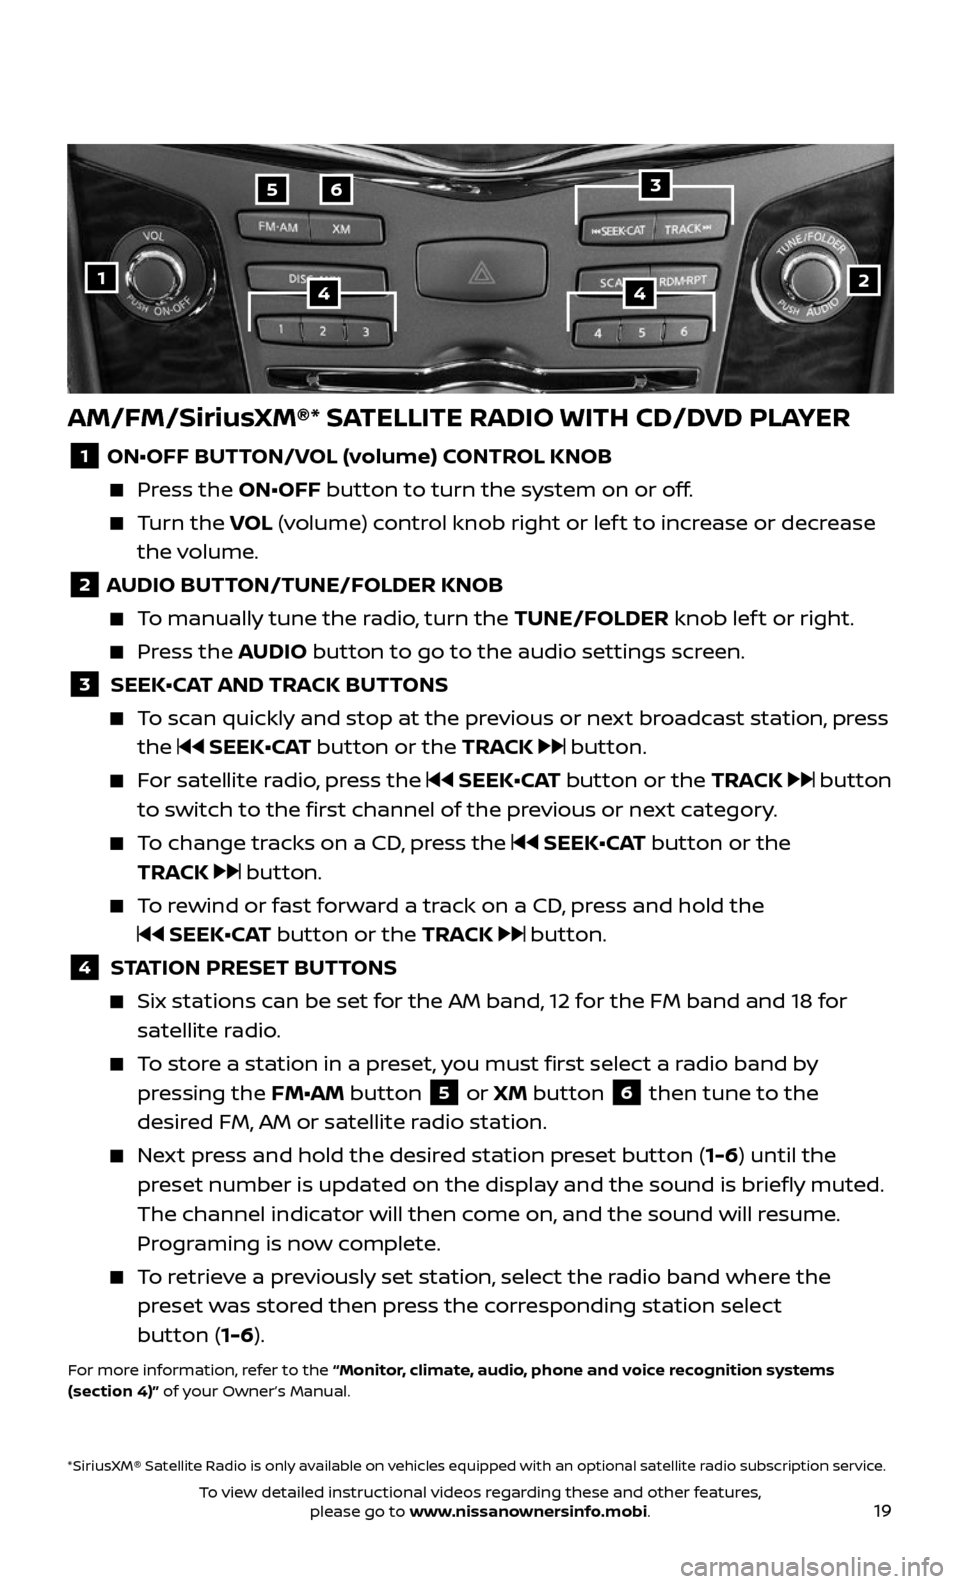
AM/FM/SiriusXM®* SATELLITE RADIO WITH CD/DVD PLAYER
1 ON•OFF BUTTON/VOL (volume) CONTROL KNOB
Press the ON•OFF button to turn the system on or off.
Turn the VOL (volume) control knob right or lef t to increase or decrease
the volume.
2 AUDIO BUTTON/TUNE/FOLDER KNOB
To manually tune the radio, turn the TUNE/FOLDER knob lef t or right.
Press the AUDIO button to go to the audio settings screen.
3 SEEK•CAT AND TRACK BUTTONS
To scan quickly and stop at the previous or next broadcast station, press
the SEEK•CAT button or the TRACK button.
For satellite radio, press the SEEK•CAT button or the TRACK button
to switch to the first channel of the previous or next category.
To change tracks on a CD, press the SEEK•CAT button or the
TRACK
button.
To rewind or fast forward a track on a CD, press and hold the
SEEK•CAT button or the TRACK button.
4 STATION PRESET BUTTONS
Six stations c an be set for the AM band, 12 for the FM band and 18 for
satellite radio.
To store a station in a preset, you must first select a radio band by
pressing the FM•AM button 5 or XM button 6 then tune to the
desired FM, AM or satellite radio station.
Next press and hold the desired station preset button (1-6) until the
preset number is updated on the display and the sound is briefly muted.
The channel indicator will then come on, and the sound will resume.
Programing is now complete.
To retrieve a previously set station, select the radio band where the
preset was stored then press the corresponding station select
button (1-6).
For more information, refer to the “Monitor, climate, audio, phone and voice recognition systems
(section 4)” of your Owner’s Manual.
2
65
144
*SiriusXM® Satellite Radio is only available on vehicles equipped with an optional satellite radio subscription service.
3
To view detailed instructional videos regarding these and other features, please go to www.nissanownersinfo.mobi.
Page 31 of 36

29
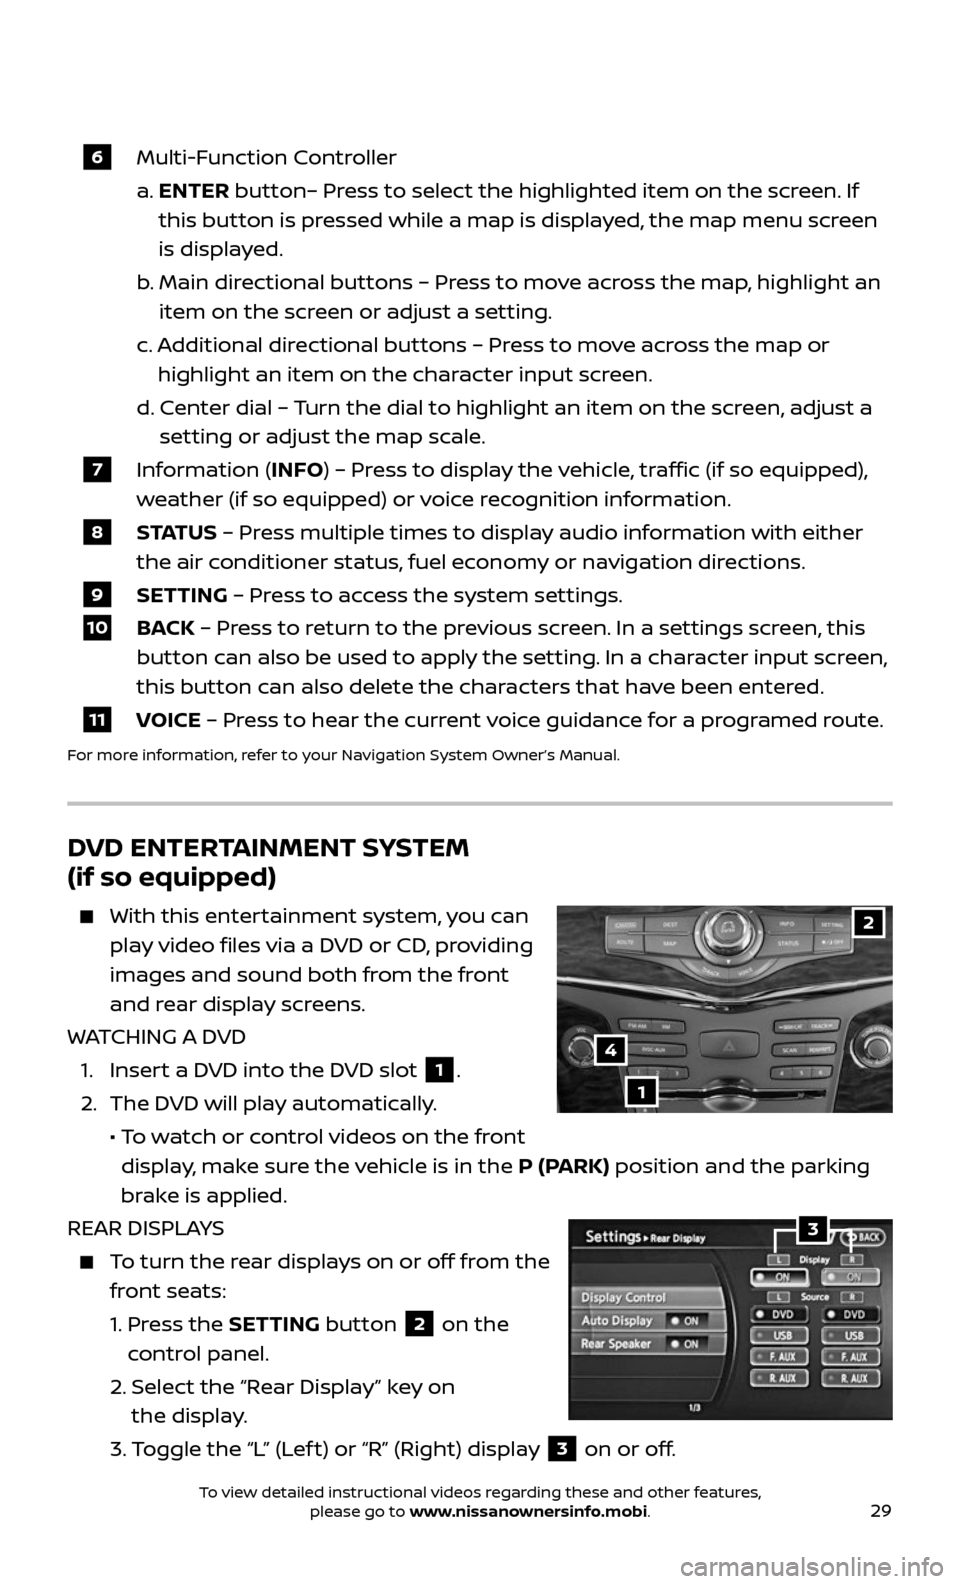
6 Multi-Function Controller
a. ENTER button– Press to select the highlighted item on the screen. If
this button is pressed while a map is displayed, the map menu screen
is displayed.
b. Main dir ectional buttons – Press to move across the map, highlight an
item on the screen or adjust a setting.
c. Additional directional buttons – Press to move across the map or
highlight an item on the character input screen.
d. C enter dial – Turn the dial to highlight an item on the screen, adjust a
setting or adjust the map scale.
7 Information (INFO) – Press to display the vehicle, traffic (if so equipped),
weather (if so equipped) or voice recognition information.
8 S TAT U S – Press multiple times to display audio information with either
the air conditioner status, fuel economy or navigation directions.
9 SETTING – Press to access the system settings.
10 BACK – Press to return to the previous screen. In a settings screen, this
button can also be used to apply the setting. In a character input screen,
this button can also delete the characters that have been entered.
11 VOICE – Press to hear the current voice guidance for a programed route.
For more information, refer to your Navigation System Owner’s Manual.
DVD ENTERTAINMENT SYSTEM
(if so equipped)
With this enter tainment system, you can
play video files via a DVD or CD, providing
images and sound both from the front
and rear display screens.
WATCHING A DVD
1. Insert a DVD into the DVD slot 1.
2. The DVD will play automatically.
• To watch or control videos on the front
display, make sure the vehicle is in the P (PARK) position and the parking
brake is applied.
REAR DISPLAYS
To turn the rear displays on or off from the
front seats:
1. Press the SETTING button 2 on the
control panel.
2. Selec t the “Rear Display” key on
the display.
3. Toggle the “L” (Lef t) or “R” (Right) display 3 on or off.
2
1
4
3
To view detailed instructional videos regarding these and other features, please go to www.nissanownersinfo.mobi.