2017 NISSAN ARMADA instrument panel
[x] Cancel search: instrument panelPage 7 of 36
5
LANE DEPARTURE WARNING (LDW) AND LANE DEPARTURE
PREVENTION (LDP) (if so equipped)
The LDW system can help alert the driver when the vehicle is traveling too
close to either the lef t or the right side of a traveling lane.
The system will operate when the vehicle is driven at speeds of
approximately 45 mph (70 km/h) and above and only when the lane
markings are clearly visible on the road.
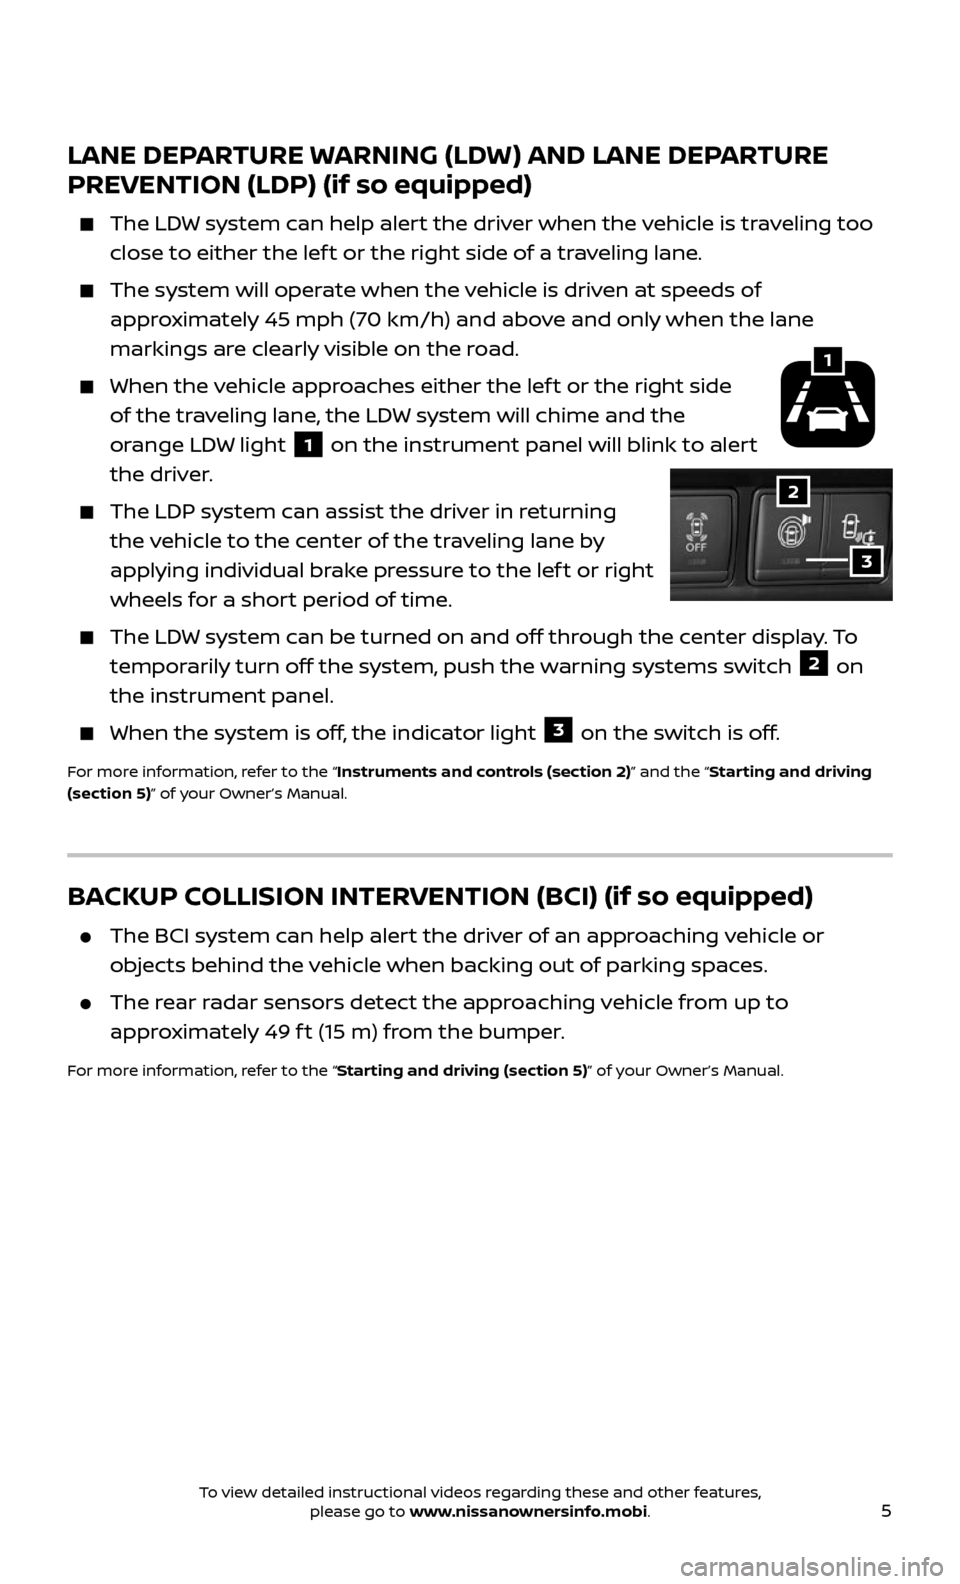
When the vehicle approaches either the lef t or the right side
of the traveling lane, the LDW system will chime and the
orange LDW light
1 on the instrument panel will blink to alert
the driver.
The LDP system c an assist the driver in returning
the vehicle to the center of the traveling lane by
applying individual brake pressure to the lef t or right
wheels for a short period of time.
The LDW system can be turned on and off through the center display. To
temporarily turn off the system, push the warning systems switch 2 on
the instrument panel.
When the system is off , the indicator light 3 on the switch is off.
For more information, refer to the “Instruments and controls (section 2)” and the “Starting and driving
(section 5)” of your Owner’s Manual.
1
2
3
BACKUP COLLISION INTERVENTION (BCI) (if so equipped)
The BCI system can help alert the driver of an approaching vehicle or
objects behind the vehicle when backing out of parking spaces.
The rear radar sensors detect the approaching vehicle from up to
approximately 49 f t (15 m) from the bumper.
For more information, refer to the “Starting and driving (section 5)” of your Owner’s Manual.
To view detailed instructional videos regarding these and other features, please go to www.nissanownersinfo.mobi.
Page 10 of 36
8
CLOCK SET/ADJUSTMENT
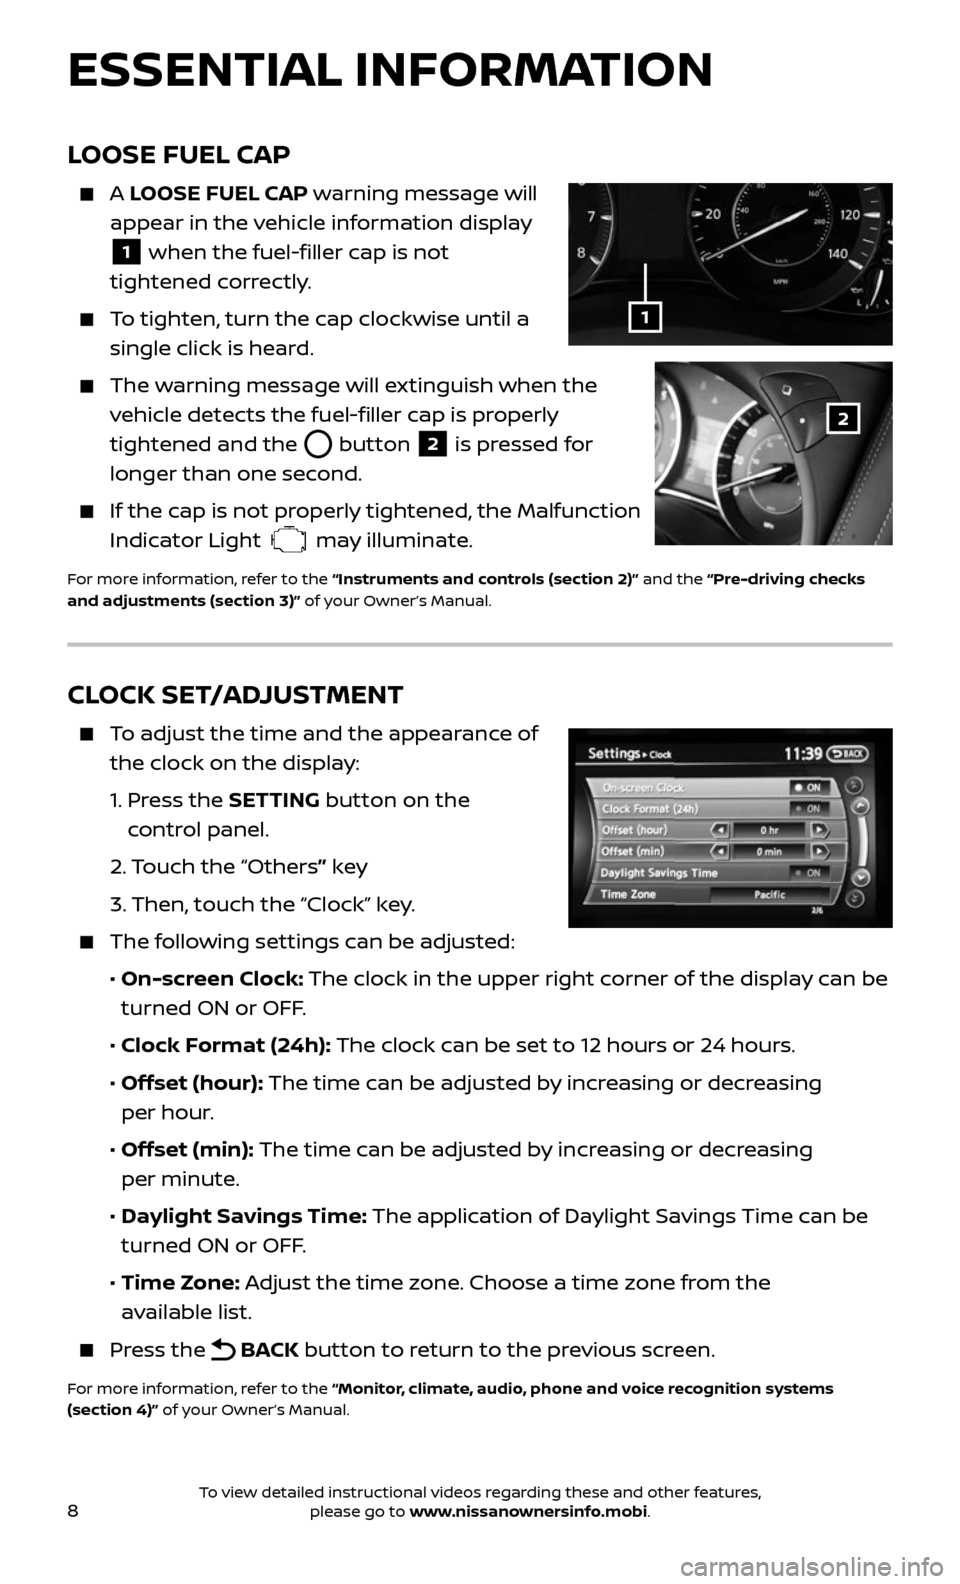
To adjust the time and the appearance of
the clock on the display:
1. Press the SETTING button on the
control panel.
2. Touch the “Others” key
3. Then, touch the “Clock” key.
The following settings can be adjusted:
• On-screen Clock: The clock in the upper right corner of the display can be
turned ON or OFF.
• Clock Format (24h): The clock can be set to 12 hours or 24 hours.
• Offset (hour): The time can be adjusted by increasing or decreasing
per hour.
• Offset (min): The time can be adjusted by increasing or decreasing
per minute.
• Daylight Savings Time: The application of Daylight Savings Time can be
turned ON or OFF.
• Time Zone: Adjust the time zone. Choose a time zone from the
available list.
Press the BACK button to return to the previous screen.
For more information, refer to the “Monitor, climate, audio, phone and voice recognition systems
(section 4)” of your Owner’s Manual.
ESSENTIAL INFORMATION
LOOSE FUEL CAP
A LOOSE FUEL CAP warning message will
appear in the vehicle information display
1 when the fuel-filler cap is not
tightened correctly.
To tighten, turn the cap clockwise until a
single click is heard.
The warning message will extinguish when the
vehicle detects the fuel-filler cap is properly
tightened and the
button 2 is pressed for
longer than one second.
If the cap is not properly tightened, the Malfunction
Indicator Light may illuminate.
For more information, refer to the “Instruments and controls (section 2)” and the “Pre-driving checks
and adjustments (section 3)” of your Owner’s Manual.
1
2
To view detailed instructional videos regarding these and other features, please go to www.nissanownersinfo.mobi.
Page 12 of 36
10
The Intelligent Key can also be used to activate the panic alarm by pressing
and holding the button 6 for more than 0.5 seconds. Once activated,
the panic alarm and headlights will stay on for a period of time.
INTELLIGENT KEY BATTERY DISCHARGE
If the bat tery of the Intelligent Key is discharged or environmental
conditions interfere with the Intelligent Key operation, start the engine
according to the following procedure:
1. Move the shif t lever to the P (PARK) position.
2. Firml y apply the foot brake.
3. Touch the ignition switch with the Intelligent Key, and a chime will sound.
4. Within 10 sec onds af ter the chime sounds, press the ignition switch
START/STOP button while depressing the brake pedal and the engine
will start.
For more information, refer to the “Pre-driving checks and adjustments (section 3)”, the “Starting and
driving (section 5)” and the “Do-it-yourself (section 8)” of your Owner’s Manual.
FIRST DRIVE FEATURES
POWER LIFTGATE RELEASE (if so equipped)
When the lif tgate is closed, the lif tgate will fully open automatically by:
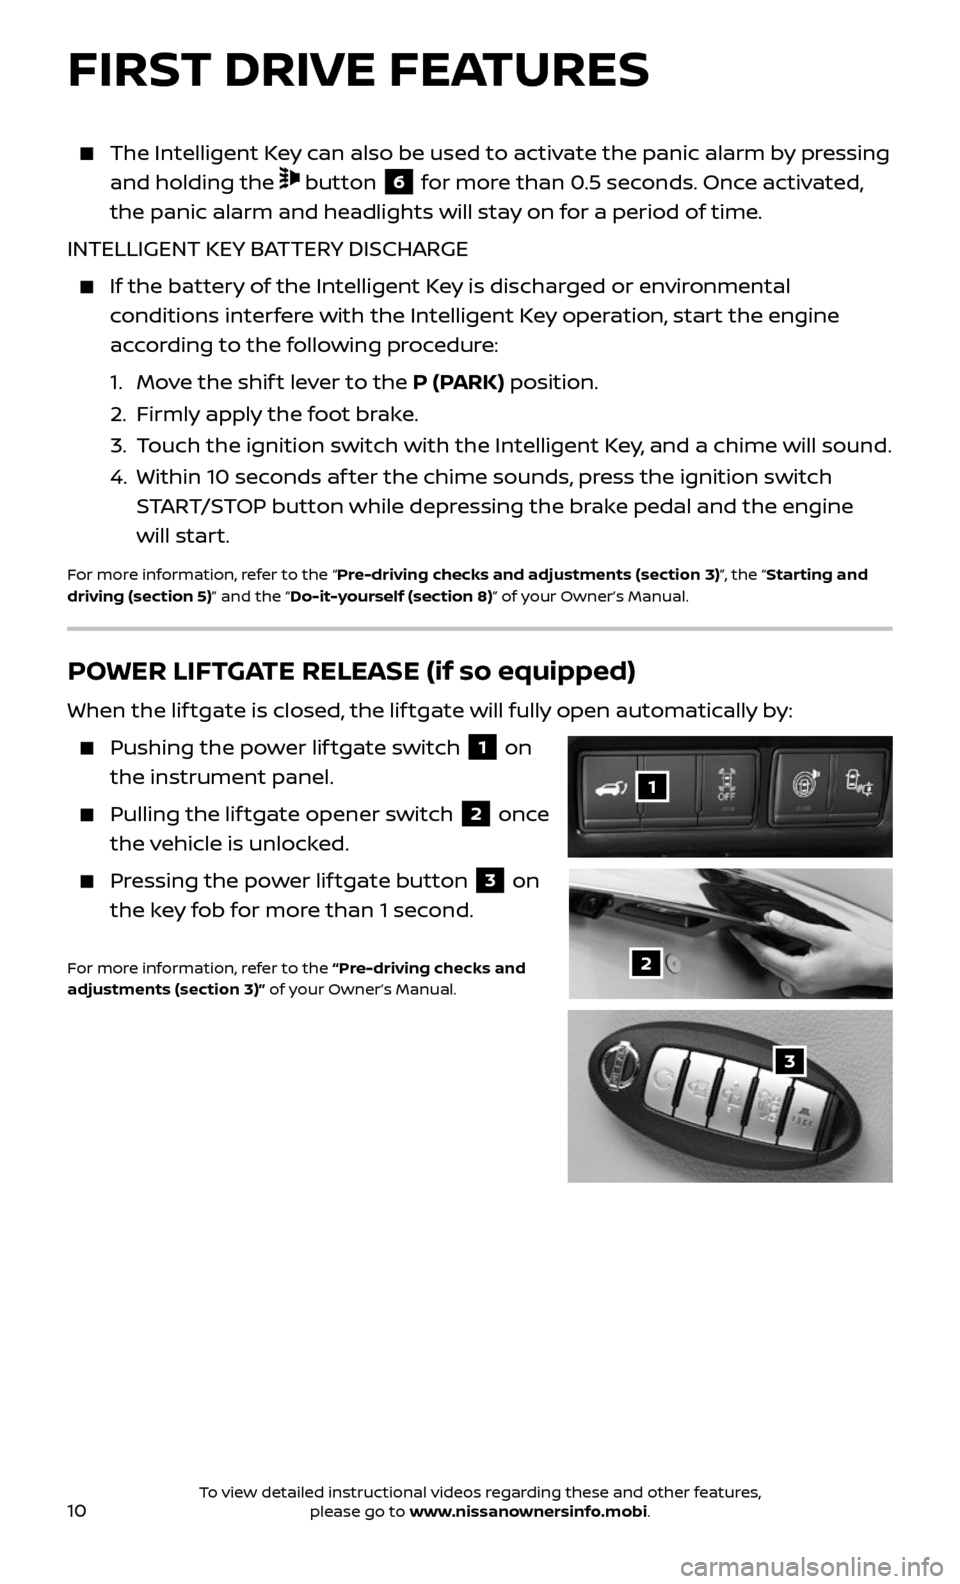
Pushing the power lif tgate switch 1 on
the instrument panel.
Pulling the lif tgate opener switch 2 once
the vehicle is unlocked.
Pressing the power lif tgate button 3 on
the key fob for more than 1 second.
For more information, refer to the “Pre-driving checks and
adjustments (section 3)” of your Owner’s Manual.2
1
3
To view detailed instructional videos regarding these and other features, please go to www.nissanownersinfo.mobi.
Page 16 of 36
14
HEADLIGHT CONTROL SWITCH
HEADLIGHT CONTROL
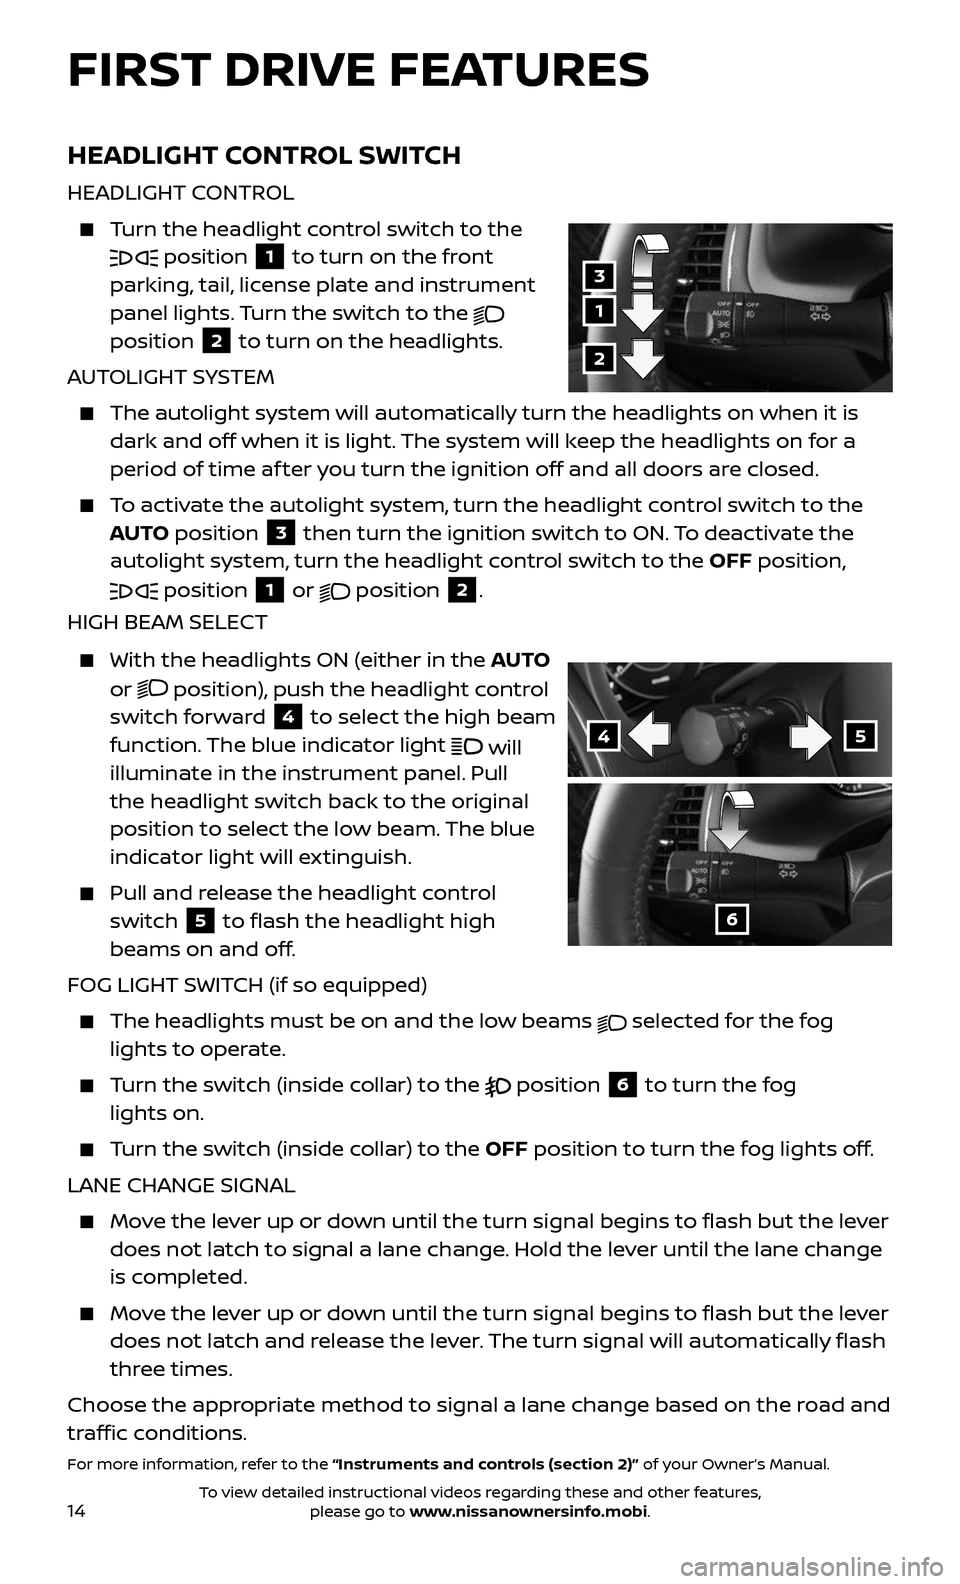
Turn the headlight control switch to the
position 1 to turn on the front
parking, tail, license plate and instrument
panel lights. Turn the switch to the
position
2 to turn on the headlights.
AUTOLIGHT SYSTEM
The autolight system wil l automatically turn the headlights on when it is
dark and off when it is light. The system will keep the headlights on for a
period of time af ter you turn the ignition off and all doors are closed.
To activate the autolight system, turn the headlight control switch to the
AUTO position
3 then turn the ignition switch to ON. To deactivate the
autolight system, turn the headlight control switch to the OFF position,
position 1 or
position
2.
HIGH BEAM SELECT
With the headlights ON (either in the AUTO
or
position), push the headlight control
switch forward
4 to select the high beam
function. The blue indicator light will
illuminate in the instrument panel. Pull
the headlight switch back to the original
position to select the low beam. The blue
indicator light will extinguish.
Pull and release the headlight control
switch 5 to flash the headlight high
beams on and off.
FOG LIGHT SWITCH (if so equipped)
The headlights must be on and the low beams selected for the fog
lights to operate.
Turn the switch (inside collar) to the position 6 to turn the fog
lights on.
Turn the switch (inside collar) to the OFF position to turn the fog lights off.
LANE CHANGE SIGNAL
Move the lever up or down until the turn signal begins to flash but the lever
does not latch to signal a lane change. Hold the lever until the lane change
is completed.
Move the lever up or down until the turn signal begins to flash but the lever
does not latch and release the lever. The turn signal will automatically flash
three times.
Choose the appropriate method to signal a lane change based on the road and
traffic conditions.
For more information, refer to the “Instruments and controls (section 2)” of your Owner’s Manual.
1
3
2
45
6
FIRST DRIVE FEATURES
To view detailed instructional videos regarding these and other features, please go to www.nissanownersinfo.mobi.
Page 23 of 36
21
INTELLIGENT CRUISE CONTROL (ICC)
(if so equipped)
VEHICLE-TO-VEHICLE DISTANCE
CONTROL MODE
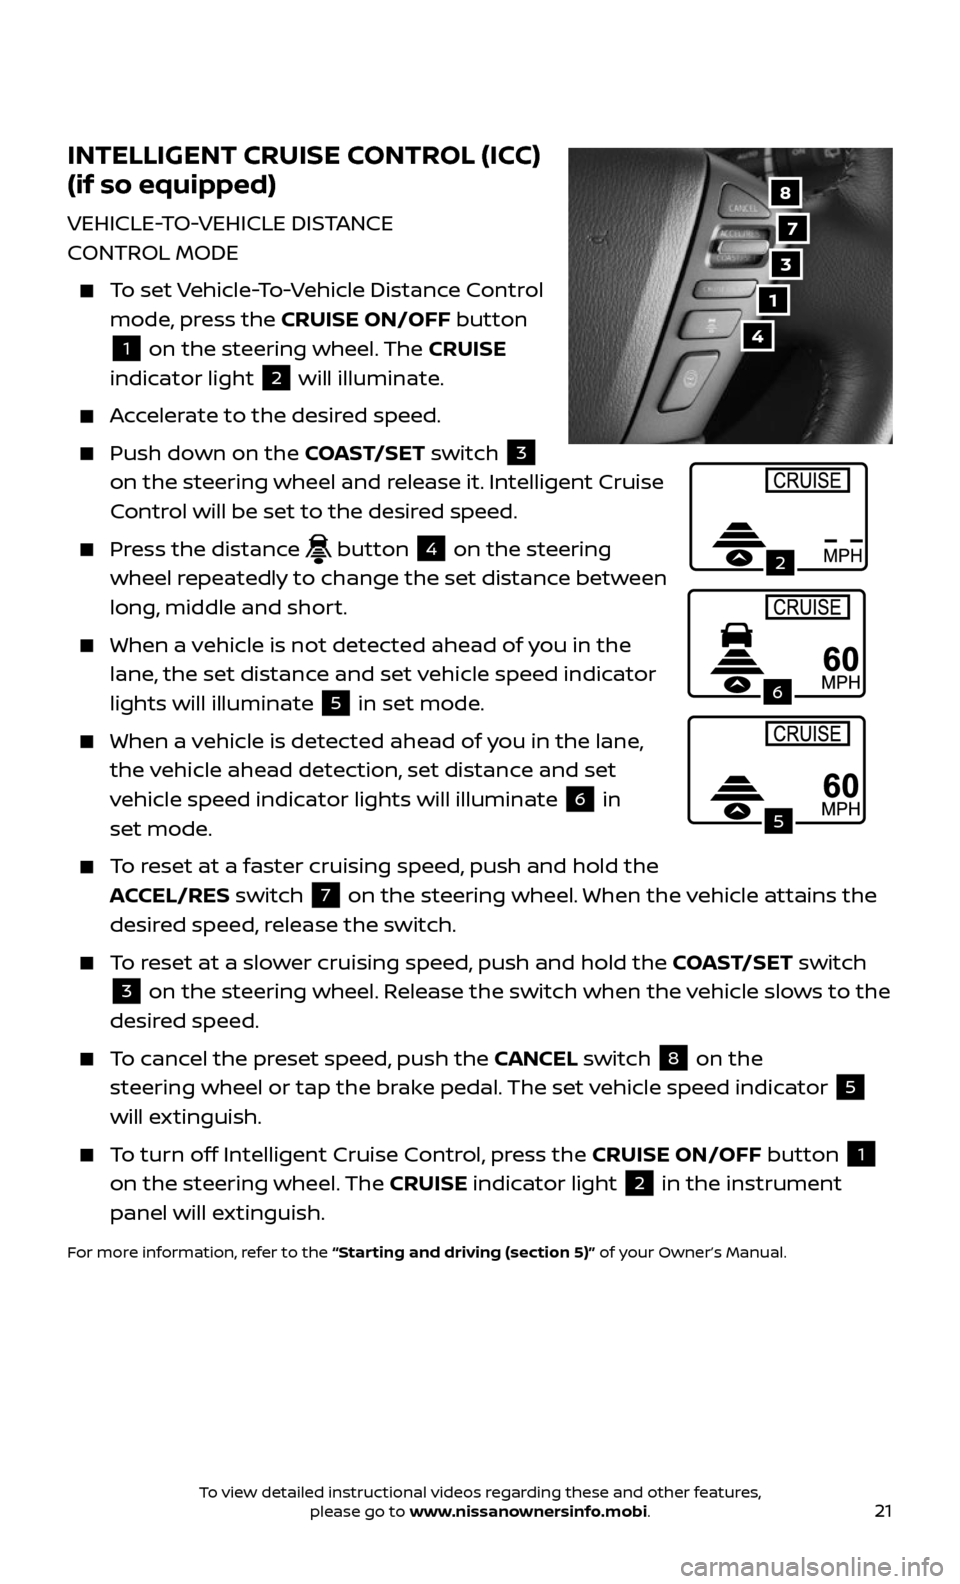
To set Vehicle-To-Vehicle Distance Control
mode, press the CRUISE ON/OFF button
1 on the steering wheel. The CRUISE
indicator light 2 will illuminate.
Accelerate to the desired speed.
Push down on the COAST/SET switch 3
on the steering wheel and release it. Intelligent Cruise
Control will be set to the desired speed.
Press the distance button 4 on the steering
wheel repeatedly to change the set distance between
long, middle and short.
When a v ehicle is not detected ahead of you in the
lane, the set distance and set vehicle speed indicator
lights will illuminate
5 in set mode.
When a vehicle is detected ahead of you in the lane,
the vehicle ahead detection, set distance and set
vehicle speed indicator lights will illuminate
6 in
set mode.
To reset at a faster cruising speed, push and hold the
ACCEL/RES switch 7 on the steering wheel. When the vehicle attains the
desired speed, release the switch.
To reset at a slower cruising speed, push and hold the COAST/SET switch
3 on the steering wheel. Release the switch when the vehicle slows to the
desired speed.
To cancel the preset speed, push the CANCEL switch 8 on the
steering wheel or tap the brake pedal. The set vehicle speed indicator
5
will extinguish.
To turn off Intelligent Cruise Control, press the CRUISE ON/OFF button 1
on the steering wheel. The CRUISE indicator light 2 in the instrument
panel will extinguish.
For more information, refer to the “Starting and driving (section 5)” of your Owner’s Manual.
7
3
8
4
1
2
5
6
To view detailed instructional videos regarding these and other features, please go to www.nissanownersinfo.mobi.
Page 24 of 36
22
POWER OUTLETS
The power outlets are used for powering
electrical accessories such as cellular
phones. They are rated at 12V,
120W (10A) maximum.
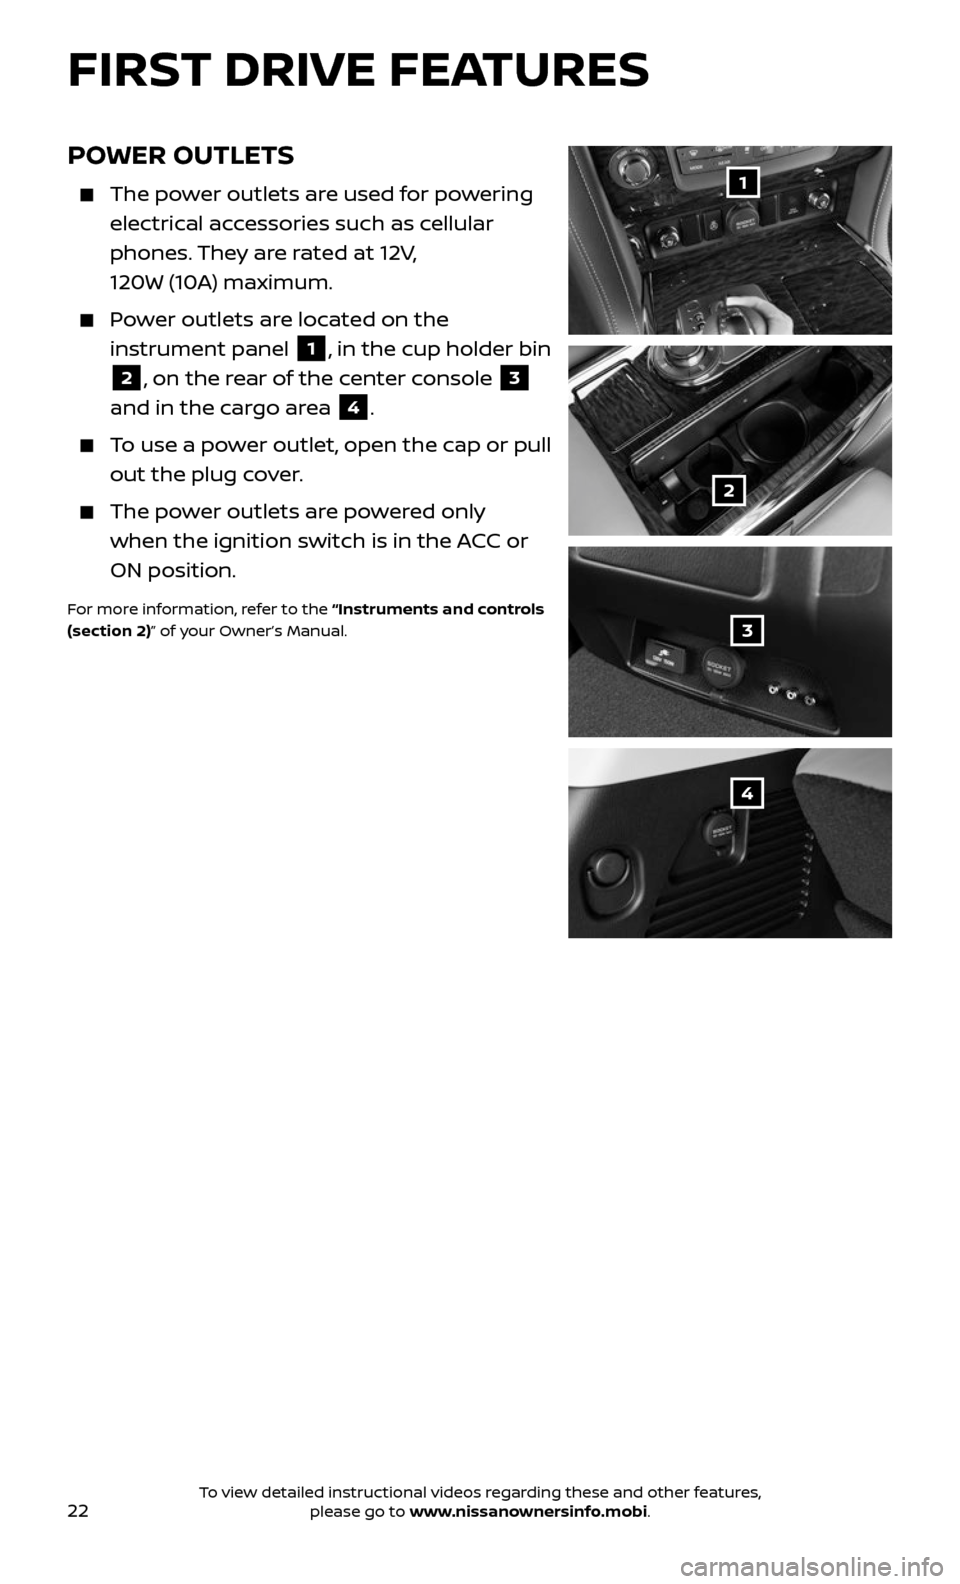
Power outlets are located on the
instrument panel 1, in the cup holder bin
2, on the rear of the center console 3
and in the cargo area 4.
To use a power outlet, open the cap or pull
out the plug cover.
The power outlets are powered only
when the ignition switch is in the ACC or
ON position.
For more information, refer to the “Instruments and controls
(section 2)” of your Owner’s Manual.
1
2
3
4
FIRST DRIVE FEATURES
To view detailed instructional videos regarding these and other features, please go to www.nissanownersinfo.mobi.
Page 25 of 36
23
VEHICLE INFORMATION DISPLAY
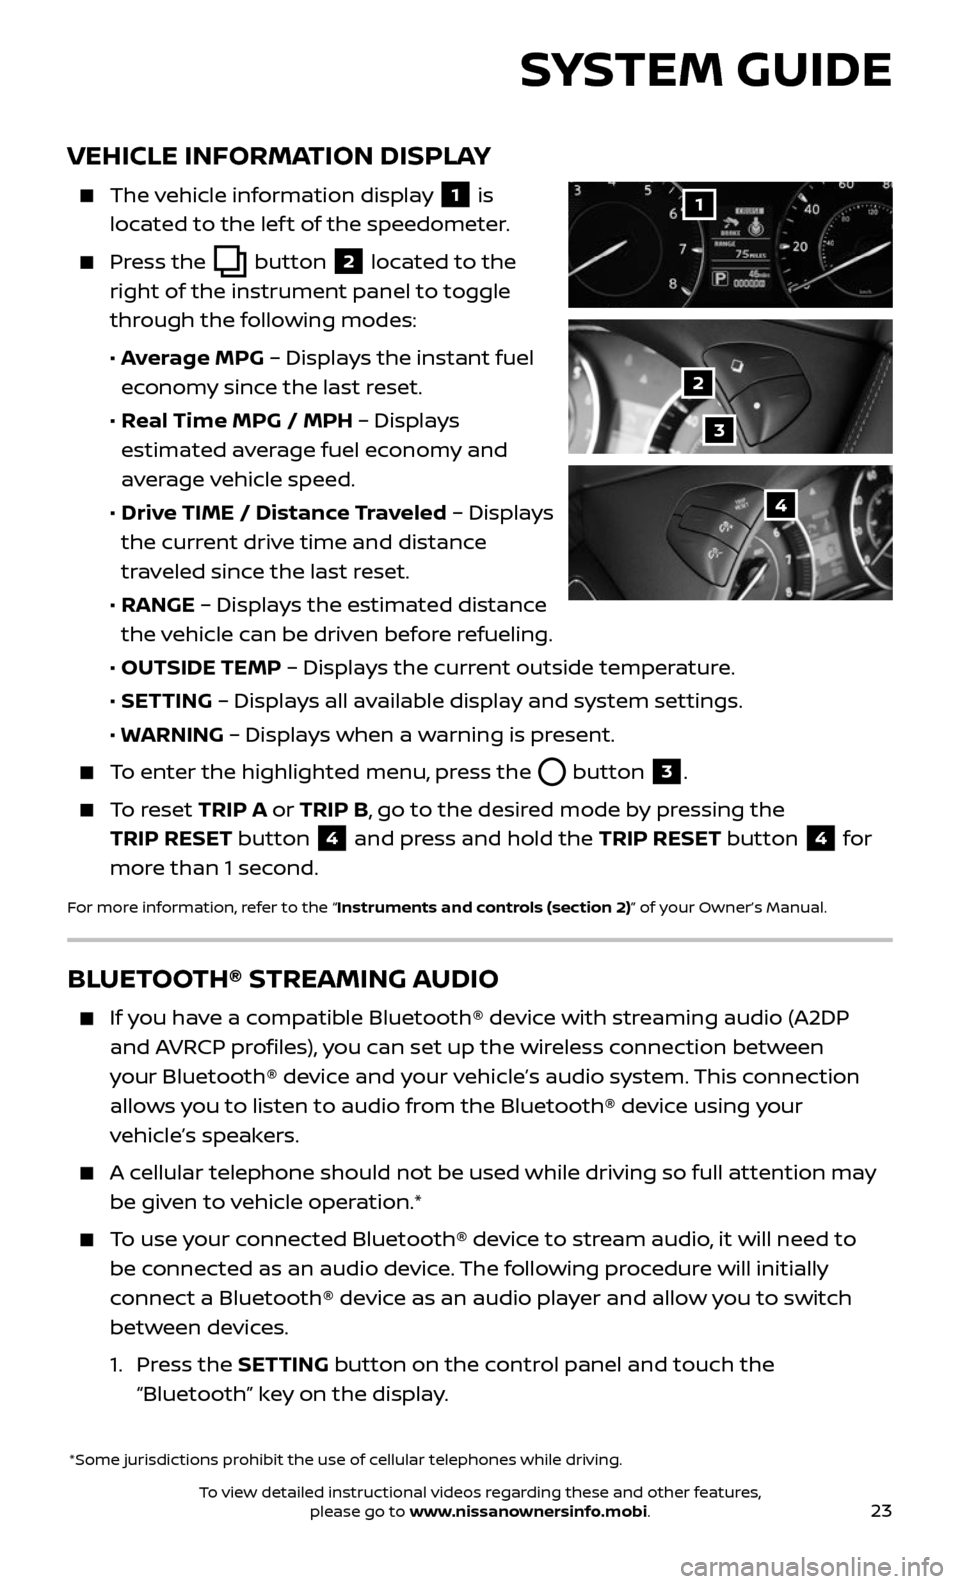
The vehicle information display 1 is
located to the lef t of the speedometer.
Press the button 2 located to the
right of the instrument panel to toggle
through the following modes:
• Average MPG – Displays the instant fuel
economy since the last reset.
• Real Time MPG / MPH – Displays
estimated average fuel economy and
average vehicle speed.
• Drive TIME / Distance Traveled – Displays
the current drive time and distance
traveled since the last reset.
• RANGE – Displays the estimated distance
the vehicle can be driven before refueling.
• OUTSIDE TEMP – Displays the current outside temperature.
• SETTING – Displays all available display and system settings.
• WARNING – Displays when a warning is present.
To enter the highlighted menu, press the button 3.
To reset TRIP A or TRIP B, go to the desired mode by pressing the
TRIP RESET button
4 and press and hold the TRIP RESET button 4 for
more than 1 second.
For more information, refer to the “Instruments and controls (section 2)” of your Owner’s Manual.
*Some jurisdictions prohibit the use of cellular telephones while driving.
1
2
3
4
SYSTEM GUIDE
BLUETOOTH® STREAMING AUDIO
If you have a compatible Bluetooth® device with streaming audio (A2DP
and AVRCP profiles), you can set up the wireless connection between
your Bluetooth® device and your vehicle’s audio system. This connection
allows you to listen to audio from the Bluetooth® device using your
vehicle’s speakers.
A cellular telephone should not be used while driving so full attention may
be given to vehicle operation.*
To use your connected Bluetooth® device to stream audio, it will need to
be connected as an audio device. The following procedure will initially
connect a Bluetooth® device as an audio player and allow you to switch
between devices.
1. Press the SETTING button on the control panel and touch the
“Bluetooth” key on the display.
To view detailed instructional videos regarding these and other features, please go to www.nissanownersinfo.mobi.