Page 2 of 36
*See your Owner’s Manual for information.
12
4
3
5
14151617
1 Headlight and Turn Signal Switch2 Instrument Brightness Control*3 Vehicle Information Display4 Low Tire Pressure Warning Light5 Wiper and Washer Switch6 Steering Wheel Switches for
Audio* / Bluetooth® / Navigation
7 Cruise Control8 Power Lif tgate Switch9 Sonar System OFF Switch*
10 Warning Systems Switch*
11 Blind Spot Warning / Blind Spot
Intervention® Switch
12 Headlight Aiming Switch*
13 Power Lif tgate ON/OFF Switch
14 Center Console Display
15 Audio System
16 Heater and Air Conditioner
(automatic)
17 Front Passenger Air Bag Status Light*
18 Climate-Controlled Seat Switch*
19 Heated Steering Wheel Switch*
20 Snow Mode Switch*
21 AUTO - 4HI - 4LO
Selection Knob*
22 Tow Mode Switch*
23 Vehicle Dynamic Control (VDC)
OFF Switch*
812
10
11
23
2019
18
18
21
22
6
7
13 9
Page 13 of 36

11
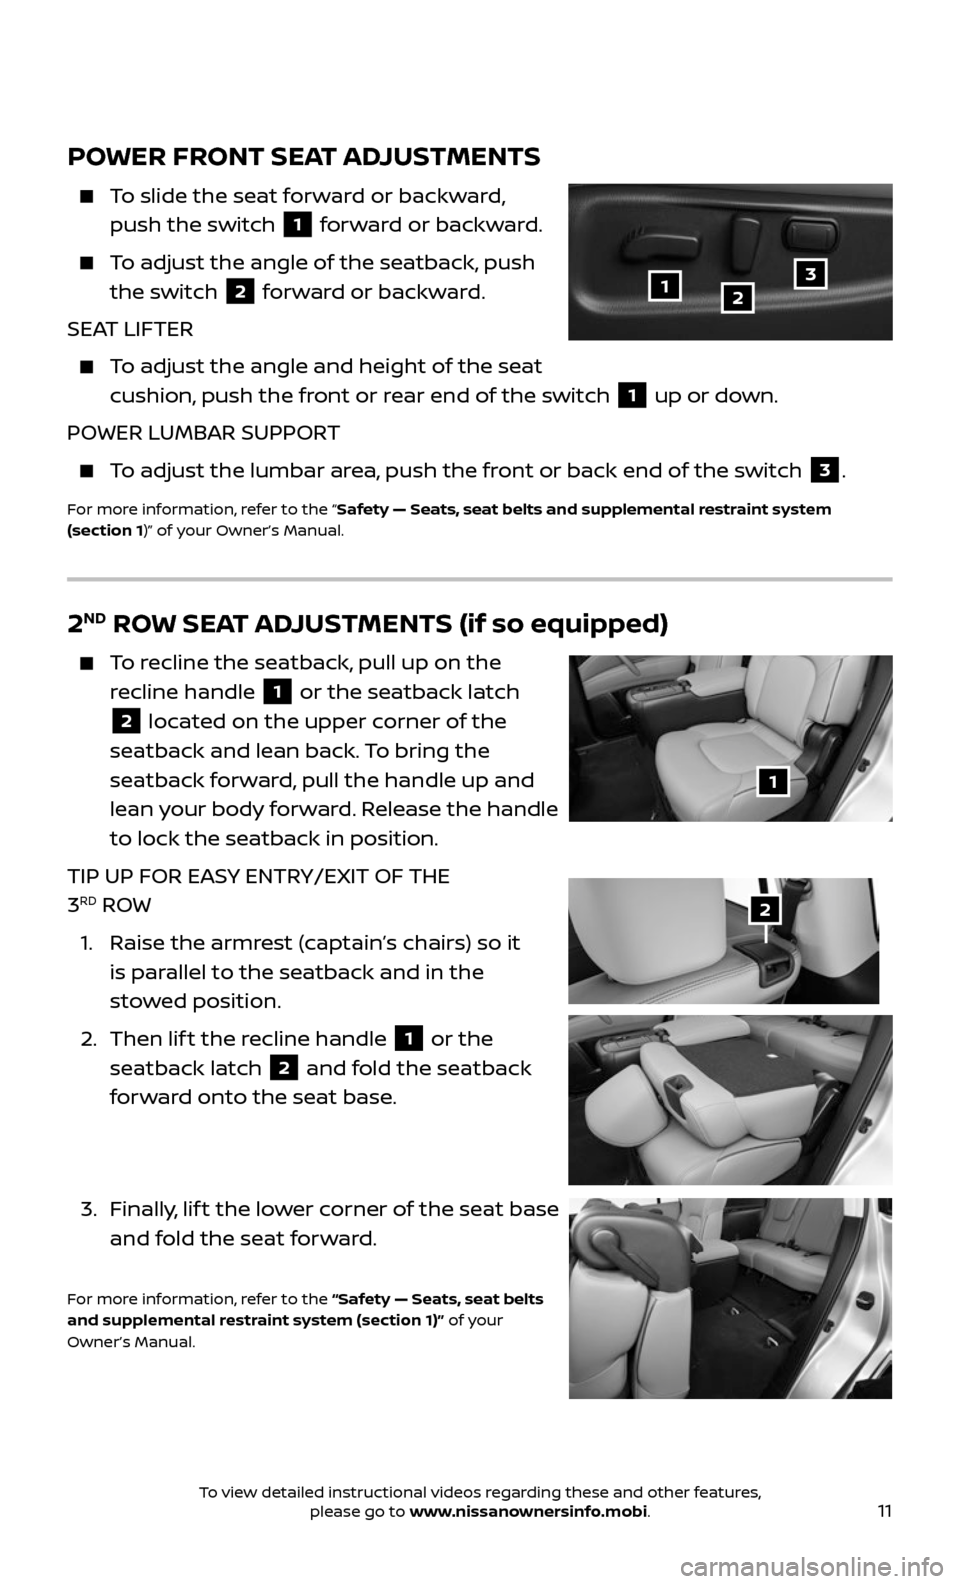
POWER FRONT SEAT ADJUSTMENTS
To slide the seat forward or backward,
push the switch 1 forward or backward.
To adjust the angle of the seatback, push
the switch 2 forward or backward.
SEAT LIFTER
To adjust the angle and height of the seat
cushion, push the front or rear end of the switch 1 up or down.
POWER LUMBAR SUPPORT
To adjust the lumbar area, push the front or back end of the switch 3.
For more information, refer to the “Safety — Seats, seat belts and supplemental restraint system
(section 1)” of your Owner’s Manual.
123
2ND ROW SEAT ADJUSTMENTS (if so equipped)
To recline the seatback, pull up on the
recline handle
1 or the seatback latch
2 located on the upper corner of the
seatback and lean back. To bring the
seatback forward, pull the handle up and
lean your body forward. Release the handle
to lock the seatback in position.
TIP UP FOR EASY ENTRY/EXIT OF THE
3
RD ROW
1. Raise the armr est (captain’s chairs) so it
is parallel to the seatback and in the
stowed position.
2. Then lif t the recline handle 1 or the
seatback latch 2 and fold the seatback
forward onto the seat base.
3. Finally, lif t the lower corner of the seat base
and fold the seat forward.
For more information, refer to the “Safety — Seats, seat belts
and supplemental restraint system (section 1)” of your
Owner’s Manual.
1
2
To view detailed instructional videos regarding these and other features, please go to www.nissanownersinfo.mobi.
Page 17 of 36

15
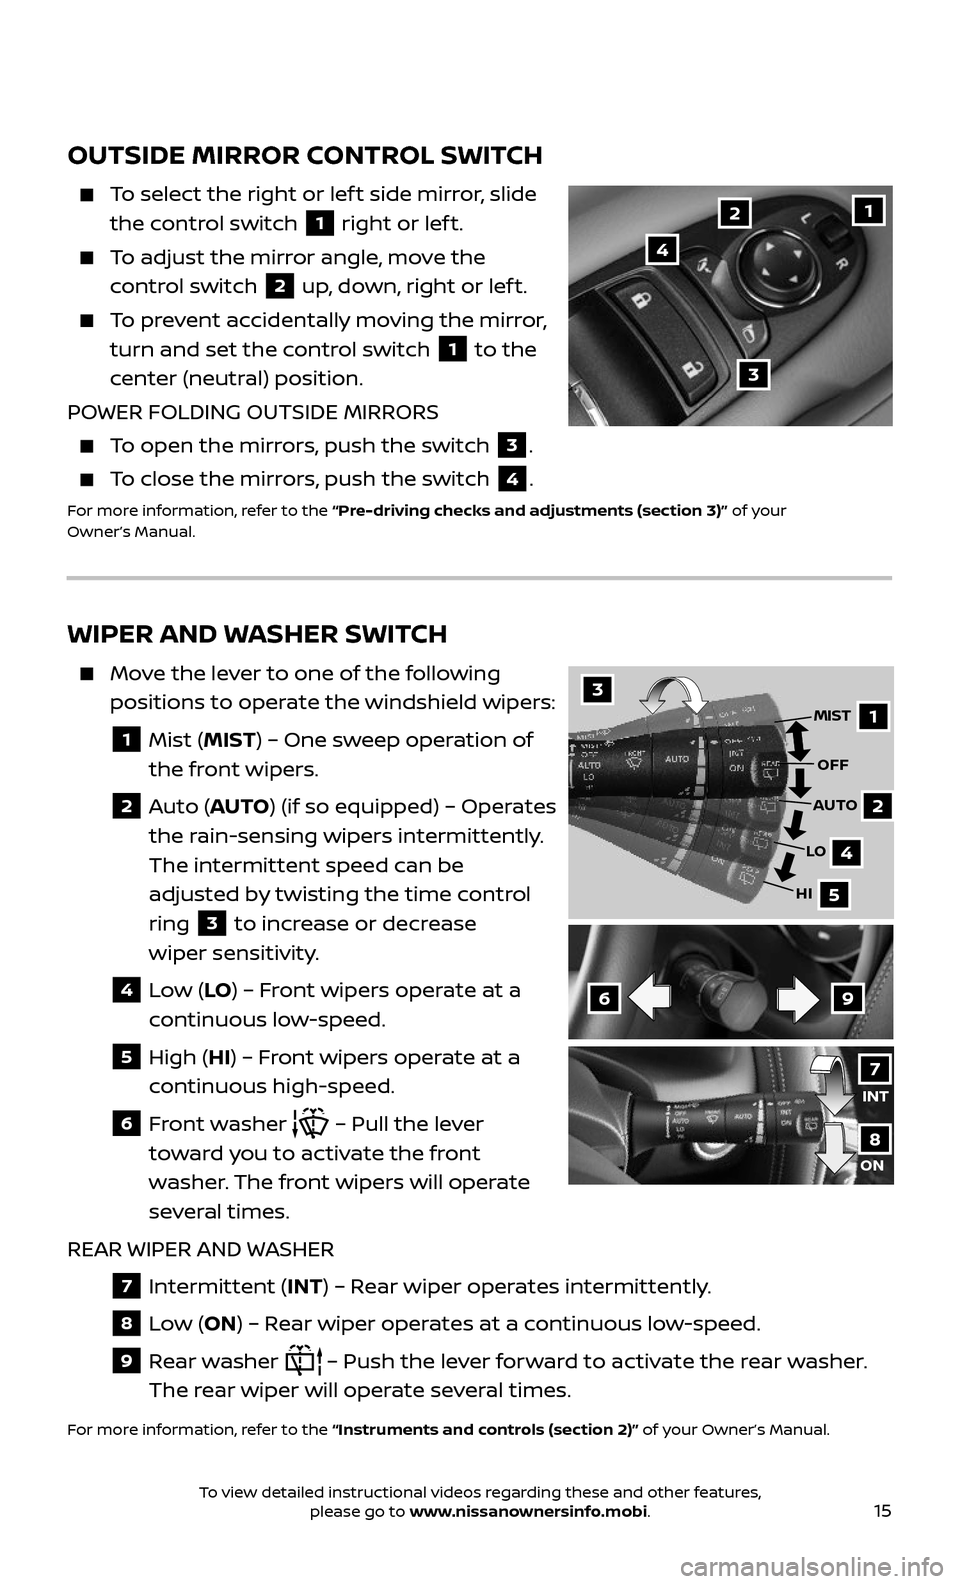
WIPER AND WASHER SWITCH
Move the lever to one of the following
positions to operate the windshield wipers:
1 Mist (MIST) – One sweep operation of
the front wipers.
2 Auto (AUTO ) (if so equipped) – Operates
the rain-sensing wipers intermittently.
The intermittent speed can be
adjusted by twisting the time control
ring
3 to increase or decrease
wiper sensitivity.
4 Low (LO ) – Front wipers operate at a
continuous low-speed.
5 High (HI) – Front wipers operate at a
continuous high-speed.
6 Front washer – Pull the lever
toward you to activate the front
washer. The front wipers will operate
several times.
REAR WIPER AND WASHER
7 Intermittent (INT) – Rear wiper operates intermittently.
8 Low (ON) – Rear wiper operates at a continuous low-speed.
9 Rear washer – Push the lever forward to activate the rear washer.
The rear wiper will operate several times.
For more information, refer to the “Instruments and controls (section 2)” of your Owner’s Manual.
69
3
1
2
4
5
MIST
OFF
AUTO
LO
HI
INT
ON
7
8
OUTSIDE MIRROR CONTROL SWITCH
To select the right or lef t side mirror, slide
the control switch 1 right or lef t.
To adjust the mirror angle, move the
control switch 2 up, down, right or lef t.
To prevent accidentally moving the mirror,
turn and set the control switch 1 to the
center (neutral) position.
POWER FOLDING OUTSIDE MIRRORS
To open the mirrors, push the switch 3.
To close the mirrors, push the switch 4.
For more information, refer to the “Pre-driving checks and adjustments (section 3)” of your
Owner’s Manual.
3
12
4
To view detailed instructional videos regarding these and other features, please go to www.nissanownersinfo.mobi.