2017 NISSAN ARMADA key
[x] Cancel search: keyPage 234 of 614
SAA1898
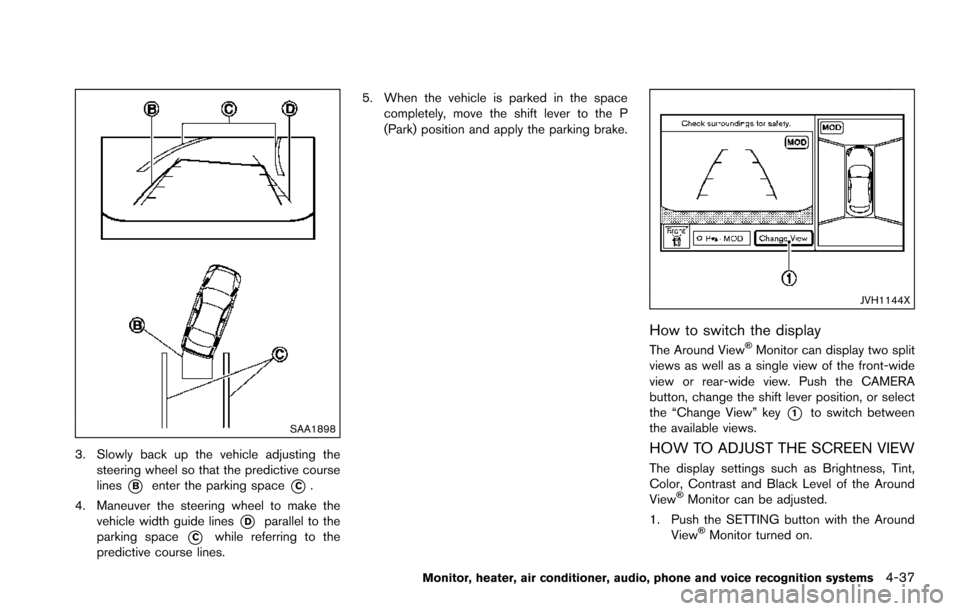
3. Slowly back up the vehicle adjusting thesteering wheel so that the predictive course
lines
*Benter the parking space*C.
4. Maneuver the steering wheel to make the vehicle width guide lines
*Dparallel to the
parking space
*Cwhile referring to the
predictive course lines. 5. When the vehicle is parked in the space
completely, move the shift lever to the P
(Park) position and apply the parking brake.
JVH1144X
How to switch the display
The Around View�ŠMonitor can display two split
views as well as a single view of the front-wide
view or rear-wide view. Push the CAMERA
button, change the shift lever position, or select
the “Change View” key
*1to switch between
the available views.
HOW TO ADJUST THE SCREEN VIEW
The display settings such as Brightness, Tint,
Color, Contrast and Black Level of the Around
View
�ŠMonitor can be adjusted.
1. Push the SETTING button with the Around View
�ŠMonitor turned on.
Monitor, heater, air conditioner, audio, phone and voice recognition systems4-37
Page 235 of 614
4-38Monitor, heater, air conditioner, audio, phone and voice recognition systems
2. Select the “Display” key.
3. Select an item you wish to adjust.
4. Adjust the level of the setting item using themulti-function controller.
NOTE:
Do not adjust any of the display settings of
the Around View
�ŠMonitor while the vehi-
cle is moving. Make sure the parking brake
is firmly applied.
JVH1303X
AROUND VIEW�ŠMONITOR SETTINGS
To set up the Around View�ŠMonitor to your
preferred settings, push the SETTING button
with the Around View
�ŠMonitor turned on and
then select the “Settings” key.
For details of the following sonar settings, refer
to the “Camera aiding sonar function (models
with Around View
�ŠMonitor)” (P.4-42) .
. Sonar
. Towing Mode
. Show Camera when Sonar Activate
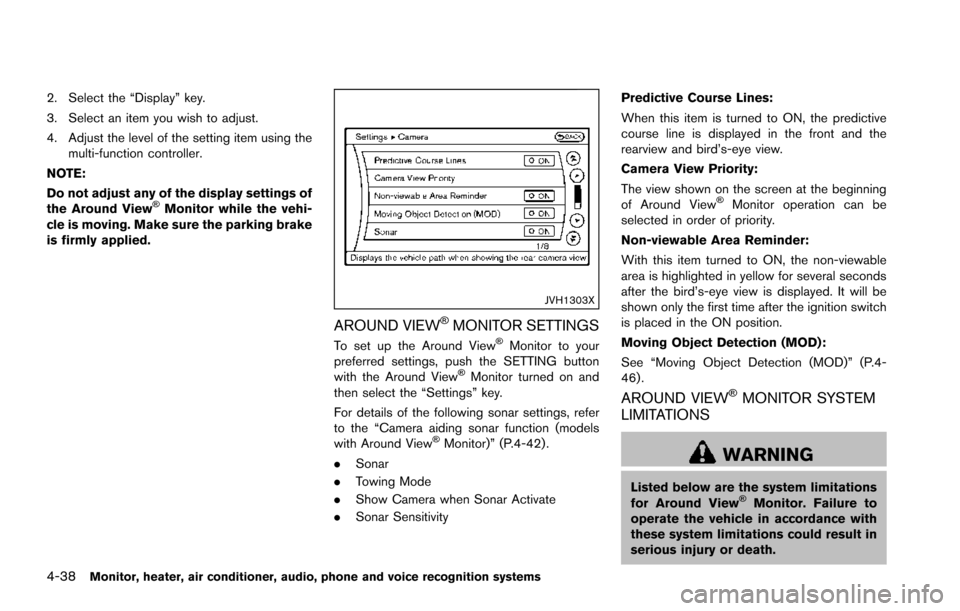
. Sonar Sensitivity Predictive Course Lines:
When this item is turned to ON, the predictive
course line is displayed in the front and the
rearview and bird’s-eye view.
Camera View Priority:
The view shown on the screen at the beginning
of Around View
�ŠMonitor operation can be
selected in order of priority.
Non-viewable Area Reminder:
With this item turned to ON, the non-viewable
area is highlighted in yellow for several seconds
after the bird’s-eye view is displayed. It will be
shown only the first time after the ignition switch
is placed in the ON position.
Moving Object Detection (MOD):
See “Moving Object Detection (MOD)” (P.4-
46) .
AROUND VIEW�ŠMONITOR SYSTEM
LIMITATIONS
WARNING
Listed below are the system limitations
for Around View�ŠMonitor. Failure to
operate the vehicle in accordance with
these system limitations could result in
serious injury or death.
Page 240 of 614
SONAR SYSTEM OPERATION
The system gives the tone for front objects when
the shift lever is in the D (Drive) position and
both front and rear objects when the shift lever is
in the R (Reverse) position.
When the camera image is shown on the center
display, the system shows the sonar indicator
regardless of the shift lever position.
The system is deactivated at speeds above 6
MPH (10 km/h) . It is reactivated at lower
speeds.
The colors of the sonar indicators and the
distance guide lines in the front, front-wide, rear
and rear-wide views indicate different distances
to the object.
When the objects are detected, the indicator
(green) appears and blinks and the tone sounds
intermittently. When the vehicle moves closer to
the object, the color of the indicator turns yellow
and the rate of the blinking and the rate of the
tone increase. When the vehicle is very close to
the object, the indicator stops blinking and turns
red, and the tone sounds continuously.
The intermittent tone will stop after 3 seconds
when an object is detected by only the sonar
and the distance does not change.
The tone will stop when the object is no longer
near the vehicle.
JVH1152X
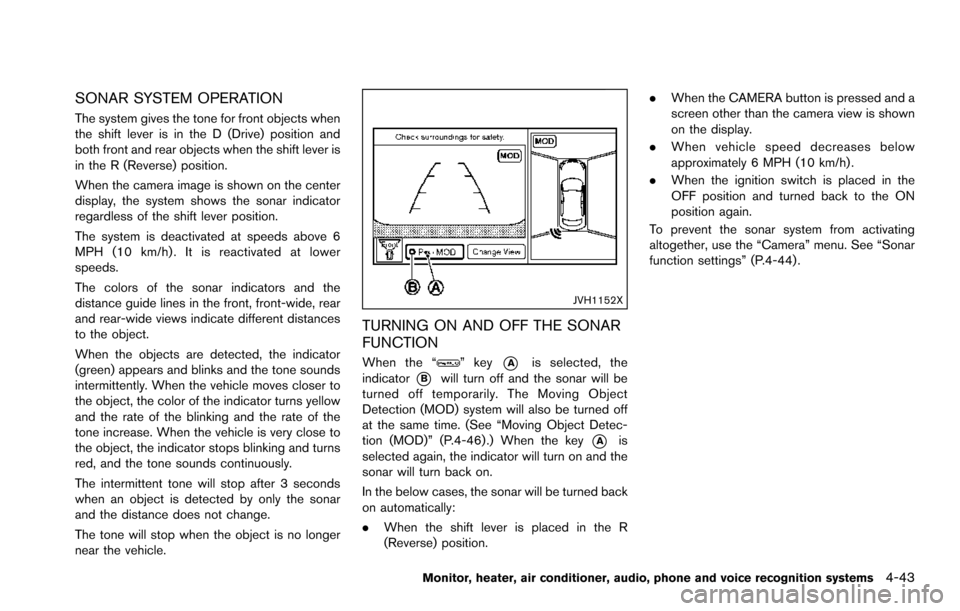
TURNING ON AND OFF THE SONAR
FUNCTION
When the “” key*Ais selected, the
indicator
*Bwill turn off and the sonar will be
turned off temporarily. The Moving Object
Detection (MOD) system will also be turned off
at the same time. (See “Moving Object Detec-
tion (MOD)” (P.4-46) .) When the key
*Ais
selected again, the indicator will turn on and the
sonar will turn back on.
In the below cases, the sonar will be turned back
on automatically:
. When the shift lever is placed in the R
(Reverse) position. .
When the CAMERA button is pressed and a
screen other than the camera view is shown
on the display.
. When vehicle speed decreases below
approximately 6 MPH (10 km/h) .
. When the ignition switch is placed in the
OFF position and turned back to the ON
position again.
To prevent the sonar system from activating
altogether, use the “Camera” menu. See “Sonar
function settings” (P.4-44) .
Monitor, heater, air conditioner, audio, phone and voice recognition systems4-43
Page 241 of 614
4-44Monitor, heater, air conditioner, audio, phone and voice recognition systems
JVH1402X
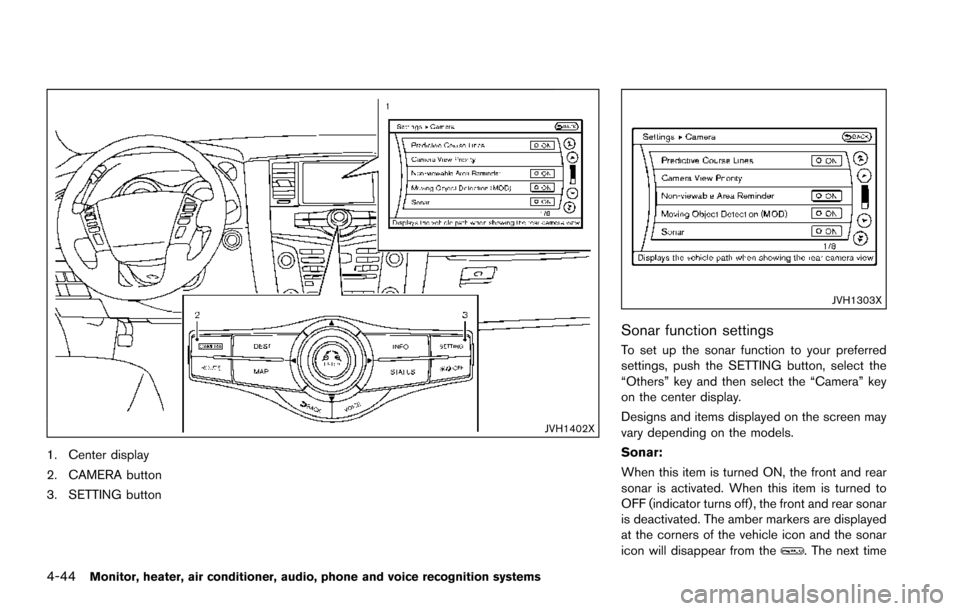
1. Center display
2. CAMERA button
3. SETTING button
JVH1303X
Sonar function settings
To set up the sonar function to your preferred
settings, push the SETTING button, select the
“Others” key and then select the “Camera” key
on the center display.
Designs and items displayed on the screen may
vary depending on the models.
Sonar:
When this item is turned ON, the front and rear
sonar is activated. When this item is turned to
OFF (indicator turns off) , the front and rear sonar
is deactivated. The amber markers are displayed
at the corners of the vehicle icon and the sonar
icon will disappear from the
. The next time
Page 246 of 614
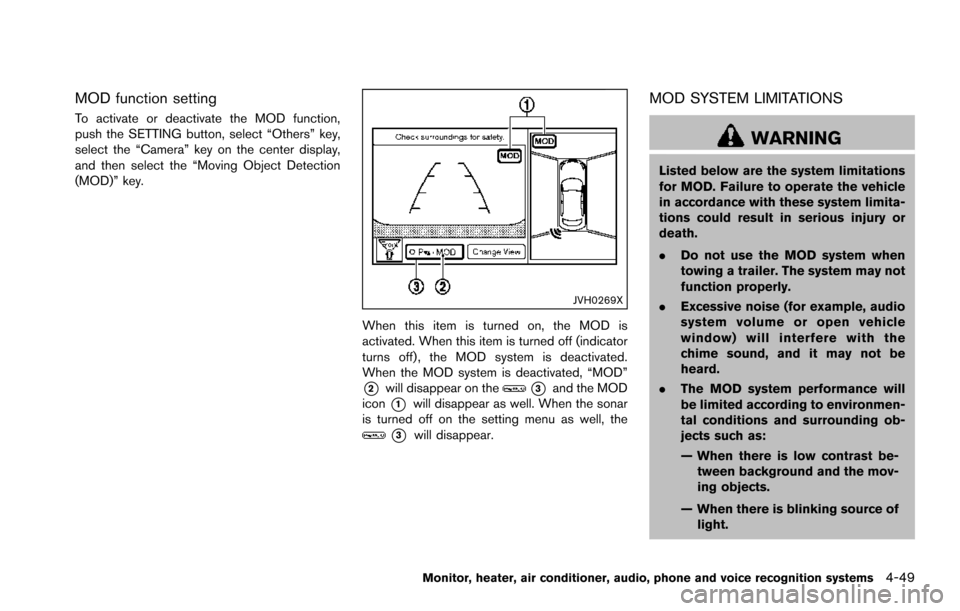
MOD function setting
To activate or deactivate the MOD function,
push the SETTING button, select “Others” key,
select the “Camera” key on the center display,
and then select the “Moving Object Detection
(MOD)” key.
JVH0269X
When this item is turned on, the MOD is
activated. When this item is turned off (indicator
turns off) , the MOD system is deactivated.
When the MOD system is deactivated, “MOD”
*2will disappear on the*3and the MOD
icon
*1will disappear as well. When the sonar
is turned off on the setting menu as well, the
*3will disappear.
MOD SYSTEM LIMITATIONS
WARNING
Listed below are the system limitations
for MOD. Failure to operate the vehicle
in accordance with these system limita-
tions could result in serious injury or
death.
. Do not use the MOD system when
towing a trailer. The system may not
function properly.
. Excessive noise (for example, audio
system volume or open vehicle
window) will interfere with the
chime sound, and it may not be
heard.
. The MOD system performance will
be limited according to environmen-
tal conditions and surrounding ob-
jects such as:
— When there is low contrast be-
tween background and the mov-
ing objects.
— When there is blinking source of light.
Monitor, heater, air conditioner, audio, phone and voice recognition systems4-49
Page 255 of 614
4-58Monitor, heater, air conditioner, audio, phone and voice recognition systems
SAA3088
SAA3058
OPERATING TIPS
When the engine coolant temperature and
outside air temperature are low, the air flow
from the foot outlets may not operate. However,
this is not a malfunction. After the coolant
temperature warms up, the air flow from the
foot outlets will operate normally.
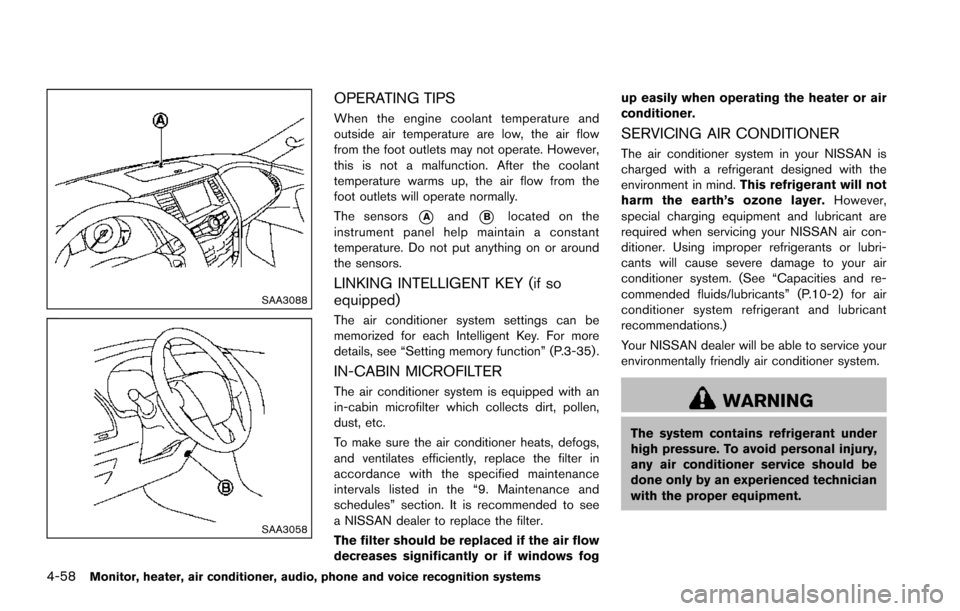
The sensors
*Aand*Blocated on the
instrument panel help maintain a constant
temperature. Do not put anything on or around
the sensors.
LINKING INTELLIGENT KEY (if so
equipped)
The air conditioner system settings can be
memorized for each Intelligent Key. For more
details, see “Setting memory function” (P.3-35) .
IN-CABIN MICROFILTER
The air conditioner system is equipped with an
in-cabin microfilter which collects dirt, pollen,
dust, etc.
To make sure the air conditioner heats, defogs,
and ventilates efficiently, replace the filter in
accordance with the specified maintenance
intervals listed in the “9. Maintenance and
schedules” section. It is recommended to see
a NISSAN dealer to replace the filter.
The filter should be replaced if the air flow
decreases significantly or if windows fog up easily when operating the heater or air
conditioner.
SERVICING AIR CONDITIONER
The air conditioner system in your NISSAN is
charged with a refrigerant designed with the
environment in mind.
This refrigerant will not
harm the earth’s ozone layer. However,
special charging equipment and lubricant are
required when servicing your NISSAN air con-
ditioner. Using improper refrigerants or lubri-
cants will cause severe damage to your air
conditioner system. (See “Capacities and re-
commended fluids/lubricants” (P.10-2) for air
conditioner system refrigerant and lubricant
recommendations.)
Your NISSAN dealer will be able to service your
environmentally friendly air conditioner system.
WARNING
The system contains refrigerant under
high pressure. To avoid personal injury,
any air conditioner service should be
done only by an experienced technician
with the proper equipment.
Page 268 of 614
Audio main operation
Head unit:
The auto loudness circuit enhances the low and
high frequency ranges automatically in both
radio reception and CD playback.
ON·OFF/Volume control:
Push the ignition switch to the ACC or ON
position, and then push the ON·OFF button
while the system is off to turn on the last audio
source, which was playing immediately before
the system was turned off. While the system is
on, pushing the ON·OFF button turns the system
off.
Turn the VOL control knob to adjust the volume.
Adjusting tone quality and speaker bal-
ance:
To adjust Bass, Treble, Balance and Fade, push
the AUDIO control knob. When the display
shows the setting you want to change (Bass,
Treble, Balance and Fade) , rotate the AUDIO
control knob to set the desired setting. For the
other setting methods, see “Audio settings”
(P.4-13) .
Switching the display:
Pushing the DISC·AUX button will switch the
displays as follows:
iPod
�Š/USB?CD/DVD ?Bluetooth�Šstream- ing audio
?AUX ?iPod
�Š/USB
Linking Intelligent Key (if so equipped):
The audio settings can be memorized for each
Intelligent Key. For more details, see “Setting
memory function” (P.3-35) .
FM-AM-SAT radio operation
When the radio band select button is pushed
while the ignition switch is in the ACC or ON
position, the radio will come on at the channel
last played.
The last channel played will also come on when
the ON·OFF button is pushed to ON.
If another audio source is playing when the radio
band select button is turned to ON, the audio
source will automatically be turned off and the
last radio channel played will come on.
When the stereo broadcast signal is weak, the
radio will automatically change from stereo to
monaural reception.
radio (FM·AM) band select:
Pushing the FM·AM radio band select button will
change the band as follows:
AM ?FM1 ?FM2 ?AM
radio (SiriusXM Satellite Radio)
band select:
Pushing the XM radio band select button will
change the band as follows:
XM1 ?XM2 ?XM3 ?XM1
The satellite radio is not available in Alaska,
Hawaii and Guam.
TUNE (Tuning):
. For AM and FM radio
Turn the radio TUNE knob for manual tuning.
. For SiriusXM Satellite Radio
Turn the radio TUNE knob to seek channels
from all of the categories when any category
is not selected.
SEEK tuning:
. For AM and FM radio
Push the SEEK·CAT or TRACK button
orto tune from low to high or high to
low frequencies and to stop at the next
broadcasting station.
. For SiriusXM Satellite Radio
Push the SEEK·CAT or TRACK button
orto tune to the first channel of the next
or previous category.
During satellite radio reception, the following
notices will be displayed under certain condi-
Monitor, heater, air conditioner, audio, phone and voice recognition systems4-71
Page 269 of 614
4-72Monitor, heater, air conditioner, audio, phone and voice recognition systems
tions.
.NO SIGNAL (No signal is received while the
SAT tuner is connected.)
. OFF AIR (Broadcasting signed off)
. CHECK ANTENNA (Antenna connection
error)
. LOADING (When the initial setting is
performed)
. UPDATING (When the satellite radio sub-
scription is not active)
. INVALID CH (Invalid channel is received.)
SCAN tuning:
Push the SCAN tuning button to tune from low
to high frequencies and stop at each broad-
casting station/channel for 5 seconds. Pushing
the button again during this 10 seconds period
will stop SCAN tuning and the radio will remain
tuned to that station/channel.
If the SCAN tuning button is not pushed within 5
seconds, SCAN tuning moves to the next
station/channel.
*1to*6Station memory operations:
12 stations/channels can be set for the FM band
(6 each for FM1 and FM2) , 18 for SiriusXM
Satellite Radio (6 each for XM1, XM2 and XM3)
and 6 stations can be set for the AM band. 1. Choose the radio band using the radio band
select button.
2. Tune to the desired station/channel using the SEEK·CAT, TRACK, SCAN button or the
radio TUNE knob.
3. Push and hold the desired station preset button
*1to*6until the radio mutes.
4. The station indicator will then come on and the sound will resume. Memorizing is now
complete.
5. Other buttons can be set in the same manner.
If the battery cable is disconnected, or if the fuse
opens, the radio memory will be erased. In that
case, reset the desired stations/channels.
Menu (SiriusXM Satellite Radio):
When the “Menu” key on the display is selected
while the SiriusXM Satellite Radio is being
played, the menu list will be displayed.
The following items are available.
. Preset List
Displays the preset channel list. If 1 of the 6
preset stations listed is touched and held,
the current station will be stored as the new
preset.
. Customize Channel List
Selects specific channels to skip while using the TUNE, SEEK·CAT or Menu-Categories
feature.
. Favorite Artists & Songs
Stores the current artist or song that is being
played. Touch the “Alert” key to be reminded
when the stored artist or song is playing on a
station while listening to SiriusXM Satellite
Radio.
. Categories
Selecting a category will go to the first
channel in that category as defined by
SiriusXM Satellite Radio.
. Direct Tune
Inputs the channel number by using a
keypad.
Compact Disc (CD) player operation
Push the ignition switch to the ACC or ON
position and insert the Compact Disc (CD) into
the slot with the label side facing up. The CD will
be guided automatically into the slot and start
playing.
After loading the CD, the number of tracks on
the CD and the play time will appear on the
display.
If the radio is already operating, it will auto-
matically turn off and the CD will play.
If the system has been turned off while the CD
was playing, pushing the ON·OFF button will