2017 NISSAN ARMADA key
[x] Cancel search: keyPage 205 of 614
4-8Monitor, heater, air conditioner, audio, phone and voice recognition systems
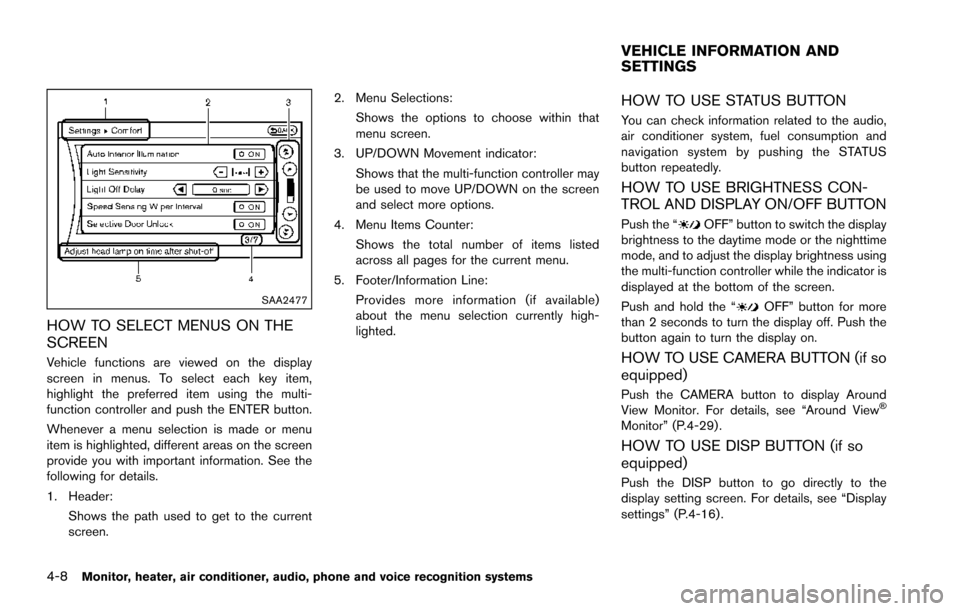
SAA2477
HOW TO SELECT MENUS ON THE
SCREEN
Vehicle functions are viewed on the display
screen in menus. To select each key item,
highlight the preferred item using the multi-
function controller and push the ENTER button.
Whenever a menu selection is made or menu
item is highlighted, different areas on the screen
provide you with important information. See the
following for details.
1. Header:Shows the path used to get to the current
screen. 2. Menu Selections:
Shows the options to choose within that
menu screen.
3. UP/DOWN Movement indicator: Shows that the multi-function controller may
be used to move UP/DOWN on the screen
and select more options.
4. Menu Items Counter: Shows the total number of items listed
across all pages for the current menu.
5. Footer/Information Line: Provides more information (if available)
about the menu selection currently high-
lighted.
HOW TO USE STATUS BUTTON
You can check information related to the audio,
air conditioner system, fuel consumption and
navigation system by pushing the STATUS
button repeatedly.
HOW TO USE BRIGHTNESS CON-
TROL AND DISPLAY ON/OFF BUTTON
Push the “OFF” button to switch the display
brightness to the daytime mode or the nighttime
mode, and to adjust the display brightness using
the multi-function controller while the indicator is
displayed at the bottom of the screen.
Push and hold the “
OFF” button for more
than 2 seconds to turn the display off. Push the
button again to turn the display on.
HOW TO USE CAMERA BUTTON (if so
equipped)
Push the CAMERA button to display Around
View Monitor. For details, see “Around View�Š
Monitor” (P.4-29) .
HOW TO USE DISP BUTTON (if so
equipped)
Push the DISP button to go directly to the
display setting screen. For details, see “Display
settings” (P.4-16) .
VEHICLE INFORMATION AND
SETTINGS
Page 207 of 614
4-10Monitor, heater, air conditioner, audio, phone and voice recognition systems
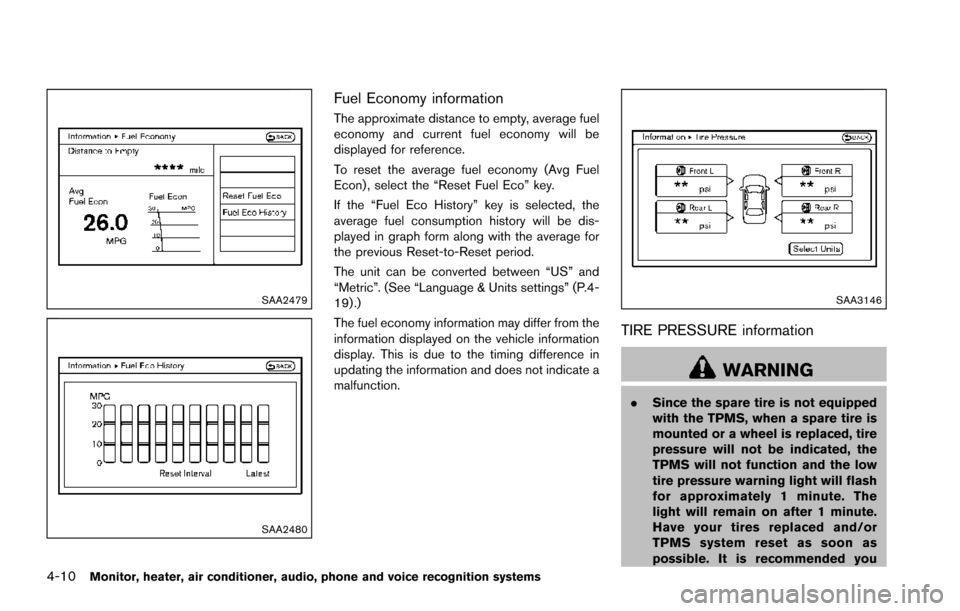
SAA2479
SAA2480
Fuel Economy information
The approximate distance to empty, average fuel
economy and current fuel economy will be
displayed for reference.
To reset the average fuel economy (Avg Fuel
Econ) , select the “Reset Fuel Eco” key.
If the “Fuel Eco History” key is selected, the
average fuel consumption history will be dis-
played in graph form along with the average for
the previous Reset-to-Reset period.
The unit can be converted between “US” and
“Metric”. (See “Language & Units settings” (P.4-
19) .)
The fuel economy information may differ from the
information displayed on the vehicle information
display. This is due to the timing difference in
updating the information and does not indicate a
malfunction.
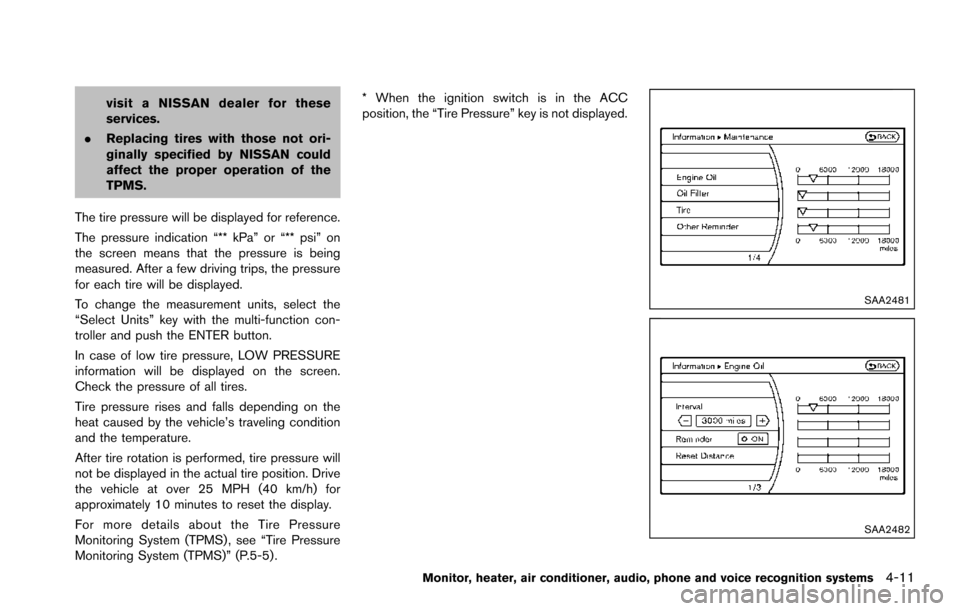
SAA3146
TIRE PRESSURE information
WARNING
.Since the spare tire is not equipped
with the TPMS, when a spare tire is
mounted or a wheel is replaced, tire
pressure will not be indicated, the
TPMS will not function and the low
tire pressure warning light will flash
for approximately 1 minute. The
light will remain on after 1 minute.
Have your tires replaced and/or
TPMS system reset as soon as
possible. It is recommended you
Page 208 of 614
visit a NISSAN dealer for these
services.
. Replacing tires with those not ori-
ginally specified by NISSAN could
affect the proper operation of the
TPMS.
The tire pressure will be displayed for reference.
The pressure indication “** kPa” or “** psi” on
the screen means that the pressure is being
measured. After a few driving trips, the pressure
for each tire will be displayed.
To change the measurement units, select the
“Select Units” key with the multi-function con-
troller and push the ENTER button.
In case of low tire pressure, LOW PRESSURE
information will be displayed on the screen.
Check the pressure of all tires.
Tire pressure rises and falls depending on the
heat caused by the vehicle’s traveling condition
and the temperature.
After tire rotation is performed, tire pressure will
not be displayed in the actual tire position. Drive
the vehicle at over 25 MPH (40 km/h) for
approximately 10 minutes to reset the display.
For more details about the Tire Pressure
Monitoring System (TPMS) , see “Tire Pressure
Monitoring System (TPMS)” (P.5-5) . * When the ignition switch is in the ACC
position, the “Tire Pressure” key is not displayed.
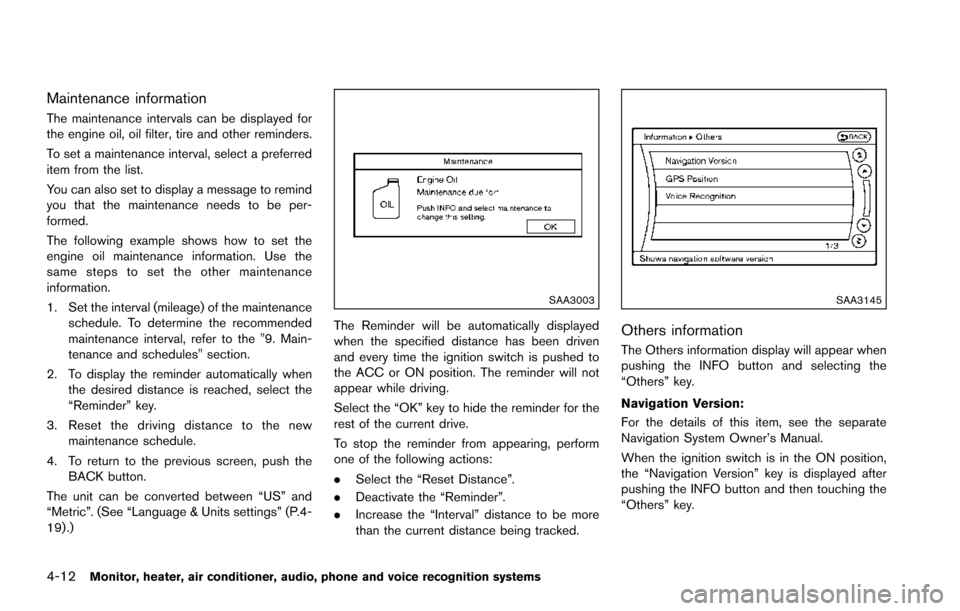
SAA2481
SAA2482
Monitor, heater, air conditioner, audio, phone and voice recognition systems4-11
Page 209 of 614
4-12Monitor, heater, air conditioner, audio, phone and voice recognition systems
Maintenance information
The maintenance intervals can be displayed for
the engine oil, oil filter, tire and other reminders.
To set a maintenance interval, select a preferred
item from the list.
You can also set to display a message to remind
you that the maintenance needs to be per-
formed.
The following example shows how to set the
engine oil maintenance information. Use the
same steps to set the other maintenance
information.
1. Set the interval (mileage) of the maintenanceschedule. To determine the recommended
maintenance interval, refer to the "9. Main-
tenance and schedules" section.
2. To display the reminder automatically when the desired distance is reached, select the
“Reminder” key.
3. Reset the driving distance to the new maintenance schedule.
4. To return to the previous screen, push the BACK button.
The unit can be converted between “US” and
“Metric”. (See “Language & Units settings” (P.4-
19) .)
SAA3003
The Reminder will be automatically displayed
when the specified distance has been driven
and every time the ignition switch is pushed to
the ACC or ON position. The reminder will not
appear while driving.
Select the “OK” key to hide the reminder for the
rest of the current drive.
To stop the reminder from appearing, perform
one of the following actions:
. Select the “Reset Distance”.
. Deactivate the “Reminder”.
. Increase the “Interval” distance to be more
than the current distance being tracked.
SAA3145
Others information
The Others information display will appear when
pushing the INFO button and selecting the
“Others” key.
Navigation Version:
For the details of this item, see the separate
Navigation System Owner’s Manual.
When the ignition switch is in the ON position,
the “Navigation Version” key is displayed after
pushing the INFO button and then touching the
“Others” key.
Page 210 of 614
GPS Position:
For the details of this item, see the separate
Navigation System Owner’s Manual.
Voice Recognition:
For the details of this item, see “NISSAN Voice
Recognition system” (P.4-117) .
SAA3159
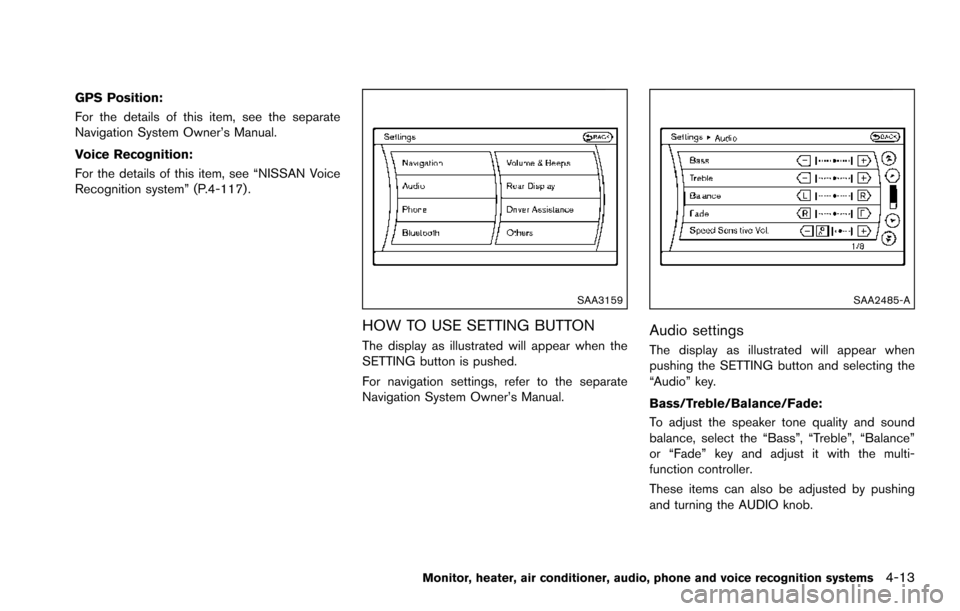
HOW TO USE SETTING BUTTON
The display as illustrated will appear when the
SETTING button is pushed.
For navigation settings, refer to the separate
Navigation System Owner’s Manual.
SAA2485-A
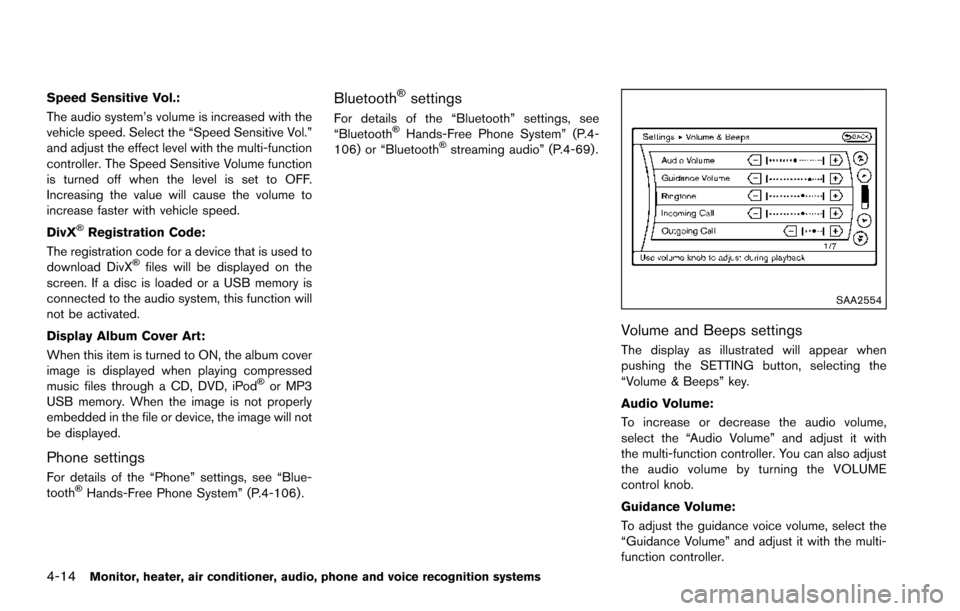
Audio settings
The display as illustrated will appear when
pushing the SETTING button and selecting the
“Audio” key.
Bass/Treble/Balance/Fade:
To adjust the speaker tone quality and sound
balance, select the “Bass”, “Treble”, “Balance”
or “Fade” key and adjust it with the multi-
function controller.
These items can also be adjusted by pushing
and turning the AUDIO knob.
Monitor, heater, air conditioner, audio, phone and voice recognition systems4-13
Page 211 of 614
4-14Monitor, heater, air conditioner, audio, phone and voice recognition systems
Speed Sensitive Vol.:
The audio system’s volume is increased with the
vehicle speed. Select the “Speed Sensitive Vol.”
and adjust the effect level with the multi-function
controller. The Speed Sensitive Volume function
is turned off when the level is set to OFF.
Increasing the value will cause the volume to
increase faster with vehicle speed.
DivX
�ŠRegistration Code:
The registration code for a device that is used to
download DivX
�Šfiles will be displayed on the
screen. If a disc is loaded or a USB memory is
connected to the audio system, this function will
not be activated.
Display Album Cover Art:
When this item is turned to ON, the album cover
image is displayed when playing compressed
music files through a CD, DVD, iPod
�Šor MP3
USB memory. When the image is not properly
embedded in the file or device, the image will not
be displayed.
Phone settings
For details of the “Phone” settings, see “Blue-
tooth�ŠHands-Free Phone System” (P.4-106) .
Bluetooth�Šsettings
For details of the “Bluetooth” settings, see
“Bluetooth�ŠHands-Free Phone System” (P.4-
106) or “Bluetooth�Šstreaming audio” (P.4-69) .
SAA2554
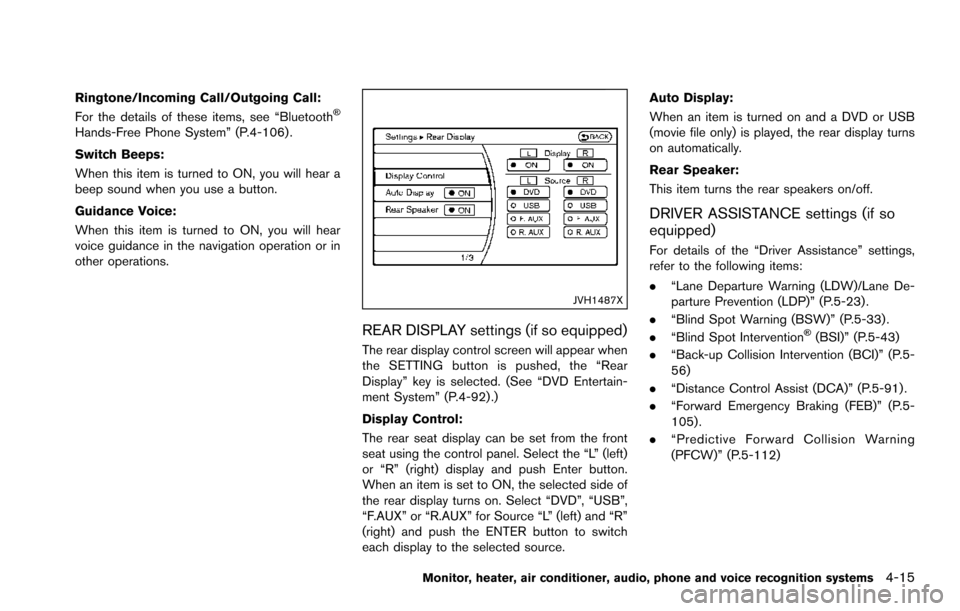
Volume and Beeps settings
The display as illustrated will appear when
pushing the SETTING button, selecting the
“Volume & Beeps” key.
Audio Volume:
To increase or decrease the audio volume,
select the “Audio Volume” and adjust it with
the multi-function controller. You can also adjust
the audio volume by turning the VOLUME
control knob.
Guidance Volume:
To adjust the guidance voice volume, select the
“Guidance Volume” and adjust it with the multi-
function controller.
Page 212 of 614
Ringtone/Incoming Call/Outgoing Call:
For the details of these items, see “Bluetooth�Š
Hands-Free Phone System” (P.4-106) .
Switch Beeps:
When this item is turned to ON, you will hear a
beep sound when you use a button.
Guidance Voice:
When this item is turned to ON, you will hear
voice guidance in the navigation operation or in
other operations.
JVH1487X
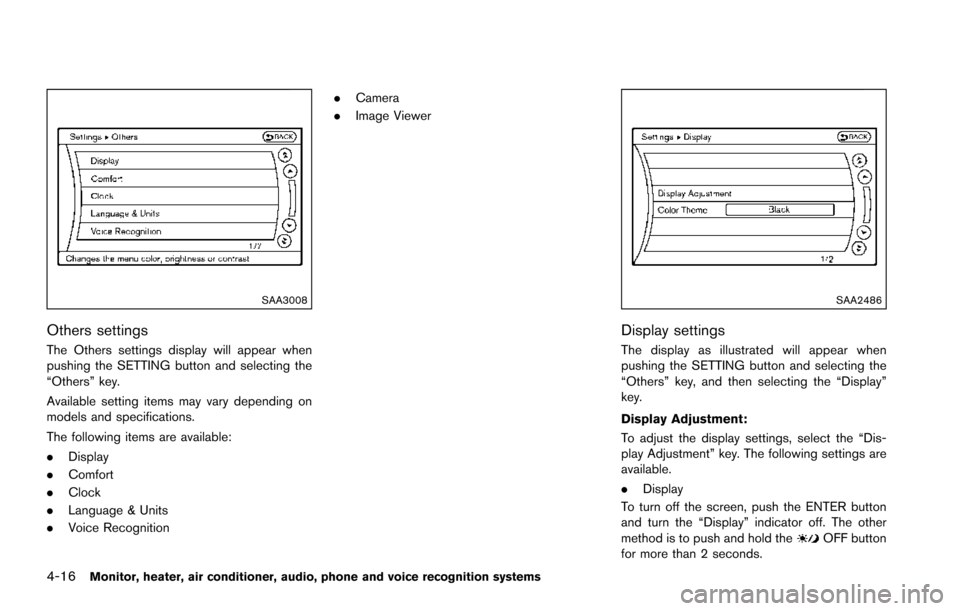
REAR DISPLAY settings (if so equipped)
The rear display control screen will appear when
the SETTING button is pushed, the “Rear
Display” key is selected. (See “DVD Entertain-
ment System” (P.4-92) .)
Display Control:
The rear seat display can be set from the front
seat using the control panel. Select the “L” (left)
or “R” (right) display and push Enter button.
When an item is set to ON, the selected side of
the rear display turns on. Select “DVD”, “USB”,
“F.AUX” or “R.AUX” for Source “L” (left) and “R”
(right) and push the ENTER button to switch
each display to the selected source.Auto Display:
When an item is turned on and a DVD or USB
(movie file only) is played, the rear display turns
on automatically.
Rear Speaker:
This item turns the rear speakers on/off.
DRIVER ASSISTANCE settings (if so
equipped)
For details of the “Driver Assistance” settings,
refer to the following items:
.
“Lane Departure Warning (LDW)/Lane De-
parture Prevention (LDP)” (P.5-23) .
. “Blind Spot Warning (BSW)” (P.5-33) .
. “Blind Spot Intervention
�Š(BSI)” (P.5-43)
. “Back-up Collision Intervention (BCI)” (P.5-
56)
. “Distance Control Assist (DCA)” (P.5-91) .
. “Forward Emergency Braking (FEB)” (P.5-
105) .
. “Predictive Forward Collision Warning
(PFCW)” (P.5-112)
Monitor, heater, air conditioner, audio, phone and voice recognition systems4-15
Page 213 of 614
4-16Monitor, heater, air conditioner, audio, phone and voice recognition systems
SAA3008
Others settings
The Others settings display will appear when
pushing the SETTING button and selecting the
“Others” key.
Available setting items may vary depending on
models and specifications.
The following items are available:
.Display
. Comfort
. Clock
. Language & Units
. Voice Recognition .
Camera
. Image Viewer
SAA2486
Display settings
The display as illustrated will appear when
pushing the SETTING button and selecting the
“Others” key, and then selecting the “Display”
key.
Display Adjustment:
To adjust the display settings, select the “Dis-
play Adjustment” key. The following settings are
available.
.Display
To turn off the screen, push the ENTER button
and turn the “Display” indicator off. The other
method is to push and hold the
OFF button
for more than 2 seconds.